A translation of the article was prepared specifically for students of the Java Developer course .
As developers, we often have to deal with legacy code, which is hard to maintain. You know how difficult it is to understand simple logic in a large, convoluted spaghetti code. Improving the code or developing new functionality becomes a nightmare for the developer.One of the main goals of software design is ease of maintenance. Code that is poorly maintained becomes difficult to manage. It is not only difficult to scale, but it is becoming a problem to attract new developers.In the IT world, things are moving fast. If you are asked to urgently implement new functionality or if you want to switch from a relational database to NoSQL, what will be your first reaction? A good test coverage increases the confidence of developers that there will be no problems with the new release. However, if your business logic is intertwined with infrastructure logic, then there may be problems with its testing.
 Why me?But there’s enough empty talk, let's look at the hexagonal architecture. Using this template will help you improve maintainability, testability, and other benefits.
Introduction to Hexagonal Architecture
The term Hexagonal Architecture (hexagonal, hexagonal architecture) was coined in 2006 by Alistair Cockburn. This architectural style is also known as Ports And Adapters Architecture . In simple words, the components of your application interact through many endpoints (ports). To process requests, you must have adapters that match the ports.Here you can draw an analogy with the USB ports on the computer. You can use them if you have a compatible adapter (charger or flash drive).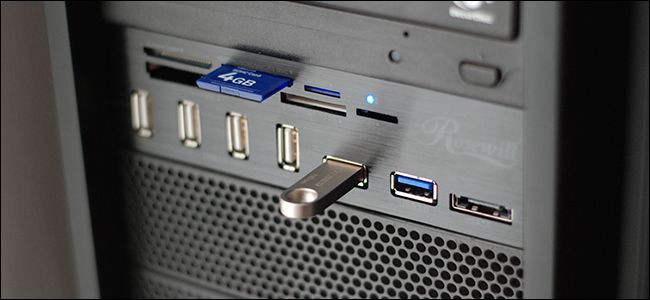 This architecture can be schematically represented as a hexagon with business logic in the center (in the core), surrounded by the objects with which it interacts, and the components that control it, providing input data.In real life, users, API calls, automated scripts, and unit testing interact and provide input to your application. If your business logic is mixed with user interface logic, then you will encounter many problems. For example, it will be difficult to switch data entry from the user interface to unit tests.The application also interacts with external objects such as databases, message queues, web servers (via HTTP API calls), etc. If necessary, migrate the database or upload data to a file, you should be able to do this without affecting the business. logic.As the name implies, “ ports and adapters ”, there are “ports” through which interaction occurs and “adapters” are components that process user input and convert it to the “language” of the domain. Adapters encapsulate the logic of interaction with external systems, such as databases, message queues, etc., and facilitate communication between business logic and external objects.The diagram below shows the layers into which the application is divided.
 The hexagonal architecture distinguishes three layers in the application: domain, application, and infrastructure:
- Domain . The layer contains the core business logic. He does not need to know the details of the implementation of the outer layers.
- Application . A layer acts as a bridge between the layers of a domain and infrastructure.
- Infrastructure . The implementation of the interaction of the domain with the outside world. The inner layers look like a black box to him.
According to this architecture, two types of participants interact with the application: primary (driver) and secondary (driven). Key actors send requests and manage the application (for example, users or automated tests). The secondary ones provide the infrastructure for communication with the outside world (these are database adapters, TCP or HTTP clients).This can be represented as follows: The left side of the hexagon consists of components that provide input for the domain (they “control” the application), and the right side consists of components that are controlled by our application.
Example
Let's design an application that will store movie reviews. The user should be able to send a request with the name of the film and get five random reviews.For simplicity, we will make a console application with data storage in RAM. The response to the user will be displayed on the console.We have a user (User) who sends a request to the application. Thus, the user becomes a “manager” (driver). The application should be able to receive data from any type of storage and output the results to the console or to a file. Managed (driven) objects will be the “data warehouse” ( IFetchMovieReviews) and the “response printer” ( IPrintMovieReviews).The following figure shows the main components of our application.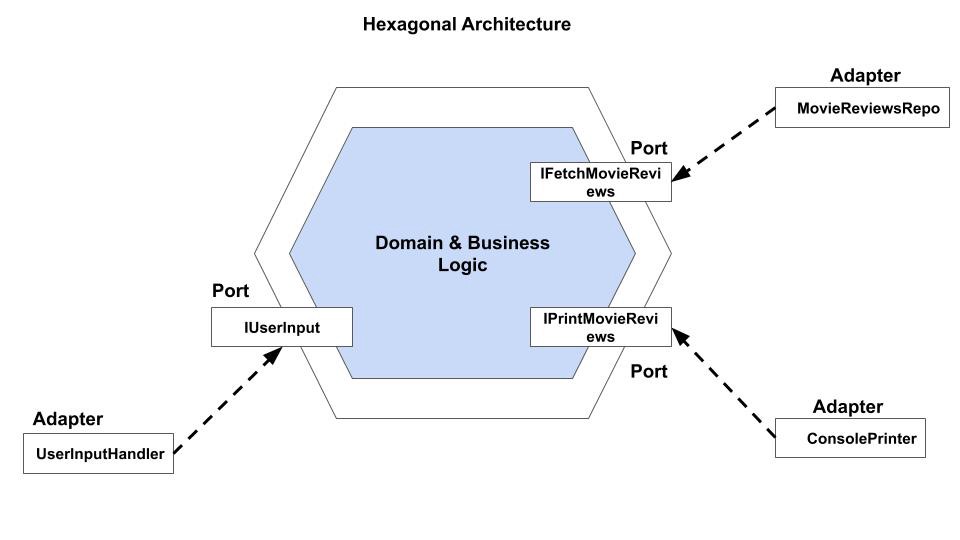 On the left are the components that provide data entry into the application. On the right are the components that allow you to interact with the database and the console.Let's look at the application code.Control port
public interface IUserInput {
    public void handleUserInput(Object userCommand);
}
Managed portspublic interface IFetchMovieReviews {
public List<MovieReview> fetchMovieReviews(MovieSearchRequest movieSearchRequest);
}
public interface IPrintMovieReviews {
public void writeMovieReviews(List<MovieReview> movieReviewList);
}
Managed port adaptersMovies will be obtained from the movie repository (MovieReviewsRepo). Display movie reviews on the console will be a class ConsolePrinter. Let's implement the two above interfaces.public class ConsolePrinter implements IPrintMovieReviews {
@Override
public void writeMovieReviews(List<MovieReview> movieReviewList) {
movieReviewList.forEach(movieReview -> {
System.out.println(movieReview.toString());
});
}
}
public class MovieReviewsRepo implements IFetchMovieReviews {
private Map<String, List<MovieReview>> movieReviewMap;
public MovieReviewsRepo() {
initialize();
}
public List<MovieReview> fetchMovieReviews(MovieSearchRequest movieSearchRequest) {
return Optional.ofNullable(movieReviewMap.get(movieSearchRequest.getMovieName()))
.orElse(new ArrayList<>());
}
private void initialize() {
this.movieReviewMap = new HashMap<>();
movieReviewMap.put("StarWars", Collections.singletonList(new MovieReview("1", 7.5, "Good")));
movieReviewMap.put("StarTreck", Arrays.asList(new MovieReview("1", 9.5, "Excellent"), new MovieReview("1", 8.5, "Good")));
}
}
Domain
The main task of our application is to process user requests. You need to get the films, process them and transfer the results to the “printer”. At the moment, we have only one functionality - movie search. To process user requests, we will use the standard interface Consumer.Let's look at the main class MovieApp.public class MovieApp implements Consumer<MovieSearchRequest> {
private IFetchMovieReviews fetchMovieReviews;
private IPrintMovieReviews printMovieReviews;
private static Random rand = new Random();
public MovieApp(IFetchMovieReviews fetchMovieReviews, IPrintMovieReviews printMovieReviews) {
this.fetchMovieReviews = fetchMovieReviews;
this.printMovieReviews = printMovieReviews;
}
private List<MovieReview> filterRandomReviews(List<MovieReview> movieReviewList) {
List<MovieReview> result = new ArrayList<MovieReview>();
for (int index = 0; index < 5; ++index) {
if (movieReviewList.size() < 1)
break;
int randomIndex = getRandomElement(movieReviewList.size());
MovieReview movieReview = movieReviewList.get(randomIndex);
movieReviewList.remove(movieReview);
result.add(movieReview);
}
return result;
}
private int getRandomElement(int size) {
return rand.nextInt(size);
}
public void accept(MovieSearchRequest movieSearchRequest) {
List<MovieReview> movieReviewList = fetchMovieReviews.fetchMovieReviews(movieSearchRequest);
List<MovieReview> randomReviews = filterRandomReviews(new ArrayList<>(movieReviewList));
printMovieReviews.writeMovieReviews(randomReviews);
}
}
Now we define a class CommandMapperModelthat will map commands to handlers.public class CommandMapperModel {
private static final Class<MovieSearchRequest> searchMovies = MovieSearchRequest.class;
public static Model build(Consumer<MovieSearchRequest> displayMovies) {
Model model = Model.builder()
.user(searchMovies)
.system(displayMovies)
.build();
return model;
}
}
Control Port Adapters
The user will interact with our system through the interface IUserInput. The implementation will use ModelRunnerand delegate the execution.public class UserCommandBoundary implements IUserInput {
private Model model;
public UserCommandBoundary(IFetchMovieReviews fetchMovieReviews, IPrintMovieReviews printMovieReviews) {
MovieApp movieApp = new MovieApp(fetchMovieReviews, printMovieReviews);
model = CommandMapperModel.build(movieApp);
}
public void handleUserInput(Object userCommand) {
new ModelRunner().run(model)
.reactTo(userCommand);
}
}
Now let's look at the user who uses the above interface.public class MovieUser {
private IUserInput userInputDriverPort;
public MovieUser(IUserInput userInputDriverPort) {
this.userInputDriverPort = userInputDriverPort;
}
public void processInput(MovieSearchRequest movieSearchRequest) {
userInputDriverPort.handleUserInput(movieSearchRequest);
}
}
application
Next, create a console application. Managed adapters are added as dependencies. The user will create and send a request to the application. The application will receive data, process and display a response to the console.public class Main {
public static void main(String[] args) {
IFetchMovieReviews fetchMovieReviews = new MovieReviewsRepo();
IPrintMovieReviews printMovieReviews = new ConsolePrinter();
IUserInput userCommandBoundary = new UserCommandBoundary(fetchMovieReviews, printMovieReviews);
MovieUser movieUser = new MovieUser(userCommandBoundary);
MovieSearchRequest starWarsRequest = new MovieSearchRequest("StarWars");
MovieSearchRequest starTreckRequest = new MovieSearchRequest("StarTreck");
System.out.println("Displaying reviews for movie " + starTreckRequest.getMovieName());
movieUser.processInput(starTreckRequest);
System.out.println("Displaying reviews for movie " + starWarsRequest.getMovieName());
movieUser.processInput(starWarsRequest);
}
}
What can be improved, changed
- In our implementation, you can easily switch from one data store to another. The storage implementation can be injected into the code without changing the business logic. For example, you can transfer data from memory to a database by writing a database adapter.
- Instead of output to the console, you can implement a “printer”, which will write data to a file. In such a multi-layer application, it becomes easier to add functionality and fix bugs.
- To test the business logic, you can write complex tests. Adapters can be tested in isolation. Thus, it is possible to increase the overall test coverage.
Conclusion
The following advantages of hexagonal architecture can be noted:- Accompaniment - loosely coupled and independent layers. It becomes easy to add new features to one layer without affecting other layers.
- Testability - unit tests are written simply and quickly performed. You can write tests for each layer using stub objects that simulate dependencies. For example, we can remove the dependency on the database by making a data warehouse in memory.
- Adaptability - the main business logic becomes independent of changes in external objects. For example, if you need to migrate to another database, then we do not need to make changes to the domain. We can make an appropriate adapter for the database.
References
That's all. See you on the course !