To let or not to let? That is the question…Now on many sites we see the opportunity to register or log in using social networks, and some sites offer the use of external security keys or fingerprints. What is it? Well-designed security standards or proprietary implementations? Can we trust these technologies and use them for website development and in everyday life? Let's get it right. So, now there are several standards and technologies for identifying users of OAuth 2.0, OpenID Connect, WebAuthn, SAML 2.0, Credential Management API, etc. In this article I will talk about the three most promising protocols OAuth 2.0, OpenID Connect and WebAuthn. And in order to understand how to put them into practice, we will do three laboratory work. We’ll use GitHub and Google as platforms for identifying users.on which most have accounts.
OAuth 2.0
Let's start with the most famous OAuth 2.0 protocol. It was published in 2012 as RFC 6749: The OAuth 2.0 Authorization Framework .Using OAuth 2.0, a user allows a specific site to receive their private data from social networks, but without transferring their logins / passwords to the site. For example, when you register on a site through Facebook, then you just give this site permission to get your name, e-mail address and other private data from Facebook.Let's deal with the technical implementation. For simplicity, I will call any site that stores user credentials on the Social Network. And MySite will name any site or application that wants to get user data from the Social Network. The standard defines the following roles:
- Resource Owner — , MySite .
- Client ( MySite) — , Authorization Server Resource Server .
- Authorization Server — / , .
- Resource Server — , API. Authorization Server Resource Server .
Authorization flow
- MySite :
- MySite Name ( ), Homepage ( MySite) Callback (, )
- The social network gives out Client ID (sometimes called AppID) and Client Secret.
- The developer ID must be registered in the Client ID and Client Secret.
Now the process itself. The details of specific implementations may vary, but the general logic will always be as follows: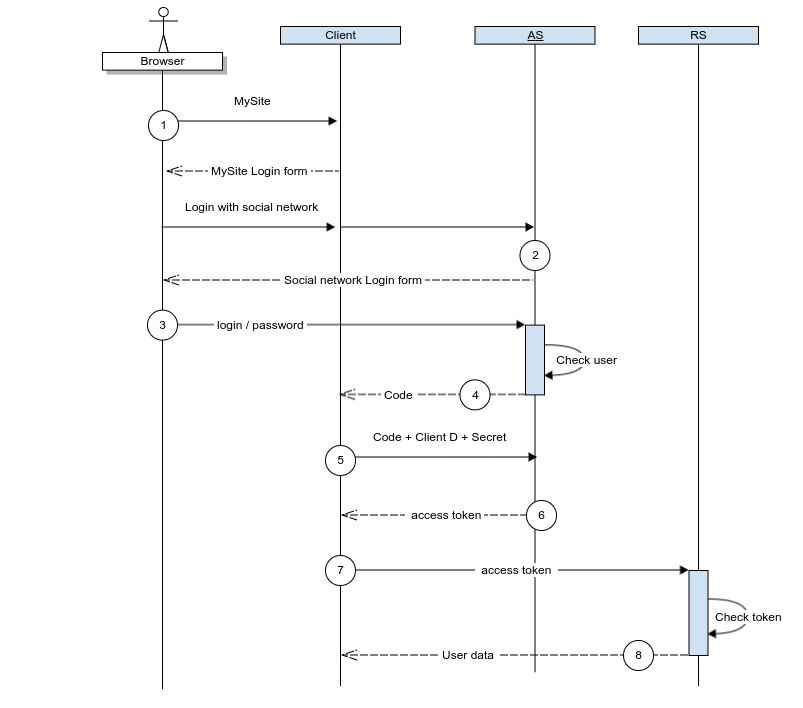
- Resource Owner logs on to Client (MySite), selects the option “log in using the Social Network”, the site redirects the user to the Social Network on the Authorization Server.
- The Authorization Server checks if the user has an active session and, if not, then displays the login form.
- Resource Owner enters his username / password and confirms that certain private data can be used by MySite, such as username or e-mail address.
- Authorization Server verifies the user and redirects to the Callback address with the authentication result and the “Authorization Code”
- Client “Authorization Code”, Client ID Client Secret.
- Authorization Server “access token” JWT (JSON Web Token), . JWT “refresh token”, c .
- Client API, “access token”.
- Resource Server “access token” (, Authorization Server) .
OAuth 2.0 (GitHub)
There are many instructions on how to implement OAuth 2.0 authorization using social networks. I personally liked the following article: Authentication using GitHub OAuth 2.0 with NodeJS It details the steps and provides a test program. But in order to really understand the algorithm, it is better to go through all the steps with your hands (http requests from the browser or calls to curl). Go.To get started, register your application on GitHub: github.com/settings/applications/newSet the parameters:For authorization to work within its own site, the addresses must be real, but this is not necessary for laboratory work.Get from GitHub:- Client ID: ab8ec08a620c2
- Client Secret: e6fdd52b0a99e8fbe76b05c1b7bb93c1e
Of course, in all laboratory work all the values are fake.This is how getting the Client ID and Secret on the GitHub website looks like: Now we start authorization. We believe that Step 1 has already been completed: the user logged onto MySite and selected “Log in using GitHub”. Step 2 of call flow is a call in REST format:
https://github.com/login/oauth/authorize?client_id=ab8ec08a620c2
- the address is the login point on github
- client_id is the Client ID issued during registration
As a result of this call, GitHub displays a window for authorization: Step 3: Enter the login / password to access GitHubStep 4: GitHub redirects the request to the Homepage, in this request we see code:
http://MySite/home?code=a29b348f63d21
There is no working site at this address, but the main thing for us is to know the code sent to form the next Step 5:https://github.com/login/oauth/access_token?client_id=ab8ec08a620c2&
client_secret=e6fdd52b0a99e8fbe76b05c1b7bb93c1e&
code=a29b348f63d21
- the address is the access token receiving point on GitHub
- client_id is the Client ID issued during registration
- client_secret is a Client Secret issued during registration
- code is the code just sent
Step 6: In response received access token:access_token=31b71cbd372acdbb20ec1644b824f3dd0&scope=&token_type=bearer
Step 7: Insert the access_token into the request header and call the GitHub API:curl -H "Authorization: token 31b71cbd372acdbb20ec1644b824f3dd0" https://api.github.com/user
Step 8: In response, we get JSON with useful information about me that you can use to create a profile on MySite:{
"login": "AlexeySushkov",
"html_url": "https://github.com/AlexeySushkov",
"repos_url": "https://api.github.com/users/AlexeySushkov/repos",
"name": "Alexey Sushkov",
"blog": "http://sushkov.ru",
"location": "St.Petersburg, Russia",
"email": "alexey.p.sushkov@gmail.com",
..
}
In fact, we examined only one OAuth 2.0 scenario. There are several scenarios, each of which is used depending on the application, security considerations, deployment method, etc. A description of all the scenarios can be found, for example, here: OAuth 2.0 in a Nutshell .Openid connect
With OAuth 2.0 a little understood. Now let's find out why we need OpenID Connect, which is an add-on for OAuth 2.0:- C OAuth 2.0 .. access token, . access token MySite. OpenID Connect — (identity). .
- OpenID Connect “service discovery”. SSO (Single Sign-On), .
Let's look at the standard from the technical side.OpenID Connect (OIDC) is an open OpenID standard developed by the OpenID Foundation consortium . OIDC extends OAuth 2.0 with the following key features:- Authorization Server, in addition to access token and refresh token, returns an “identity token” (ID Token). It is contained in the same JWT. The following information can be extracted from ID Token: username, login time, ID Token expiration date. Token IDs can be transferred between participants.
- OIDC provides an additional API that allows you to request information about the user and his current sessions.
The interaction diagram in OpenID Connect looks the same as with OAuth. The only difference in the content of the requests:- In the initial request for code, an additional attribute, scope = openid, is added.
- As a result of the algorithm, Client, in addition to access and refresh token, receives an Token ID.
OpenID Connect: Lab (Google)
Now let's see what Google will please us on this topic. There are detailed instructions for configuring and using OpenID Connect from Google and a sandbox for using the Google API: Google OAuth 2.0 Playground .Here, as in the case of OAuth 2.0, we will go through the steps and look at the incoming data. Similarly, we believe that the application is registered, Client ID and Client Secret are received, Step 1 is passed. Step 2 of call flow is a call in REST format:https://accounts.google.com/o/oauth2/v2/auth?
response_type=code&
client_id=140797064495-b8b79j42m97nkkrlndfstikv8.apps.googleusercontent.com&
scope=openid%20email&
redirect_uri=http%3A//c18529.shared.hc.ru/wp-login.php&
state=765439764
Google is a little more complicated, because they pay more attention to safety:- address is the login point on Google
- response_type = code - expect to receive code in response
- client_id - Client ID issued during registration
- scope = openid email - what data do we want to access
- redirect_uri - redirect_uri specified during application registration
- state - the number generated by the Client, which is transmitted between Client and AS to protect against intruder interference.
Step 3: There is no password entry form, as I was already logged in to Google.Step 4: Google redirects the request to the Homepage, in this request we see code:http://MySite?state=123&code=4/xAFkcMzhyJhUErRJYwIyntSYN-WeJjfZHLiwWL4IaT-WkHzMU18xABlPmev-M_87wVbqTkQ1y93w6GB5&scope=email+openid+https://www.googleapis.com/auth/userinfo.email&authuser=0&prompt=none
As in the case of GitHub, there is no working website at this address, but this is not necessary, the main thing for us is to know the code in order to form the next Step 5. This is also a bit more complicated, because Google requires a POST request, not a GET:curl -d "code=4/xAFkcMzhyJhUErRJYwIyntSYN-WeJjfZHLiwWL4IaT-WkHzMU18xABlPmev-M_87wVbqTkQ1y93w6GB5&client_id=140797064495-b8b79j42m97nkkrlndfstikv8.apps.googleusercontent.com&
client_secret=HMVctrTicW6RC1Q8T&
redirect_uri=http%3A//c18529.shared.hc.ru/wp-login.php&
grant_type=authorization_code"
-H "Content-Type: application/x-www-form-urlencoded" -X POST https://oauth2.googleapis.com/token
- address is the token receiving point on Google
- code is the code just sent
- client_id is the Client ID issued during registration
- client_secret is a Client Secret issued during registration
- grant_type = authorization_code - the only valid value from the standard
Step 6: In response received access_token and id_token:{
"access_token": "ya29.Il_AB0KeKnjBJx0dhjm2nCLt1B-Mq0aQBW5T302JnlZfsxW1AXqLFfDJZRMi2R2WKG4OX4msKLjx4E4CSl4G_4ajAy3aqrf4pM0ic0jJr092pA67H9aktJktCbx",
"expires_in": 3327,
"scope": "openid https://www.googleapis.com/auth/userinfo.email",
"token_type": "Bearer",
"id_token": "eyJhbGciOiJSUzI1NiIsImtpZCI6IjE3ZDU1ZmY0ZTEwOTkxZDZiMGVmZDM5MmI5MWEzM2U1
………………………………_…………………………………………………….._4mUTiMNSAHljap1hLD2hAzgOZWuQ"
}
What to do now with this wealth?Step 7: With access_token everything is clear: we include it in an API call, for example GMail:curl -H "Authorization: Bearer ya29.a0Adw1xeWvFoxHKNICHnV6vFFj5TZdPQVlYD98h8wjW95ZEbHVui_pk7HGRoq3Q7MlVLV23xkVM0yyjSP8ClSlvfUy3b_IqvKQW5Lvwj38QzJhee-aH1grerB4pRpMzn_FGueigG_RGI56pKPgFBTr49cpynQy" https://www.googleapis.com/gmail/v1/users/alexey.p.sushkov@gmail.com/profile
Step 8: In response, we get JSON with useful information:{
"emailAddress": "alexey.p.sushkov@gmail.com",
"messagesTotal": 372543,
...
}
Now let's check the statement that id_token contains information for authenticating the user and maintaining the session. To do this, you need to decrypt the contents. The easiest way to do this is to contact the Google API atoauth2.googleapis.com/tokeninfo and specify the received id_token as a parameter:https://oauth2.googleapis.com/tokeninfo?id_token=eyJhbGciOiJSUzI1NiIsImtpZCI6IjE3ZDU1ZmY0ZTEwOTkxZDZiMGVmZDM5MmI5MWEzM2U1NGMwZTIxOGIiLCJ0eXAiOi
………………………_……………………………...
SVQ5GQni3irfOzOXYEiqijp6TjGa_a-3jKcEsU5TbasZmAIejsdVcNy2_4mUTiMNSAHljap1hLD2hAzgOZWuQ
Got JSON:{
"iss": "https://accounts.google.com",
"email": "alexey.p.sushkov@gmail.com",
"email_verified": "true",
"iat": "1583257010",
"exp": "1583260610",
"typ": "JWT"
...
}
We see that id_token contains information about the user's login, time of receipt and lifetime of the token. We can conclude that OpenID Connect from Google is working, and it can be used for relevant scenarios.Webauthn
Web Authentication API (also known as WebAuthn):- The standard allows users to identify themselves on sites and in applications using external security keys (for example, USB keys) or by fingerprint and, subsequently, by other biometric data: face, retina.
- — / «Public key cryptography». Public key cryptography — , . Private key ( ) , public key ( ) .
- W3C (World Wide Web Consortium) FIDO, Google, Mozilla, Microsoft, Yubico. W3C HTTP, HTML, XML . WebAuthn. WebAuthn : Chrome, Firefox, Edge, Safari.
Compared to OAuth 2.0, the following roles are added to WebAuthn:Authenticator : an external security key (physical media or fingerprint scanner) that authenticates the user using various technologies, such as BlueTooth / NFC / USB. Serves for:- Generation of public key credentials (public / private key pairs).
- Authenticator securely stores the private key in its memory
- Passes the public key to external systems
- Signs data with a private key and transfers the result to external systems
Authenticator uses the CTAP protocol (Client to Authenticator Protocols) to interact with the browser.Relying Party : performs the same function as the “Authorization Server” in OAuth 2.0, namely, verifies the identity of the user. Only in OAuth 2.0 it was the username / password, and in WenAuthn it was the public key credentials.User Agent : integrates the browser and the network application, serves the same purposes as the Client in OAuth 2.0, namely, on the one hand, interacts with the user and provides him with a GUI, and on the other hand, interacts with systems that store user credentials .Authorization flow
Before starting the authentication process, just like in OAuth 2.0, you need to perform preparatory steps, only in OAuth 2.0 we registered the application, and in WebAuth 2.0 we register the user. The Web Authentication API specifies two calls:- navigator.credentials.create - to create user credentials
- navigator.credentials.get - verifies user credentials
Accordingly, to register, you must call navigator.credentials.create.As a result of this, the user’s Authenticator will store the private key for a specific site, and the public key will be stored in the Relying Party.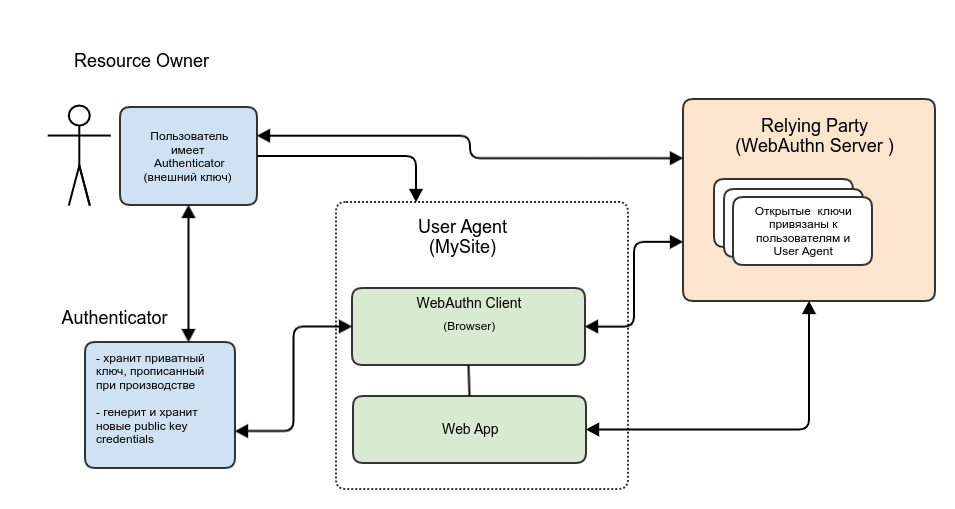 After that, the authentication process will be as follows:
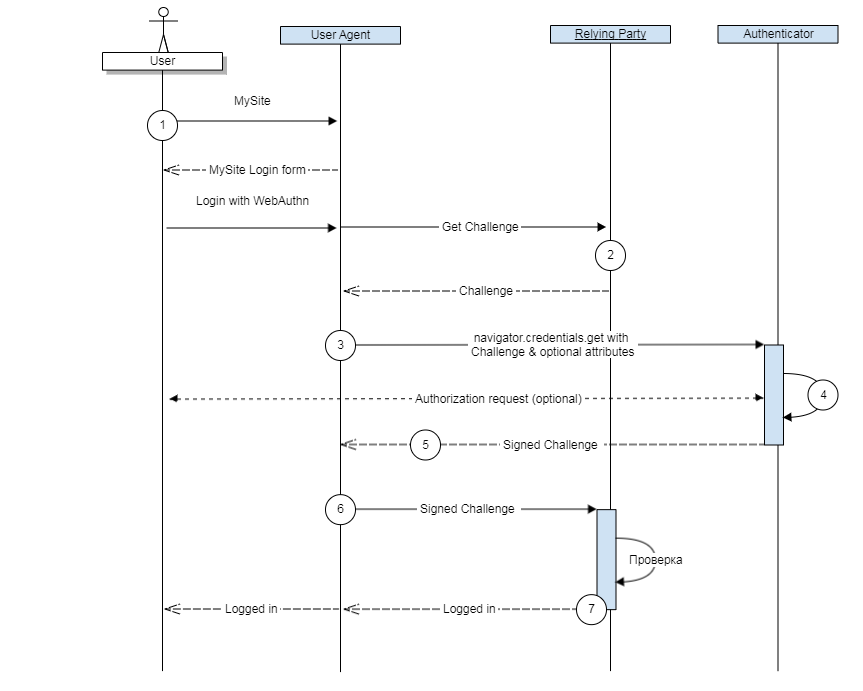
- “WebAuthn”. , , WebAuthn, “ ” “ ”. Relying Party Challenge. Challenge — , Code OAuth 2.0.
- Relying Party Challenge. , REST API.
- Authenticator- CTAP (Client to Authenticator Protocols). navigator.credentials.get c :
- Authenticator , , .
- , Authenticator .
- The application sends the signed data to the Relying Party.
- Relying Party decrypts the data using the public key, checks the Challenge and authorizes the user.
To fix the material we do laboratory work:WebAuthn: Lab (Google)
To implement WebAuthn, only http requests cannot be dispensed with, as you need to call the browser API to interact with the Authenticator. But here Google is happy, made a sandbox with step-by-step instructions: Your first WebAuthn .As a result of the work, we get a JS client-server application that implements fingerprint authentication. A working deme is located at .If you run it on a smartphone with a fingerprint sensor, you can see the result of work. As usual, first preparation - register the user: Create a username / password and then attach the fingerprint:
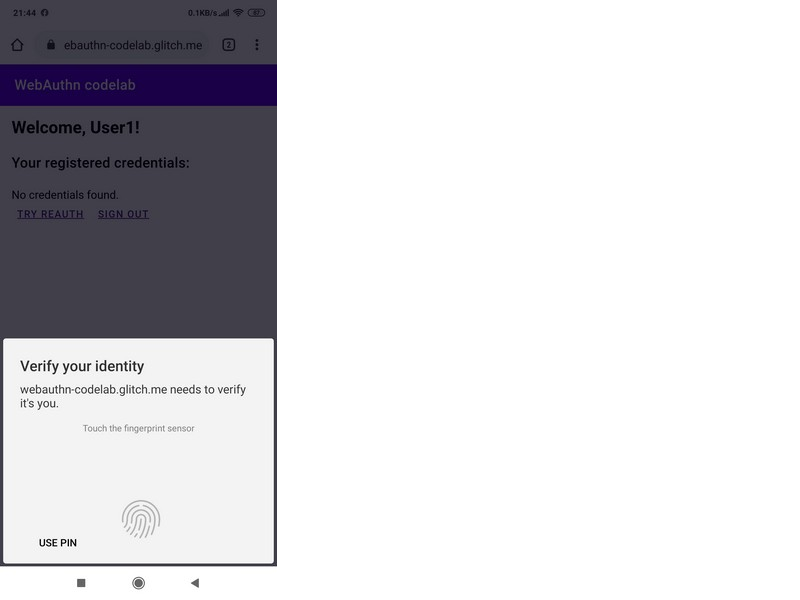 After that, the program shows which public key is attached to this fingerprint:
 Now you can start the authentication script. As usual, we believe that Step 1 has been completed and we are on the site. To go to Step 2, click “Try Reauth”. The browser will perform Step 3 and will interact with the Authenticator, which in Step 4 will ask you to attach your finger:
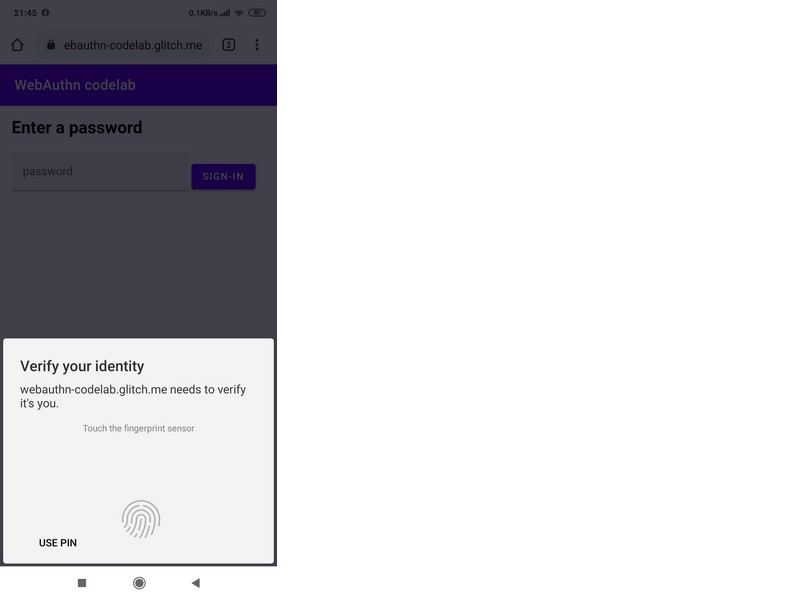 And if the registered finger is attached, then Steps 5 and 6 will pass successfully and in Step 7 the application will again show the window with the corresponding public key:
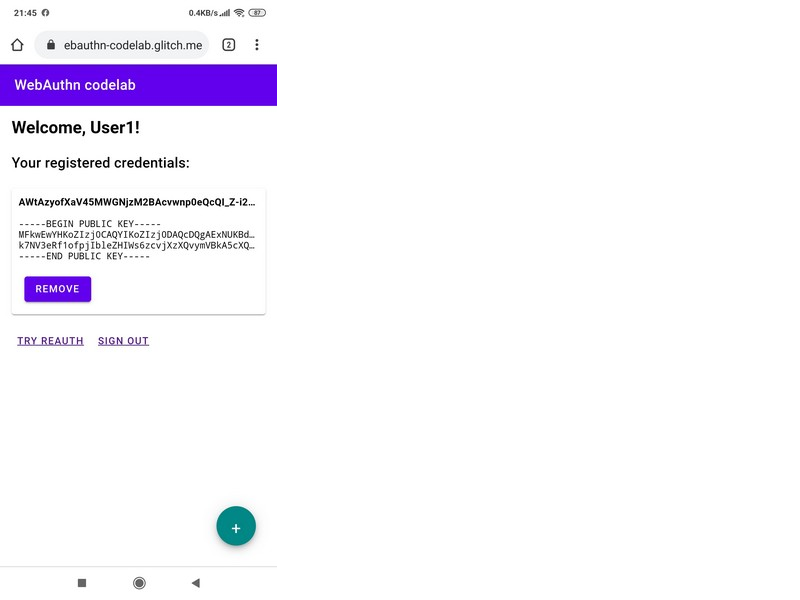
Conclusion
So, we examined the three most common and promising protocols for user identification: OAuth 2.0, OpenID Connect, WebAuthn. We understood the scope of their applicability:- OAuth 2.0 - used to register and login users to sites using social networks. And also to get user data from social networks.
- OpenID Connect — . OpenID Connect SSO .
- WebAuthn — .
- , , .
- , , .
- It makes sense to authenticate users to cloud platforms such as Facebook or Google, as they employ the best security experts who can provide all the nuances of security.
- I suggest optimistic about the future, because WebAuthn protocol - a real chance to get rid of the password hell of our time!
It's only the beginning!Appendix: other authentication protocols
For completeness, I will list the other relevant protocols and technologies used to identify users:SAML 2.0 (Security Assertion Markup Language)
The mature protocol of 2005, but has a limited set of scenarios for building SSO systems. Uses an XML-based data format. More details can be found in the article: “Who uses the SAML 2.0 authentication protocol”Credential Management API
The development is carried out by the same organization as WebAuthn - W3C. Credential Management standard allows you to:- Store the identity of subscribers, which allows users to access sites without entering passwords, but use passwords from the store.
- Select the necessary accounts to enter certain sites.
- Allows you to use logins / passwords entered on one device on other devices.
A common implementation example of the Credential Management API is Google’s password manager: passwords.google.comInitiative for Open Authentication (OATH)
Oath resourcesA Complete List of OAuth 2.0-Based Protocols