There are not many tutorials on creating roguelike in Unity, so I decided to write it. Not to boast, but to share knowledge with those who are at the stage at which I was already quite a while.Note: I am not saying that this is the only way to create a roguelike in Unity. He is just one of . Probably not the best and most effective, I learned through trial and error. And I will learn some things right in the process of creating a tutorial.Let's assume that you know at least the basics of Unity, for example, how to create a prefab or script, and the like. Do not expect me to teach you how to create sprite sheets, there are many great tutorials about this. I will focus not on studying the engine, but on how to implement the game that we will create together. If you run into difficulties, head over to one of Discord's awesome communities and ask for help:Unity Developer CommunityRoguelikesSo, let's get started!Stage 0 - planning
Yes that's right. The first thing to create is a plan. It will be good for you to plan the game, and for me - to plan the tutorial so that after a while we will not be distracted from the topic. It’s easy to get confused in the game’s functions, just like in the roguelike dungeons.We will write roguelike. We will mainly follow the wise advice of Cogmind developer Josh Ge here . Follow the link, read the post or watch the video, and then come back.What is the purpose of this tutorial? Get a solid simple basic roguelike, with which you can then experiment. It should have dungeon generation, a player moving on the map, visibility fog, enemies and objects. Only the most necessary. So, the player should be able to go down the stairs several floors. let's say, by five, increase your level, improve, and at the end fight with the boss and defeat him. Or die. That, in fact, is all.Following the advice of Josh Ge, we will build the functions of the game so that they lead us to the goal. So we get the roguelike framework, which can be further expanded, add your own chips, creating uniqueness. Or throw everything in the basket, take advantage of the experience gained and start over from scratch. It will be awesome anyway.I will not give you any graphic resources. Draw them yourself or use the free tilesets, which can be downloaded here , here or by searching in Google. Just do not forget to mention the authors of the graphics in the game.Now let's list all the functions that will be in our roguelike in the order of their implementation:- Dungeon Map Generation
- Player character and his movement
- Area of visibility
- Enemies
- Search for a way
- Fight, Health, and Death
- Player Level Up
- Items (weapons and potions)
- Console cheats (for testing)
- Dungeon floors
- Saving and loading
- Final boss
After implementing all this, we will have a strong roguelike, and you will greatly boost your game development skills. Actually, it was my way to improve my skills: creating code and implementing functions. Therefore, I am sure that you can handle this as well.Stage 1 - MapManager Class
This is the first script we will create and it will become the backbone of our game. It is simple, but contains the bulk of the important information for the game.So, create a .cs script called MapManager and open it.Delete ": MonoBehaviour" because it will not inherit from it and will not be attached to any GameObject.Remove the Start () and Update () functions.At the end of the MapManager class, create a new public class called Tile.The Tile class will contain all the information of a single tile. So far, we do not need much, only x and y positions, as well as a game object located in this position of the map.So, we have basic tile information. Let's create a map from this tile. It's simple, we only need a two-dimensional array of Tile objects. It sounds complicated, but there is nothing special about it. Simply add the Tile [,] variable to the MapManager class:Voila! We have a map!Yes, it is empty. But this is a map. Each time something moves or changes state on the map, the information on this map will be updated. That is, if, for example, a player tries to switch to a new tile, the class will check the destination tile address on the map, the presence of the enemy and its patency. Thanks to this, we don’t have to check thousands of collisions at each turn, and we don’t need colliders for each game object, which will facilitate and simplify the work with the game.The resulting code looks like this:using System.Collections;
using System.Collections.Generic;
using UnityEngine;
public class MapManager
{
public static Tile[,] map;
}
public class Tile {
public int xPosition;
public int yPosition;
public GameObject baseObject;
}
The first stage is completed, let's move on to filling out the card. Now we will begin to create a dungeon generator.Stage 2 - a couple of words about the data structure
But before you begin, let me share the tips that have arisen thanks to the feedback received after the publication of the first part. When creating a data structure, you need to think from the very beginning how you will maintain the state of the game. Otherwise, later it will be much more chaotic. The user of Discord st33d, the developer of Star Shaped Bagel (you can play this game for free here ), said that at first he created the game, thinking that it would not save states at all. Gradually, the game began to get bigger, and her fan asked for support for the saved map. But because of the chosen method of creating the data structure, it was very difficult to save the data, so he was not able to do this.We really learn from our mistakes. Despite the fact that I put the save / load part at the end of the tutorial, I think through them from the very beginning, and just haven’t explained them yet. In this part I will talk a little about them, but so as not to overload inexperienced developers.We will save such things as an array of variables of the Tile class in which the map is stored. We will save all this data, except for the variables of the GameObject class, which are inside the Tile class. Why? Just because GameObjects cannot be serialized with Unity to stored data.Therefore, in fact, we do not need to save the data stored inside GameObjects. All data will be stored in classes such as Tile, and later also Player, Enemy, etc. Then we will have GameObjects to simplify the calculation of such things as visibility and movement, as well as drawing sprites on the screen. Therefore, within the classes there will be GameObject variables, but the value of these variables will not be saved and loaded. When loading, we will force to generate GameObject again from the saved data (position, sprite, etc.).Then what do we need to do right now? Well, just add two lines to the existing Tile class and one to the top of the script. First we add “using System;” to the script title, and then [Serializable] in front of the whole class and [NonSerialized] right in front of the GameObject variable. Like this:I’ll tell you more about this when we get to the part of the tutorial on saving / loading. For now, let’s leave it all and move on.Stage 3 - a little more about the data structure
I got another review on the data structure that I want to share here.In fact, there are many ways to implement data in a game. The first one I use and which will be implemented in this tutorial: all the tile data is in the Tile class, and all of them are stored in an array. This approach has many advantages: it is easier to read, everything you need is in one place, data is easier to manipulate and export to a save file. But from the point of view of memory, it is not so effective. You will have to allocate a lot of memory for variables that will never be used in the game. For example, later we will put the Enemy GameObject variable in the Tile class so that we can point directly from the map to the GameObject of the enemy standing on this tile to simplify all calculations related to the battle. But this will mean that each tile in the game will have allocated space in memory for the GameObject variable,even if there is no enemy on this tile. If there are 10 enemies on a map of 2500 tiles, then there will be 2490 empty, but allocated GameObject variables - you can see how much memory is wasted.An alternative method would be to use structures to store the basic data of tiles (for example, position and type), and all other data would be stored in hashmap-s, which would be generated only if necessary. This would save a lot of memory, but the payback would be a slightly more complicated implementation. Actually it would be a little more advanced than I would like in this tutorial, but if you want, then in the future I can write a more detailed post about it.In addition, if you want to read a discussion of this topic, then this can be done on Reddit .Stage 4 - Dungeon Generation Algorithm
Yes, this is another section in which I will talk and we will not begin to program anything. But this is important, careful planning of algorithms will save us a lot of working time in the future.There are several ways to create a dungeon generator. The one that we will implement together is not the best and not the most effective ... it's just an easy, initial way. It is very simple, but the results will be quite good. The main problem will be many dead end corridors. Later, if you want, I can publish another tutorial on better algorithms.In general, the algorithm we use works as follows: let's say we have a whole map filled with zero values - a level consisting of a stone. At the beginning we cut out a room in the center. From this room we break through the corridor in one direction, and then add other corridors and rooms, always starting randomly from an existing room or corridor, until we reach the maximum number of corridors / rooms given at the very beginning. Or until the algorithm can find a new place to add a new room / corridor, whichever comes first. And so we get a dungeon.So, let's describe this in a more algorithm-like way, step by step. For convenience, I will call each detail of the map (corridor or room) an element so that I do not have to say “room / corridor” every time.- Cut the room in the center of the map
- Randomly select one of the walls
- We break through the corridor in this wall
- Randomly select one of the existing elements.
- Randomly select one of the walls of this element
- If the last selected item is a room, then we generate a corridor. If the corridor, then randomly choose whether the next element will be a room or another corridor
- Check if there is enough space in the selected direction to create the desired item
- If there is a place, create an element, if not, return to step 4
- Repeat from step 4
That's all. We will get a simple map of the dungeon, in which there are only rooms and corridors, without doors and special elements, but this will be our beginning. Later we will fill it with chests, enemies and traps. And you can even customize it: we will learn how to add interesting elements you need.Stage 5 - cut out the room
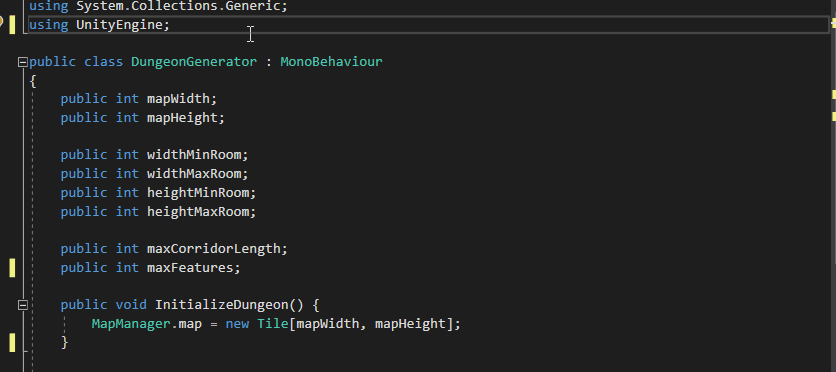
Finally proceed to the coding! Let's cut our first room.First, create a new script and call it DungeonGenerator. It will inherit from Monobehaviour, so you will need to attach it to GameObject later. Then we will need to declare several public variables in the class so that we can set the parameters of the dungeon from the inspector. These variables will be the width and height of the map, the minimum and maximum height and width of the rooms, the maximum length of the corridors and the number of elements that should be on the map.Next we need to initialize the dungeon generator. We do this to initialize the variables that will be populated by the generation. For now, this will be just a map. And, and also delete the Start () and Update () functions that Unity generates for the new script, we will not need them.Here we initialized the map variable of the MapManager class (which we created in the previous step), passing the width and height of the map, defined by the variables above as parameters of the two dimensions of the array. Thanks to this, we will have a map of horizontal x size (width) and vertical y size (height), and we can access any cell in the map by entering MapManager.map [x, y]. This will be very useful when manipulating the position of objects.Now we will create a function to render the first room. We will call it FirstRoom (). We made InitializeDungeon () a public function, because it will be launched by another script (Game Manager, which we will create shortly; it will centralize the management of the entire game launch process). We do not need any external scripts to have access to FirstRoom (), so we do not make it public.Now, to continue, we will create three new classes in the MapManager script so that you can create a room. These are the Feature, Wall, and Position classes. The Position class will contain the x and y positions so that we can track where everything is. The wall will have a list of positions, the direction in which it “looks” relative to the center of the room (north, south, east or west), length, and the presence of a new element created from it. The element will have a list of all the positions that it consists of, the type of the element (room or corridor), an array of Wall variables, and its width and height.Now let's get to the FirstRoom () function. Let's go back to the DungeonGenerator script and create a function right below InitializeDungeon. She will not need to receive any parameters, so we will leave it simple (). Next, inside the function, we first need to create and initialize the Room variable and its list of Position variables. We do it like this:Now let's set the size of the room. It will receive a random value between the minimum and maximum height and width declared at the beginning of the script. While they are empty, because we did not set a value for them in the inspector, but do not worry, we will do it soon. We set random values like this:Next, we need to declare where the starting point of the room will be located, that is, where the point of room 0.0 will be located in the map grid. We want to make it start in the center of the map (half width and half height), but maybe not exactly in the center. It might be worth adding a small randomizer so that it moves slightly left and down. Therefore, we set xStartingPoint as half the width of the map, and yStartingPoint as half the height of the map, and then take the just given roomWidth and roomHeight, we get a random value from 0 to this width / height, and subtract it from the initial x and y. Like this:Next, in the same function we will add walls. We need to initialize the array of walls that are in the newly created room variable, and then initialize each wall variable inside this array. And then initialize each list of positions, set the length of the wall to 0 and enter the direction in which each wall will “look”.After the array is initialized, we loop around each element of the array in the for () loop, initialize the variables of each wall, and then use the switch, which names the direction of each wall. It is chosen arbitrarily, we only need to remember what they will mean.Now we will execute two nested for loops immediately after placing the walls. In the outer loop, we go around all the y values in the room, and in the nested loop, all the x values. This way we will check each cell x in row y so that we can implement it.Then the first thing to do is to find the real value of the cell position on the map scale from the room position. This is pretty simple: we have the starting points x and y. They will be position 0,0 in the grid of the room. Then if we need to get the real value of x, y from any local x, y, then we add the local x and y with the initial positions x and y. Then we save these real x, y values to the Position variable (from a previously created class), and then add them to the List <> of the room’s positions.The next step is to add this information to the map. Before changing the values, remember to initialize the Tile variable.Now we will make a change to the Tile class. Let's go to the MapManager script and add one line to the definition of the Tile class: “public string type;”. This will allow us to add a tile class by declaring that the tile in x, y is a wall, floor, or something else. Next, let's go back to the cycle in which we did the work and add a big if-else construct, which will allow us not only to determine each wall, its length and all positions in this wall, but also to specify on the global map what a specific tile is - a wall or gender.
Stage 6 - drawing the first room
The first thing to think about when implementing an ASCII card is which font to choose. The main factor to consider when choosing a font for ASCII is whether it is proportional (variable width) or monospaced (fixed width). We need a monospace font so that the cards look as needed (see example below). By default, any new Unity project uses the Arial font, and it is not monospaced, so we need to find another. Windows 10 typically has monospaced fonts Courier New, Consolas, and Lucida Console. Choose one of these three or download any other in the place you need and place it in the Fonts folder inside the Assets folder of the project.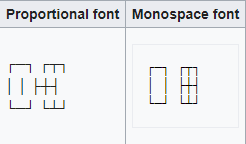

using System.Collections;
using System;
using System.Collections.Generic;
using UnityEngine;
public class MapManager {
public static Tile[,] map;
}
[Serializable]
public class Tile {
public int xPosition;
public int yPosition;
[NonSerialized]
public GameObject baseObject;
public string type;
}
[Serializable]
public class Position {
public int x;
public int y;
}
[Serializable]
public class Wall {
public List<Position> positions;
public string direction;
public int length;
public bool hasFeature = false;
}
[Serializable]
public class Feature {
public List<Position> positions;
public Wall[] walls;
public string type;
public int width;
public int height;
}
DungeonGenerator.cs:using System.Collections;
using System.Collections.Generic;
using UnityEngine;
using UnityEngine.UI;
public class DungeonGenerator : MonoBehaviour
{
public int mapWidth;
public int mapHeight;
public int widthMinRoom;
public int widthMaxRoom;
public int heightMinRoom;
public int heightMaxRoom;
public int maxCorridorLength;
public int maxFeatures;
public bool isASCII;
public void InitializeDungeon() {
MapManager.map = new Tile[mapWidth, mapHeight];
}
public void GenerateDungeon() {
FirstRoom();
DrawMap(isASCII);
}
void FirstRoom() {
Feature room = new Feature();
room.positions = new List<Position>();
int roomWidth = Random.Range(widthMinRoom, widthMaxRoom);
int roomHeight = Random.Range(heightMinRoom, heightMaxRoom);
int xStartingPoint = mapWidth / 2;
int yStartingPoint = mapHeight / 2;
xStartingPoint -= Random.Range(0, roomWidth);
yStartingPoint -= Random.Range(0, roomHeight);
room.walls = new Wall[4];
for (int i = 0; i < room.walls.Length; i++) {
room.walls[i] = new Wall();
room.walls[i].positions = new List<Position>();
room.walls[i].length = 0;
switch (i) {
case 0:
room.walls[i].direction = "South";
break;
case 1:
room.walls[i].direction = "North";
break;
case 2:
room.walls[i].direction = "West";
break;
case 3:
room.walls[i].direction = "East";
break;
}
}
for (int y = 0; y < roomHeight; y++) {
for (int x = 0; x < roomWidth; x++) {
Position position = new Position();
position.x = xStartingPoint + x;
position.y = yStartingPoint + y;
room.positions.Add(position);
MapManager.map[position.x, position.y] = new Tile();
MapManager.map[position.x, position.y].xPosition = position.x;
MapManager.map[position.x, position.y].yPosition = position.y;
if (y == 0) {
room.walls[0].positions.Add(position);
room.walls[0].length++;
MapManager.map[position.x, position.y].type = "Wall";
}
else if (y == (roomHeight - 1)) {
room.walls[1].positions.Add(position);
room.walls[1].length++;
MapManager.map[position.x, position.y].type = "Wall";
}
else if (x == 0) {
room.walls[2].positions.Add(position);
room.walls[2].length++;
MapManager.map[position.x, position.y].type = "Wall";
}
else if (x == (roomWidth - 1)) {
room.walls[3].positions.Add(position);
room.walls[3].length++;
MapManager.map[position.x, position.y].type = "Wall";
}
else {
MapManager.map[position.x, position.y].type = "Floor";
}
}
}
room.width = roomWidth;
room.height = roomHeight;
room.type = "Room";
}
void DrawMap(bool isASCII) {
if (isASCII) {
Text screen = GameObject.Find("ASCIITest").GetComponent<Text>();
string asciiMap = "";
for (int y = (mapHeight - 1); y >= 0; y--) {
for (int x = 0; x < mapWidth; x++) {
if (MapManager.map[x,y] != null) {
switch (MapManager.map[x, y].type) {
case "Wall":
asciiMap += "#";
break;
case "Floor":
asciiMap += ".";
break;
}
} else {
asciiMap += " ";
}
if (x == (mapWidth - 1)) {
asciiMap += "\n";
}
}
}
screen.text = asciiMap;
}
}
}
GameManager.cs:using System.Collections;
using System.Collections.Generic;
using UnityEngine;
public class GameManager : MonoBehaviour
{
DungeonGenerator dungeonGenerator;
void Start() {
dungeonGenerator = GetComponent<DungeonGenerator>();
dungeonGenerator.InitializeDungeon();
dungeonGenerator.GenerateDungeon();
}
}