 We’ll show you how to use Kubernetes CRD to automate security and protect your applications.Translation from the team of the magazine Tomorrow Cloudy Mail.ru Cloud Solutions . Source: Niteen Kole How to Automate Container Security by Using CRDs to Get Security Policy as Code with Extras .
Why do you need CRD
Security has long been a headache for DevOps teams . Existing software tools successfully solve the problems of automating the assembly and rolling out of applications - automatic rolling out of applications based on containers has become the standard. At the same time, automation of security settings is far behind.You can implement automated vulnerability scanning, but the need to manually configure policies for application security is becoming a headache.The introduction of Kubernetes custom resource definitions (CRDs) will help to resolve issues with defining security policies as code at the initial stage of application assembly and rollout, and automate their use when rolling out applications to the production environment.CRD can be used to implement global security policies that define application behavior and configure the security of several Kubernetes clusters used.Using CRD for automation and defining security settings centrally as code, you can simultaneously tighten security settings and simplify their application. This ultimately leads to applications becoming more efficient, with fewer errors, and, most importantly, safer.How does CRD work?
To define security policies, we will use NeuVector CRD inside the NeuVector container platform . Alternatives to NeuVector for container security: AquaSec, StackRox, Sysdig Secure, Twistlock.NeuVector CRD contains policies that first collect a complete profile of normal application behavior.The collected behavior is added to the white list, including all network rules, processes, protocols, and file operations. All this together constitutes a set of standard application operations. Then, security settings are applied, allowing only confirmed network connections inside the containers that make up the application. These connections are identified during the inspection of the OSI model layer 7 (application protocol layer). Thus, any attempt of unauthorized external connection will be prevented.Security policies will prevent attackers from using communications outside or inside containers to use the application for their own purposes.CRD allows you to define both global rules and rules for each service separately. CRDs are also compatible with Kubernetes RBAC, allowing you to use service accounts and Kubernetes roles to enforce security policies.In addition, versioning is available to create its own policies for each version of the application; integration with security policy management utilities such as the Open Policy Agent is supported . Kubernetesready - made clusters with a specially adapted monitoring system based on Prometheus and Grafana, as well as TLS and RBAC for managing access rights and standardizing development in distributed teams, can be tested for free in the Mail.ru Cloud Solutions cloud.Creation of NeuVector CRD
NeuVector CRD allows you to use native YAML Kubernetes files to create security rules.Create an nvsecurityrule.yaml file containing a description of NeuVector CRD. This file controls NvSecurityRulerelating to the nature namespacedand NvClusterSecurityRulerelated to the cluster.apiVersion: apiextensions.k8s.io/v1beta1
kind: CustomResourceDefinition
metadata:
name: nvsecurityrules.neuvector.com
spec:
group: neuvector.com
names:
kind: NvSecurityRule
listKind: NvSecurityRuleList
plural: nvsecurityrules
singular: nvsecurityrule
scope: Namespaced
version: v1
versions:
— name: v1
served: true
storage: true
---
apiVersion: apiextensions.k8s.io/v1beta1
kind: CustomResourceDefinition
metadata:
name: nvclustersecurityrules.neuvector.com
spec:
group: neuvector.com
names:
kind: NvClusterSecurityRule
listKind: NvClusterSecurityRuleList
plural: nvclustersecurityrules
singular: nvclustersecurityrule
scope: Cluster
version: v1
versions:
— name: v1
served: true
storage: true
To create a CRD, run:$ kubectl create -f nvsecurityrule.yaml
As soon as the NeuVector CRD is created, all resources created later with the parameter kind: NvSecurityRulewill be processed by this CRD. Thus, you can create your own resources with connected security policies. Before doing anything, it is advisable to study the NeuVector documentation and add the necessary clusterrolesand clusterrolebindings.Also, using this CRD to apply NeuVector security policies in a Kubernetes cluster requires proper rights settings (RBAC). Security policies defined by CRD for any namespace can only be applied by a user who has the right to deploy to the specified namespace. Applying security policies to a cluster requires cluster administrator privileges.Below is a piece of test code from demo-security-v1.yaml, which restricts containers nginx-podin the namespace demoby providing access to other containers of the same namespace only via HTTP.apiVersion: v1
items:
- apiVersion: neuvector.com/v1
kind: NvSecurityRule
metadata:
name: nv.nginx-pod.demo
spec:
egress:
— Selector:
criteria:
— key: service
op: =
value: node-pod.demo
— key: domain
op: =
value: demo
name: nv.node-pod.demo
action: allow
applications:
- HTTP
name: nv.node-pod.demo-egress-0
ports: any
— Selector:
criteria:
— key: service
op: =
Below the snippet should be a description of all network connections allowed to containers in the namespace demo, for example, connections to the server redis, as well as processes and disk activity allowed to each container. Do not forget to first deploy the NeuVector security policies and then deploy the application. Thus, security policies will be effective from the moment the application starts.To apply a security policy:$ kubectl create -f demo-security-v1.yaml
NeuVector reads the security policies in the created resources and uses the REST API to contact the NeuVector controller, which creates the rules and configurations in accordance with the transferred security policies.Options for applying security policies as code
Using security policies as a code opens up a lot of opportunities for both DevOps / DevSecOps commands and programmers. Here are some examples.Development and testing of security manifests at the initial stage of building applications
Developers can use CRD to make the application safer in the early stages of development. They can simultaneously make manifests for deploying and applying security policies.After building the image, automatically checking for vulnerabilities, and approval by the DevOps team, DevOps can verify both manifestos and provide recommendations to the development team from a security point of view. New applications will be deployed together with effective security policies from the very first deployment to production.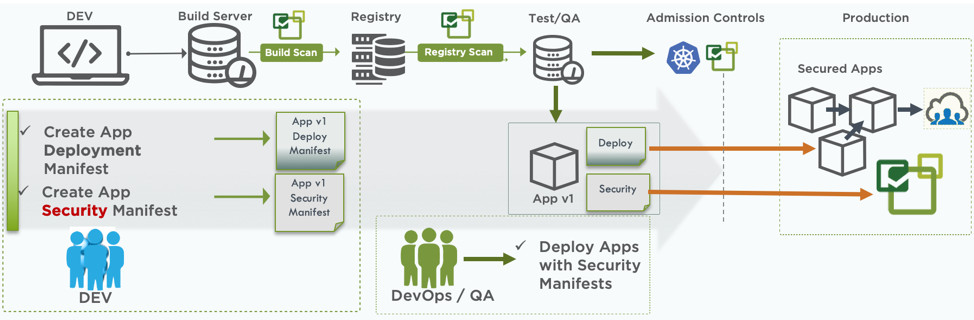
Using behavioral analysis to create security policies
DevOps teams can use NeuVector behavioral analysis capabilities in test environments to develop security policies and create yaml files suitable for use in NeuVector CRD.The following figure, starting from the lower right corner of the diagram, shows how your DevOps team deploys the application to a test environment, where a complete analysis of the application's behavior is performed and security profiles for the network, file activity and processes are formed.These rules are exported and passed on to developers who make the necessary adjustments, and DevOps, who test them before using them in production.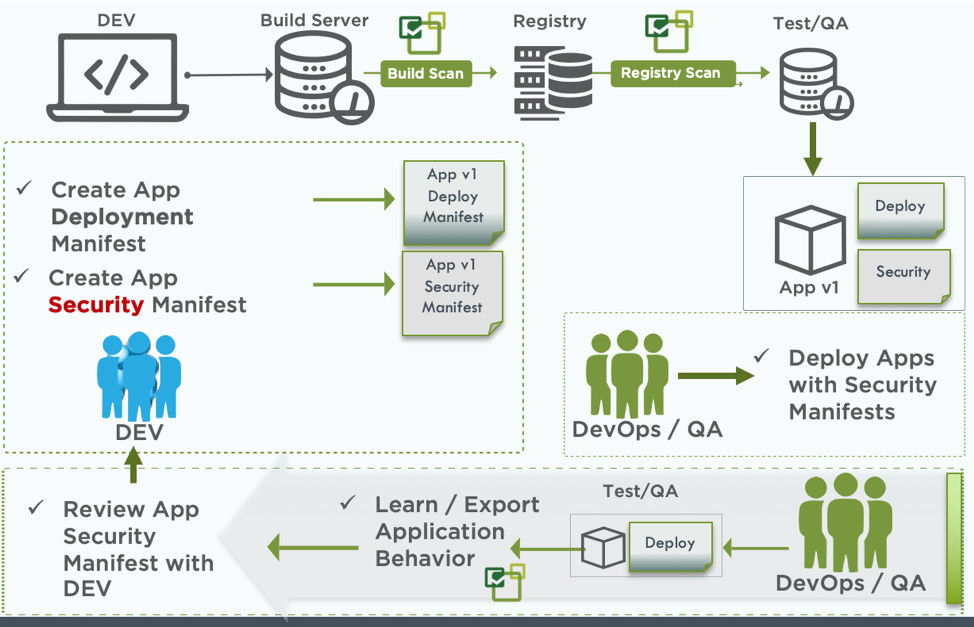
Global Security Policies
NeuVector CRD allows you to define global security policies that are not tied to either a particular application or to a group of applications in a cluster. For example, your security or implementation team may define global network rules to block any connections in all containers or to configure monitoring access to all processes in the cluster.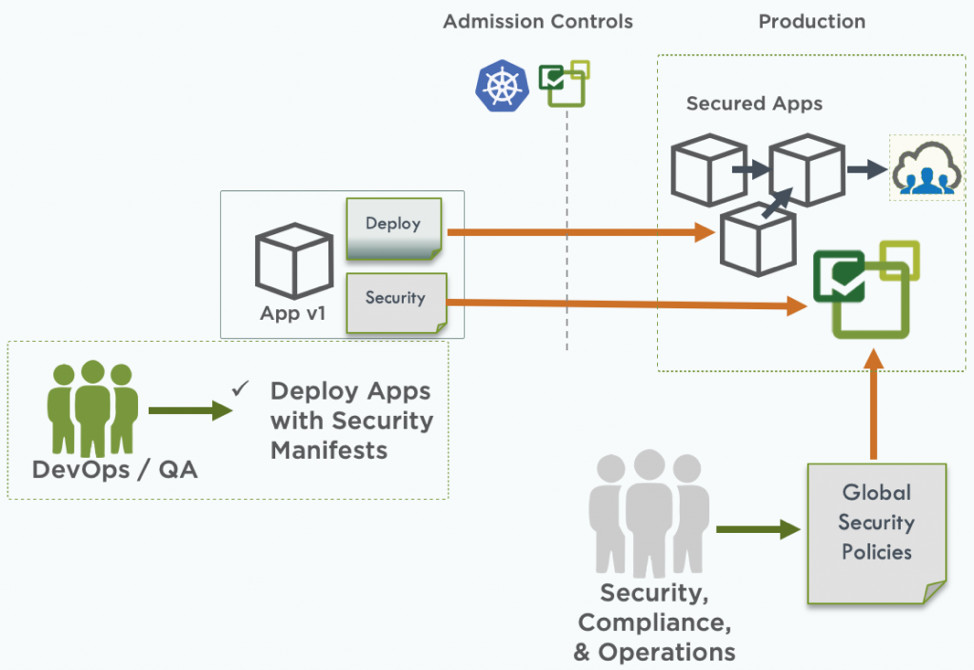 Using common security policies and application security policies in conjunction, you can build complex and precise security settings that your organization needs.The following is an example of banning ssh connections from containers to the outside:
- apiVersion: neuvector.com/v1
  kind: NvClusterSecurityRule
  metadata:
    name: containers
    namespace: default
  spec:
    egress: []
    file: []
    ingress:
    — Selector:
        criteria: []
        name: external
      action: deny
      applications:
      - SSH
      name: containers-ingress-0
      ports: tcp/22
    process:
    — action: deny
      name: ssh
      path: /bin/ssh
    target:
      Selector:
        criteria:
        — key: container
          op: =
          value: '*'
        name: containers
      policymode: null
    version: v1
Migrating Security Policies from Testing to Production
With NeuVector CRD, you can control the automatic migration of security policies - all or only those you need - from the test environment to the production environment. In the NeuVector console, you can configure the mode of new services for detection, monitoring, or protection.Choosing a monitoring or protection mode means that any deployment or service update will necessarily include the setting of security policies that you define. Thus, the service will go into active state only after applying security policies.Using the capabilities of Kubernetes CRD and security policies as code, your developers and DevOps will be able to apply automation of security policies for applications and be sure that applications are much better protected at all stages: from the beginning of development to work in production.