In this article, Maxim Shestakov, DevOps Engineer at Plarium Krasnodar studio, shares his experience in building and delivering iOS applications to users that accumulated during CI / CD debugging.
Training
Everyone connected with developing applications for Apple devices has already managed to appreciate the controversial usability of the infrastructure. Difficulties are everywhere: from the developer profile menu to the debugging and assembly tools.There are plenty of articles on the basics on the net, so we’ll try to highlight the main thing. Here is what you need to successfully build the application:- Developer account ;
- macOS-based device acting as a build server;
- the generated developer certificate , which will then be used to sign the application;
- created application with a unique ID (the importance of the Bundle Identifier should be noted, because the use of wildcard ID makes it impossible to use many functions of the application, for example: Associated Domains, Push Notifications, Apple Sign In and others);
- application signature profile .
The developer certificate should be generated through Keychain on any macOS device. The type of certificate is very important. Depending on the application environment (Dev, QA, Staging, Production), it will differ (Development or Distribution), as well as the type of application signature profile.The main types of profiles:- Development - designed to sign the application of the development team, using the Development-certificate (name of the form iPhone Developer: XXXXX);
- Ad Hoc - intended for signing a test application and internal verification by the QA department, using the Distribution certificate of the developer (name of the iPhone Distribution type: XXXXX);
- App Store - release build for external testing through TestFlight and uploading to the App Store, using the Distribution certificate of the developer.
When generating Development and Ad Hoc profiles, a list of devices on which you can install the build is also indicated , which allows you to further restrict access for users. The App Store profile does not have a list of devices, since TestFlight is responsible for access control during closed beta testing, which will be discussed later.For clarity, you can present the developer profile in the form of a tablet below. It’s easier to understand what parameters for the assembly we need and where to get them.
Assembly
To make it easier to separate assemblies by project and environment, we use the names of the view profiles ${ProjectName}_${Instance}, that is, the project name + instance (depends on the application environment: Dev, QA, GD, Staging, Live, and so on).When importing to a build server, the profile changes its name to a unique ID and moves to the folder /Users/$Username/Library/MobileDevice/Provisioning Profiles(where it $Usernamecorresponds to the build server user account name).There are two ways to build the * .ipa file - obsolete (PackageApplication) and modern (through XcAchive creation and export). The first method is considered obsolete, since from version 8.3 the app file packaging module has been removed from the Xcode distribution. To use it, you need to copy the module from the old Xcode (version 8.2 and earlier) to the folder:/Applications/Xcode.app/Contents/Developer/Platforms/iPhoneOS.platform/Developer/usr/bin/And then run the command:chmod +x /Applications/Xcode.app/Contents/Developer/Platforms/iPhoneOS.platform/Developer/usr/bin/*
Next, you need to collect the * .app-file of the application:xcodebuild \
-workspace $ProjectDir/$ProjectName.xcworkspace \
-scheme $SchemeName \
-sdk iphoneos \
build \
-configuration Release \
-derivedDataPath build \
CODE_SIGN_IDENTITY=”$DevAccName”\
PROVISIONING_PROFILE=”$ProfileId”
DEPLOYMENT_POSTPROCESSING=YES \
SKIP_INSTALL=YES \
ENABLE_BITCODE=NO
Where:-workspace- path to the project file.-scheme- used circuit specified in the project.-derivedDataPath- the path to unload the assembled application (* .app).CODE_SIGN_IDENTITY- the name of the developer account that can be verified in Keychain (iPhone Developer: XXXX XXXXXXX, without TeamID in brackets).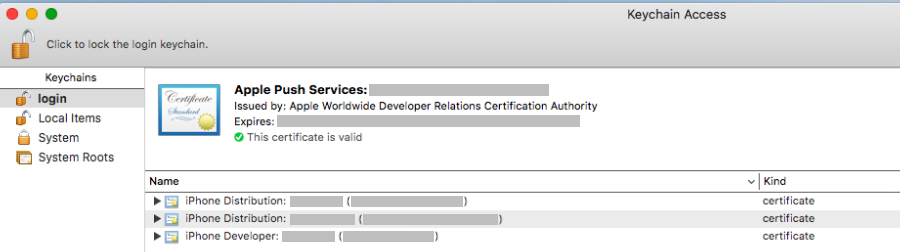
PROVISIONING_PROFILE- The profile ID for signing the application, which can be obtained with the command:cd "/Users/$Username/Library/MobileDevice/Provisioning Profiles/" && find *.mobileprovision -type f | xargs grep -li ">${ProjectName}_${Instance}<" | sed -e 's/.mobileprovision//'
If the application uses an additional profile (for example, for Push Notifications), then instead PROVISIONING_PROFILEindicate:APP_PROFILE=”$AppProfile” \
EXTENSION_PROFILE=”$ExtProfile” \
Next, the resulting * .app file should be packaged in * .ipa. To do this, you can use a command of the form:/usr/bin/xcrun --sdk iphoneos PackageApplication \
-v $(find "$ProjectDir/build/Build/Products/Release-iphoneos" -name "*.app") \
-o "$ProjectDir/$ProjectName_$Instance.ipa"
However, this method is considered obsolete from the point of view of Apple. It is relevant to obtain * .ipa by exporting from the application archive.First you need to collect the archive with the command:xcodebuild \
-workspace $ProjectDir/$ProjectName.xcworkspace \
-scheme $SchemeName \
-sdk iphoneos \
-configuration Release \
archive \
-archivePath $ProjectDir/build/$ProjectName.xcarchive \
CODE_SIGN_IDENTITY=”$DevAccName” \
PROVISIONING_PROFILE=”$ProfileId”
ENABLE_BITCODE=NO \
SYNCHRONOUS_SYMBOL_PROCESSING=FALSE
The differences are in the assembly method and the option SYNCHRONOUS_SYMBOL_PROCESSINGthat disables the unloading of characters during assembly.Next, we need to generate a file with export settings:ExportSettings="$ProjectDir/exportOptions.plist"
cat << EOF > $ExportSettings
<?xml version="1.0" encoding="UTF-8"?>
<!DOCTYPE plist PUBLIC "-//Apple//DTD PLIST 1.0//EN" "http://www.apple.com/DTDs/PropertyList-1.0.dtd">
<plist version="1.0">
<dict>
<key>compileBitcode</key>
<false/>
<key>uploadBitcode</key>
<false/>
<key>uploadSymbols</key>
<false/>
<key>method</key>
<string>$Method</string>
<key>provisioningProfiles</key>
<dict>
<key>$BundleID</key>
<string>$ProfileId</string>
</dict>
<key>signingCertificate</key>
<string>$DevAccName</string>
<key>signingStyle</key>
<string>manual</string>
<key>stripSwiftSymbols</key>
<true/>
<key>teamID</key>
<string>$TeamID</string>
<key>thinning</key>
<string><none></string>
</dict>
</plist>
EOF
Where:$Method- the delivery method corresponds to the type of application signature profile, that is, for Development the value will be development, for Ad Hoc - ad-hoc, and for the App Store - app-store.$BundleID- The application ID that is specified in the application settings. You can check with the command:defaults read $ProjectDir/Info CFBundleIdentifier
$DevAccName $ProfileId- settings for the developer name and signature profile ID that were used earlier and must match the values in the export settings.$TeamID- ten-digit ID in brackets after the name of the developer, example: iPhone Developer: ....... (XXXXXXXXXX); can check in Keychain.Next, using the export command, we get the necessary * .ipa file:xcodebuild \
-exportArchive \
-archivePath $ProjectDir/build/$ProjectName.xcarchive \
-exportPath $ProjectDir \
-exportOptionsPlist $ExportSettings
Delivery
Now the assembled file must be delivered to the end user, that is, installed on the device.For the distribution of Development and Ad Hoc builds, there are many services like HockeyApp, AppBlade and others, but in this article we will talk about a stand-alone server for distributing applications.Installing the application for iOS takes place in 2 stages:- Obtaining the application installation manifest through the Items Service.
- Installing the * .ipa file according to the information specified in the manifest via HTTPS.
Thus, for starters, we need to generate the installation manifest (file type * .plist) with the command:cat << EOF > $manifest
<?xml version="1.0" encoding="UTF-8"?>
<!DOCTYPE plist PUBLIC "-//Apple//DTD PLIST 1.0//EN" "http://www.apple.com/DTDs/PropertyList-1.0.dtd">
<plist version="1.0">
<dict>
<key>items</key>
<array>
<dict>
<key>assets</key>
<array>
<dict>
<key>kind</key>
<string>software-package</string>
<key>url</key>
<string>$ipaUrl</string>
</dict>
</array>
<key>metadata</key>
<dict>
<key>bundle-identifier</key>
<string>$BundleID</string>
<key>bundle-version</key>
<string>$AppVersion</string>
<key>kind</key>
<string>software</string>
<key>title</key>
<string>$ProjectName_$Instance</string>
<key>subtitle</key>
<string>$Instance</string>
</dict>
</dict>
</array>
</dict>
</plist>
EOF
As you can see, the manifest contains almost all the parameters involved in the assembly of the application.Application version ( $AppVersion) can be checked with the command:defaults read $ProjectDir/Info CFBundleVersion
The parameter $ipaUrlcontains a direct link to download the * .ipa file. From the seventh version of iOS, the application must be installed via HTTPS. In the eighth version, the manifest format has changed slightly: blocks with settings for application icons of the form have been removed<images>
<image>...</image>
</images>
Thus, to install the application, a simple html page with a link of the form is enough:itms-services://?action=download-manifest&url=https://$ServerUrl/$ProjectName/$Instance/iOS/$AppVersion/manifest.plist
For the needs of development and testing departments, Plarium has created its build installation application, which gives us:- autonomy and independence,
- centralized access control and secure installation of applications through "temporary", dynamically created links,
- extensible functionality (that is, the development team, if necessary, can integrate the missing functions into an existing application).
Testing
Now we will talk about pre-release application testing using TestFlight .Prerequisites for downloading are the App Store signature profile type and the presence of generated API keys.There are several ways to download the application:- via Xcode (Organizer),
- through altool,
- via Application Loader for older versions of Xcode (now Transporter).
For automatic loading, altool is used, which also has two authorization methods:- App-Specific Password,
- API Key
It is preferable to download the application using the API Key.To get the API Key, follow the link and generate the key. In addition to the key itself in * .p8 format, we will need two parameters: IssuerID and KeyID.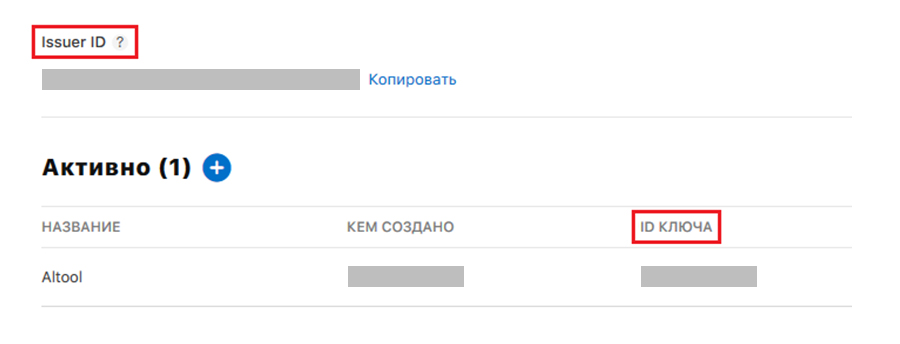 Next, we import the downloaded key to the build server:
mkdir -p ~/.appstoreconnect/private_keys
mv ~/Downloads/AuthKey_${KeyID}.p8 ~/.appstoreconnect/private_keys/
Before loading the application into TestFlight, you need to validate the application, do this with the command:xcrun altool \
--validate-app \
-t ios \
-f $(find "$ProjectDir" -name "*.ipa") \
--apiKey “$KeyID” \
--apiIssuer “$IssuerID”
Where apiKeyand apiIssuerhave field values from the API key generation page.Then, upon successful validation, we load the application with a command --upload-appwith the same parameters.The application will be tested by Apple within one to two days and after that it will be available to external testers: they will be sent e-mail links for installation.Another way to download the application through altool is to use the App-Specific Password.To get the App-Specific Password you need to follow the link and generate it in the Security section. Next, create a build server record in Keychain with this password. From version 11 of Xcode, this can be done with the command:
xcrun altool --store-password-in-keychain-item "Altool" -u "$DeveloperName" -p $AppPswd
Where:$DeveloperNameis the name of the iOS developer account used to login to Apple services.$AppPswd- generated App-Specific Password.Next, we get the value of the asc-provider parameter and verify the success of importing the password with the command:xcrun altool --list-providers -u "$DeveloperName" -p "@keychain:Altool"
We get the conclusion:Provider listing:
- Long Name - - Short Name -
XXXXXXX XXXXXXXXX
As you can see, the desired Short Name (asc-provider) value matches the $ TeamID parameter that we used when building the application.To validate and load the application in TestFlight, use the command:xcrun altool \
--(validate|upload)-app \
-f $(find "$ProjectDir" -name "*.ipa") \
-u "$DeveloperName" \
-p "@keychain:Altool" \
As a parameter value, -pyou can take the value $AppPswdin unencrypted (explicit) form.However, as already mentioned, from the point of view of operability, it is better to select the API Key for authorization altool, as various problems are encountered in different versions of Xcode (it doesn’t see Keychain, authorization errors during unloading, etc.).That, in fact, is all. I wish all involved in successful builds and trouble-free releases on the App Store.