Smart Home platforms allow you to integrate devices and create new scenarios for their interaction. The platform effect is known: users are more likely to choose the one with which their existing devices are compatible, rather than switch to any new one. Therefore, it may be more profitable for developers of new ingenious devices to integrate into an already finished platform, focusing on the “iron” product, rather than developing their own “bicycles” in the form of cloud ecosystems and personal accounts.Let's see how to integrate your own device with the Samsung SmartThings Smart Home platform. We are implementing a direct connection option for controlling the Smart Home device using the example of a button switch and a three-color light bulb. 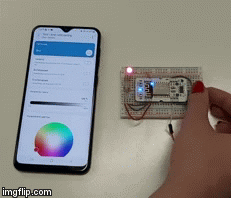
Why do we need Smart Home platforms?
Now gadgets and smart devices are on sale - as much as you want. No problem buying a kettle with Bluetooth control or a light bulb with WiFi. But does this make your home “smart”? A situation is not uncommon: a light bulb is controlled only through a mobile application from the manufacturer. This creates inconvenience if you are trying to combine at least several different brands. Therefore, the ideal platform is one that allows you to manage devices of different manufacturers in the same way.Moreover, I would like to see a “computer dissolved in everyday life”, as Mark Weiser from Xerox PARC dreamed about it: do not control through a special application, do not spray your focus of attention. I would like a natural interaction with a smart environment that does not change our habits. How to implement this technically? For example, it may be scenarios where heterogeneous devices in the house are involved: you woke up - the wearable device detected this and the kettle turned on; you came home - the sensor on the door recorded this, taking into account the time of day, the curtains closed, the lamp turned on, and the air conditioning turned on taking into account the temperature.Scenarios become even more useful if we use the Internet: for example, to remotely check whether the outlet with the iron is turned off. Or a banal example: your smart home looked at the weather forecast and gave you advice on how to dress best. Or you can add voice control through a smart speaker.The Smart Home platform is designed for all of this. Consider what the Samsung SmartThings platform can do.Background - What are SmartThings?
SmartThings started as a startup. At the time when he appeared, in 2012 in the USA, the topic of “Smart Home” was not yet at the top of the hype, there were still no smart speakers and a variety of gadgets in stores. The idea came to the founder of the startup, Alex Hawkinson, after one incident: his family house in Colorado suffered from the fact that after a temporary outage of electricity, the water pipes froze, they burst, and the whole floor was flooded. Then he thought that he could have prevented the problem if he knew about what was happening in the house. After unsuccessfully searching for a turnkey solution, Hawkinson and his colleagues made a prototype of the device and launched a campaign on Kickstarter. The campaign was over-successful, raising $ 1,200,000 instead of the planned $ 250,000 in 30 days. The sale of a hub hub with a small set of devices in the kit has begun: smart socket, door open sensor, motion sensor, presence sensor. And in 2019, already under the Samsung SmartThings brand, the third version of the hub was released. The key to success on Kickstarter was the availability of working prototypes of iron and software, and friendliness to the maker communityThe creators of the startup have left the DIY environment, so they are consistently developing the concept of an open API for geek makers who can act as early adopters at an early stage. In the Kickstarter campaign, there was a shield for Arduino and various cloud modules to seamlessly connect your third-party device. On the Internet you can find many examples of home-made devices compatible with SmartThings, whether it is a controlled chicken coop door (with the solution of a serious life task - to save chickens from a predatory mink), or remote installation of an electronic lock code for guests with Airbnb.
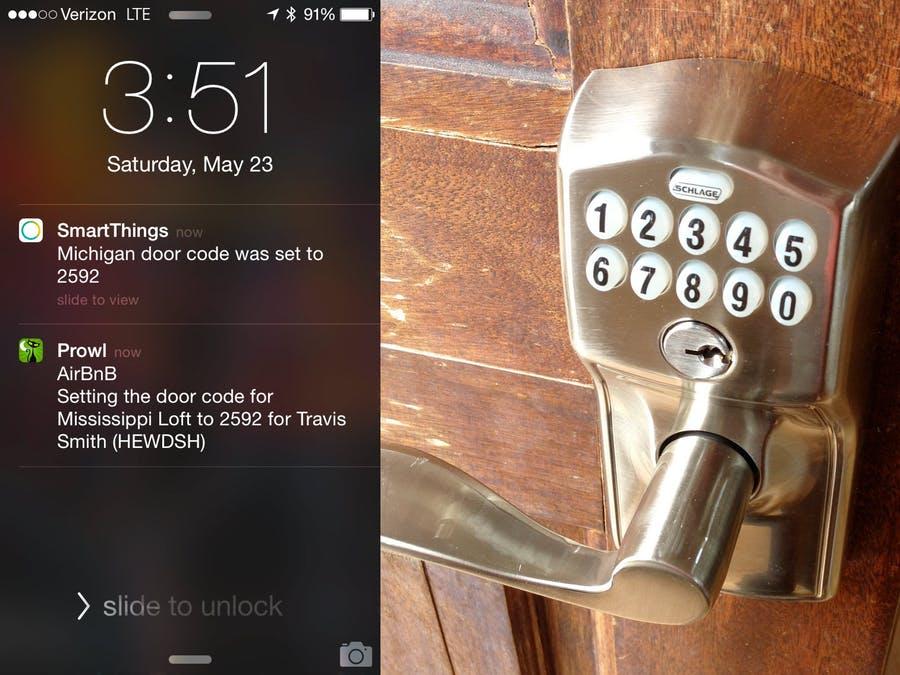 Photo source: https://www.hackster.io/aaronpk/auto-airbnb-entry-745799In 2012-2013, SmartThings went through several rounds of investing and received $ 12.5 million. And finally, in 2014, she became interested in Samsung and was acquired for $ 200 million as part of a strategy to enter the Internet of Things market.The platform’s cloud capabilities remained free: the authors, now Samsung employees, not excluding the theoretical possibility to charge for large volumes of traffic, emphasize: there will always be a free option for device developers. This is good, because now almost all cloud services provide for monetization, and often even for a trial period you need to attach a bank card. SmartThings is a completely free platform.
SmartThings Architecture
 Let's move the pattern from left to right.
Devices
SmartThings Devices - this can be not only devices from the SmartThings suite , but also many third-party partners from the list of partners. If the device is not in the list of officially supported, you can search for the Device Handler to it - it can be provided by the developer community - or write your own.
Connection Methods
You can connect devices to the platform in the following ways:- Hub-connected - through a hub hub, relevant for devices that do not have their Internet connection, but are connected via traditional wireless networks like ZigBee for such systems.
- Directly-connected - via the Internet directly to the cloud. SmartThings recently released a camcorder, a light bulb and a smart socket, and they work without a hub - via WiFi. This is the option we will implement in this guide.
- Cloud-connected - through a third-party cloud for those devices that already have their own cloud ecosystem. This is more complicated, therefore we will not consider such an option.
Hub
Typically, to connect a variety of equipment in your home should be a special small server "Smart Home" that supports various protocols. He - a hub, hub, gateway - the names are different. Hub and a set of devices to it. Photo source: IXBT .
application
SmartThings App is an application that can be installed on the main mobile OS and with its help: add new devices to the system, control already added ones, set automation rules, receive notifications via push and SMS, and much more. 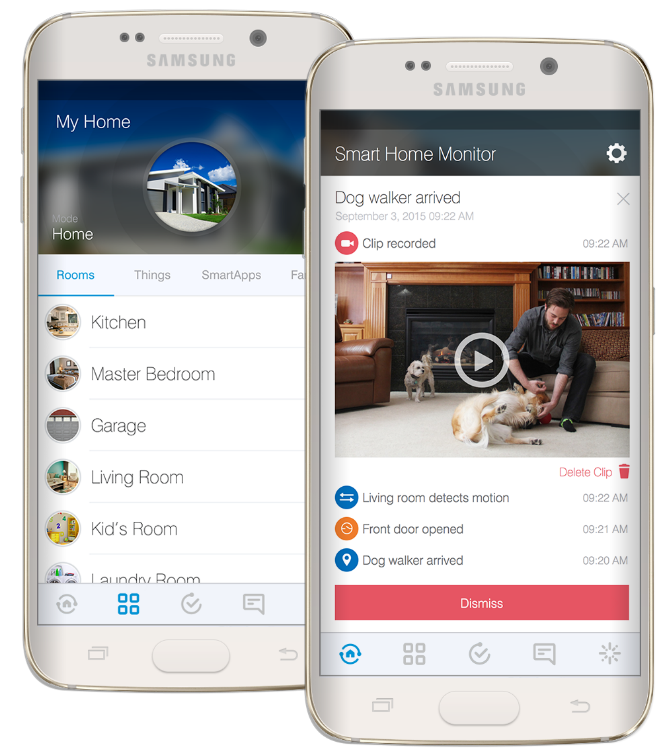
Abstraction
In SmartThings, as in many other smart home platforms, there are the following abstractions: rooms, scenes, scenarios. Devices are grouped into rooms. You simply attach this or that gadget to one room in the application, and call it “Kitchen”, “Bathroom”, “Hallway”.There are still scenes (Scenes) - these are situations: “sleep”, “rest”, “work”, “watching a movie” - each of the situations is characterized by its own set of device states. Scenes and rooms on the application screenAnd finally, scripts (Routines): if-then automation rules. By default, the program has four scenarios: “I am back”, “Good night”, “Bye”, “Good morning”. You can configure activation of the script according to the condition of morning, or in the case of movement, or in the case of opening the door, and so on. A nontrivial example: when I enter home - block network traffic on my home surveillance camera to prevent the leakage of my personal videos. Or a cruel educational example: forcibly disconnect the tablet from the network when it is 11 o’clock in the evening to prevent yourself from sticking on the Internet instead of a healthy sleep.
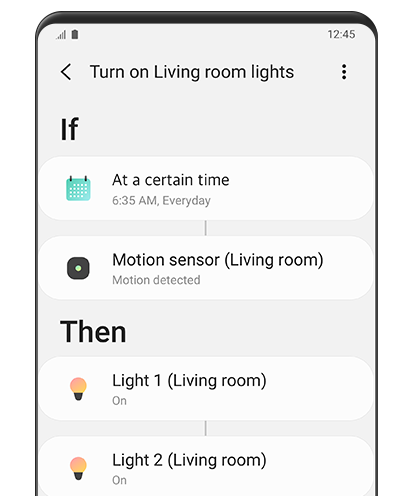 Moreover, in the SmartThings program on the phone there is an interesting opportunity - memorizing typical actions. When you often use the phone, over time, it starts to tell you how best to configure scenes based on the most frequently launched applications.To add new devices to the system, a plug-in system is provided. The developer can program the plug-in for his own device - the user interface inside the SmartThings application and the logic of the device. This is essentially a web application. From the point of view of the developer, the plugin can subscribe to events or notifications from the device, send him a message, monitor the status of the connection with the device. There is clear documentation about the life cycle of the plugin.They are downloaded by the user from the "plug-in store" as necessary, so as not to inflate the application on the phone.
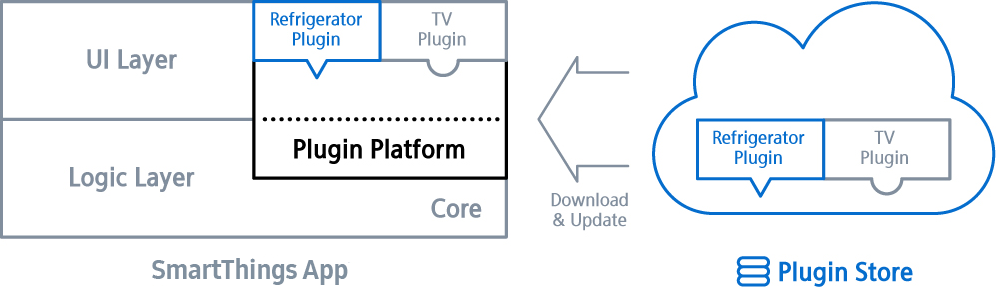 But now we will not do any plug-ins, but we will make it simpler: we will add a home-made device using only standard platform tools.
Making your device compatible with SmartThings
You may have a question: why? What is the point of making it compatible if you are a device developer?- The main advantage is the increase in product value due to automatic integration with the entire ecosystem.
- Subject to passing the functional testing, you can paste the logo: “Compatible with SmartThings” on the product box, thereby guaranteeing trouble-free installation and configuration of the device in the SmartThings ecosystem.
- As with any platform, your task is facilitated: you no longer need to try and develop, for example, a user interface - you can use the standard buttons and other elements of the SmartThings interface.
- You get PR and audience of users thanks to the SmartThings community (it is lively and active).
In the manual below, we will connect our own, fully custom device.What is proposed to do
The SmartThings Device SDK (STDK) was recently presented at the Samsung Developer Conference in October 2019. Below we offer a translation of the manual for this SDK. And not just a translation: we did the same thing and repeated it with our own hands, so there will be some practical comments that go beyond the original manual.How the final result will look like shown in the video:The RGB lamp is connected to the SmartThings platform via WiFi, and you control it through the phone. The lamp itself is implemented in the cheapest and easiest way - on the super popular ESP8266 chip. Iron is not important: it can be done on any microcontroller, because the SDK is written in C, laid out in the public domain and it can be ported if desired. The ESP is unlikely to go into production (for starters, it’s more convenient to use other interfaces in the Smart Home than WiFi), but it’s quite suitable for the model and illustration.The functionality of the resulting “smart bulb” will be as follows: RGB-LED control using the color wheel on the phone. As well as turning it off and on using the button.The development process is shown in the diagram: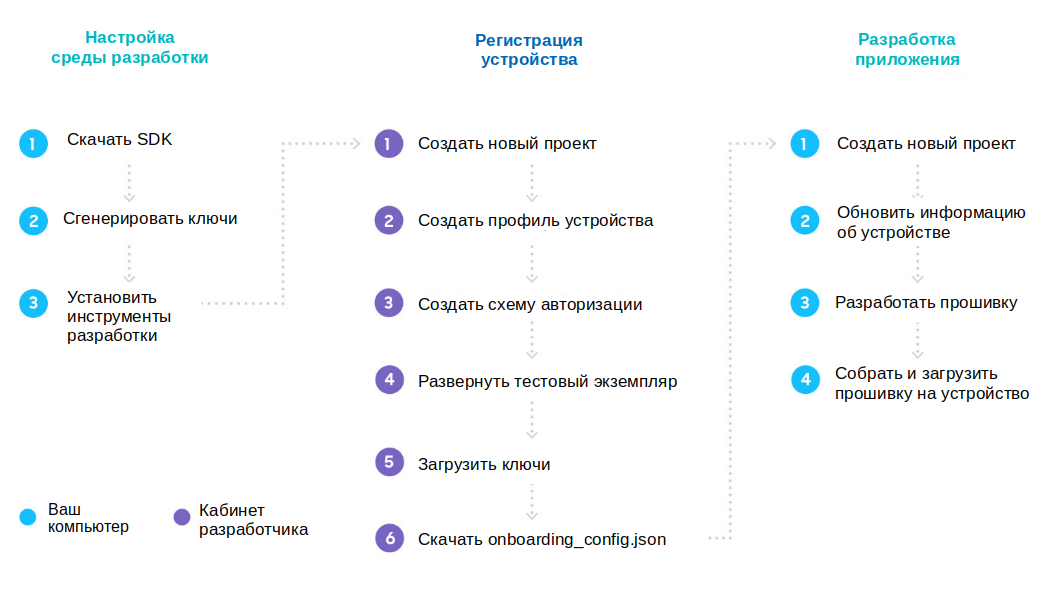 The process shown is not hard, some of the steps can be reversed, which we will show in the manual.
Iron
The original manual shows everything on the example of the WeMos D1 Mini board, this is an ESP8266-based debug board that can be inserted into the breadboard. In general, there is nothing tricky in it, it’s just a module of the Chinese ESP chip that is super popular among fans, soldered for convenience to a wider board in the size of the breadboard. Therefore, you can do everything on any other board.
 Left: WeMos D1, right - Troyka WiFi Shield
Soft
What you need to build the example:- Ubuntu Linux version no lower than 18.04 (you can build an example for both Windows and MacOS, but for definiteness we chose Linux)
- Android 1.7.39, iOS 1.6.41-343. Play Market SmartThings, Samsung Account. Samsung, .
- ESP8266 SDK. , , , :
git clone https://github.com/espressif/ESP8266_RTOS_SDK.git
SDK IDF_PATH:
nano ~/.bashrc
export IDF_PATH="~/git/ESP8266_RTOS_SDK:$IDF_PATH"
- :
sudo apt-get install gcc git wget make libncurses-dev flex bison gperf python python-pip python-setuptools python-serial python-cryptography python-future python-pyparsing python-pyelftools
():
sudo mkdir /opt/Espressif
sudo chown username /opt/Espressif/
cd /opt/Espressif
wget https://dl.espressif.com/dl/xtensa-lx106-elf-linux64-1.22.0-100-ge567ec7-5.2.0.tar.gz
tar -xzf ./xtensa-lx106-elf-linux64-1.22.0-100-ge567ec7-5.2.0.tar.gz
cd xtensa-lx106-elf
export PATH="/opt/Espressif/xtensa-lx106-elf/bin:$PATH"
- Smart Things Device SDK C – . github, , , .
git clone https://github.com/SmartThingsCommunity/st-device-sdk-c-ref.git
cd st-device-sdk-c-ref
./setup.sh esp8266
The following devices will be considered as examples: smart switch and smart light bulb. We will start with a smart switch, as simpler and not requiring any external peripherals.Step 1. Register your device.
Work begins in the SmartThings Developer Workspace , where you need to log in using your Samsung Account. This account is created for free, and to create it is not necessary to have a Samsung phone.  In Developer Workspace, you are immediately offered to create the first project. We agree, after which Device Integration should be selected from the two project options.
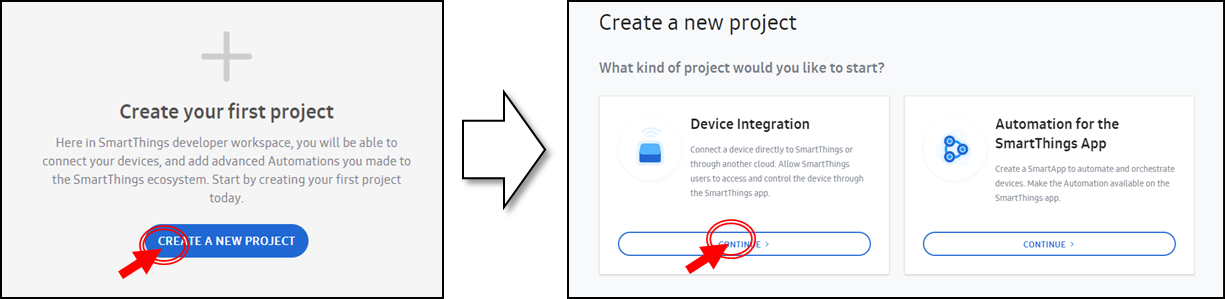 The choice will be given three options for integrating the device:
 - SmartThings Cloud Connector - for connecting devices that have their own cloud that will be connected to the SmartThings cloud
- SmartThings Hub is not available for ZigBee, Z-Wave, Bluetooth devices, and at the time of writing, as the hub is not yet officially sold in Russia
- Directly Connected is the easiest option to connect directly, without any intermediaries.
Choose the third option. Think of a project name, for example, for simplicity - SmartSwitch.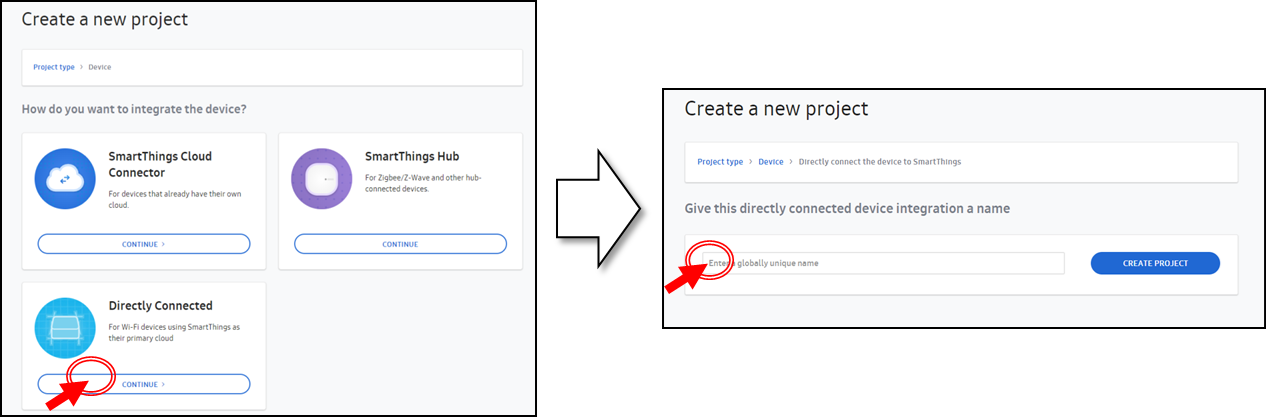 Add a device profile. Speaking in terms of OOP, a device profile is such a “class”, and a specific device is a “class instance”.We need to determine the functional characteristics of the device in terms of SmartThings Capability. You can read about the general “capabilities” of the device in the manual.
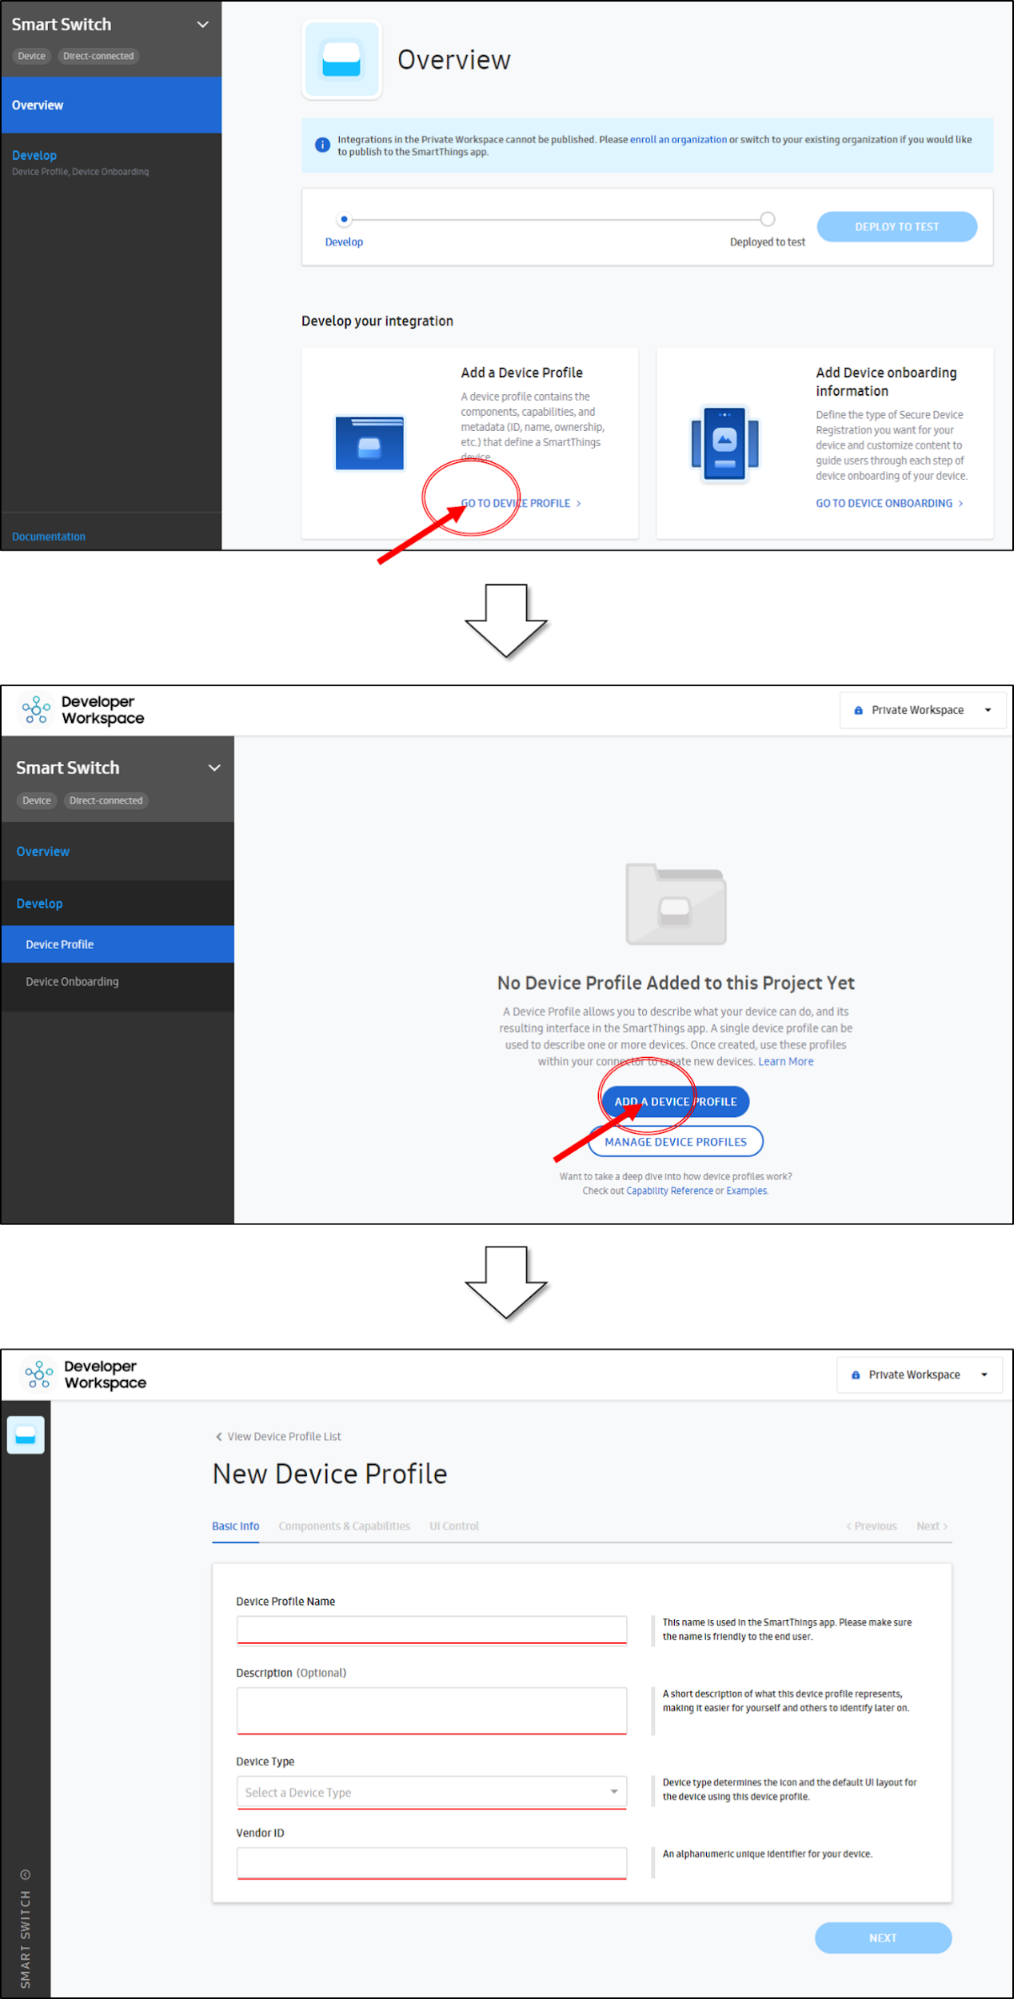 We fill in the fields with our values. For example, the profile name can be entered Test Switch Profile, description - any text, device type - Switch, Vendor ID - any text. “Device Type” affects the icon of your device and the user interface. There are not many possible types of devices on the list (although there are exotic ones, for example WineCellar - a wine cabinet), so if you don’t find yours, don’t be discouraged and just choose the closest and closest one. On the last screen (Dashboard Control) you can not change anything.After creating the profile, do not forget to click on the “Add device profile to project” button in the upper right.
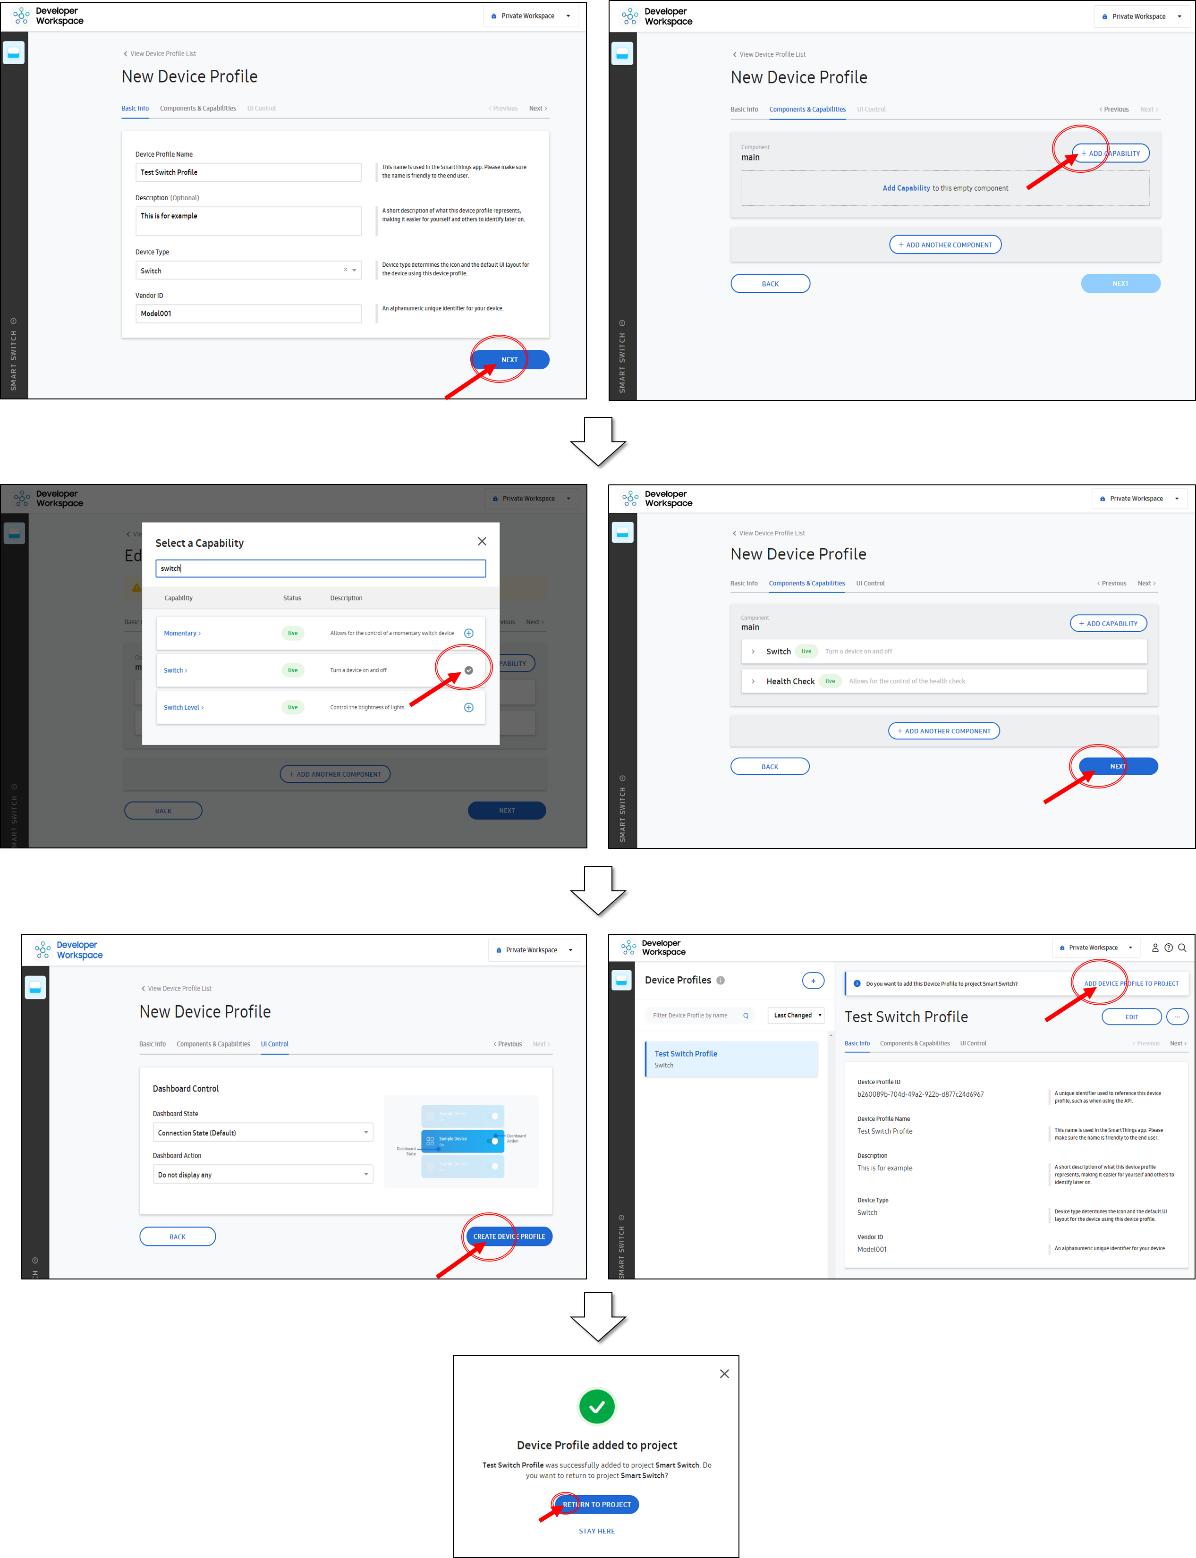
- Important: Health Check is required for all directly connected devices. Add it to the device profile.
- « » : Switch, Health Check.
Now add the authentication profile (Onboarding profile). In short, in this profile you can customize the screens that appear when you first connect and login. Enter any name and any three-digit number. You can skip the other two screens for now. On the last screen, select the confirmation option - Button Confirm - by pressing the button on the device. In this manual, we assume that you got a board with a built-in button. If suddenly there is no button (for example, you are using another ESP module), you can choose the option without authentication at all - it is called Just Works, that is, it “just works” without any questions.And again, by analogy with the previous example, do not forget to click the "Add device onboarding to project" button. All that remains is to click the Deploy button. After that, you can see your device in the SmartThings application - but only in Developer Mode. If Deploy is not pushed, and they say “Please add a Model Name” - this means that you did not specify a Device Onboarding ID, scroll down the page below and do it - enter any name of your choice.
 Now you can start testing your virtual device on your phone.The entire first step is shown in detail in the video:
Register a device in the cloud
Before you start working with the actual hardware, you need to do something else. After pressing the Deploy button, the screen will look different: a new Device Identity field will appear there.  To authenticate your device in the SmartThings cloud, you need to enter its serial number and public key (with ED25519 signature scheme). This is easy enough.This example shows how to create a pair of ED25519 keys using a tool in the SDK. You will get the device_info.json file as the result of the program in the tools / keygen / linux / output_ {serialNumber} folder . The Linux version of keygen is located in st-iot-device-sdk-c-reference / iot-core / tools / keygen / linux or in st-device-sdk-c / tools / keygen / linuxThe serial number for the test device will be randomly generated in the STDK + [MNID] format + alphanumeric format (8 characters). You can find your MNID in the developer profile in the Manage Account section.
 Next, to generate the alphanumeric part, you need to enter your MNID (4 characters) as a keygen parameter. In the example below, the MNID is fJ * c.
    cd ~/Workspace/st-iot-device-sdk-c-ref/iot-core/tools/keygen
    ./stdk-keygen -m fJ*c
    Go Device Identity of Developer Workspace.

    Serial Number:
    ┌──────────┬──────────┐
    │ STDKfJ*c    │ abed**5c   │
    └──────────┴──────────┘

    Public Key:
    waGgyjWIvHhF1LU***FG2hx/4u***ADFHr/ry0j5jbk=
Copy “abed ** 5c” from the keygen issuance, and paste into the XXXXXXXX fields in the Device Identity Registration section. A window will appear asking you to enter the public key. Copy the public key from the keygen issuance (“waGgyjWIvHhF1LU *** FG2hx / 4u *** ADFHr / ry0j5jbk =” in this example) and paste in the “Device Public Key” field.
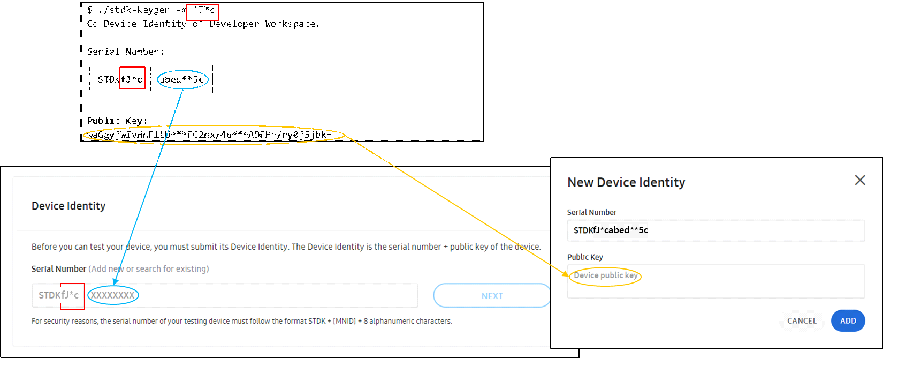
Step 2. Device firmware
Talk about the code that you will download to the device.Examples of firmware are located in the st-device-sdk-c-ref / apps / esp8266 / folder . We will be interested in the st_switch example .- Download onboarding_profile.json in the overview window of your device in the developer's office.

- Copy the downloaded onboarding_profile.json file to the directory of your application - in our case apps / esp8266 / st_switch / main .
cd ~/Workspace/st-device-sdk-c-ref/apps/esp8266/st_switch/main/
cp ~/Downloads/onboarding_profile.json .
There is already an example of such a file - just replace it with yours.
- Similarly, copy the device_info.json file from the tools / keygen / linux / output_ {serialNumber} folder , in which the device-specific information is located, to the same folder, replacing the existing file.
cd ~/Workspace/st-device-sdk-c-ref/iot-core/tools/keygen/linux/
cp output_{serialNumber}/device_info.json ~/Workspace/st-device-sdk-c-ref/apps/esp8266/st_switch/main/
In this file, in addition to the keys and serial number, there is the line “firmwareVersion” - it can be replaced with the version of your program.
- Now assemble and flash the program.
cd ~/Workspace/st-device-sdk-c-ref
./build.sh esp8266 st_switch
./build.sh esp8266 st_switch flash
./build.sh esp8266 st_switch monitor
Or the same, but shorter:
cd ~/Workspace/st-device-sdk-c-ref
./build.sh esp8266 st_switch flash monitor
! If you can’t flash the program in any way - most likely, you forgot to put the ESP8266 board into programming mode. This is usually done by pressing a button on the board itself. For example, the Wi-Fi Troyka module can be translated by holding down the PROG button, and then pressing and releasing the RESET button.After the firmware is downloaded, do not forget to restart the board.Step 3. Connection and control from the phone
Turn on developer mode in the SmartThings app on your phone. How to do this is written on the official website, but it’s easier to explain in words: enter the settings through the “gear” and press the “SmartThings Details” button for 20 seconds. The “Developer Mode” menu appears below. Our device should be visible in the list in the SmartThings application: launch the application, click the plus button and Add device. Scroll to the end of the vendor list and see the “My Testing Devices” icon. Click on it and select your device.
 Moreover: if you have already activated the developer mode and turned on the device, then you will have a pop-up menu offering to add this particular device!The connection starts :
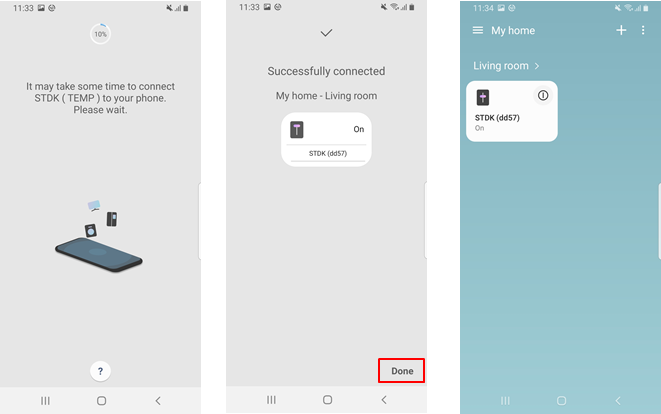 Manage the device from the SmartThings application. At first, the device appears as an access point, because it does not yet know the password for your WiFi. During the connection process, you specify the network with which the device should connect. If you have a hidden access point, then ESP will not be able to connect to it, so choose an open point.The result will be this:
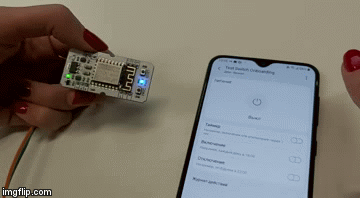 In this example ( st-switch ), you control the built-in LED on the board by pressing the button on the board itself. As you can see, for this example you don’t even need any additional peripherals, only the ESP8266 board itself.You can also turn on / off the device with the button on the control panel in the mobile application:
 And of course, if you press the physical button, the status of the light bulb in the application is also updated.
Smart Light Example
After you have done the Smart Switch example, let's try to complicate things a bit. There will be an RGB LED, and we will turn on / off an external button, and also select a color through the application.Iron
The connection scheme will be simple: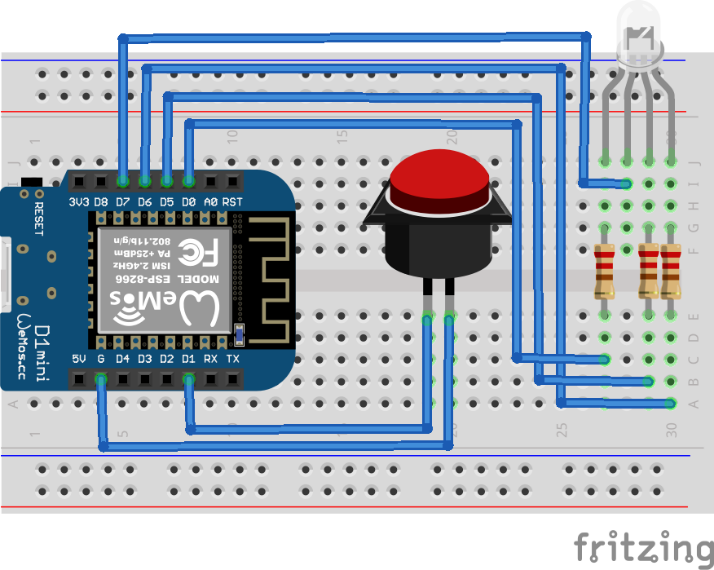 And the circuit diagram also does not hurt:
 If you look at the source (located at: st-device-sdk-c-ref / apps / esp8266 / st_lamp), then the connection there is the following: You can reassign the conclusions according to which it is the model of the board you have. Please note that there is one notation system (D1, D2 ...) on the board, and another in the code, but this is easy to figure out just by looking at the documentation for your board.
#define GPIO_OUTPUT_NOTIFICATION_LED 2
#define GPIO_INPUT_BUTTON 5
#define GPIO_OUTPUT_COLORLED_R 16
#define GPIO_OUTPUT_COLORLED_G 14
#define GPIO_OUTPUT_COLORLED_B 12
#define GPIO_OUTPUT_COLORLED_0 13
Software part
According to the software part, we will change several steps:- When adding Capabilities, you must specify the following: Switch, Switch Level, Color Control, Health Check. The type of device there will be - Light.
- We take an example of firmware from the same folder with examples, it is called st_lamp .
The interface in the application will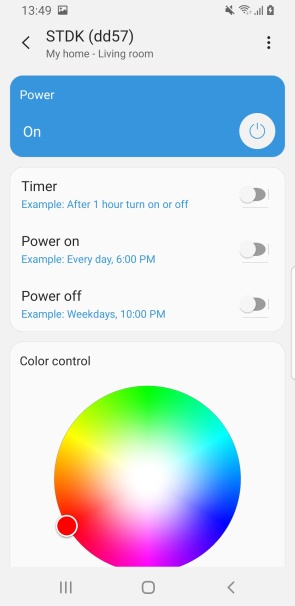 look like this: How it looks in action - once again GIF:
Conclusion
So, you have a ready working example. You see that most of the code has already been done for you - everything related to connection, authentication, device interface. The SmartThings example is valuable in that it is not tied to any hardware device, and you can watch and evaluate what platform functionality is needed in 2k20 if you are developing a Smart Home. Tatyana Volkova - Author of the Samsung IT Academy’s Internet of Things track curriculum, specialist in corporate social responsibility programs at Samsung Research Center