 Get ready to write a clone of food delivery service deliveroo.co.uk using modern technologies: Nuxt.js , GraphQL , Strapi and Stripe !From the entrance to the checkout, we will give users the opportunity to discover new restaurants, dishes and choose their favorite food.The final demo below should make you hungry :)
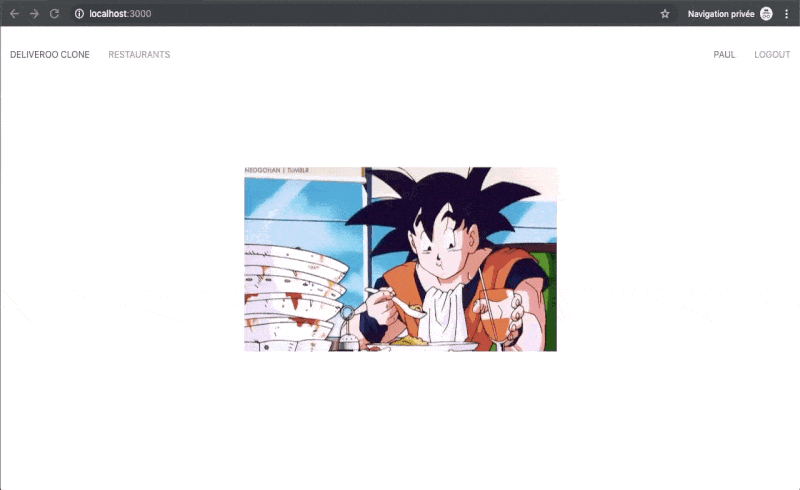
Introduction
Nuxt.js is a framework for building applications using Vue.js. Designed to develop launch-ready applications, it provides a good project structure using webpack and babel.Vue.js is one of the most popular front-end frameworks, with over 100K stars on GitHub. Created by Evan Yu in 2014, Vue.js quickly became one of the leaders among javascript frameworks thanks to three main advantages: a simple API, a small library size and excellent performance.REST uses 99% of all existing APIs. Thanks to SOAP, REST quickly became the de facto standard because of its simplicity.In 2015, Facebook published GraphQL- The query language used to receive data from the API, it continues to grow and has been adopted by companies such as GitHub, Twitter and Yelp.Strapi is an open source headless CMS that saves you the time it takes to develop an API.With an extensible plugin system, Strapi provides a number of built-in features: admin panel, authentication and access control, content management, API generation, etc.Strapi is a 100% open source project (take a look at GitHub ), which means:- Strapi is a completely free project.
- You can install Strapi on your server, thus without losing control of the data.
- Fully customizable and expandable thanks to the plugin system.
Stripe is an online payment system that makes the life of developers easier when working with payments. In this tutorial we will use it to place orders.Already want to start development? Let's start!Note: The source code for the entire series of articles is available here .Install Nuxt
First of all, we need to create a Nuxt.js project using vue cli, let's put @ vue / cli if it has not been installed before:yarn global add @vue/cli
npm install -g @vue/cli
Create a directory deliveroo-clone-tutorial:mkdir deliveroo-clone-tutorial
Then go to it:cd deliveroo-clone-tutorial
Next, create a Nuxt.js project, which we will call frontend:yarn create nuxt-app frontend
npx create-nuxt-app frontend
npm init nuxt-app frontend
After running the command above, you can answer questions, however, in our case, you can answer only one by choosing yarn as the package manager:? Choose the package manager: Yarn
For the rest, just press enter.We also perform:cd frontend && yarn dev
Fine! Let's open localhost: 3000 to make sure that the application started correctly.Install UIkit
UIkit is a modular, lightweight css framework for developing fast and functional web interfaces.We will use this framework in this tutorial.Install uikit in the directory frontend:yarn add uikit
Now we need to add uikit to the Nuxt application, we will do this using the plugin.Create a file /frontend/plugins/uikit.jsand copy the following code into it:import Vue from 'vue'
import UIkit from 'uikit/dist/js/uikit-core'
import Icons from 'uikit/dist/js/uikit-icons'
UIkit.use(Icons)
UIkit.container = '#__nuxt'
Vue.prototype.$uikit = UIkit
Plugins and css files must be connected to nuxt.config.jsso open it and add the following:...
css: [
"uikit/dist/css/uikit.min.css",
"uikit/dist/css/uikit.css",
],
plugins: [
{ src: '~/plugins/uikit.js', ssr: false }
],
...
Fine! UIkit is ready!Now let's create the first component.Create a Header Component
The component Header.vuewill be used on every page of our application.Create a Header.vuefile in the component directory/frontend/components/<template>
<client-only>
<nav class="uk-navbar-container" uk-navbar>
<div class="uk-navbar-left">
<ul class="uk-navbar-nav">
<li class="uk-active">
<router-link tag="a" class="navbar-brand" to="/" exact>Deliveroo clone</router-link>
</li>
<li>
<router-link tag="a" class="navbar-brand" to="/restaurants" exact>Restaurants</router-link>
</li>
</ul>
</div>
</nav>
</client-only>
</template>
A component layouts/default.vueis the root of all your pages. Inside it lies our <nuxt /> application. (the pages for which we are creating in this tutorial)Next, to use the component Header.vueyou need to import it and remove unnecessary css styles, as well as determine the container in which our application will be located.Copy and replace with the following code the one located in /frontend/layouts/default.vue:<template>
<div>
<Header />
<div class="uk-section uk-section-default">
<div class="uk-container uk-container-large">
<nuxt />
</div>
</div>
</div>
</template>
<script>
import Header from '~/components/Header.vue'
export default {
components: {
Header
}
}
</script>
Now let's change our main page in a file /frontend/pages/index.vue, delete the content and styles, replacing with the following code:<template>
<div>
<img src="https://media.giphy.com/media/zBL9j9oiR3VM4/giphy.gif" class="uk-position-center" alt="">
</div>
</template>
Now we can get to the main page (index.vue), which is connected to layouts/default.vueand where the component is also importedHeader.vue- Reload this page to see the changes on localhost: 3000
- Run yarn dev or npm run dev if you stopped the command earlier

Strapi
When there is a frontend, this is good, but our application obviously needs a backend to manage users, restaurants, dishes and orders.To make this magic happen, let's create a project with Strapi to manage content.Install Strapi
Make sure you are using Node.js 10 or higher, and also that one of the databases is installed and running on your machine: MongoDB, Postgres, or MySQL.Strapi can be used with different databases. You can --quickstart easily install Strapi with an SQLite database using the option . This option is recommended for prototyping and development with Strapi. (If MongoDB is not used)Install Strapi and generate a project that we will name backendin the directorydeliveroo-clone-tutorialyarn create strapi-app backend --quickstart
npx create-strapi-app backend --quickstart
We wait a few seconds until the project starts. Your browser should open automatically, if not, open localhost: 1337 / admin / yourself for the next step.Note: This is how you can start the Strapi server again if you stop it:strapi develop
Create an administrator
Add an administrator on the registration page .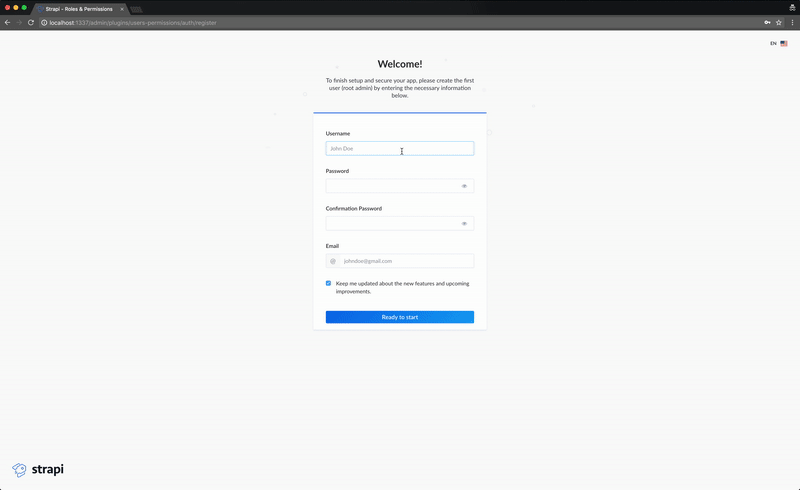 Great work, we have successfully installed projects with Nuxt.js and Strapi!
Translator's notes:The author received permission to translate.This article is the first of a series, in the future I plan to gradually translate them all.I hope this material was useful to you!