Android Q is the tenth version of Android with API level 29. One of the main ideas of the new version is the concept of edge-to-edge, when applications occupy the entire screen, from the bottom to the top. This means that the Status Bar and Navigation Bar must be transparent. But, if they are transparent, then there is no system UI - it overlaps the interactive components of the application. This problem is solved with insets.Mobile developers avoid insets, they cause fear in them. But in Android Q it will not be possible to get around insets - you will have to study and apply them. In fact, there is nothing complicated about insets: they show which screen elements intersect with the system interface and suggest how to move the element so that it does not conflict with the system UI. Konstantin Tskhovrebov will tell about how insets work and how they are useful.Konstantin Tskhovrebov (terrakok) works in Redmadrobot . Has been involved in Android for 10 years and has accumulated a lot of experience in various projects in which there was no place for insets, they always managed to get around somehow. Konstantin will tell about a long history of avoiding the insets problem, about studying and fighting Android. He will consider typical tasks from his experience in which insets could be applied, and show how to stop being afraid of the keyboard, recognize its size and respond to appearance.Note. The article was written based on a report by Konstantin at Saint AppsConf 2019 . The report used materials from several articles on insets. Link to these materials at the end.Typical tasks
Color Status Bar. In many projects, the designer draws a color Status Bar. It became fashionable when Android 5 came along with the new Material Design.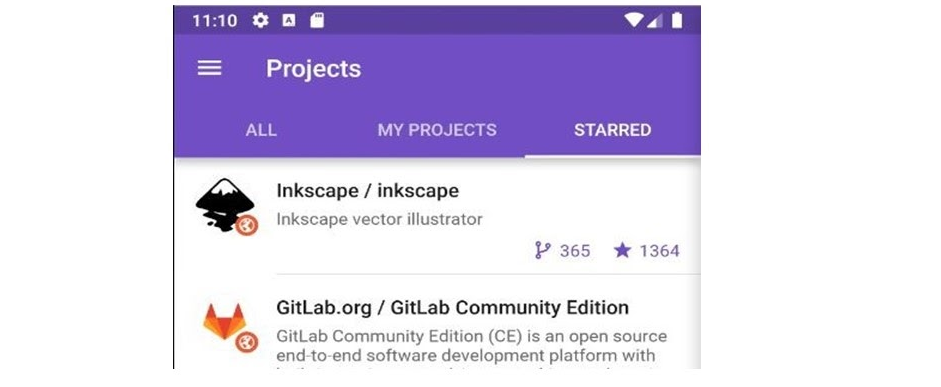 How to paint Status Bar? Elementary - add
 colorPrimaryDarkand the color is substituted. <style name="AppTheme" parent="Theme.AppCompat.Light.NoActionBar">
...
<item name="colorPrimaryDark">@color/colorAccent</item>
...
</style>
For Android above the fifth version (API from 21 and above), you can set special parameters in the topic:<style name="AppTheme" parent="Theme.AppCompat.Light.NoActionBar">
...
<item name="android:statusBarColor">@color/colorAccent</item>
...
</style>
Multi-colored Status Bar . Sometimes designers on different screens draw the Status Bar in different colors.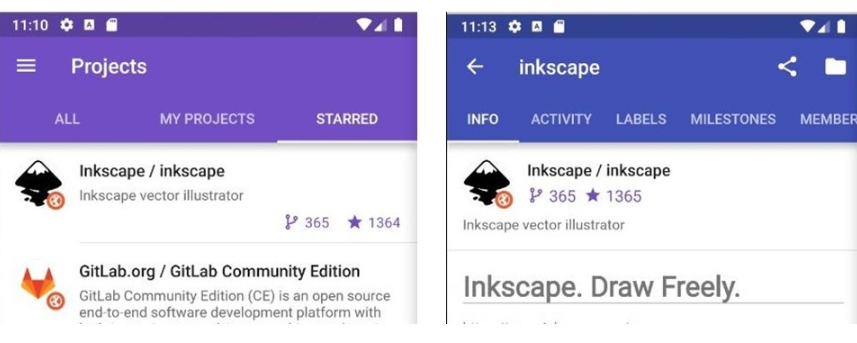 It's okay, the easiest way that works is with different topics in different activities .The more interesting way is to change colors directly in runtime .
override fun onCreateView(...): View {
    requireActivity().window.statusBarColor = requireContext().getColor(R.color.colorPrimary)
    ...
}
The parameter is changed through a special flag. But the main thing is not to forget to change the color back when the user exits the screen back.Transparent Status Bar. This is harder. Most often, transparency is associated with maps, because it is on maps that transparency is best seen. In this case, as before, we set a special parameter:<style name="AppTheme" parent="Theme.AppCompat.Light.NoActionBar">
...
<item name="android:windowTranslucentStatus">true</item>
...
</style>
Here, of course, there is a well-known trick - to indent higher, otherwise the Status Bar will be superimposed on the icon and it will be ugly.But on other screens everything breaks.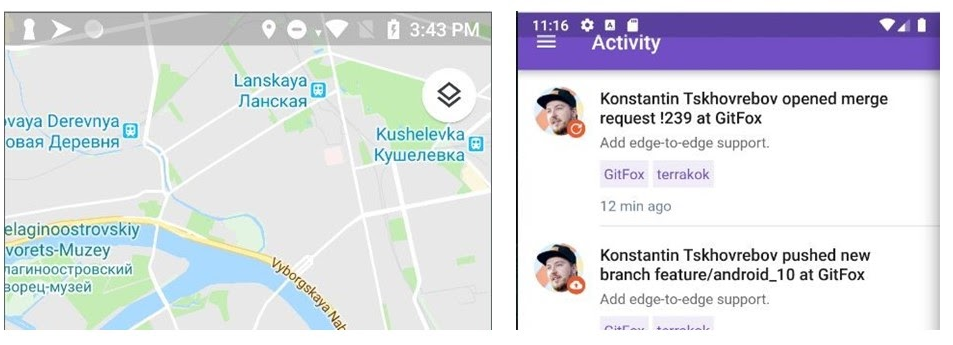 How to solve the problem? The first method that comes to mind is different activities: we have different topics, different parameters, they work differently.Work with the keyboard. We avoid insets not only with the Status Bar, but also when working with the keyboard.
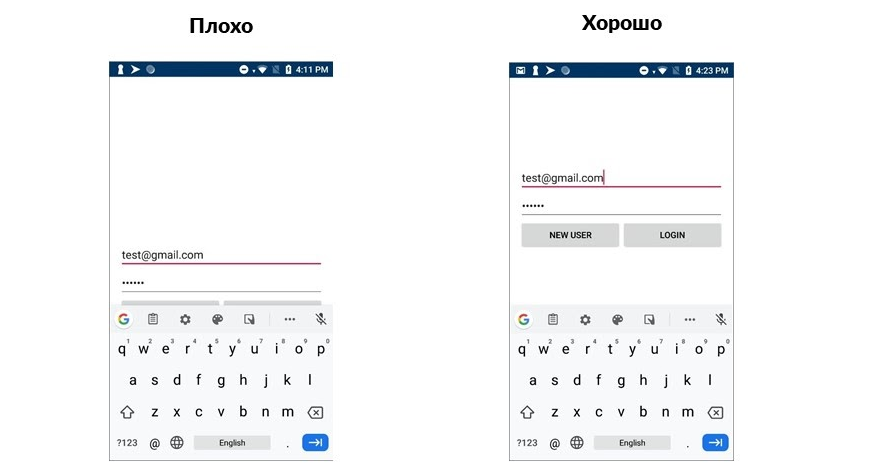 Nobody likes the option on the left, but to turn it into an option on the right, there is a simple solution.
<activity
    ...
    android:windowSoftInputMode="adjustResize">
    ...
</activity>
Activity can now resize when the keyboard appears. It works simply and severely. But don't forget another trick - wrap everything in ScrollView. Suddenly the keyboard will occupy the entire screen and there will be a small strip on top?There are times more difficult when we want to change the layout when the keyboard appears. For example, otherwise arrange the buttons or hide the logo.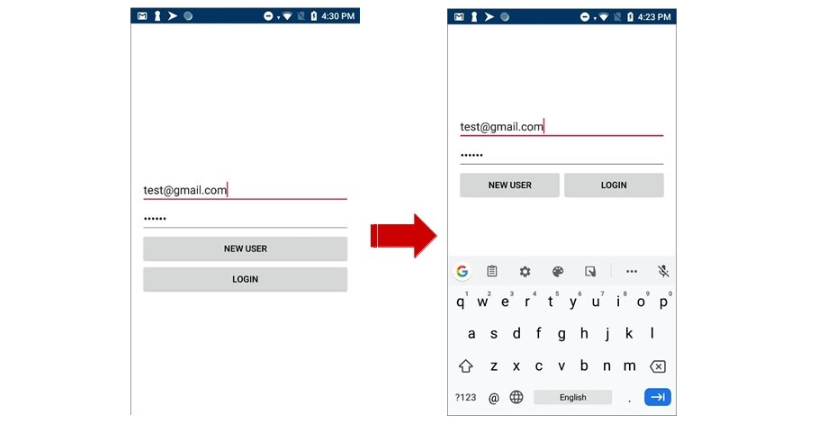 We trained so many crutches with a keyboard and a transparent Status Bar, now it's hard to stop us. Go to StackOverflow and copy the beautiful code.
boolean isOpened = false;
public void setListenerToRootView() {
final View activityRootView = getWindow().getDecorView().findViewById(android.R.id.content);
activityRootView.getViewTreeObserver().addOnGlobalLayoutListener(new OnGlobalLayoutListener() {
@Override
public void onGlobalLayout() {
int heightDiff = activityRootView.getRootView().getHeight() - activityRootView.getHeight();
if (heightDiff > 100) {
Toast.makeText(getApplicationContext(), "Gotcha!!! softKeyboardup", 0).show();
if (isOpened == false) {
}
isOpened = true;
} else if (isOpened == true) {
Toast.makeText(getApplicationContext(), "softkeyborad Down!!!", 0).show();
isOpened = false;
}
}
});
}
It even calculated the probability of a keyboard appearing. The code works, in one of the projects we even used it, but for a long time.Many crutches in the examples are associated with the use of different activities. But they are bad not only because they are crutches, but also for other reasons: the problem of “cold start”, asynchrony. I described the problems in more detail in the article “ License to drive a car, or why applications should be Single-Activity ”. In addition, Google’s documentation indicates that the recommended approach is a Single Activity application.What did we do before Android 10
We (at Redmadrobot) are developing fairly high-quality applications, but have long avoided insets. How did we manage to avoid them without large crutches and in one activity?Note. Screenshots and code taken from my pet project GitFox .Imagine the application screen. When we developed our applications, we never thought that there could be a transparent Navigation Bar below. Is there a black bar below? So what, users are used to it.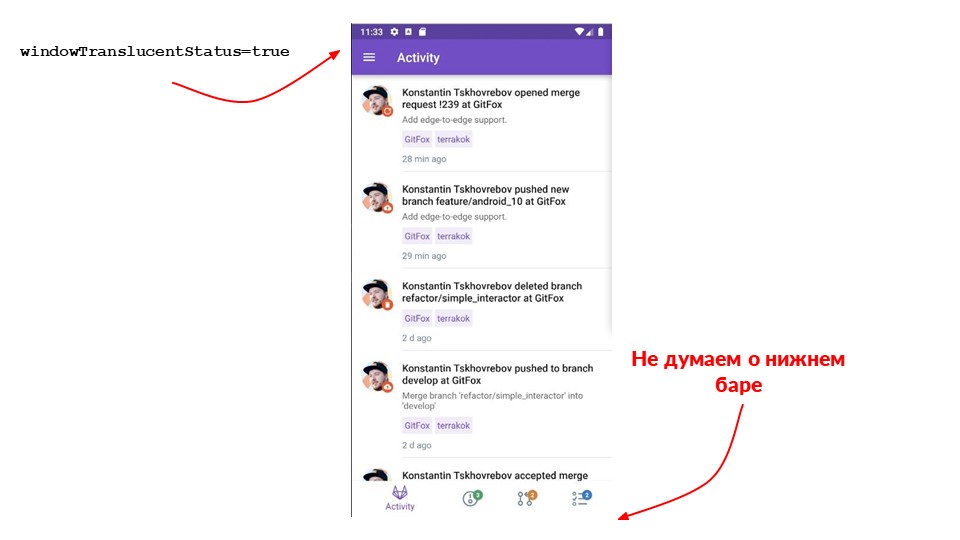 At the top, we initially set the parameter that the Status Bar is black with transparency. How does it look in terms of layout and code?
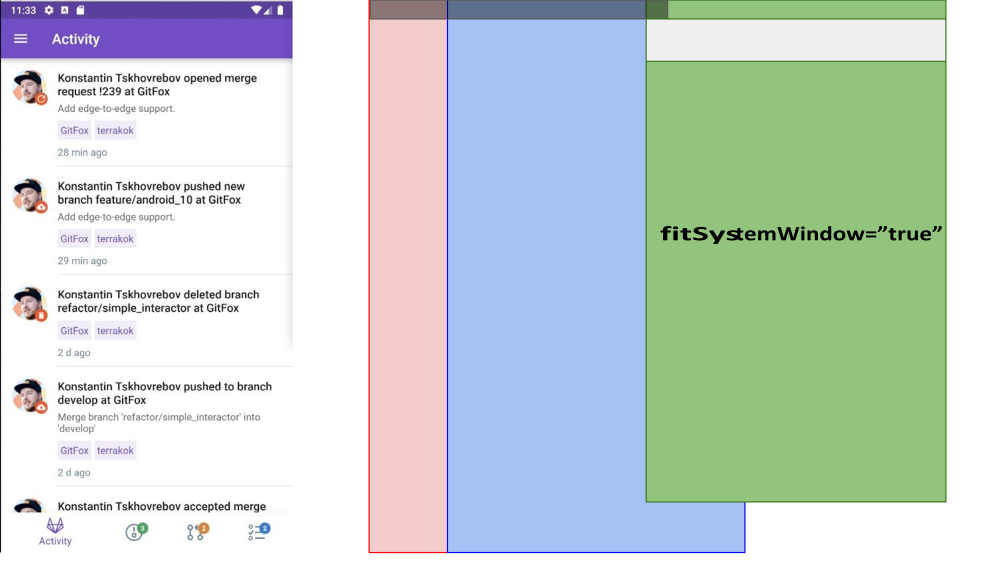 The abstraction in the figure: the red block is the activity of the application, the blue is the fragment with the navigation bot (with Tabs), and inside it the green fragments with the content are switched. It can be seen that the Toolbar is not under the Status Bar. How did we achieve this?Android has a tricky flag
 fitSystemWindow. If you set it to true, the container will add padding to itself so that nothing inside it falls under the Status Bar. I believe this flag is the official crutch from Google for those who are afraid of insets. Use everything will work relatively well without insets.The flag FitSystemWindow=”true”adds padding to the container that you specified. But the hierarchy is important: if one of the parents set this flag to “true”, then its distribution will not be taken into account, because the container has already applied the indentation.The flag works, but another problem appears. Imagine a screen with two tabs. When switching, a transaction is launched, which causes a replacefragment one on another, and everything breaks.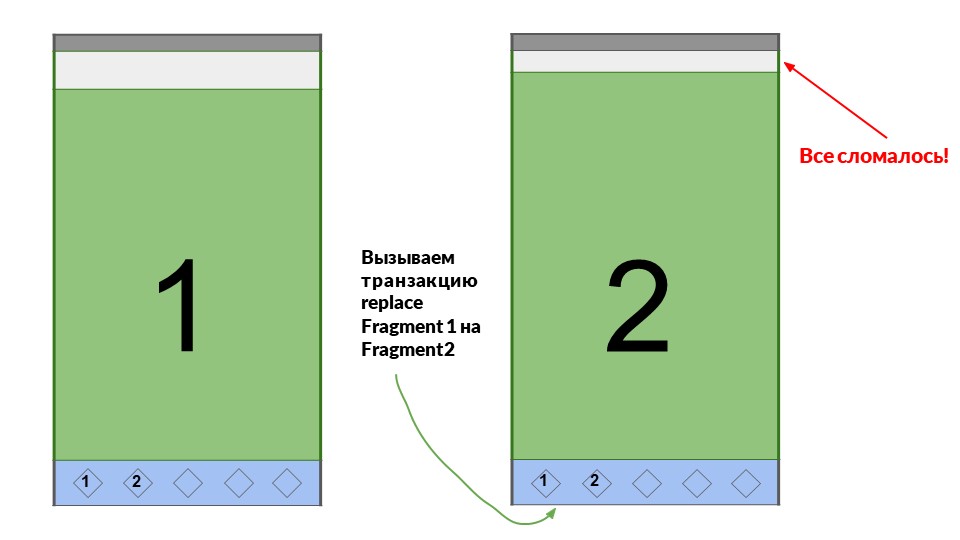 The second fragment also has a flag set
 FitSystemWindow=”true”, and this should not happen. But what happened, why? The answer is that this is a crutch, and sometimes it does not work.But we found a solution on Stack Overflow : use root for not fragments FrameLayout, but CoordinatorLayout. It was created for other purposes, but it works here.Why does it work?
Let's see in the source what is happening in CoordinatorLayout.@Override
public void onAttachedToWindow() {
super.onAttachedToWindow();
...
if (mLastInsets == null && ViewCompat.getFitsSystemWindows(this)) {
ViewCompat.requestApplyInsets(this);
}
...
}
We see a beautiful comment that insets are needed here, but they are not. We need to re-ask them when we request a window. We figured out that insets somehow work inside, but we don’t want to work with them and leave Coordinator.In the spring of 2019, we developed the application, at which time Google I / O just passed. We have not figured everything out yet, so we continued to hold on to prejudice. But we noticed that switching Tabs at the bottom is somehow slow, because we have a complex layout, loaded with UI. We find a simple way to solve this - change replaceto show/hideso that each time you do not re-create the layout.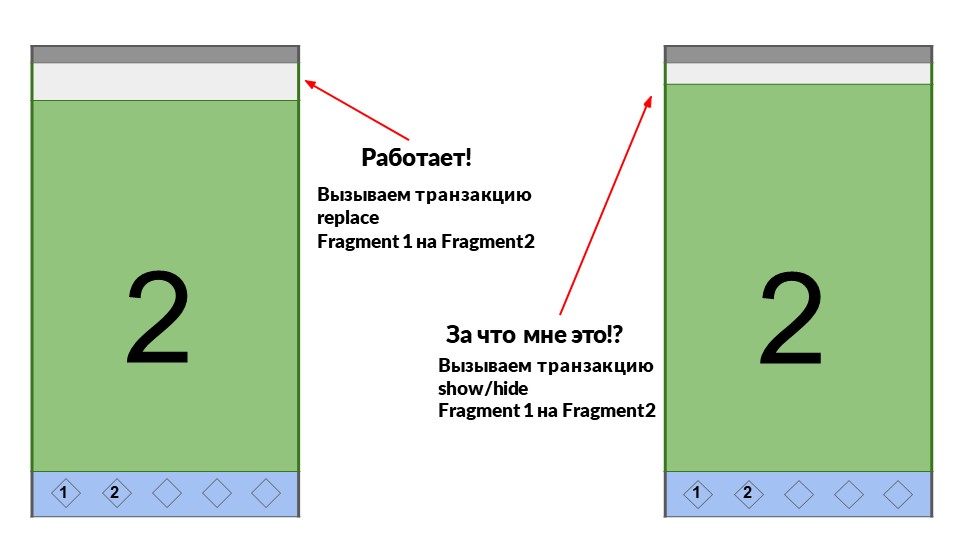 We change, and again nothing works - everything has broken! Apparently it’s just not possible to scatter crutches, you need to understand why they worked. We study the code and it turns out that any ViewGroup is also able to work with insets.
@Override
public WindowInsets dispatchApplyWindowInsets(WindowInsets insets) {
    insets = super.dispatchApplyWindowInsets(insets);
    if (!insets.isConsumed()) {
        final int count = getChildCount();
        for (int i = 0; i < count; i++) {
            insets = getChildAt(i).dispatchApplyWindowInsets(insets);
            if (insets.isConsumed()) {
                break;
            }
        }
    }
    return insets;
}
There is such a logic inside: if at least someone has already processed insets, then all subsequent Views inside the ViewGroup will not receive them. What does this mean for us? Let me show you an example of our FrameLayout, which switches Tabs.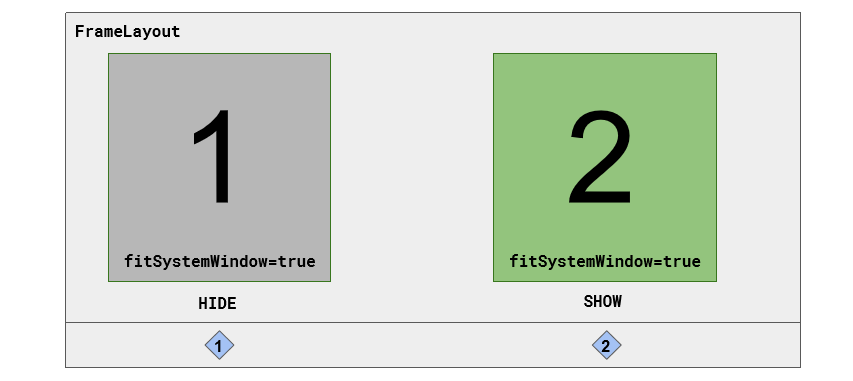 Inside there is the first fragment that has the flag set
 fitSystemWindow=”true”. This means that the first fragment processes insets. After that, we call the HIDEfirst fragment and the SHOWsecond. But the first one remains in the layout - his View is left, just hidden.The container goes through its View: it takes the first fragment, gives it insets, and from it fitSystemWindow=”true”- he took them and processed them. Perfectly, FrameLayout looked that the insets were processed, and did not give it to the second fragment. Everything works as it should. But this does not suit us, what should we do?We write our own ViewGroup
We came from Java, and there OOP in all its glory, so we decided to inherit. We wrote our own ViewGroup, from which we redefined the method dispatchApplyWindowInsets. It works the way we need it: it always gives back to the children the insets that came, regardless of whether we processed them or not.class WindowInsetFrameLayout @JvmOverloads constructor(
context: Context,
attrs: AttributeSet? = null,
defStyleRes: Int = 0
) : FrameLayout(context, attrs, defStyleRes) {
override fun dispatchApplyWindowInsets(insets: WindowInsets): WindowInsets {
for (child in (0 until childCount)) {
getChildAt(child).dispatchApplyWindowInsets(insets)
}
return insets.consumeSystemWindowInsets()
}
}
Custom ViewGroup works, the project too is everything we need. But he still does not reach a general solution. When we figured out what they told us on Google IO, we realized that we won’t be able to act like that anymore.Android 10
Android 10 showed us two important UI concepts that are strictly recommended to adhere to: edge-to-edge and Gestural Navigation.Edge-to-edge. This concept suggests that the content of the application should occupy all possible space on the screen. For us, as developers, this means that applications should be placed under the Status Bar and Navigation Bar system panels.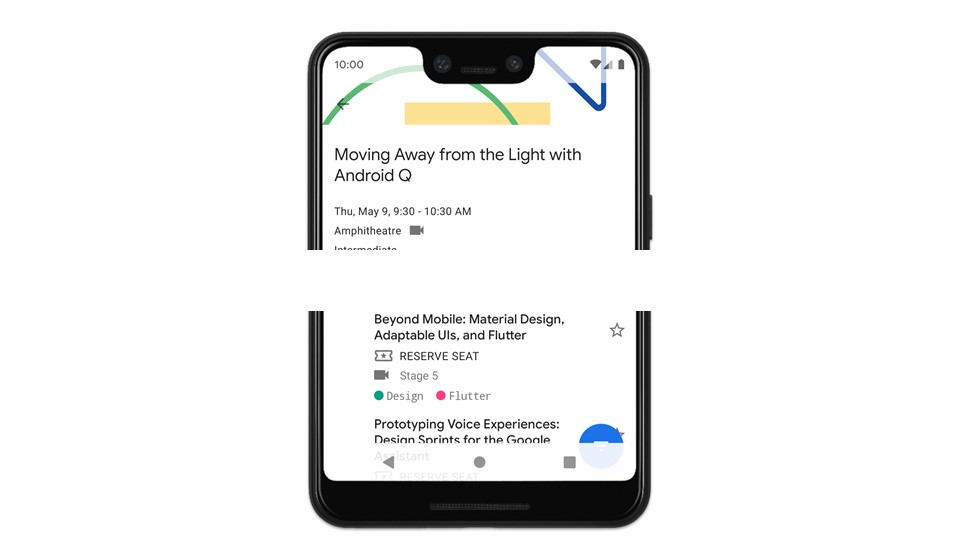 Previously, we could somehow ignore this or be placed only under the Status Bar.As for the lists, they should scroll not only to the last element, but also further so as not to remain under the Navigation Bar.Gestural Navigation. This second important concept is gesture navigation . It allows you to control the application with your fingers from the edge of the screen. Gesture mode is non-standard, everything looks different, but now you can not switch between two different Navigation Bar.At this moment, we realized that everything is not so simple. It will not be possible to further avoid insets if we want to develop quality applications. It's time to study the documentation and understand what insets are.
Insets What do you need to know about them?
Insets were created to scare developers.
They have been doing this perfectly since the moment it appeared in Android 5.Of course, everything is not so scary. The concept of insets is simple - they report a system UI overlay on the application screen. It can be a Navigation Bar, Status Bar or a keyboard. The keyboard is also a regular system UI, which is superimposed on top of the application. It is not necessary to try to process it with any crutches, only insets.The goal of insets is to resolve conflicts . For example, if there is another element above our button, we can move the button so that the user can continue to use the application.To handle inset, use Windowlnsetsfor Android 10 and WindowInsetsCompatfor other versions.There are 5 different types of insets in Android 10and one "bonus", which is called not inset, but otherwise. We’ll deal with all types, because most know only one thing - System Window Insets.System window insets
Introduced in Android 5.0 (API 21). Obtained by the method getSystemWindowInsets().This is the main type of insets that you need to learn how to work with, because the rest work the same way. They are needed to process the Status Bar, first of all, and then the Navigation Bar and keyboard. For example, they solve a problem when the Navigation Bar is above the application. As in the picture: the button remained under the Navigation Bar, the user cannot click on it and is very unhappy.Tappable element insets
Appeared only in Android 10. Obtained by the method getTappableElementInsets().These insets are only useful for handling various Navigation Bar modes . As Chris Bane himself says , you can forget about this type of insets and get around only System Window Insets. But if you want the application to be 100% cool, not 99.9% cool, you should use it.Look at the picture.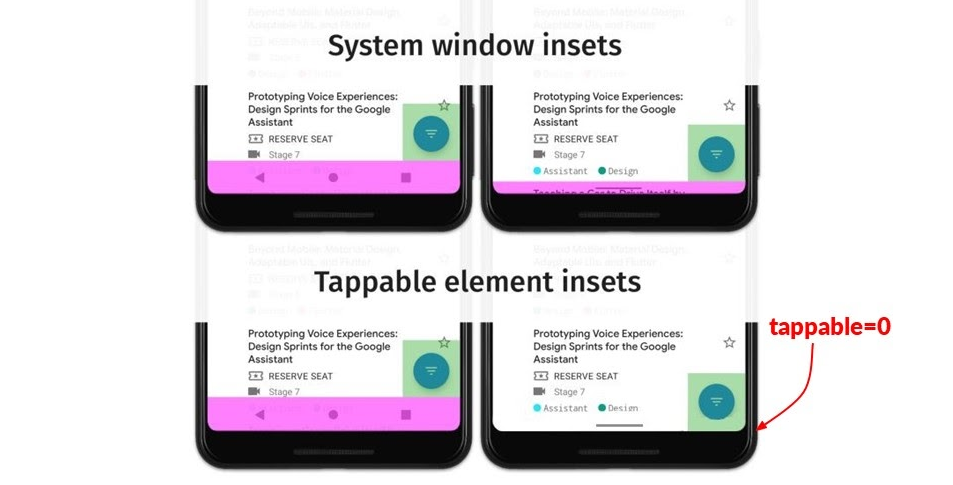 On top, the crimson color indicates System Window Insets, which will come in different modes of the Navigation Bar. It can be seen that on the right and on the left they are equal to the Navigation Bar.Recall how gesture navigation works: in the right mode, we never click on a new panel, but always drag our fingers from bottom to top. This means that the buttons can not be removed. We can continue to press our FAB (Floating Action Button) button, no one will interfere. Therefore, it
 TappableElementInsetswill come empty because FAB is not necessary to move. But if we move a little higher, that's okay.The difference appears only with gesture navigation and the transparent Navigation Bar (color adaptation). This is not a very pleasant situation.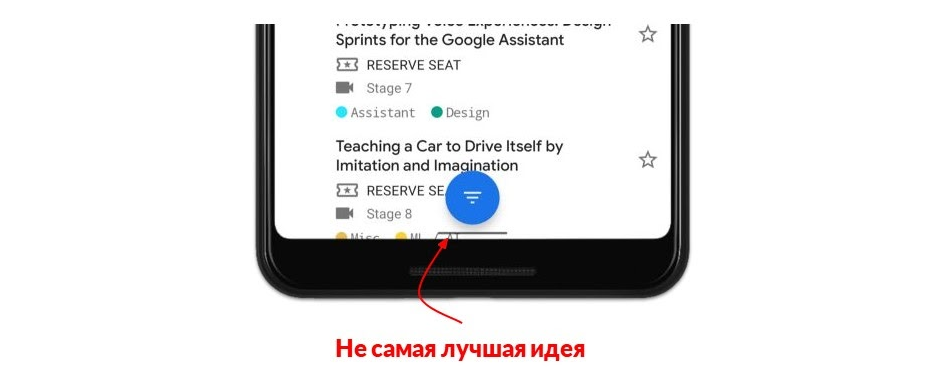 Everything will work, but it looks unpleasant. The user may be confused by the proximity of the elements. It can be explained that one is for gestures and the other is for pressing, but still not beautiful. Therefore, either raise the FAB higher or leave it on the right.
System gesture insets
Appeared only in Android 10. Obtained by the method getSystemGestureInsets().These insets are related to gesture navigation. Initially, it was assumed that the system UI is drawn on top of the application, but System Gesture Insets say that it is not the UI that is drawn, but the system itself handles the gestures. They describe where the system will handle gestures by default.The areas of these insets are approximately those marked in yellow on the diagram.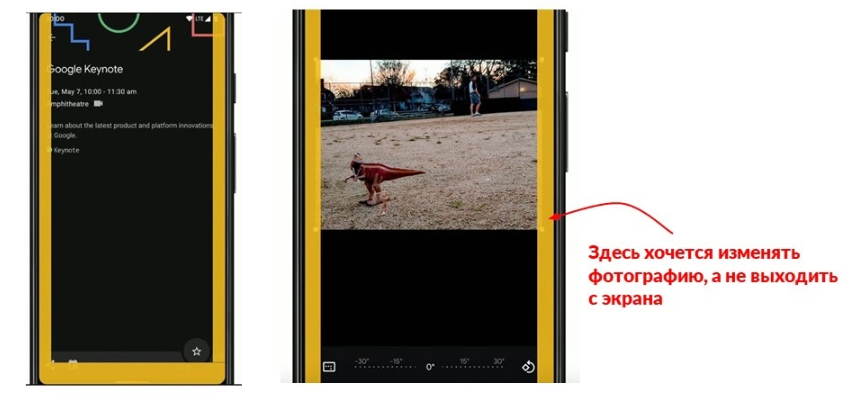 But I want to warn you - they will not always be like that. We will never know what new screens Samsung and other manufacturers will come up with. There are already devices in which the screen is on all sides. Perhaps the insets will not be where we expect at all. Therefore, you need to work with them as with some abstraction: there are such insets in System Gesture Insets in which the system itself processes gestures.These insets can be overridden. For example, you are developing a photo editor. In some places, you yourself want to handle gestures, even if they are near the edge of the screen. Indicate to the system that you will process the point on the screen in the corner of the photo yourself. It can be redefined by telling the system: "I will always process the square around the point myself."
Mandatory system gesture insets
Appeared only in Android 10. This is a subtype of System Gesture Insets, but they cannot be overridden by the application.We use the method getMandatorySystemGestureInsets()to determine the area where they will not work. This was done intentionally so that it was impossible to develop a “hopeless” application: redefine the navigation gesture from the bottom up, which allows you to exit the application to the main screen. Here, the system always processes the gestures itself .Not necessarily it will be on the bottom of the device and not necessarily of this size. Work with it as an abstraction.These were relatively new kinds of insets. But there are those that appeared even before Android 5 and were called differently.Stable insets
Introduced with Android 5.0 (API 21). Obtained by the method getStableInsets().Even experienced developers can not always say why they are needed. I’ll tell you a secret: these insets are only useful for full-screen applications: video players, games. For example, in the playback mode, any system UI is hidden, including the Status Bar, which moves beyond the edge of the screen. But it’s worth touching the screen, as the Status Bar will appear on top.If you put any BACK button at the top of the screen, while it correctly processes System Window Insets, then with each Tab a UI appears on the screen from above, and the button jumps down. If you do not touch the screen for a while, the Status Bar disappears, the button bounces up because System Window Insets have disappeared.For such cases, Stable Insets are just right. They say that now no element is drawn on your application, but can do it. With these insets, you can know in advance the value of the Status Bar in this mode, for example, and position the button where you want.Note. The method getStableInsets()appeared only with API 21. Previously, there were several methods for each side of the screen. We examined 5 types of insets, but there is one more that does not apply to insets directly. It helps deal with bangs and cutouts.Bangs and necklines
Screens are no longer square. They are oblong, with one or more cutouts for the camera and bangs on all sides. Up to 28 APIs we could not process them. I had to guess through insets what was happening there. But with the 28 API and beyond (from the previous Android), the class officially appeared
 DisplayCutout. It is in the same insets from which you can get all the other types. The class allows you to find out the location and size of artifacts.In addition to location information, a set of y flags is provided for the developer WindowManager.LayoutParams. They allow you to include different behaviors around cutouts. Your content may be displayed around them, or may not be displayed: in landscape and portrait mode in different ways.Flagswindow.attributes.layoutInDisplayCutoutMode =LAYOUT_IN_DISPLAY_CUTOUT_MODE_DEFAULT. In portrait - there is, and in landscape - a black bar by default.LAYOUT_IN_DISPLAY_CUTOUT_MODE_NEVER. Not at all - a black stripe.LAYOUT_IN_DISPLAY_CUTOUT_MODE_SHORT_EDGES - always is.
The display can be controlled, but we work with them in the same way as with any other Insets.insets.displayCutout
.boundingRects
.forEach { rect -> ... }
Callback with insets with an array comes to us displayCutout. Then we can run through it, process all the cutouts and bangs that are in the application. You can learn more about how to work with them in the article .Understood with 6 kinds of insets. Now let's talk about how it works.How it works
Insets are needed, first of all, when something is drawn on top of the application, for example, the Navigation Bar.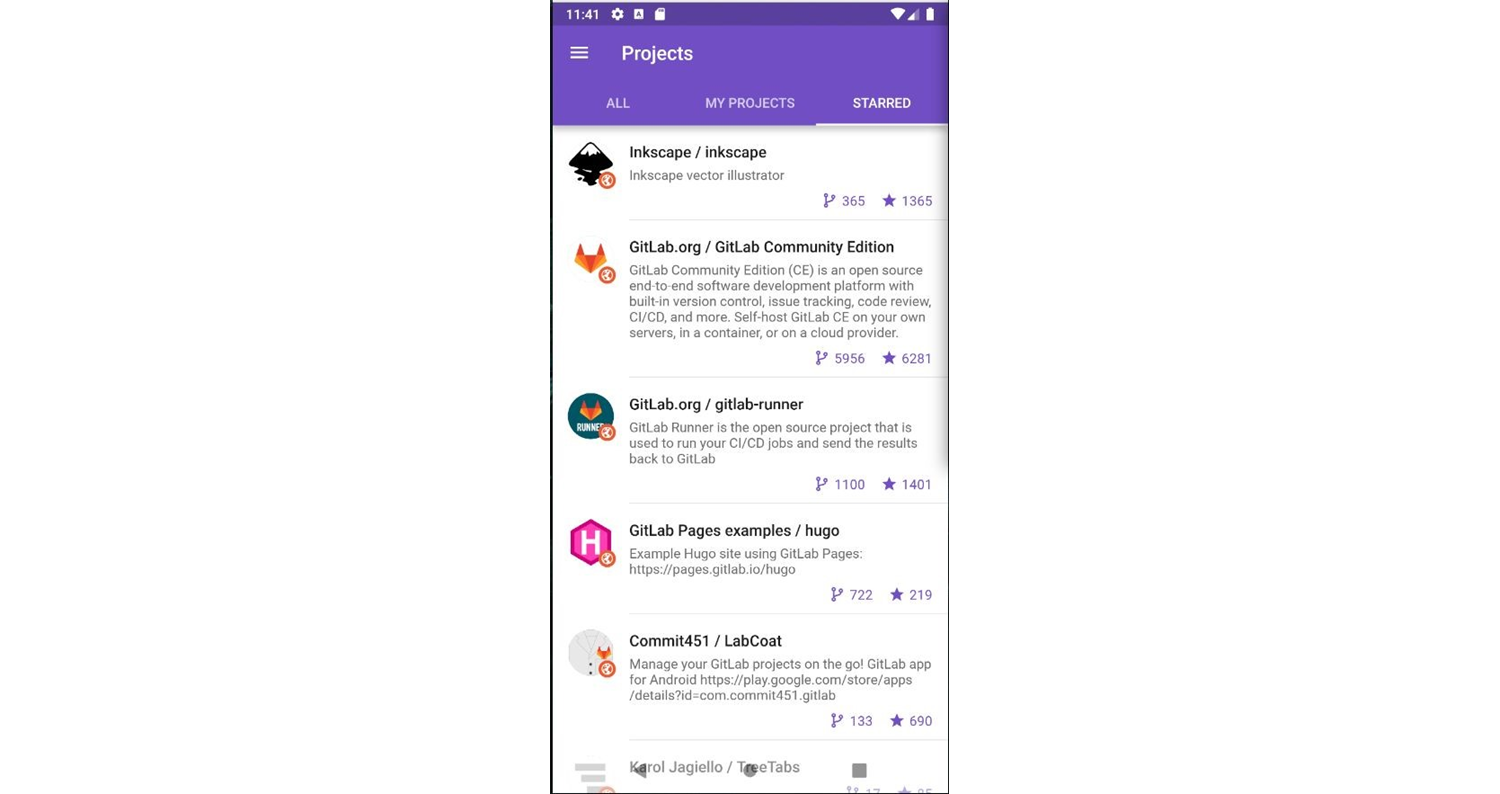 Without insets, the application will not have a transparent Navigation Bar and Status Bar. Do not be surprised that you do not come
 SystemWindowInsets, this happens.Spread insets
The entire UI hierarchy looks like a tree with a View at its ends. Nodes are usually a ViewGroup. They also inherit from View, so insets come to them in a special way dispatchApplyWindowInsets. Starting from the root View, the system sends insets throughout the tree. Let's see how View works in this case.The system calls on it the method dispatchApplyWindowInsetsinto which the insets come. Back this View should return something. What to do to handle this behavior?For simplicity, we only consider WindowInsets.Handling insets
First of all, redefinition of the method dispatchApplyWindowInsetsand implementation inside its own logic seem logical : insets came, we implemented everything inside.If you open the View class and look at the Javadoc written on top of this method, you can see: “Do not override this method!”We handle Insets through delegation or inheritance.
Use delegation . Google provided the opportunity to expose its own delegate, who is responsible for handling insets. You can install it through the method setOnApplyWindowInsetsListener(listener). We set a callback that handles these insets.If for some reason this does not suit us, you can inherit from View and override another method onApplyWindowInsets(WindowInsets insets) . We substitute our own insets into it.Google did not choose between delegation and inheritance, but allowed to do everything together. This is great because we don’t have to redefine all Toolbar or ListView to handle insets. We can take any ready-made View, even a library one, and set the delegate there, which will handle insets without redefinition.What shall we return?Why return something?
To do this, you need to understand how the distribution of insets, i.e., ViewGroup, works. What is she doing inside herself. Let's take a closer look at the default behavior using the example I showed earlier.System insets came at the top and bottom, for example, 100 pixels each. The ViewGroup sends them to the first View that it has. This View handled them somehow and returns insets: on the top it decreases to 0, but on the bottom it leaves. At the top, she added padding or margin, but at the bottom she did not touch and reported this. Next, the ViewGroup passes insets to the second View. The next View processes and renders insets. Now the ViewGroup sees that the insets are processed both above and below - there is nothing left, all the parameters are zero.The third View doesn’t even know that there were some insets and something was happening. ViewGroup will return insets back to the one who exposed them.When we started to deal with this topic, we wrote down the idea for ourselves - always return the same insets that came. We wanted to avoid such a situation when some View did not even recognize that there were insets. The idea looked logical. But it turned out that no. Google has not in vain added behavior to insets, as in the example.This is necessary so that insets always reach the entire hierarchy of the View and you can always work with them. In this case, there will be no situation when we switch two fragments, one has processed, and the second has not yet received. In the practice section, we will return to this point.
Practice
Theory is done. Let's see how it looks in the code, because in theory everything is always smooth. We will use AndroidX.Note. In GitFox, everything is already implemented in the code, full support for all the goodies from the new Android. In order not to check Android versions and not to search for the required type of Insets, always use the view.setOnApplyWindowInsetsListener { v, insets -> ... }version from AndroidX - instead ViewCompat.setOnApplyWindowInsetsListener(view) { v, insets -> ... }.There is a screen with a dark Navigation Bar. It does not overlap any element on top. Everything is the way we are used to.But it turns out that now we need to make it transparent. How?Turn on transparency
The simplest thing is to indicate in the subject that the Status Bar and Navigation Bar are transparent.<style name="AppTheme" parent="Theme.MaterialComponents.Light">
<item name="android:windowTranslucentStatus">true</item>
<item name="android:windowTranslucentNavigation">true</item>
</style>
At this moment, everything begins to overlap each other both from above and from below.Interestingly, there are two flags, and there are always three options. If you specify transparency for the Navigation Bar, the Status Bar will become transparent by itself - such a limitation. You can not write the first line, but I always love clarity, so I write 2 lines so that followers can understand what is happening, and not dig inside.If you choose this method, the Navigation Bar and Status Bar will turn black with transparency. If the application is white, then you can add colors only from the code. How to do it?Turn on transparency with color
It's good that we have a Single Activity application, so we put two flags in one activity.rootView.systemUiVisibility = View.SYSTEM_UI_FLAG_LAYOUT_STABLE or
View.SYSTEM_UI_FLAG_LAYOUT_HIDE_NAVIGATION
<style name="AppTheme" parent="Theme.MaterialComponents.Light">
<!-- Set the navigation bar to 50% translucent white -->
<item name="android:navigationBarColor">#80FFFFFF</item>
</style>
There are a lot of flags there, but it is these two that will help to make transparency in the Navigation Bar and Status Bar. Color can be specified through the theme.This is the strange behavior of Android: something through the theme, and something through the flags. But we can specify parameters both in the code and in the subject. This is not Android so bad, just on older versions of Android the flag specified in the topic will be ignored. navigationBarColorIt will highlight that on Android 5 this is not, but everything will come together. In GitFox, it was from the code that I set the color of the Navigation Bar.We carried out frauds - indicated that the Navigation Bar is white with transparency. Now the application looks like this.What could be easier than handling insets?
Indeed, elementary.ViewCompat
.setOnApplyWindowInsetsListener(bottomNav) { view, insets ->
view.updatePadding(bottom = insets.systemWindowInsetBottom)
insets
}
We take the method setOnApplyWindowInsetsListenerand pass it into it bottomNav. We say that when insets come, install the bottom padding that came in systemWindowInsetBottom. We want it underneath, but all of our clickable elements are on top. We return fully insets so that all other View in our hierarchy also receive them.Everything looks great.But there is a catch. If in the layout we indicated some kind of padding at the Navigation Bar below, then here it was deleted - set updatePaddinginsets equal. Our layout does not look as we would like.To save the values from the layout, you must first save what is in the lower padding. Later, when insets arrive, add and set the resulting values.val bottomNavBottomPadding = bottomNav.paddingBottom
ViewCompat
.setOnApplyWindowInsetsListener(bottomNav) { view, insets ->
view.updatePadding(
bottom = bottomNavBottomPadding + insets.systemWindowInsetBottom
)
Insets
}
It’s inconvenient to write like this: everywhere in the code where you use insets, you need to save the value from the layout, then add them to the UI. But there is Kotlin, and this is wonderful - you can write your own extension, which will do all this for us.Add Kotlin!
We remember initialPaddingand give it to the handler when new insets come (along with them). This will help them somehow add together or build some kind of logic from above.fun View.doOnApplyWindowInsets(block: (View, WindowInsetsCompat, Rect) -> WindowInsetsCompat) {
val initialPadding = recordInitialPaddingForView(this)
ViewCompat.setOnApplyWindowInsetsListener(this) { v, insets ->
block(v, insets, initialPadding)
}
requestApplyInsetsWhenAttached()
}
private fun recordInitialPaddingForView(view: View) =
Rect(view.paddingLeft, view.paddingTop, view.paddingRight, view.paddingBottom)
.
bottomNav.doOnApplyWindowInsets { view, insets, padding ->
view.updatePadding(
bottom = padding.bottom + insets.systemWindowInsetBottom
)
insets
}
We have to redefine the lambda. It has not only insets, but also paddings. We can add them not only from below, but also from above, if it is a Toolbar that processes the Status Bar.Something forgotten!
There is a call to an incomprehensible method.fun View.doOnApplyWindowInsets(block: (View, WindowInsetsCompat, Rect) -> WindowInsetsCompat) {
val initialPadding = recordInitialPaddingForView(this)
ViewCompat.setOnApplyWindowInsetsListener(this) { v, insets ->
block(v, insets, initialPadding)
}
requestApplyInsetsWhenAttached()
}
private fun recordInitialPaddingForView(view: View) =
Rect(view.paddingLeft, view.paddingTop, view.paddingRight, view.paddingBottom)
This is due to the fact that you can’t just hope that the system will send you insets. If we create a View from the code or install a InsetsListenerlittle later, the system itself may not pass the last value.We must check that when the View is on the screen, we told the system: "Insets have arrived, we want to process them." We set the Listener and must make a request requestsApplyInsets. "fun View.requestApplyInsetsWhenAttached() {
if (isAttachedToWindow) {
requestApplyInsets()
} else {
addOnAttachStateChangeListener(object : View.OnAttachStateChangeListener {
override fun onViewAttachedToWindow(v: View) {
v.removeOnAttachStateChangeListener(this)
v.requestApplyInsets()
}
override fun onViewDetachedFromWindow(v: View) = Unit
})
}
}
If we created a View code and have not yet attached it to our layout, then we must subscribe to the time when we do it. Only then we request insets.But then again, there is Kotlin: they wrote a simple extension and we don’t have to think about it anymore.Refining RecyclerView
Now let's talk about finalizing the RecyclerView. The last element falls under the Navigation Bar and remains below - ugly. It’s also inconvenient to click on it. If this is not a new panel, but the old one, a large one, then in general the entire element may disappear under it. What to do?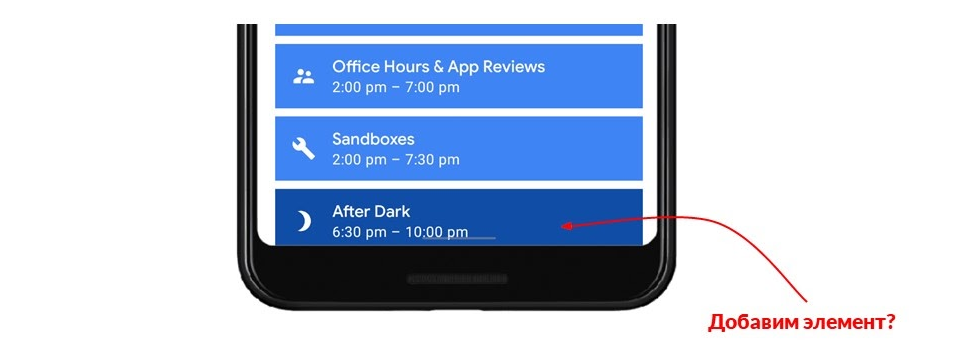 The first idea is to add an element below, and set the height to fit insets. But if we have an application with hundreds of lists, then somehow we will have to subscribe each list to insets, add a new element there and set the height. In addition, RecyclerView is asynchronous, it is not known when it will work. There are many problems.But there is another official hack. Surprisingly, it works efficiently.
<androidx.recyclerview.widget.RecyclerView
        android:id="@+id/recyclerView"
    android:layout_width="match_parent"
    android:layout_height="match_parent"
    android:clipToPadding="false" />

recyclerView.doOnApplyWindowInsets { view, insets, padding ->
    view.updatePadding(
        bottom = padding.bottom + insets.systemWindowInsetBottom
    )
}
There is such a flag in the layout clipToPadding. By default, it is always true. This suggests that you do not need to draw elements that appear where padding is exposed. But if set clipToPadding="false", then you can draw.Now, if you set padding at the bottom, in RecyclerView it will work like this: at the bottom, padding is set, and the element is drawn on top of it until we scroll. Once reached the end, RecyclerView will scroll the elements to the position that we need.By setting one such flag, we can work with RecyclerView as with a normal View. Do not think that there are elements that scroll - just set the padding below, as, for example, in the Bottom Navigation Bar.Now we always returned insets as if they were not processed. The whole insets came to us, we did something with them, set the paddings and returned again all the whole insets. This is necessary so that any ViewGroup always passes these insets to all View. It works.Application bug
In many applications on Google Play that have already processed insets, I noticed a small bug. Now I’ll tell about him.There is a screen with navigation in the basement. On the right is the same screen that shows the hierarchy. The green fragment displays the content on the screen, inside it has a RecyclerView.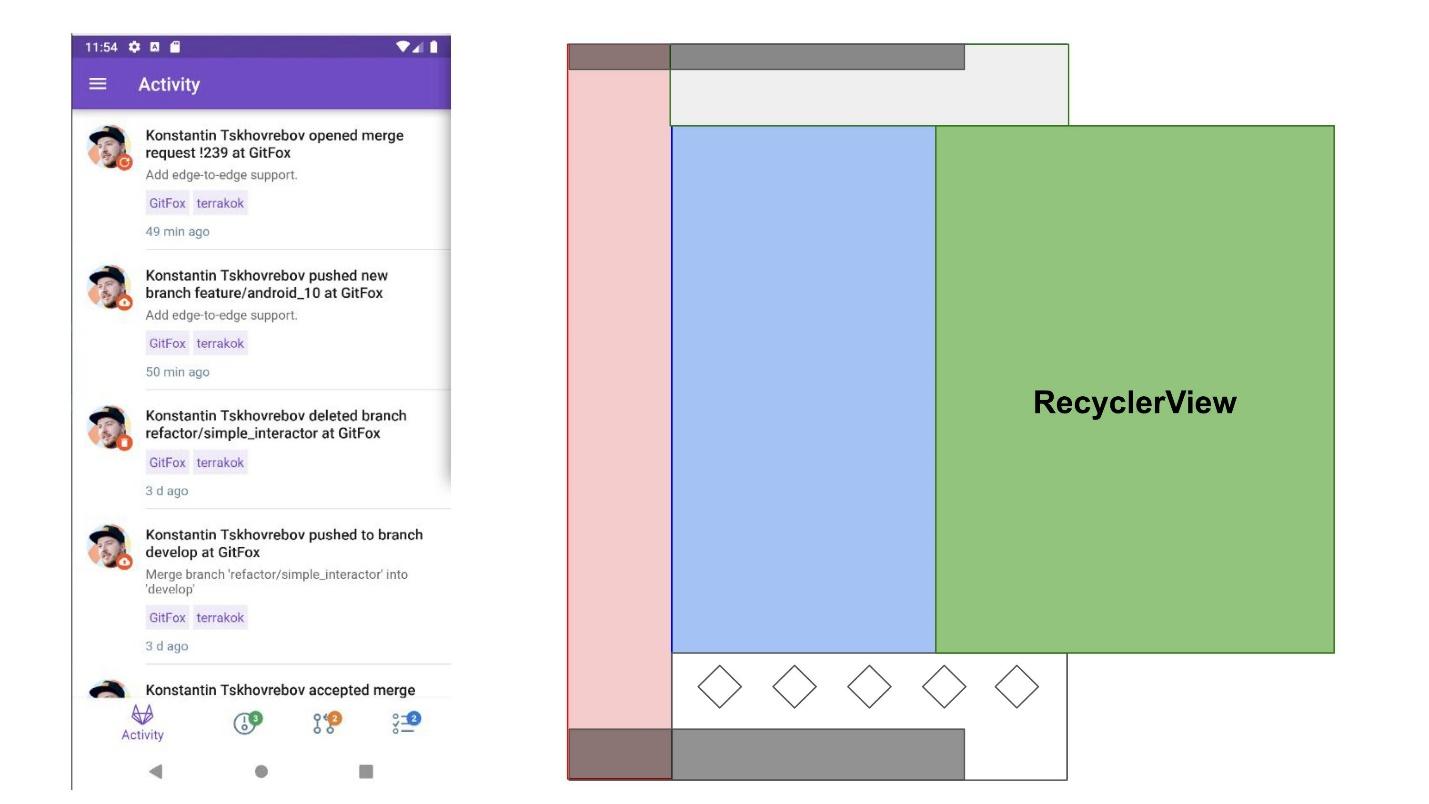 Who handled the insets here? Toolbar: he applied padding on top so that his content moves under the Status Bar. Accordingly, the Bottom Navigation Bar applied insets from below and rose above the Navigation Bar. But RecyclerView does not handle insets in any way, it does not fall under them, it does not need to process insets - everything is done correctly.
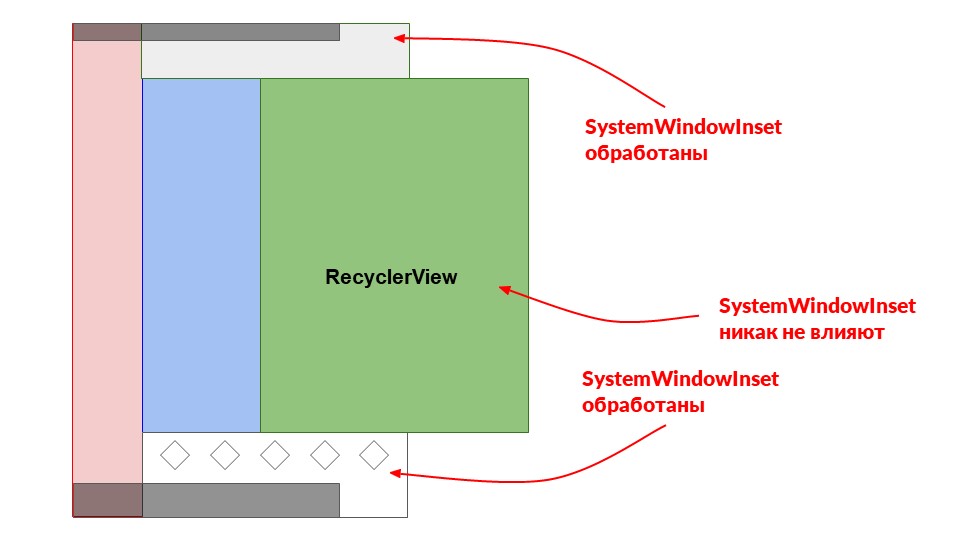 But here it turns out that we want to use the green RecyclerView fragment in another place where the Bottom Navigation Bar is no longer there. At this point, RecyclerView is already starting to handle insets from below. We need to apply padding to it to properly scroll from under the Navigation Bar. Therefore, in RecyclerView, we also add insets processing.
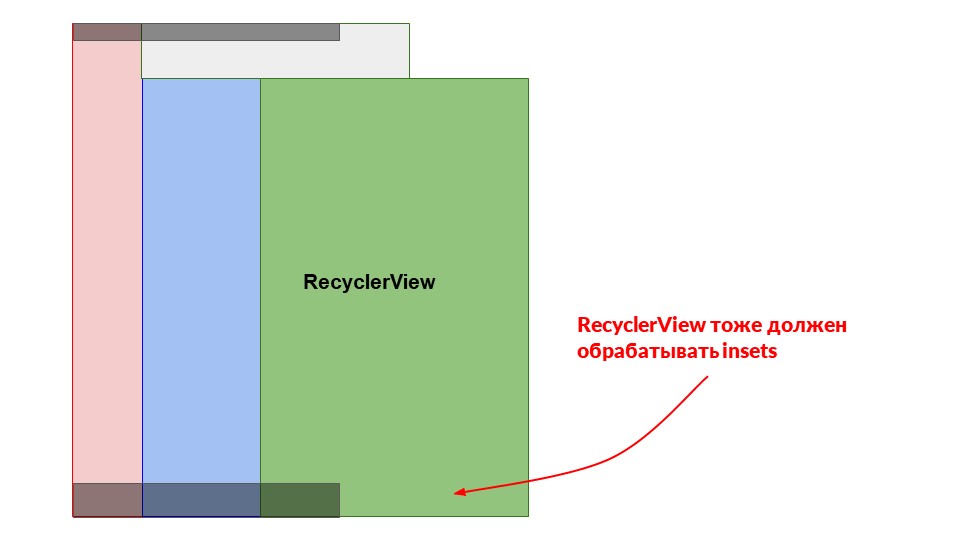 We go back to our screen, where everyone processes insets. Remember, no one reports that he processed them?
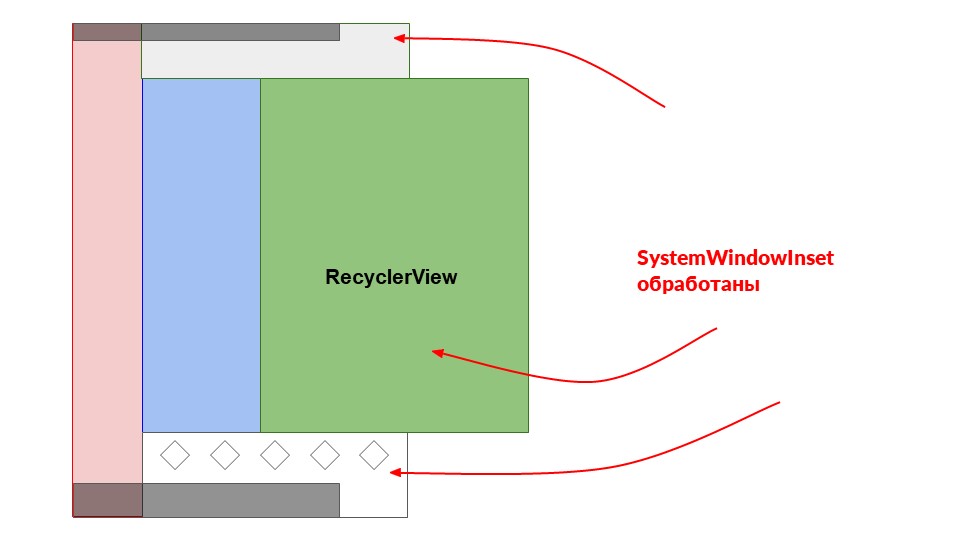 We see this situation: RecyclerView processed insets from below, although it does not reach the Navigation Bar - a space appeared at the bottom. I noticed this in applications, and quite large and popular.
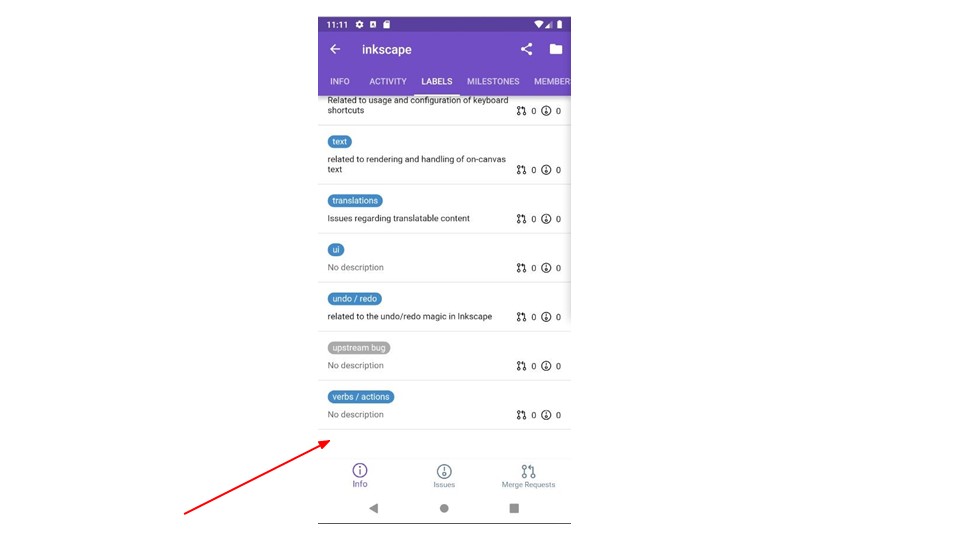 If this is the case, we remember that we return all insets to process. So (it turns out!) It is necessary to report that the insets are processed: Navigation Bar should report that the insets processed. They should not get to RecyclerView.
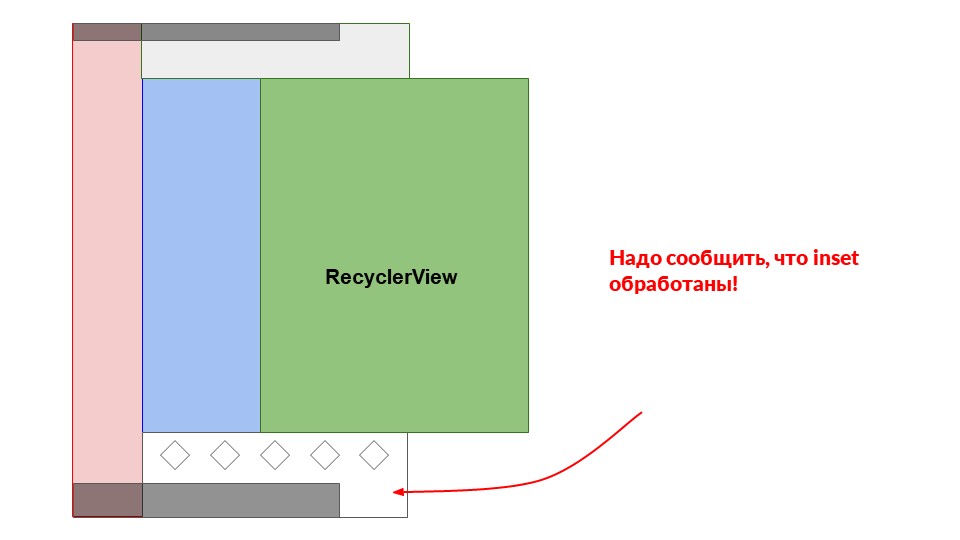 To do this, install the Bottom Navigation Bar
 InsetsListener. Subtract inside bottom + insetsthat they are not processed, return 0.doOnApplyWindowInsets { view, insets, initialPadding ->
view.updatePadding(
bottom = initialPadding.bottom + insets.systemWindowInsetBottom
)
insets.replaceSystemWindowInsets(
Rect(
insets.systemWindowInsetLeft,
insets.systemWindowInsetTop,
insets.systemWindowInsetRight,
0
)
)
}
We return new insets, in which all the old parameters are equal, but bottom + insetsequal to 0. It seems that everything is fine. We start and again nonsense - RecyclerView still handles insets for some reason. I did not immediately understand that the problem is that the container for these three Views is LinearLayout. Inside them is a Toolbar, a snippet with a RecyclerView and at the bottom of the Bottom Navigation Bar. LinearLayout takes its children in order and applies insets to them.It turns out that the Bottom Navigation Bar will be the last. He told someone that he processed all the insets, but it was too late. All insets were processed from top to bottom, RecyclerView has already received them, and this does not save us.
 What to do? LinearLayout does not work the way I want, it transfers them from top to bottom, and I need to get the bottom one first.
Redefine All
The Java developer played in me - everything needs to be redefined ! Well, now dispatchApplyWindowInsetsredefine, set yLinearLayout, which will always go from bottom to top. He will first send insets Bottom Navigation Bar, and then to everyone else.@Override
public WindowInsets dispatchApplyWindowInsets(WindowInsets insets) {
insets = super.dispatchApplyWindowInsets(insets);
if (!insets.isConsumed()) {
final int count = getChildCount();
for (int i = 0; i < count; i++) {
insets = getChildAt(i).dispatchApplyWindowInsets(insets);
if (insets.isConsumed()) {
break;
}
}
}
return insets;
}
But I stopped in time, remembering the comment that there was no need to redefine this method.Here, a little higher is the salvation: ViewGroup checks for a delegate that processes the insets, then calls the super method on View and includes its own processing. In this code, we get insets, and if they have not been processed yet, we begin the standard logic for our children.I wrote a simple extension. It allows, applying InsetsListenerto one View, to say to whom these insets pass.fun View.addSystemBottomPadding(
targetView: View = this
) {
doOnApplyWindowInsets { _, insets, initialPadding ->
targetView.updatePadding(
bottom = initialPadding.bottom + insets.systemWindowInsetBottom
)
insets.replaceSystemWindowInsets(
Rect(
insets.systemWindowInsetLeft,
insets.systemWindowInsetTop,
insets.systemWindowInsetRight,
0
)
)
}
}
Here it targetViewis equal by default to the same View on top of which we apply addSystemBottomPadding. We can redefine it.On my LinearLayout I hung such a handler, passing as targetView- this is my Bottom Navigation Bar.- First he will give insets Bottom Navigation Bar.
- That will process insets, will return zero bottom.
- Further, by default, they will go from top to bottom: Toolbar, fragment with RecyclerView.
- Then, perhaps, he will again send insets Bottom Navigation Bar. But this is no longer important, everything will work so well.
I achieved exactly what I wanted: all insets are processed in the order in which they are needed.
Important
A few important things to keep in mind.The keyboard is the system UI on top of your application. No need to treat her in a special way. If you look at the Google keyboard, it’s not just a Layout with buttons that you can click on. There are hundreds of modes for this keyboard: searching for gifs and memes, voice input, resizing from 10 pixels in height to screen sizes. Do not think about the keyboard, but subscribe to insets.Navigation Drawer still does not support gesture navigation. At Google IO, they promised that everything would work out of the box. But in Android 10, Navigation Drawer still does not support this. If you upgrade to Android 10 and enable navigation with gestures, Navigation Drawer will fall off. Now you need to click on the hamburger menu to make it appear, or a combination of random circumstances allows you to stretch it.In the pre-alpha version of Android, Navigation Drawer works, but I did not dare to update - this is pre-alpha. Therefore, even if you install the latest version of GitFox from the repository, there is a Navigation Drawer there, but it cannot be pulled. As soon as official support comes out, I will update and everything will work fine.Android 10 Preparation Checklist
Set the transparency of the Navigation Bar and Status Bar from the beginning of the project . Google strongly recommends maintaining a transparent Navigation Bar. For us, this is an important practical part. If the project works, but you didn’t turn it on, take the time to support Android 10. Turn on them first in the subject, like translucent, and correct the layout where it broke.Add extensions to Kotlin - it's easier with them.Add to all the Toolbar on top of the padding. Toolbars are always at the top, and that's what you need to do.For all RecyclerViews, add padding from the bottom and the ability to scroll through clipToPadding="false".Think of all the buttons on the edges of the screen (FAB) . FABs will most likely not be where you expect.Do not override or make your own implementations for all LinearLayout and other similar cases. Do the trick, as in GitFox, or take my ready-made extension to help.Check the gestures at the edges of the screen for custom View . Navigation Drawer does not support this. But it’s not so difficult to support it with your hands, to redefine insets for gestures on the screen with Navigation Drawer. Perhaps you have picture editors where gestures work.Scrolling in ViewPager does not work from the edge, but only from the center to the right and left . Google says this is normal. If you pull the ViewPager from the edge, then it is perceived as pressing the "Back" button.In a new project, immediately include all the transparency. You can tell designers that you do not have a Navigation Bar and a Status Bar. The whole square is your application content. And the developers will already figure out where and what to raise.Useful links:- @rmr_spb in a telegram - records of internal mitaps of Redmadrobot SPb.
- All source code in this article and even more in GitFox . There is a separate Android 10 branch, where you can see by commit how I got to all this and how I supported the new Android.
- Chris Bane's Insetter Library . It contains 5-6 extensions that I showed. To use in your project, contact the library, most likely it will move to Android Jetpack. I developed them in my project and, it seems to me, they got better.
- Chris Bane's article .
- FunCorn, , .
- «Why would I want to fitsSystemWindows?» .
AppConf, youtube- . , - . AppsConf , . , , stay tuned!