In anticipation of the start of the course, "C # Developer" prepared a translation of interesting material.
Async / Await - Introduction
The Async / Await language construct has existed since C # version 5.0 (2012) and quickly became one of the pillars of modern .NET programming - any self-respecting C # developer should use it to improve application performance, overall responsiveness, and code readability.Async / Await makes introducing asynchronous code deceptively simple and eliminates the need for the programmer to understand the details of its processing, but how many of us really know how it works and what are the advantages and disadvantages of this method? There is a lot of useful information, but it is fragmented, so I decided to write this article.Well then, let's delve into the topic.State Machine (IAsyncStateMachine)
The first thing to know is that under the hood, every time you have a method or function with Async / Await, the compiler actually turns your method into a generated class that implements the IAsyncStateMachine interface. This class is responsible for maintaining the state of your method during the life cycle of an asynchronous operation - it encapsulates all the variables of your method in the form of fields and breaks your code into sections that are executed during state machine transitions between states, so that the thread can leave the method and when it will return, the state will not change.As an example, here is a very simple class definition with two asynchronous methods:using System.Threading.Tasks;using System.Diagnostics;
namespace AsyncAwait
{
public class AsyncAwait
{
public async Task AsyncAwaitExample()
{
int myVariable = 0;
await DummyAsyncMethod();
Debug.WriteLine("Continuation - After First Await");
myVariable = 1;
await DummyAsyncMethod();
Debug.WriteLine("Continuation - After Second Await");
myVariable = 2;
}
public async Task DummyAsyncMethod()
{
}
}
}
A class with two asynchronous methodsIf we look at the code generated during the assembly, we will see something like this: Note that we have 2 new inner classes generated for us, one for each asynchronous method. These classes contain a state machine for each of our asynchronous methods.Further, having studied the decompiled code for
 <AsyncAwaitExample> d__0, we will notice that our internal variable is «myVariable»now a class field: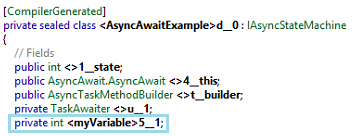 We can also see other class fields used internally to maintain state
 IAsyncStateMachine. The state machine goes through states using the methodMoveNext(), in fact, a large switch. Notice how the method continues in different sections after each of the asynchronous calls (with the previous continuation label).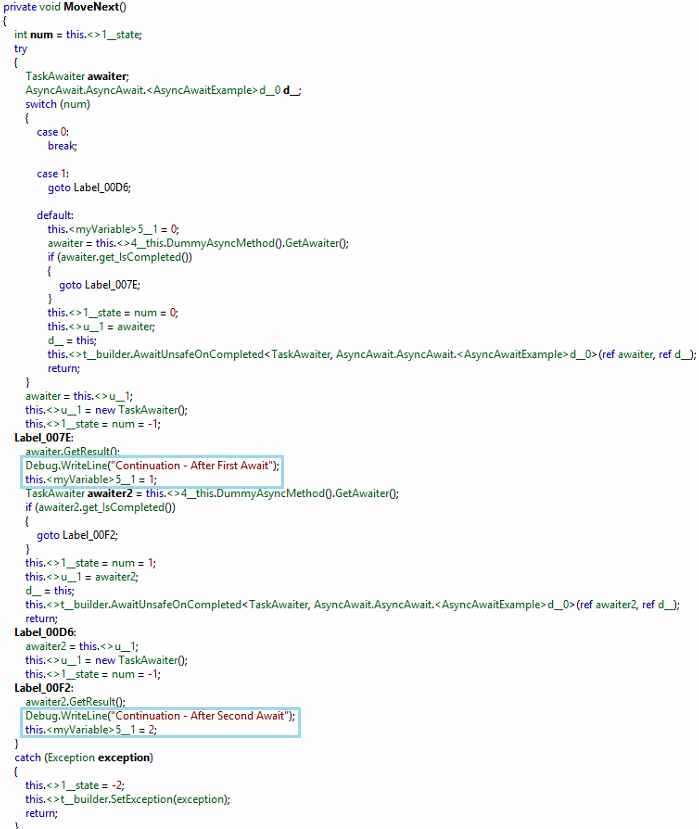 That means async / await elegance comes at a price. Using async / await actually adds some complexity (which you may not be aware of). In server-side logic, this may not be critical, but in particular when programming mobile applications that take into account each CPU and KB memory cycle, you should keep this in mind, since the amount of overhead can quickly increase. Later in this article, we will discuss best practices for using Async / Await only where necessary.For a pretty instructive explanation of the state machine, watch this video on YouTube.
When to Use Async / Await
There are generally two scenarios where Async / Await is the right solution.- I / O related work : Your code will expect something, such as data from a database, reading a file, calling a web service. In this case, you should use Async / Await, not the Task Parallel Library.
- CPU related work : your code will perform complex calculations. In this case, you should use Async / Await, but you need to start work in another thread using Task.Run. You may also consider using Task Parallel Library .
Async all the way
When you start working with asynchronous methods, you will quickly notice that the asynchronous nature of the code begins to spread up and down your hierarchy of calls - this means that you must also make your calling code asynchronous, and so on.You might be tempted to “stop” this by blocking the code using Task.Result or Task.Wait, converting a small part of the application and wrapping it in a synchronous API so that the rest of the application is isolated from changes. Unfortunately, this is a recipe for creating hard to track deadlocks.The best solution to this problem is to allow asynchronous code to grow in the codebase naturally. If you follow this decision, you will see the extension of the asynchronous code to its entry point, usually an event handler or controller action. Surrender to asynchrony without a trace!More information in this MSDN article .If the method is declared as async, make sure there is await!
As we discussed, when the compiler finds an async method, it turns this method into a state machine. If your code does not have await in its body, the compiler will generate a warning, but the state machine will nevertheless be created, adding unnecessary overhead for an operation that will never actually complete.Avoid async void
Async void is something that should really be avoided. Make it a rule to use async Task instead of async void.public async void AsyncVoidMethod()
{
}
public async Task AsyncTaskMethod()
{
}
The async void and async Task methodsThere are several reasons for this, including:- Exceptions thrown in the async void method cannot be caught outside this method :
when an exception is thrown from the async Task or async Task <T >method, this exception is caught and placed in the Task object. When using async void methods, there is no Task object, so any exceptions thrown from the async void method will be called directly in the SynchronizationContext, which was active when the async void method was run.Consider the example below. The capture block will never be reached.public async void AsyncVoidMethodThrowsException()
{
throw new Exception("Hmmm, something went wrong!");
}
public void ThisWillNotCatchTheException()
{
try
{
AsyncVoidMethodThrowsException();
}
catch(Exception ex)
{
Debug.WriteLine(ex.Message);
}
}
Exceptions thrown in the async void method cannot be caught outside this method.Compare with this code, where instead of async void we have async Task. In this case, catch will be reachable.public async Task AsyncTaskMethodThrowsException()
{
throw new Exception("Hmmm, something went wrong!");
}
public async Task ThisWillCatchTheException()
{
try
{
await AsyncTaskMethodThrowsException();
}
catch (Exception ex)
{
Debug.WriteLine(ex.Message);
}
}
The exception is caught and placed in the Task object.- Async void methods can cause unwanted side effects if the caller does not expect them to be asynchronous : if your asynchronous method returns nothing, use async Task (without a “
<T >” for Task) as the return type. - Async void methods are very difficult to test : due to differences in error handling and layout, it is difficult to write unit tests that call async void methods. Asynchronous MSTest test only works for asynchronous methods that return a Task or Task
<T >.
An exception to this practice are asynchronous event handlers. But even in this case, it is recommended to minimize the code written in the handler itself - expect an async Task method that contains logic.More information in this MSDN article .Prefer return Task instead of return await
As already discussed, every time you declare a method as asynchronous, the compiler creates a state machine class that actually wraps the logic of your method. This adds certain overhead that can accumulate, especially for mobile devices, where we have more stringent resource limits.Sometimes a method does not have to be asynchronous, but it returns Task <T >and allows the other side to handle it accordingly. If the last sentence of your code is an await return, you should consider refactoring it so that the return type of the method is Task <T>(instead of async T). Because of this, you avoid generating a state machine, which makes your code more flexible. The only case we really want to wait is when we do something with the async Task result in the continuation of the method.public async Task<string> AsyncTask()
{
return await GetData();
}
public Task<string> JustTask()
{
return GetData();
}
Prefer return Task instead of return awaitNote that if we do not have await and instead return Task <T >, the return occurs immediately, so if the code is inside a try / catch block, the exception will not be caught. Similarly, if the code is inside the using block, it will immediately delete the object. See the next tip.Do not wrap the return Task inside try..catch {} or using {} blocks
Return Task can cause undefined behavior when used inside a try..catch block (an exception thrown by the asynchronous method will never be caught) or inside a using block, because the task will be returned immediately.If you need to wrap your asynchronous code in a try..catch or using block, use return await instead.public Task<string> ReturnTaskExceptionNotCaught()
{
try
{
return GetData();
}
catch (Exception ex)
{
Debug.WriteLine(ex.Message);
throw;
}
}
public Task<string> ReturnTaskUsingProblem()
{
using (var resource = GetResource())
{
return GetData(resource);
}
}
Do not wrap the return task inside blocks try..catch{}orusing{} .More information in this thread on stack overflow.Avoid using .Wait()or .Result- use insteadGetAwaiter().GetResult()
If you need to block waiting for Async Task to complete, use GetAwaiter().GetResult(). Waitand Resultwrap any exceptions in AggregateException, which complicates error handling. The advantage GetAwaiter().GetResult()is that it returns the usual exception instead AggregateException.public void GetAwaiterGetResultExample()
{
string data = GetData().Result;
data = GetData().GetAwaiter().GetResult();
}
If you need to block waiting for Async Task to complete, use the GetAwaiter().GetResult().More information at this link .If the method is asynchronous, add the Async suffix to its name
This is the convention used in .NET to more easily distinguish between synchronous and asynchronous methods (with the exception of event handlers or web controller methods, but they still should not be explicitly called by your code).Asynchronous library methods should use Task.ConfigureAwait (false) to improve performance
The .NET Framework has the concept of a “synchronization context," which is a way to "get back to where you were before." Whenever a Task is waiting, it captures the current synchronization context before waiting.After the Task is completed .Post(), the synchronization context method is called , which resumes work from where it was before. This is useful for returning to the user interface thread or for returning to the same ASP.NET context, etc.When writing library code, you rarely need to go back to the context you were in before. When Task.ConfigureAwait (false) is used, the code no longer tries to resume from where it was before, instead, if possible, the code exits in the thread that completed the task, which avoids context switching. This improves performance slightly and can help avoid deadlocks.public async Task ConfigureAwaitExample()
{
var data = await GetData().ConfigureAwait(false);
}
Typically, use ConfigureAwait (false) for server processes and library code.This is especially important when the library method is called a large number of times, for better responsiveness.Typically, use ConfigureAwait (false) for server processes in general. We don’t care which thread is used to continue, unlike applications in which we need to return to the user interface thread.Now ... In ASP.NET Core, Microsoft has done away with SynchronizationContext, so theoretically you don't need that. But if you write library code that could potentially be reused in other applications (e.g. UI App, Legacy ASP.NET, Xamarin Forms), this remains best practice .For a good explanation of this concept, watch this video .Asynchronous task progress report
A fairly common use case for asynchronous methods is to work in the background, free up the user interface thread for other tasks, and maintain responsiveness. In this scenario, you might want to report the progress back to the user interface so that the user can monitor the progress of the process and interact with the operation.To solve this common problem, .NET provides the IProgress <T interface >, which provides the Report <T method >, which is invoked by an asynchronous task to report the progress to the caller. This interface is accepted as a parameter of the asynchronous method - the caller must provide an object that implements this interface..NET provides Progress <T >, the default implementation of IProgress <T >, which is actually recommended, as it handles all the low-level logic associated with saving and restoring the synchronization context. Progress <T >also provides an Action <T event and callback >— both called when a task reports progress.Together, IProgress <T >and Progress <T >provide an easy way to transfer progress information from a background task to a user interface thread.Please note that <T>it can be a simple value, such as an int, or an object that provides contextual progress information, such as percentage of completion, a string description of the current operation, ETA, and so on.Consider how often you report progress. Depending on the operation you are performing, you may find that your code reports progress several times per second, which may result in the user interface becoming less responsive. In such a scenario, it is recommended that progress be reported at larger intervals.More information in this article on the official Microsoft .NET blog.Cancel Asynchronous Tasks
Another common use case for background tasks is the ability to cancel execution. .NET provides the class CancellationToken. The asynchronous method receives the CancellationToken object, which is then shared by the calling party code and the asynchronous method, thus providing a mechanism for signaling cancellation.In the most common case, cancellation occurs as follows:- The caller creates a CancellationTokenSource object.
- The caller calls the canceled asynchronous API and passes the CancellationToken from the CancellationTokenSource (CancellationTokenSource.Token).
- The caller requests a cancellation using the CancellationTokenSource (CancellationTokenSource.Cancel ()) object.
- The task confirms the cancellation and cancels itself, usually using the CancellationToken.ThrowIfCancellationRequested method.
Note that in order for this mechanism to work, you will need to write code to check for cancellations requested at regular intervals (i.e. at each iteration of your code or at a natural breakpoint in the logic). Ideally, after a cancel request, the asynchronous task should be canceled as quickly as possible.You should consider using undo for all methods that can take a long time to complete.More information in this article on the official Microsoft .NET blog.Progress and Cancellation Report - Example
using System;
using System.Threading.Tasks;
using System.Windows.Forms;
using System.Threading;
namespace TestAsyncAwait
{
public partial class AsyncProgressCancelExampleForm : Form
{
public AsyncProgressCancelExampleForm()
{
InitializeComponent();
}
CancellationTokenSource _cts = new CancellationTokenSource();
private async void btnRunAsync_Click(object sender, EventArgs e)
{
<int> , , , , ETA . .
var progressIndicator = new Progress<int>(ReportProgress);
try
{
await AsyncMethod(progressIndicator, _cts.Token);
}
catch (OperationCanceledException ex)
{
lblProgress.Text = "Cancelled";
}
}
private void btnCancel_Click(object sender, EventArgs e)
{
_cts.Cancel();
}
private void ReportProgress(int value)
{
lblProgress.Text = value.ToString();
}
private async Task AsyncMethod(IProgress<int> progress, CancellationToken ct)
{
for (int i = 0; i < 100; i++)
{
await Task.Delay(1000);
if (ct != null)
{
ct.ThrowIfCancellationRequested();
}
if (progress != null)
{
progress.Report(i);
}
}
}
}
}
Waiting for a period of time
If you need to wait a while (for example, try again to check the availability of the resource), be sure to use Task.Delay - never use Thread.Sleep in this scenario.Waiting for several asynchronous tasks to complete
Use Task.WaitAny to wait for the completion of any task. Use Task.WaitAll to wait for all tasks to complete.Do I have to rush to switch to C # 7 or 8? Sign up for a free webinar to discuss this topic.