Translation of the Recursive Neural Network Guide from Tensorflow.org. The material discusses both the built-in capabilities of Keras / Tensorflow 2.0 for quick meshing, as well as the possibility of customizing layers and cells. Cases and limitations of the use of the CuDNN core are also considered, which allows to accelerate the process of learning the neural network.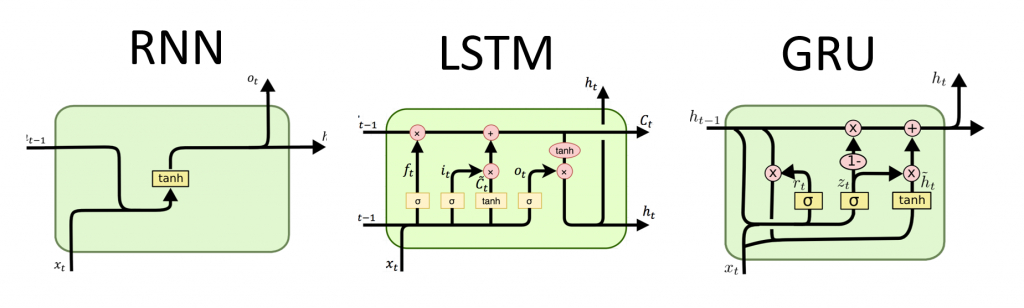 Recursive neural networks (RNNs) are a class of neural networks that are good for modeling serial data, such as time series or natural language.If schematically, the RNN layer uses a loop
 forto iterate over a time-ordered sequence, while storing in an internal state, encoded information about the steps that he has already seen.Keras RNN API is designed with a focus on:Ease of use : built-in layers tf.keras.layers.RNN, tf.keras.layers.LSTM, tf.keras.layers.GRUallow you to quickly build a recursive model without having to make complex configuration settings.Easy customization : You can also define your own layer of RNN cells (inner part of the loopfor) with custom behavior and use it with a common layer of `tf.keras.layers.RNN` (the` for` loop itself). This will allow you to quickly prototype various research ideas in a flexible manner, with a minimum of code.Installation
from __future__ import absolute_import, division, print_function, unicode_literals

import collections
import matplotlib.pyplot as plt
import numpy as np

import tensorflow as tf

from tensorflow.keras import layers
Building a simple model
Keras has three built-in RNN layers:tf.keras.layers.SimpleRNN, a fully-connected RNN in which the output of the previous time step should be passed to the next step.tf.keras.layers.GRU, first proposed in the article Studying phrases using RNN codec for statistical machine translationtf.keras.layers.LSTM, first proposed in the article Long-term Short-Term Memory
In early 2015, Keras introduced the first reusable open source Python and LSTM and GRU implementations.The following is an example of a Sequentialmodel that processes sequences of integers by nesting each integer in a 64-dimensional vector, then processing sequences of vectors using a layer LSTM.model = tf.keras.Sequential()
model.add(layers.Embedding(input_dim=1000, output_dim=64))
model.add(layers.LSTM(128))
model.add(layers.Dense(10))
model.summary()
Outputs and Statuses
By default, the output of the RNN layer contains one vector per element. This vector is the output of the last RNN cell containing information about the entire input sequence. The dimension of this output (batch_size, units), where unitscorresponds to the argument unitspassed to the layer constructor.The RNN layer can also return the entire output sequence for each element (one vector for each step), if you specify return_sequences=True. The dimension of this output is (batch_size, timesteps, units).model = tf.keras.Sequential()
model.add(layers.Embedding(input_dim=1000, output_dim=64))
model.add(layers.GRU(256, return_sequences=True))
model.add(layers.SimpleRNN(128))
model.add(layers.Dense(10))
model.summary()
In addition, the RNN layer can return its final internal state (s).The returned states can be used later to resume execution of the RNN or to initialize another RNN . This setting is usually used in the encoder-decoder model, sequence to sequence, where the final state of the encoder is used for the initial state of the decoder.In order for the RNN layer to return its internal state, set the parameter return_stateto value Truewhen creating the layer. Note that there are LSTM2 state tensors, and GRUonly one.To adjust the initial state of a layer, simply call the layer with an additional argument initial_state.Note that the dimension must match the dimension of the layer element, as in the following example.encoder_vocab = 1000
decoder_vocab = 2000
encoder_input = layers.Input(shape=(None, ))
encoder_embedded = layers.Embedding(input_dim=encoder_vocab, output_dim=64)(encoder_input)
output, state_h, state_c = layers.LSTM(
64, return_state=True, name='encoder')(encoder_embedded)
encoder_state = [state_h, state_c]
decoder_input = layers.Input(shape=(None, ))
decoder_embedded = layers.Embedding(input_dim=decoder_vocab, output_dim=64)(decoder_input)
decoder_output = layers.LSTM(
64, name='decoder')(decoder_embedded, initial_state=encoder_state)
output = layers.Dense(10)(decoder_output)
model = tf.keras.Model([encoder_input, decoder_input], output)
model.summary()
RNN layers and RNN cells
The RNN API, in addition to the built-in RNN layers, also provides cell-level APIs. Unlike RNN layers, which process entire packets of input sequences, an RNN cell processes only one time step.The cell is inside the cycle of the forRNN layer. Wrapping a cell with a layer tf.keras.layers.RNNgives you a layer capable of processing sequence packets, e.g. RNN(LSTMCell(10)).Mathematically, RNN(LSTMCell(10))it gives the same result as LSTM(10). In fact, the implementation of this layer inside TF v1.x was only to create the corresponding RNN cell and wrap it in the RNN layer. However, the use of embedded layers GRUand LSTMallows the use of CuDNN that can give you better performance.There are three built-in RNN cells, each of which corresponds to its own RNN layer.tf.keras.layers.SimpleRNNCellmatches the layer SimpleRNN.tf.keras.layers.GRUCellmatches the layer GRU.tf.keras.layers.LSTMCellmatches the layer LSTM.
Abstraction of a cell together with a common class tf.keras.layers.RNNmakes it very easy to implement custom RNN architectures for your research.Cross-batch save state
When processing long sequences (possibly endless), you might want to use the cross-batch statefulness pattern .Usually, the internal state of the RNN layer is reset with each new data packet (i.e. each example that sees the layer is assumed to be independent of the past). The layer will maintain state only for the duration of processing this element.However, if you have very long sequences, it is useful to break them down into shorter ones and transfer them to the RNN layer in turn without resetting the layer state. Thus, a layer can store information about the entire sequence, although it will only see one subsequence at a time.You can do this by setting `stateful = True` in the constructor.If you have the sequence `s = [t0, t1, ... t1546, t1547]`, you can split it for example into:s1 = [t0, t1, ... t100]
s2 = [t101, ... t201]
...
s16 = [t1501, ... t1547]
Then you can process it with:lstm_layer = layers.LSTM(64, stateful=True)
for s in sub_sequences:
output = lstm_layer(s)
When you want to clean the condition, use layer.reset_states().Note: In this case, it is assumed that the example iin this package is a continuation of the example of the iprevious package. This means that all packages contain the same number of elements (package size). For example, if the package contains [sequence_A_from_t0_to_t100, sequence_B_from_t0_to_t100], the next package should contain [sequence_A_from_t101_to_t200, sequence_B_from_t101_to_t200].
Here is a complete example:paragraph1 = np.random.random((20, 10, 50)).astype(np.float32)
paragraph2 = np.random.random((20, 10, 50)).astype(np.float32)
paragraph3 = np.random.random((20, 10, 50)).astype(np.float32)
lstm_layer = layers.LSTM(64, stateful=True)
output = lstm_layer(paragraph1)
output = lstm_layer(paragraph2)
output = lstm_layer(paragraph3)
lstm_layer.reset_states()
Bidirectional RNN
For sequences other than time series (e.g. texts), it often happens that the RNN model works better if it processes the sequence not only from beginning to end, but also vice versa. For example, to predict the next word in a sentence, it is often useful to know the context around the word, and not just the words in front of it.Keras provides a simple API for creating such bidirectional RNNs: a wrapper tf.keras.layers.Bidirectional.model = tf.keras.Sequential()
model.add(layers.Bidirectional(layers.LSTM(64, return_sequences=True),
input_shape=(5, 10)))
model.add(layers.Bidirectional(layers.LSTM(32)))
model.add(layers.Dense(10))
model.summary()
Under the hood, the Bidirectionaltransferred RNN layer go_backwardswill be copied and the field of the newly copied layer will be turned over , and thus the input data will be processed in the reverse order.The output of ` BidirectionalRNN by default will be the sum of the output of the forward layer and the output of the reverse layer. If you need other merge behavior, e.g. concatenation, change the `merge_mode` parameter in the` Bidirectional` wrapper constructor.Performance Optimization and CuDNN Core in TensorFlow 2.0
In TensorFlow 2.0, the built-in LSTM and GRU layers are usable by default CuDNN cores if a graphics processor is available. With this change, the previous layers keras.layers.CuDNNLSTM/CuDNNGRUare outdated, and you can build your model without worrying about the equipment on which it will work.Since the CuDNN kernel is built with some assumptions, this means that the layer will not be able to use the CuDNN kernel layer if you change the default settings of the built-in LSTM or GRU layers . E.g.- Changing a function
activationfrom tanhto something else. - Changing a function
recurrent_activationfrom sigmoidto something else. - Usage
recurrent_dropout> 0. - Setting it
unrollto True, which causes LSTM / GRU to decompose the internal tf.while_loopinto a deployed loop for. - Set
use_biasto False. - Using masks when the input data is not right justified (if the mask matches the right strictly right data, CuDNN can still be used. This is the most common case).
When possible use CuDNN kernels
batch_size = 64
input_dim = 28
units = 64
output_size = 10
def build_model(allow_cudnn_kernel=True):
if allow_cudnn_kernel:
lstm_layer = tf.keras.layers.LSTM(units, input_shape=(None, input_dim))
else:
lstm_layer = tf.keras.layers.RNN(
tf.keras.layers.LSTMCell(units),
input_shape=(None, input_dim))
model = tf.keras.models.Sequential([
lstm_layer,
tf.keras.layers.BatchNormalization(),
tf.keras.layers.Dense(output_size)]
)
return model
Loading the MNIST dataset
mnist = tf.keras.datasets.mnist

(x_train, y_train), (x_test, y_test) = mnist.load_data()
x_train, x_test = x_train / 255.0, x_test / 255.0
sample, sample_label = x_train[0], y_train[0]
Create an instance of the model and compile it
We have chosen sparse_categorical_crossentropyas a function of losses. The output of the model has a dimension [batch_size, 10]. The answer of the model is an integer vector, each of the numbers is in the range from 0 to 9.model = build_model(allow_cudnn_kernel=True)
model.compile(loss=tf.keras.losses.SparseCategoricalCrossentropy(from_logits=True),
optimizer='sgd',
metrics=['accuracy'])
model.fit(x_train, y_train,
          validation_data=(x_test, y_test),
          batch_size=batch_size,
          epochs=5)
Build a new model without CuDNN core
slow_model = build_model(allow_cudnn_kernel=False)
slow_model.set_weights(model.get_weights())
slow_model.compile(loss=tf.keras.losses.SparseCategoricalCrossentropy(from_logits=True),
optimizer='sgd',
metrics=['accuracy'])
slow_model.fit(x_train, y_train,
validation_data=(x_test, y_test),
batch_size=batch_size,
epochs=1)
As you can see, the model built with CuDNN is much faster for training than the model using the usual TensorFlow core.The same model with CuDNN support can be used for output in a single-processor environment. Annotation tf.devicesimply indicates the device used. The model will run by default on the CPU if the GPU is not available.You just do not need to worry about the hardware you are working on. Isn't that cool?with tf.device('CPU:0'):
cpu_model = build_model(allow_cudnn_kernel=True)
cpu_model.set_weights(model.get_weights())
result = tf.argmax(cpu_model.predict_on_batch(tf.expand_dims(sample, 0)), axis=1)
print('Predicted result is: %s, target result is: %s' % (result.numpy(), sample_label))
plt.imshow(sample, cmap=plt.get_cmap('gray'))
RNN with list / dictionary input, or nested input
Nested structures allow you to include more information in one time step. For example, a video frame may contain audio and video input simultaneously. The dimension of the data in this case may be:[batch, timestep, {\"video\": [height, width, channel], \"audio\": [frequency]}]
In another example, handwritten data can have both x and y coordinates for the current pen position, as well as pressure information. So the data can be represented as follows:[batch, timestep, {\"location\": [x, y], \"pressure\": [force]}]
The following code builds an example of a custom RNN cell that works with such structured input.Define a user cell supporting nested input / output
NestedInput = collections.namedtuple('NestedInput', ['feature1', 'feature2'])
NestedState = collections.namedtuple('NestedState', ['state1', 'state2'])
class NestedCell(tf.keras.layers.Layer):
def __init__(self, unit_1, unit_2, unit_3, **kwargs):
self.unit_1 = unit_1
self.unit_2 = unit_2
self.unit_3 = unit_3
self.state_size = NestedState(state1=unit_1,
state2=tf.TensorShape([unit_2, unit_3]))
self.output_size = (unit_1, tf.TensorShape([unit_2, unit_3]))
super(NestedCell, self).__init__(**kwargs)
def build(self, input_shapes):
input_1 = input_shapes.feature1[1]
input_2, input_3 = input_shapes.feature2[1:]
self.kernel_1 = self.add_weight(
shape=(input_1, self.unit_1), initializer='uniform', name='kernel_1')
self.kernel_2_3 = self.add_weight(
shape=(input_2, input_3, self.unit_2, self.unit_3),
initializer='uniform',
name='kernel_2_3')
def call(self, inputs, states):
input_1, input_2 = tf.nest.flatten(inputs)
s1, s2 = states
output_1 = tf.matmul(input_1, self.kernel_1)
output_2_3 = tf.einsum('bij,ijkl->bkl', input_2, self.kernel_2_3)
state_1 = s1 + output_1
state_2_3 = s2 + output_2_3
output = [output_1, output_2_3]
new_states = NestedState(state1=state_1, state2=state_2_3)
return output, new_states
Build an RNN Model with Nested Input / Output
Let's build a Keras model that uses a layer tf.keras.layers.RNNand a custom cell that we just defined.unit_1 = 10
unit_2 = 20
unit_3 = 30
input_1 = 32
input_2 = 64
input_3 = 32
batch_size = 64
num_batch = 100
timestep = 50
cell = NestedCell(unit_1, unit_2, unit_3)
rnn = tf.keras.layers.RNN(cell)
inp_1 = tf.keras.Input((None, input_1))
inp_2 = tf.keras.Input((None, input_2, input_3))
outputs = rnn(NestedInput(feature1=inp_1, feature2=inp_2))
model = tf.keras.models.Model([inp_1, inp_2], outputs)
model.compile(optimizer='adam', loss='mse', metrics=['accuracy'])unit_1 = 10
unit_2 = 20
unit_3 = 30
input_1 = 32
input_2 = 64
input_3 = 32
batch_size = 64
num_batch = 100
timestep = 50
cell = NestedCell(unit_1, unit_2, unit_3)
rnn = tf.keras.layers.RNN(cell)
inp_1 = tf.keras.Input((None, input_1))
inp_2 = tf.keras.Input((None, input_2, input_3))
outputs = rnn(NestedInput(feature1=inp_1, feature2=inp_2))
model = tf.keras.models.Model([inp_1, inp_2], outputs)
model.compile(optimizer='adam', loss='mse', metrics=['accuracy'])
Train the model on randomly generated data
Since we don’t have a good dataset for this model, we use random data generated by the Numpy library for demonstration.input_1_data = np.random.random((batch_size * num_batch, timestep, input_1))
input_2_data = np.random.random((batch_size * num_batch, timestep, input_2, input_3))
target_1_data = np.random.random((batch_size * num_batch, unit_1))
target_2_data = np.random.random((batch_size * num_batch, unit_2, unit_3))
input_data = [input_1_data, input_2_data]
target_data = [target_1_data, target_2_data]
model.fit(input_data, target_data, batch_size=batch_size)
With a layer, tf.keras.layers.RNNyou only need to determine the mathematical logic of a single step within the sequence, and the layer tf.keras.layers.RNNwill handle the iteration of the sequence for you. This is an incredibly powerful way to quickly prototype new types of RNNs (e.g. the LSTM variant).After verification, the translation will also appear on Tensorflow.org. If you want to participate in translating the documentation of the Tensorflow.org website into Russian, please contact in a personal or comments. Any corrections and comments are appreciated.