How parking sensors work and how to trick him
 One fine day ... Why am I lying? The day when my Russian-Chinese parking sensors installed by the previous owner died was not so beautiful. Something needs to be done, but what? Buy another finished product on any online platform? Not interested. On the network, and on the hub, there is a sufficient amount of materials on the reverse of the protocol for communicating the block with the indicator or on creating your own parking sensors on Arduino . And you can go one of these ways. But this is not what the soul desired. And she wanted something more full-time, close in execution to automotive electronics.It is no secret to anyone that the performance and circuitry of automotive electronics is somewhat different from household electronics, as is its electronic components. I wanted something like this, "real." On this day, the idea arose to introduce a conditionally native parking sensors. At least parking sensors, which were put on cars at the factory or at least on the way from the factory to the end user. And since I have a Toyota now, and a middle-aged Toyota is usually Denso electronics, it was decided to collect parking sensors on what official and not-so-dealers set up to create "new" Toyota cars. Once it was a factory set of additional equipment, the installation and operation of which is fairly well documented by the manufacturer.The choice fell on the Denso 188100-2410 block, as the most common. I already knew that the block requires six sensors (4 angular and 2 rear), but I was not going to put 2 angular front ones and realized that the block would violently resist the absence of the front pair (the corresponding errors were described in the documentation). But what seemed easier? How can he detect the lack of sensors? Yes, except for the load resistance, I thought, it’s okay - throw him the resistors for emulation. And the search for the kit began.Some time passed and the set of the unit, wiring and sensors was evenly laid out on the floor of the workshop, all the connections were made, here it is - a joyful moment of the first inclusion. And, quite expectedly, he swears at the lack of sensors. Instead of missing sensors, I throw in resistors with the thought, "Well, what can he do there, except to measure the current consumption." But different reasonable values of resistors do not affect the unit, and it continues to vote on the absence of sensors. Nezhdanchik. Quick googling did not give an answer to my questions, which was the reason for writing this article.
How parking sensors work
I think the general idea is completely obvious to anyone with a technical background. The unit generates a packet of pulses whose frequency is in the ultrasonic range. Well, in order not to shock with the sounds of people around, and developers, as a rule, do not think about bats, dolphins and other more advanced organisms. Since there are several sensors and the distance for each of them is estimated separately so as not to catch the reflections of the signals emitted by the neighboring sensors, the pulse packets for them are spaced in time. Only two front corner signals are shown.
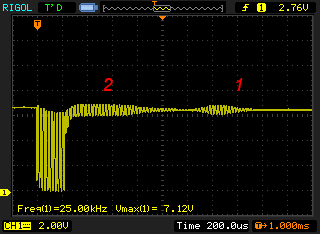
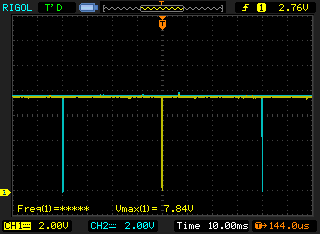 After sending the pack, the unit waits for reflection and, guided by the propagation time, estimates the distance to the obstacle.The oscillogram shows a reflected burst of pulses 1 after approximately 1.3 ms, which at a speed of sound propagation of 330 m / s gives approximately 430 mm, that is, with acceptable accuracy it corresponds to twice the distance to the object under experimental conditions (about 20 cm per eye). But what else is visible on this waveform? If a sensor is connected, then immediately after the burst of pulses generated by the unit, there is an echo 2. And if the sensor is not connected, then the first waveform in the text shows that this local echo is absent. As it turned out, it’s from this echo that the unit determines the presence and conditional health of the sensor.
How to trick him
Well now everything is clear and obvious, let's start. We need to form an echo of approximately known amplitude and approximately known duration. This should be done as simple as possible, cheaper, so that immediately through two channels, and so that there is no need for additional power (so that the connection completely repeats the native sensors).Here came to mind such a scheme (image clickable) on a couple of channels on one of the cheapest microcontrollers. In the diagram, it seems to me, everything is quite obvious and understandable, if someone has questions or suggestions, you are welcome to comment.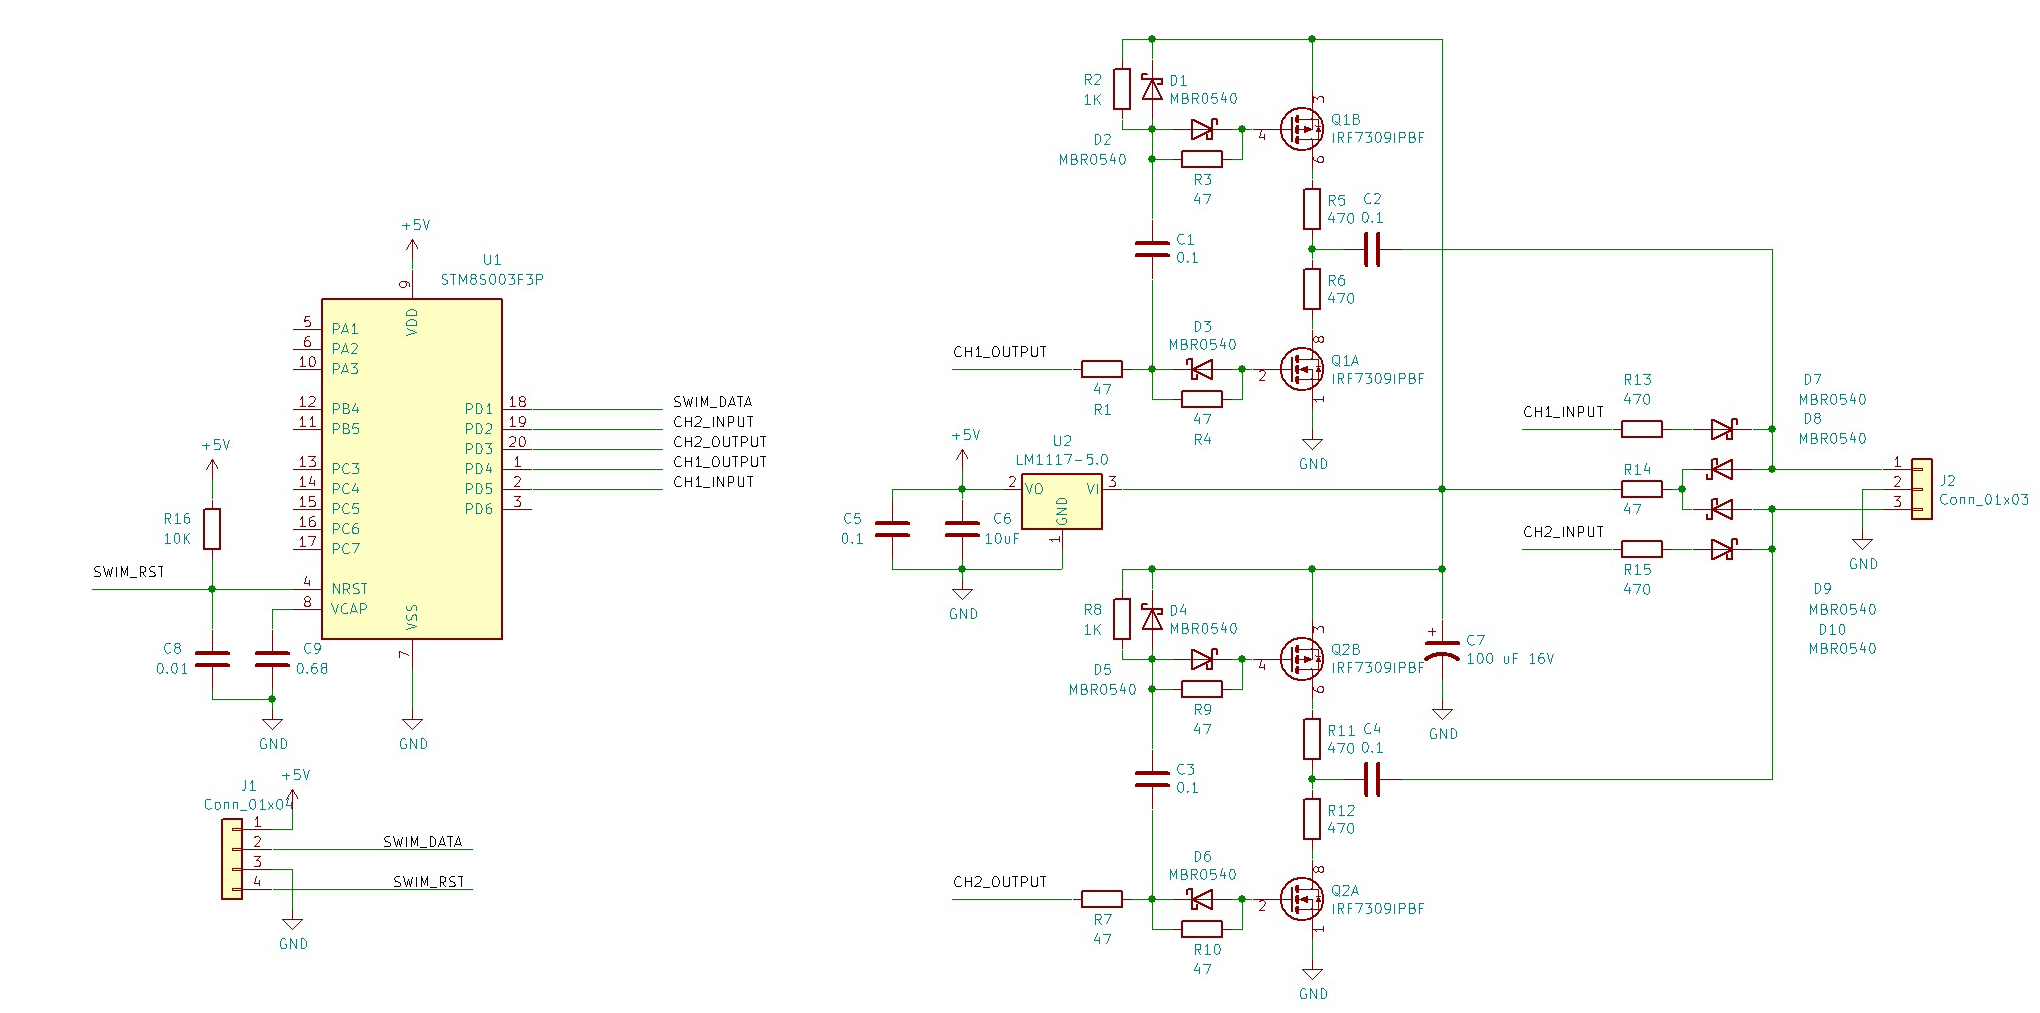 Because it’s not comme il faut to put something on breadboards and wires into a car, and our Chinese friends (God grant them health and strength in the fight against the virus) make boards so easily, quickly, conveniently and inexpensively, it was designed and ordered, on one of the famous sites, the board.
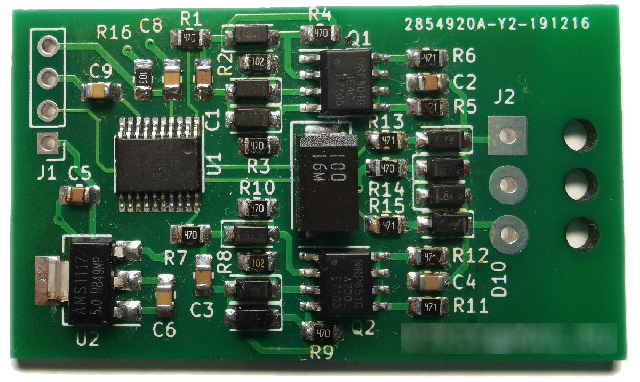 It was quickly assembled from improvised materials and in the evening a simple firmware was written that implements echo generation through two channels. At this point, an attentive reader will ask: “But what about the requirements for components and the performance of automotive electronics?”Yes, they are not respected, I made the most out of what was possible at home. Or not the maximum? Your opinion? What could be done better?Here is the result of the work of this "simulator":
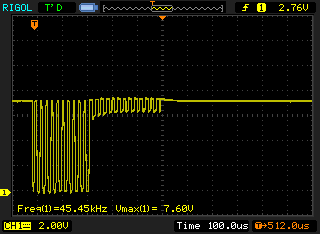 PS The unit calmed down and no longer requires the missing sensors to be connected, and the whole set is waiting for the warm days for installation.
Source: https://habr.com/ru/post/undefined/
All Articles