Radioactive products. Gamma spectrometer. Part 1
Hamsters welcome you friends.Today's post will be devoted to scintillation gamma spectrometry and the study of the invisible world in the language of gamma quanta. Many things that surround us in everyday life may contain radioactive isotopes; they can be of either natural or man-made origin. When decaying, they emit alpha, beta or gamma radiation. We are interested in the last comrade from the list of suspects. Today we will catch him, transform, and calculate the insidious isotope based on energy traces. In the course we will consider how to assemble a gamma spectrometer and how to set it up. We learn how to choose the right sodium iodide crystal and many other subtleties in this spectrometric craft. Imagine the situation: you are walking along the food market, and here the dosimeter is triggered in your pocket and notifies you when the background radiation is exceeded. Question: how do you know which radioactive isotope infected Baba Rai's tomatoes? It's simple, for this it is necessary to place the object in a special lead house and examine it using a gamma spectrometer. After a few hours, from the characteristic energy peaks, we find out that the tomatoes are infected with the radioactive isotope of cesium-137 , and its daughter decay product of barium-137 . Baba Rai probably has a nuclear reactor at home! The quick start guide is pretty comprehensive, so let's see how it all starts and how it all works.
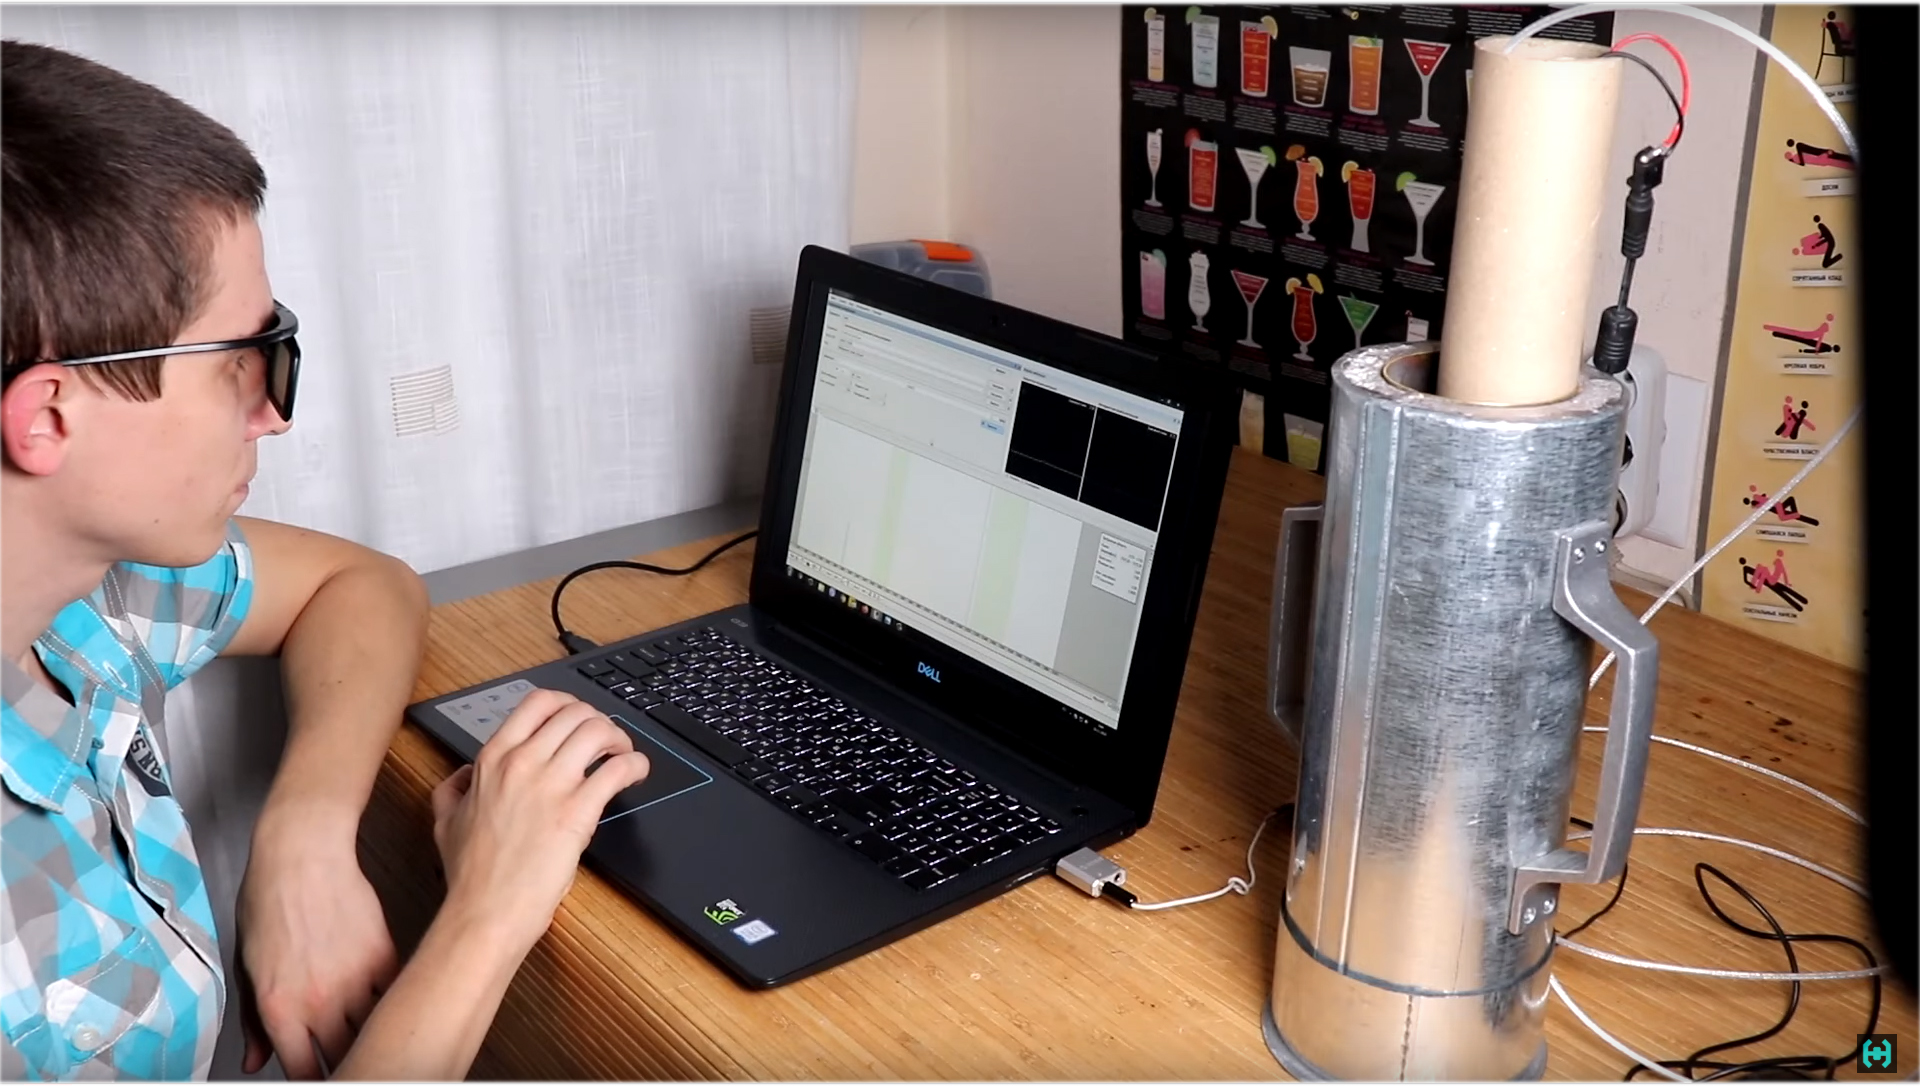 Background. In the distant 2017th year, on the RadioKOT website I came across an interesting article about gamma spectrometry. Its author is Maxim. As it turns out later, this is the creator of the Atom series devices. The article is quite simple, it says in detail what is needed to build this device, the diagrams are drawn. There are explanations of some of the nuances of tuning, and working with a homemade gamma spectrometer. As I thought with two fingers, and after a week on my desk lay all the necessary components for working on the project.The most exotic element of the whole structure is the sodium iodide crystal. The search for this artifact mainly led to
 Eugene Nagurny, a seller who sells such gizmos in almost all forums. We phoned him, I told him that I was going to make a gamma spectrometer. For his part, he advised finding an FEU-85A photomultiplier, technical petroleum jelly as an optical lubricant for this project, and recommended buying a 30 * 70 mm sodium scintillation crystal from him. It is more than in the article, which means the device should come out more sensitive. Such a handsome man came to me. The only thing that caused doubt was a strange yellowish tint. I wrote to the seller about the color, to which he replied if the crystal is clean, transparent, and is visible to the bottom, then it is of excellent quality. "It's good!"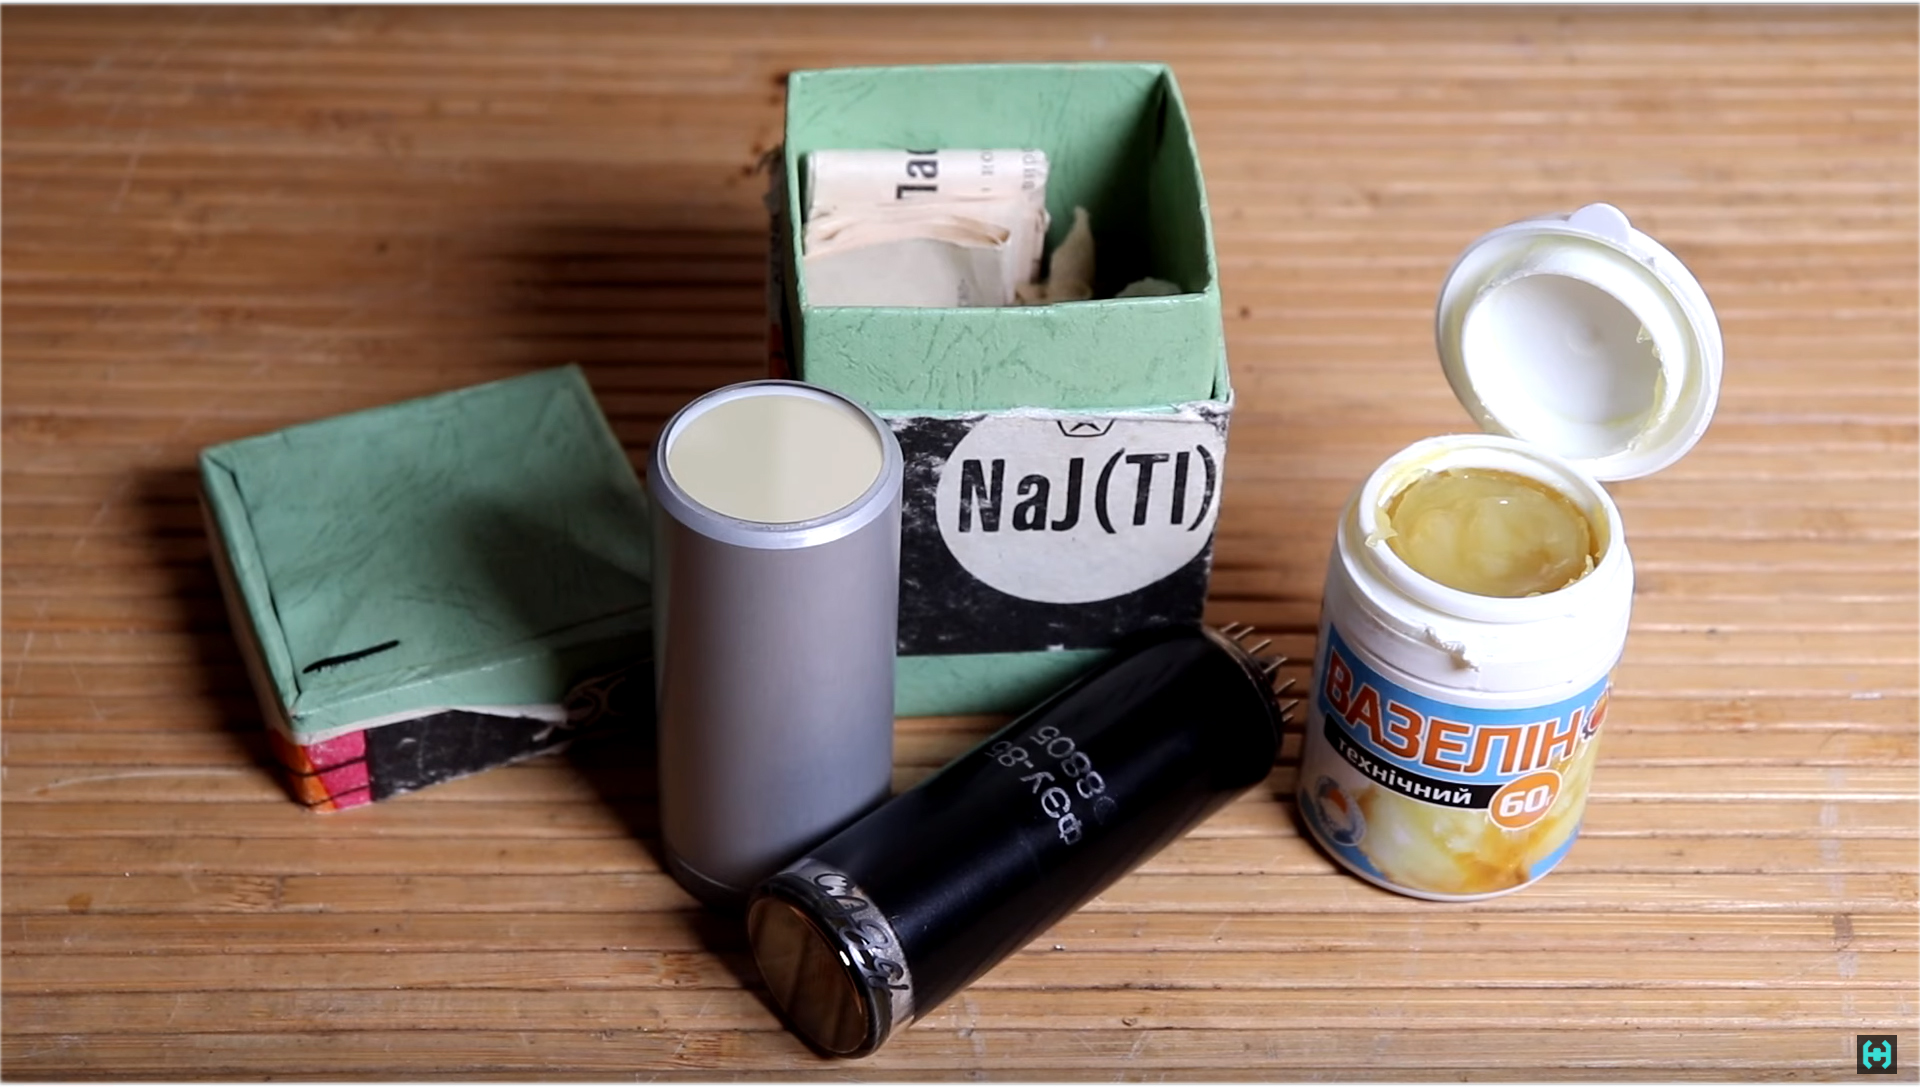 All components are on hand, the work is muddied, the wheels are spinning. Since only the scheme is given in the original article, you need to breed the board yourself. A couple of evenings, and the first sketches began to appear on paper. Here and seats for their radio elements, and the dimensions are such that the entire device fits in a cardboard tube for ease of use. Using the photoresist method, we transfer the tracks onto foil fiberglass. We corrode the board, and solder microcircuits, resistors, capacitors and other components on it, the placement of which is provided in advance. An audio amplifier has been added to detect clicks of gamma rays entering the scintillator crystal. A dc-dc converter is also added, which allows you to power the entire device from a conventional 5-volt power bank.Archive with gerber files and other utilities
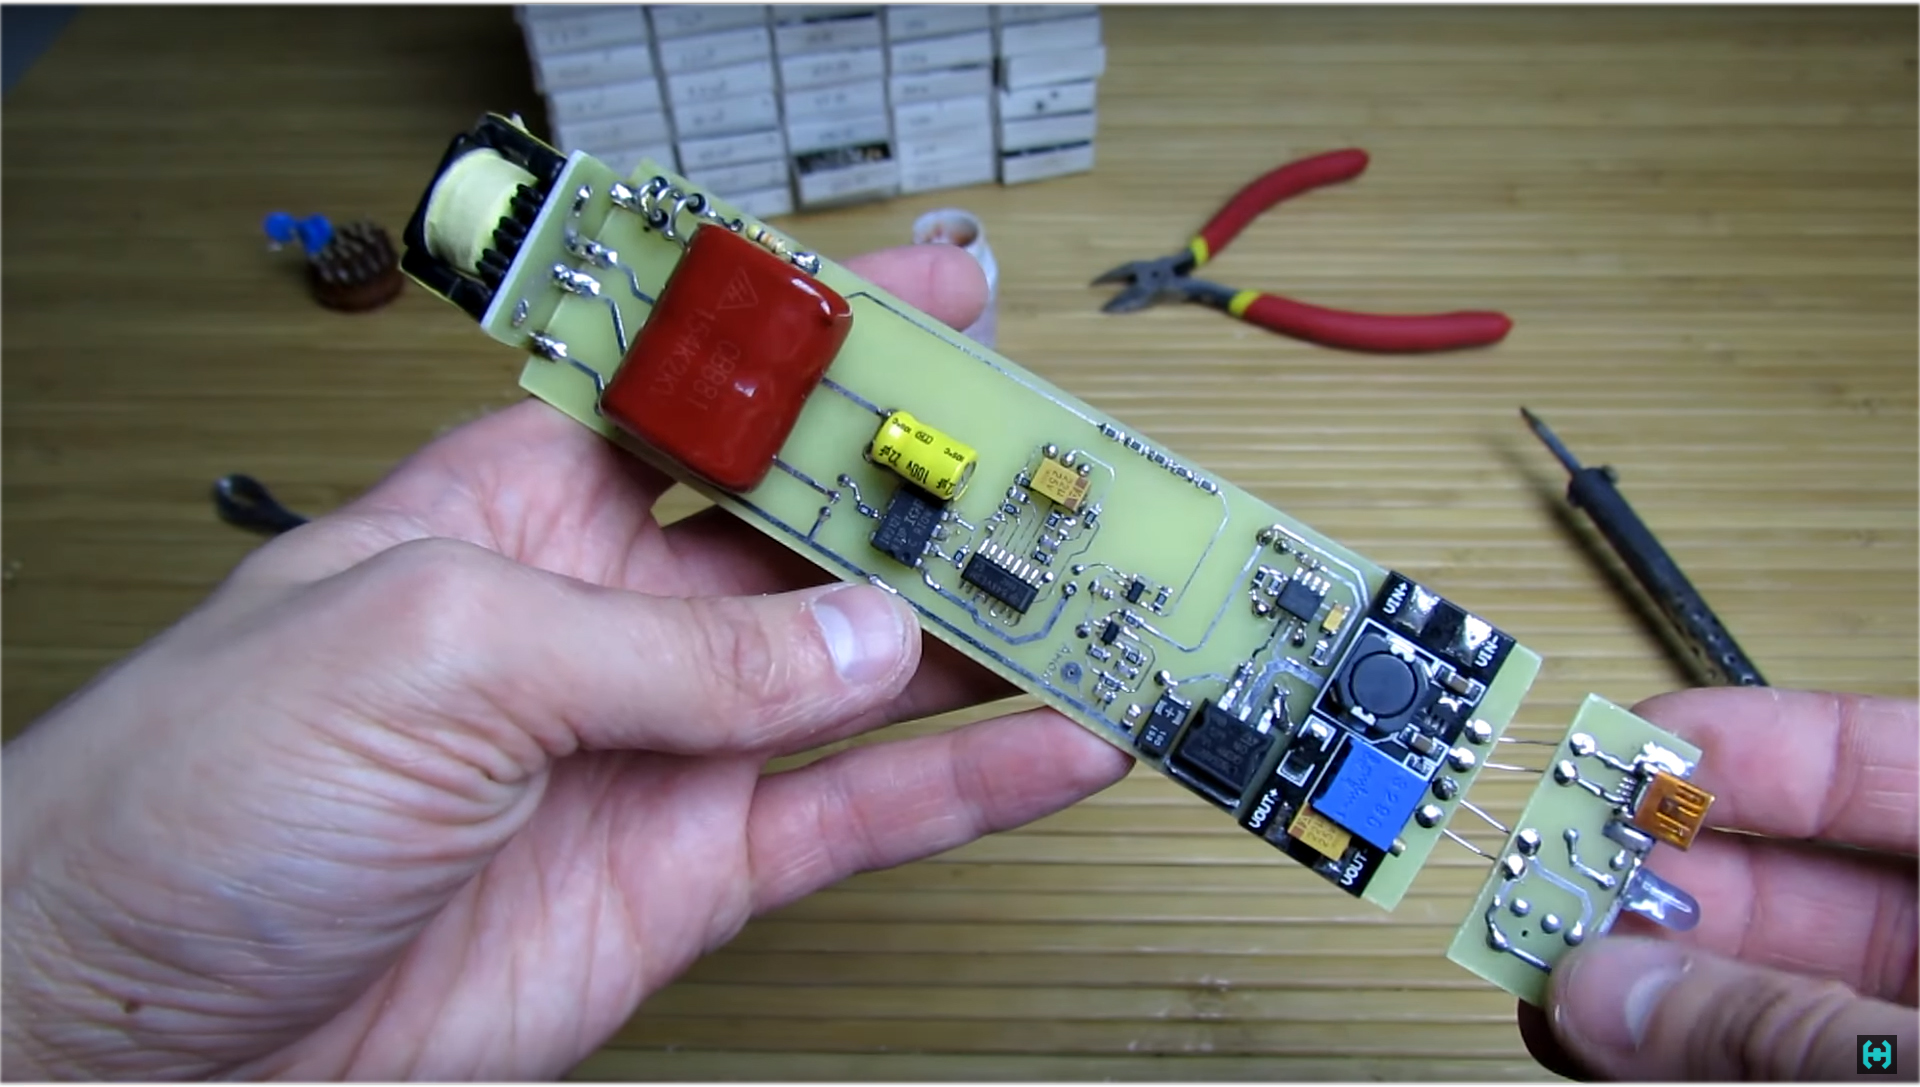 The circuit is assembled and configured. On the oscilloscope screen, pulses of different amplitudes are clearly visible, which in turn indicate the performance of the gamma spectrometer. Everything would be fine, but when you connect the device to a computer, the program that analyzes the signal received at the input of the sound card shows some strange bumps that have nothing to do with the spectra of previously known control sources. The next few months of trying to figure out the cause of the problem did not lead to anything good. At this stage, I scored a big thick bolt, and went on to work on other projects ...
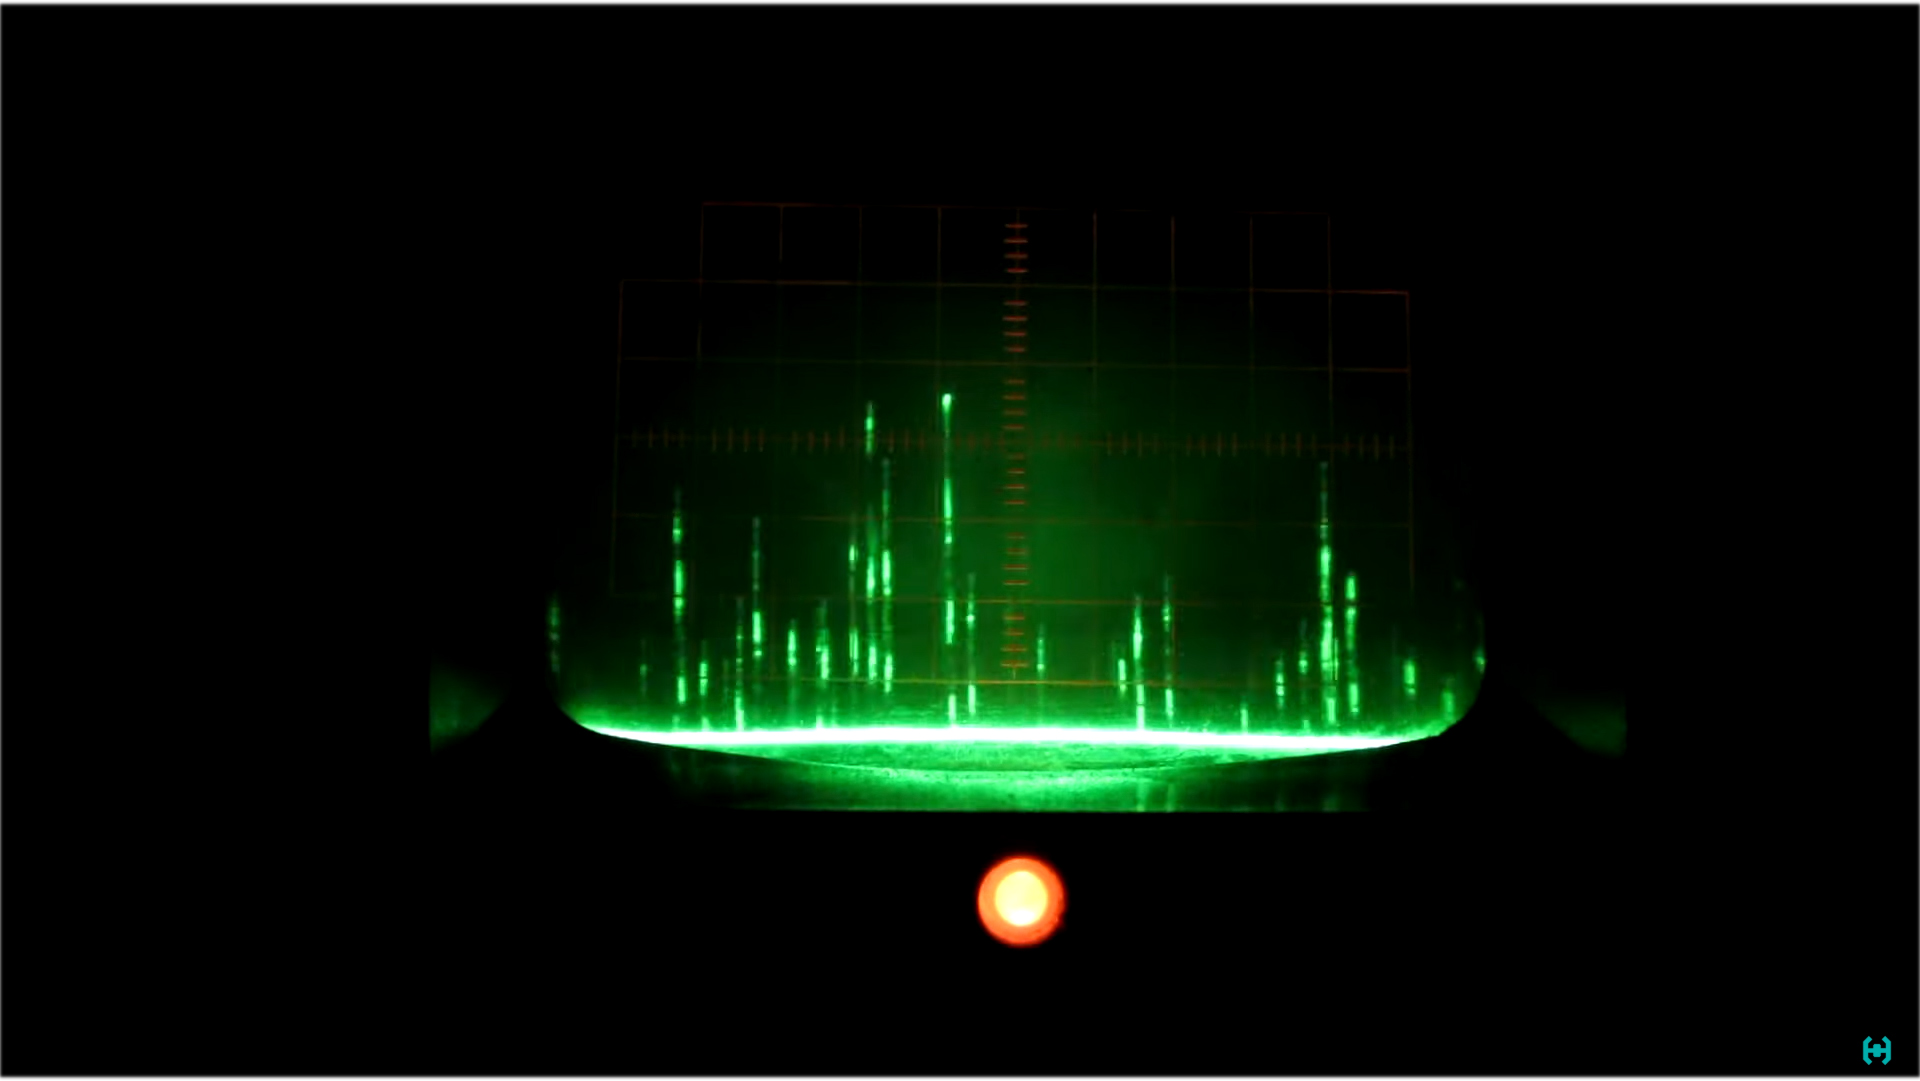 After some time, a stranger asked me:“How are you doing !?”- I say: no way;“He's like that: yes, then keep the gerber files of the correct converter board.”This stranger turned out to be Dima Novikov , a radio amateur and a spectrometer with experience. He aroused a second wind in this direction, and work began to boil over again. A further task was to turn to the Chinese, and order printed circuit boards from them .After about a week and a half, a neat evacuated package arrived in which there were 10 boards. Why do you ask so much !? Stock pocket does not press! Now you can install radio elements. At the beginning, we blow massive parts with a hairdryer, and then small ones with a soldering iron. The whole installation procedure takes no more than 30 minutes, after which an adjustable negative high voltage converter appears, with which we will feed the photomultiplier. But, I feel we somehow dispersed, and I’m sure many now don’t understand what’s what. I'll try to explain on the fingers.
 The gamma spectrometer consists of five parts, all of them are now presented on your screens.On the left is a bakelite socket with a voltage divider for the photomultiplier tube. Next is the high voltage power supply we just assembled. In the middle we see a scintillator crystal, it is a substance in which the invisible gamma radiation is converted into visible light. It gets into the photoelectronic multiplier and amplifies, giving the output information that we will further process. The rightmost piece of iron is permalloy, it is needed to protect the PMT from external electromagnetic influences.
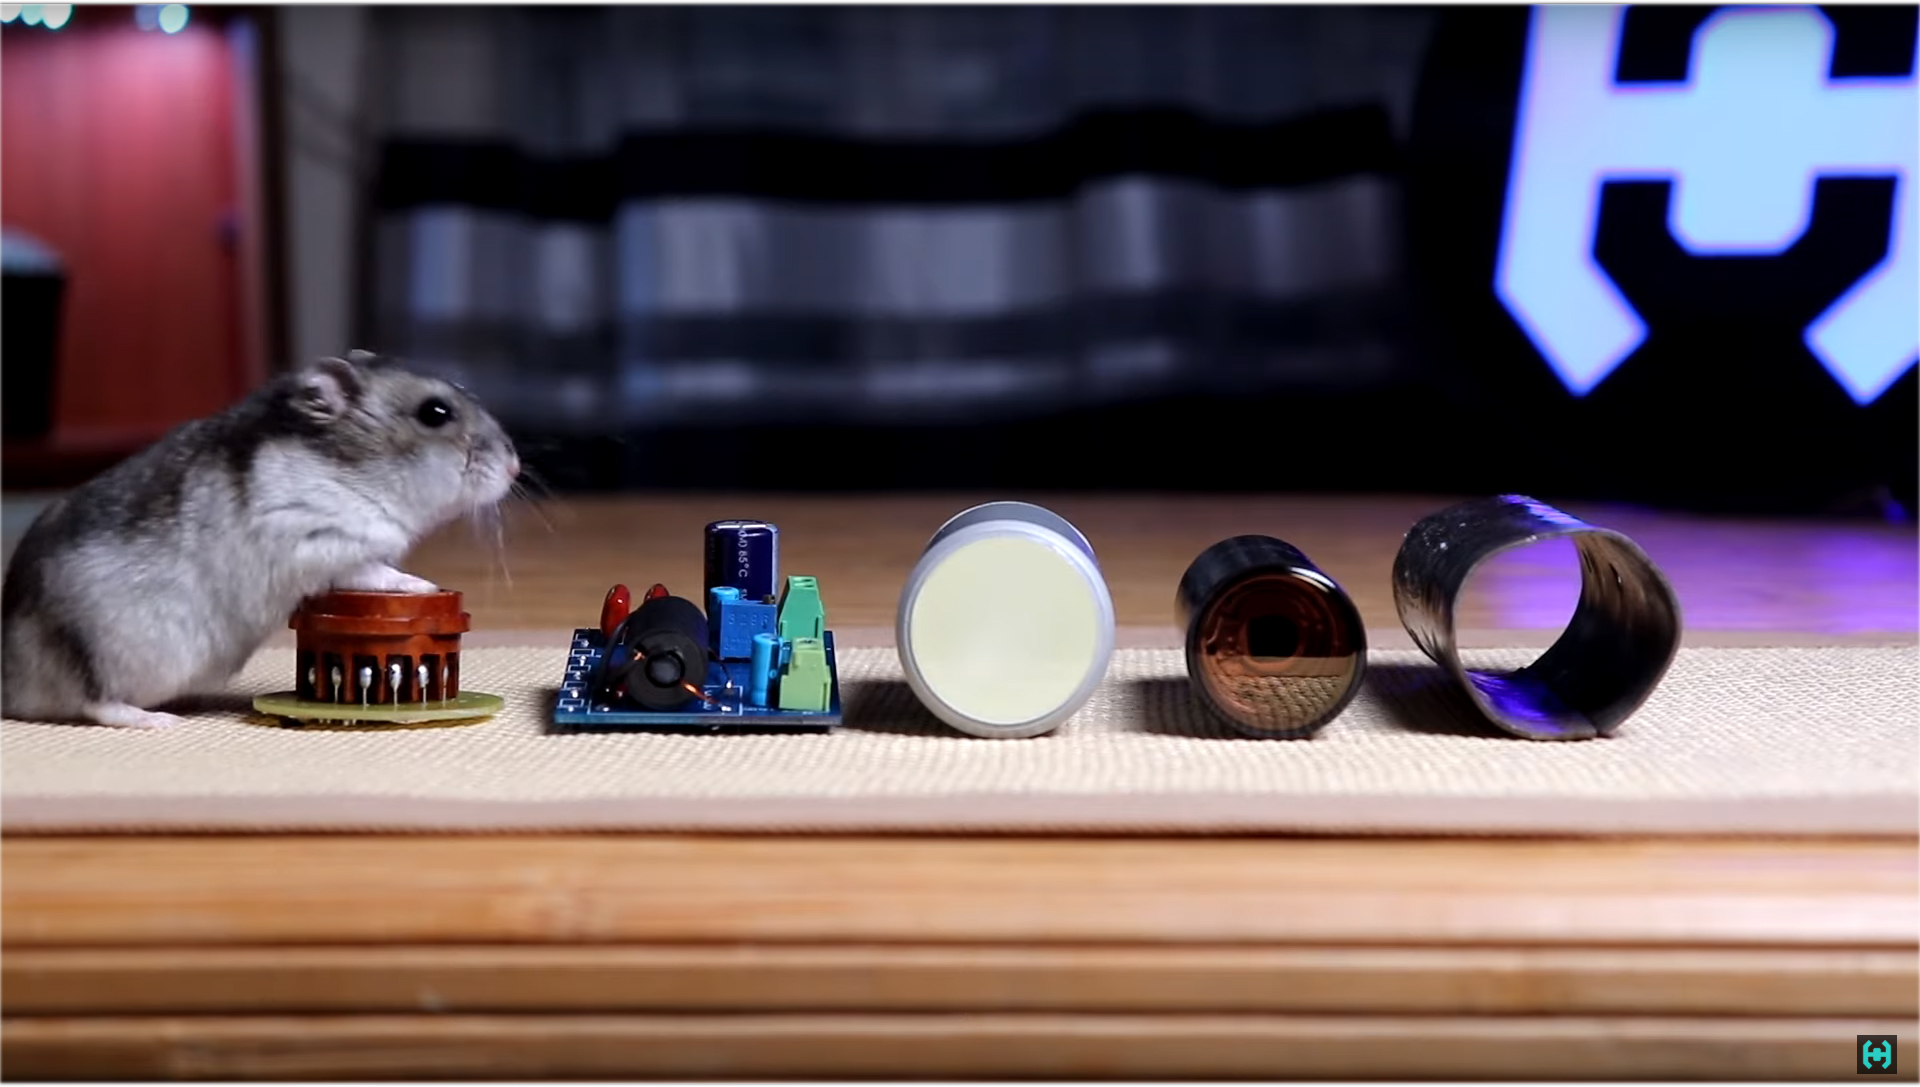 Within the framework of this project, exclusively sodium iodide crystals activated by thallium NaJ (TI) were used.This sample in a beautiful Soviet wrapper cost about 70 bucks. Pleasure is not cheap. These scintillators are the most common, they have high gamma and X-ray absorption efficiency, high light output, good energy resolution and a fairly short flash time. This crystal literally glows in x-rays with a beautiful blue light whose wavelength lies in the region of 415 nm.In general, for a more crude demonstration of this phenomenon, you can take ordinary kitchen salt, and light it with an x-ray. As a result, it will also scintillate in the visible range of light, but it cannot be used for gamma-ray spectrometry, since it has a band structure, and very few photons will be emitted during one decay process. Pure sodium iodide is also impossible to use for these purposes, because the crystal is activated with thallium. It changes the structure of the compound, creating additional energy levels, so the finished material is characterized by high luminescence efficiency.Ideally, the number of photons emitted by the scintillator should be proportional to the absorbed energy, this will allow to obtain energy spectra of radiation. Roughly speaking, the greater the energy of a gamma ray that has flown into the crystal, the greater the flash of light, the more photons will get into the photo electron multiplier. Everything is simple.
 Now let's look at what you need to pay attention to when choosing a thallium activated sodium iodide crystal.The first and most important thing is color! The crystal should be perfectly transparent, it should not have yellowness, turbidity or any cracks. The main differences are clearly visible on this frame. You should also carefully examine the optical window where the light will come from, there should be no spots or signs of crystal detachment from glass, such defects can be seen only in good light. Since sodium iodide is very hygroscopic, attention should be paid to the tightness of the aluminum container, which prevents contact with moisture in the environment.Most of the samples that can be found on sale, released back in the distant Soviet Union. This sample size 30 * 70 mm was born in October 1985. When buying, you can focus on the passport, which indicates the light output. This document is very important, we will pay special attention to it. Below in black and white it is written that the detectors remain operational for 12 months from the date of shipment by the manufacturer. In general, this passport has expired for at least 30 years, so I’ll go to let it go for its intended purpose)Nobody canceled the visual assessment! We carefully look at the color, and we are suspicious of yellowness. According to one theory, this color indicates a violation of production technology, as a result of which the poorly dried reflective powder, which is located between the aluminum container and the crystal, somehow reacted with sodium iodide.
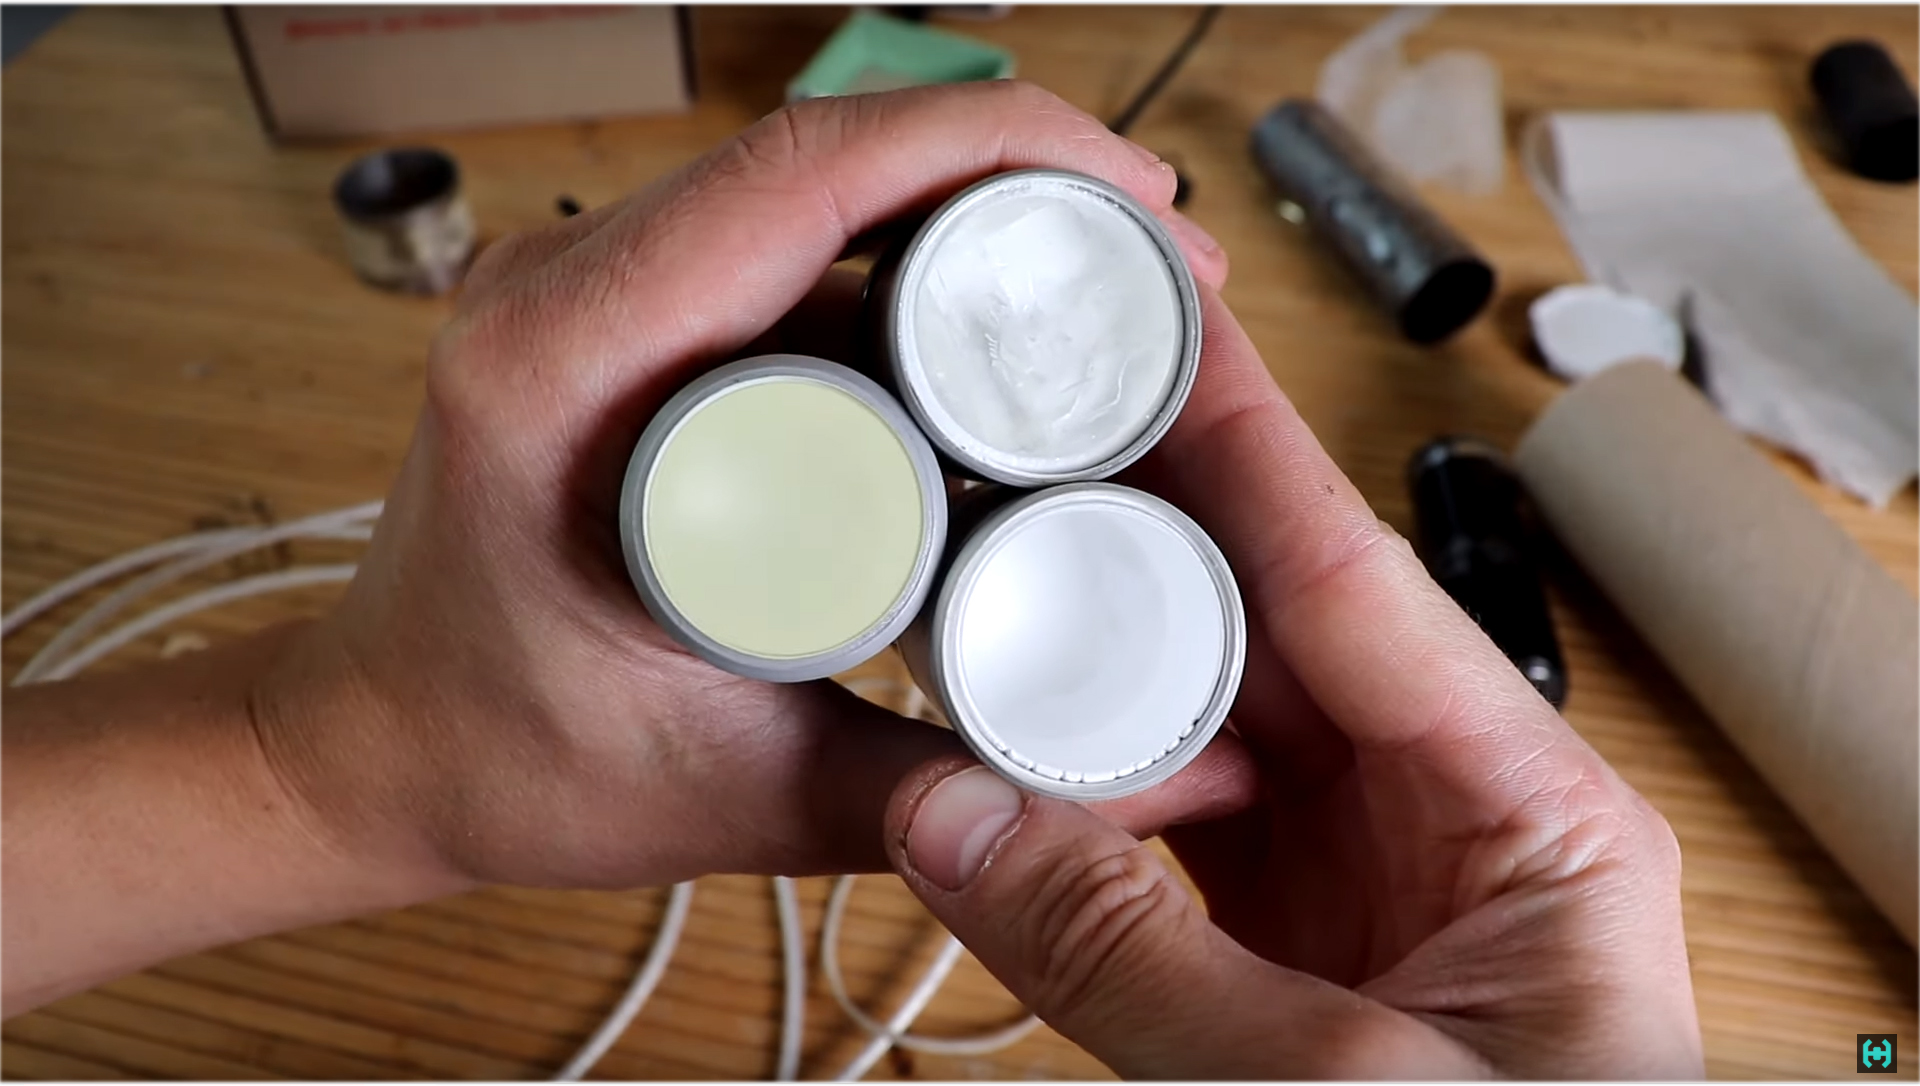 What does this ultimately lead to !?Yellowness impedes the good passage of light, which leads to a significant deterioration in the final resolution, and more than 14% of such a sample should not be expected. For example, the spectrum of a transparent 8% crystal is shown in green, all individual energy peaks are clearly visible here, while the yellow crystal (black spectrum) merged the whole picture into one continuous mess. The yellow crystal is like a cataract; it seems to see the world, but it cannot see the details. Such samples are suitable only for calculating devices, where only the presence of pulses is important. In these cases, such yolks will undoubtedly work.
 Feature of scintillators.If you illuminate it with ultraviolet light (it looks transparent to the bottom, but the crystal is yellow in shade), it will immediately become cloudy, and in appearance it will look like milk. But the main rule of a good scintillator is to completely absorb ionizing radiation, and completely skip the flash of your own scintillation light. For example, a good crystal is shown, it is transparent both in daylight and in ultraviolet, while there are no opacities.Another interesting parameter is the afterglow. Good crystals have a fairly long afterglow after exposure to ultraviolet radiation, this is clearly visible in this frame. Curiously, the yellow crystal does not have this parameter at all. For the sake of interest, I even tried to take a photo with a 30 second exposure of both samples immediately after exposure. Everything is very well demonstrated here.
 A cracked scintillator behaves similarly. It remains completely transparent, and through it all the cracks are examined. Afterglow is not so pronounced here, but in the photo with a long shutter speed it is also clearly visible. Many say that the crystal after external exposure to light must be kept for several days in the dark, so that it calms down. From practice, just half an hour after the brutal bullying with the use of an ultraviolet lamp, the spectra before and after irradiation were practically the same. This is clearly seen if one spectrum is superimposed on another. Here even the number of background pulses in the lead house remained unchanged.As for the size, the larger the crystal, the larger its area, the more gamma rays from the surrounding space will fall into it. A scintillator size of 30 * 40 mm implies the size of the crystal itself, and a sealed container with reflective powder has several large dimensions that extend 6 mm larger than the specified size in height and width. If you remove the contents of the sealed container, sodium iodide will be salty in taste and will leave iodine stains on the sink. After which he will turn white, talk and become unusable.And so, gamma radiation enters the scintillator and interacts with it, causing flashes of light in the body of the crystal. Our further task is to catch them and convert them into an electrical signal. For this, photoelectronic multipliers are used.Light photons incident on the photomultiplier photomultiplier knock out the photoelectrons from it, they in turn focus on the first dynode, and knock out the secondary electrons from it, they focus and are sent to the next dynode each time being multiplied. To focus and accelerate electrons, a high voltage is applied to the anode and dynodes. As a result of these manipulations, current pulses are recorded on the PMT anode, which directly depend on the absorbed energy of gamma radiation.
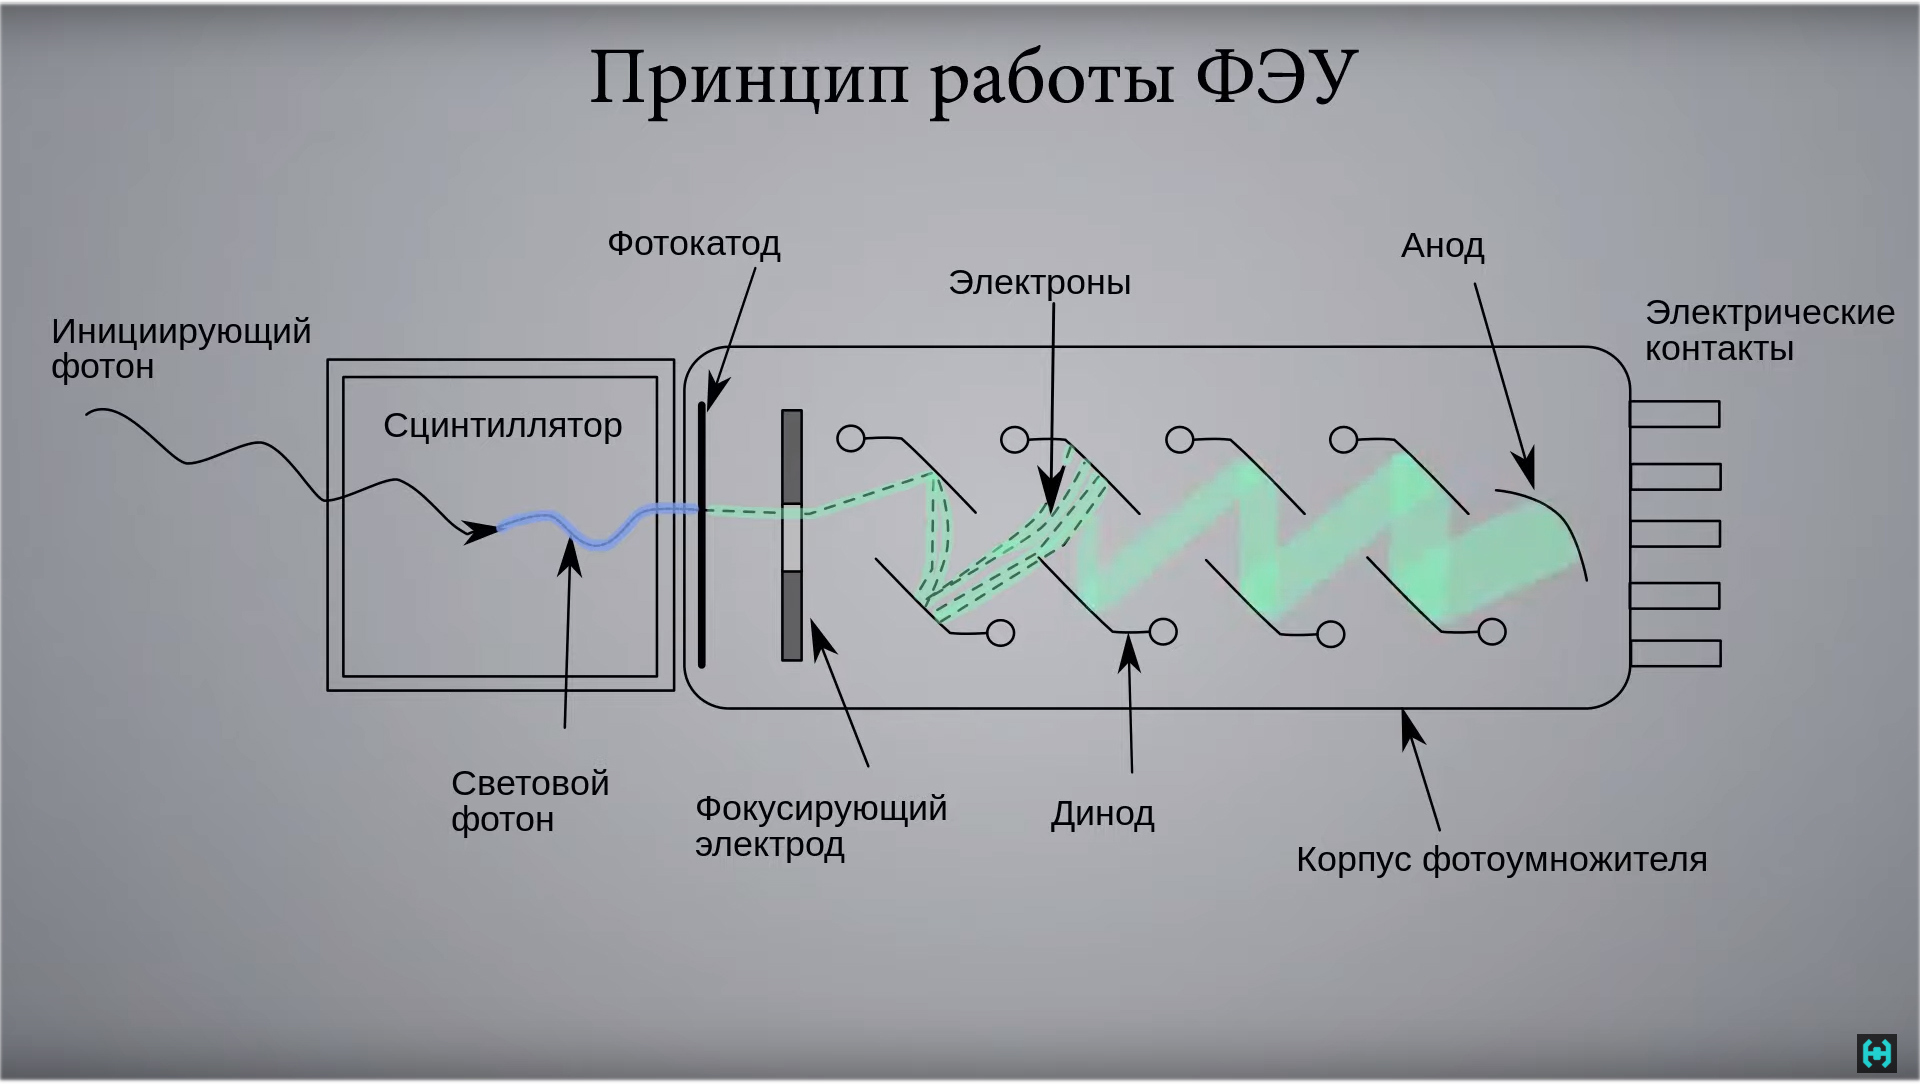 The number of electrons arriving at the anode directly depends on the number of dynodes located inside the photomultiplier. Also, its spectral sensitivity should be consistent with the radiation length of the scintillator itself.For example, the PMT-85Athe region of maximum spectral sensitivity lies in the range from 380-420 nm, which is consistent with the sodium iodide crystal with its wavelength of 415 nm. It is also important to consider the amplitude resolution, it indicates 10%. The number of amplification stages, that is, dynodes 11. In the framework of this work, two 85 PMTs were compared, with the letter A and without. What is the difference? Some say that the PMT with the letter A has less dark anode current, which gives less noise. Others claim that this is a rejection from the factory.In practice, when comparing both samples, there was no difference, both in noise and resolution. The only thing is that the FEU-85A operates at a lower voltage of 540 volts instead of 600. As a result, I settled on the letter A, the lower the voltage, the less noise on the spectrum.
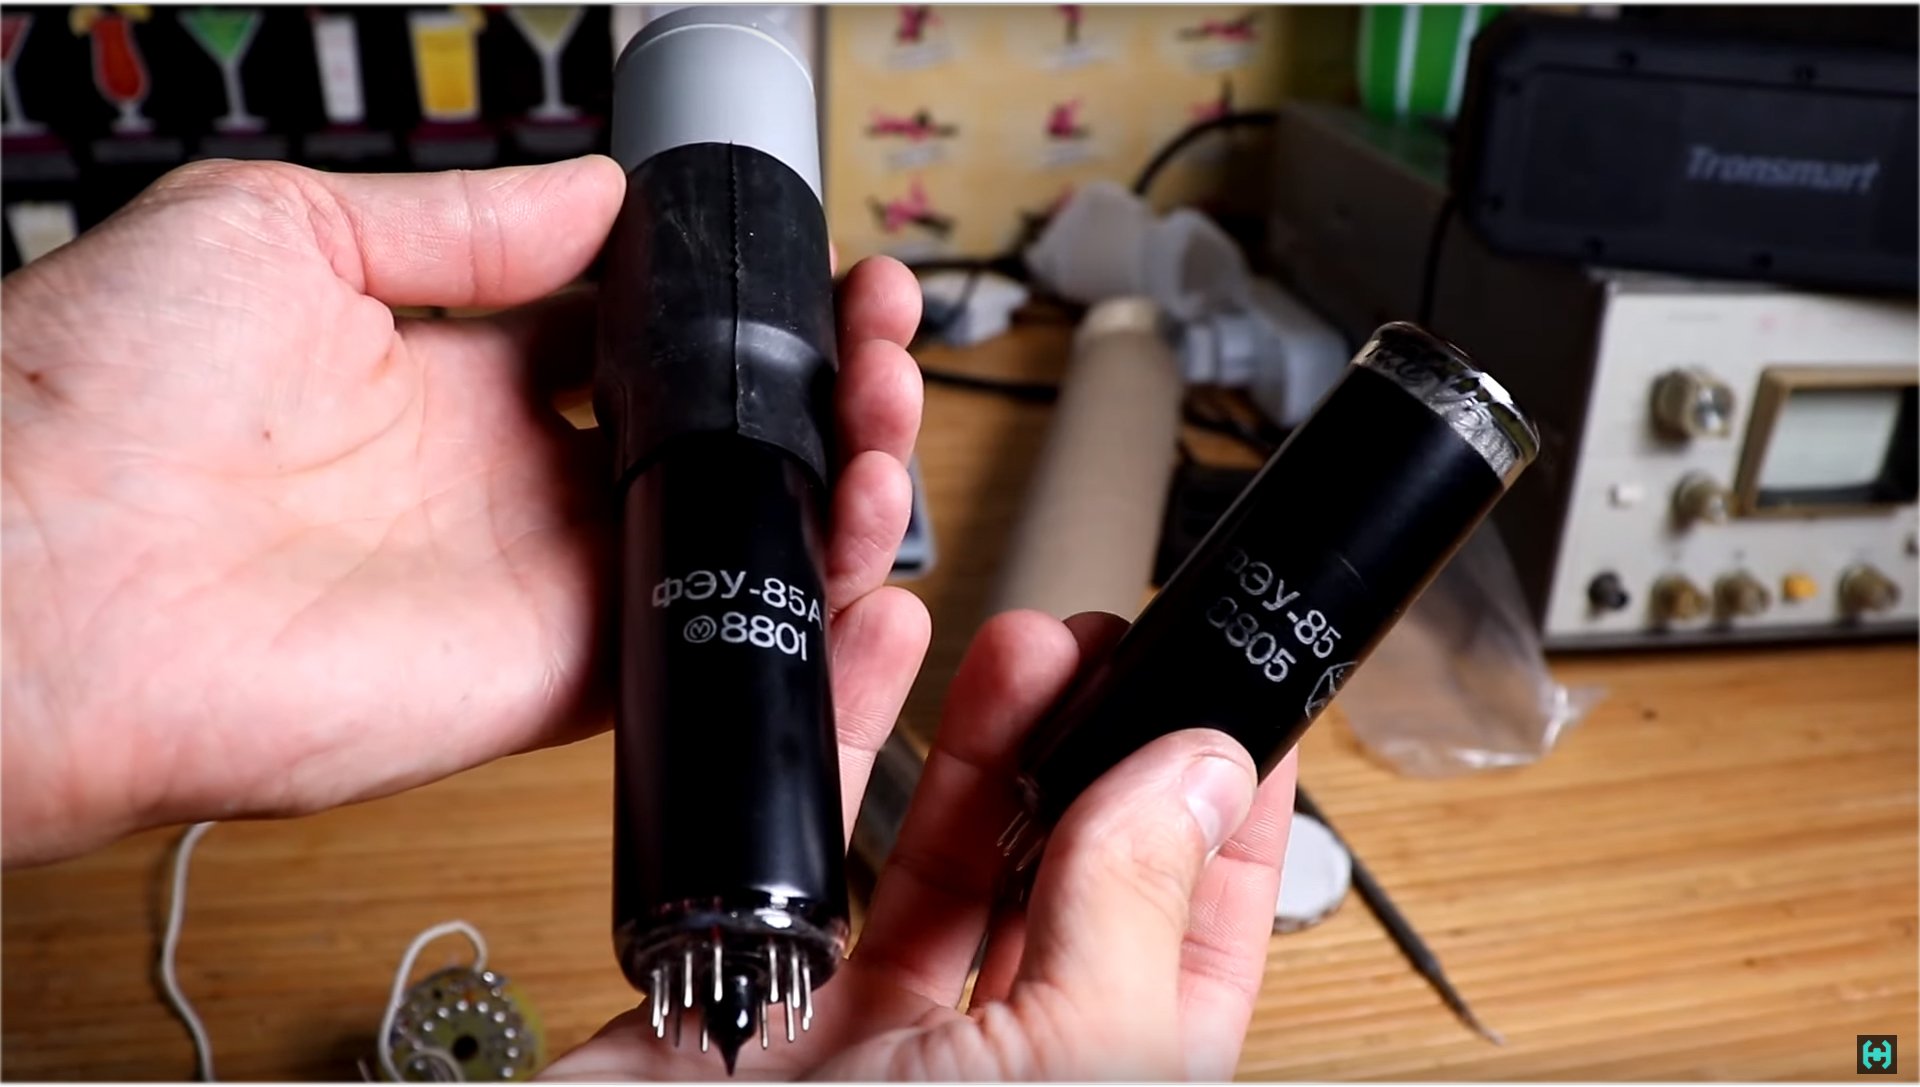 This is a PMT-31, its spectral sensitivity suits us, but there are only 8 dynodes, and the amplitude resolution is 11%. The sample is clearly worse in performance. With regards to the passports themselves, for the FEU-85A, it guarantees the preservation of technical characteristics for 12 years from the date of production. In general, this piece of paper is overdue for 20 years. Believe it is not worth it, everything needs to be checked in work.With regards to the choice of PMT when buying from hand. First of all, you need to visually inspect the glass bottle for cracks. If any, then the friend is probably dead. This will also be evidenced by the antimony-cesium photocathode, which will become colorless by reacting with oxygen. Actually everything, the rest of the parameters can be found out only when checking on the installation.
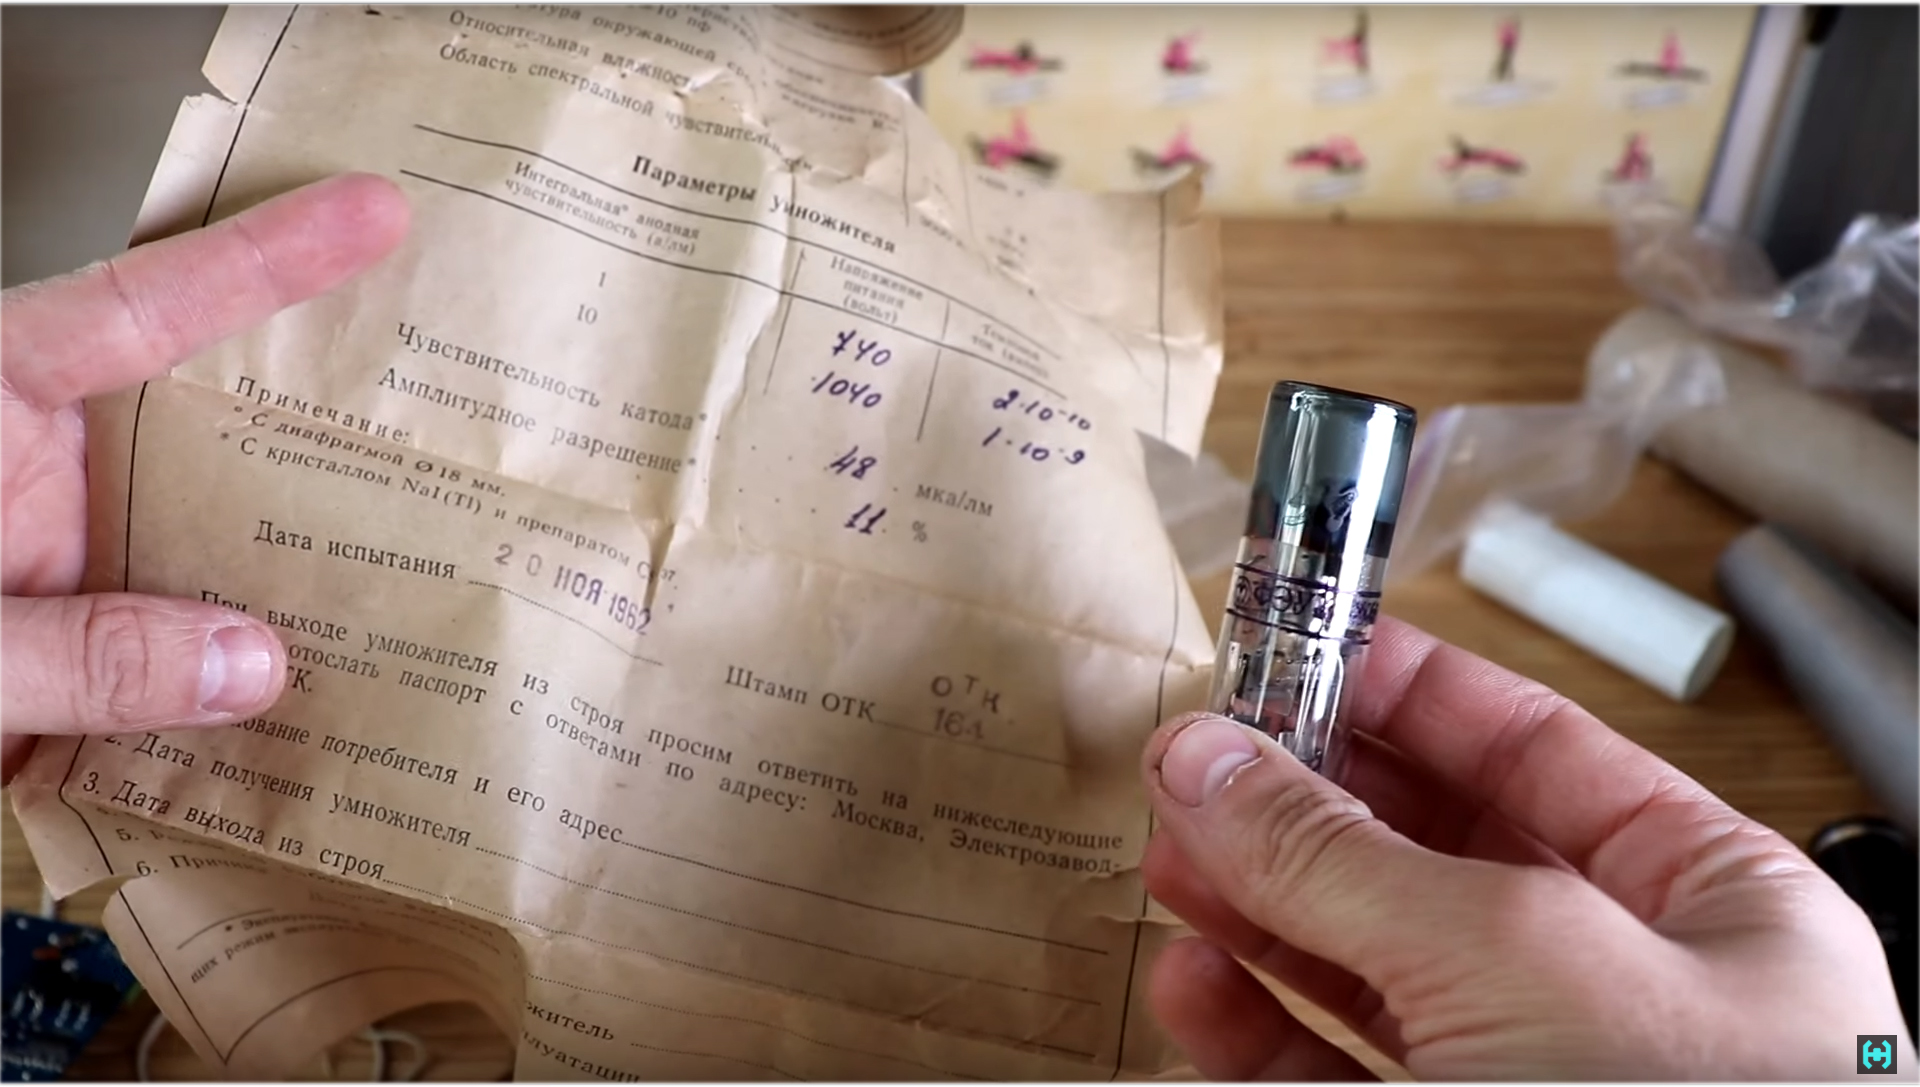 To start the photoelectronic multiplier, it is necessary to apply a high voltage to it by connecting the dynodes through a divider in the form of resistors, according to the design scheme. There is also a transimpedance amplifier on this board , it converts the input current to a proportional output voltage, which is fed directly to the computer’s sound card.
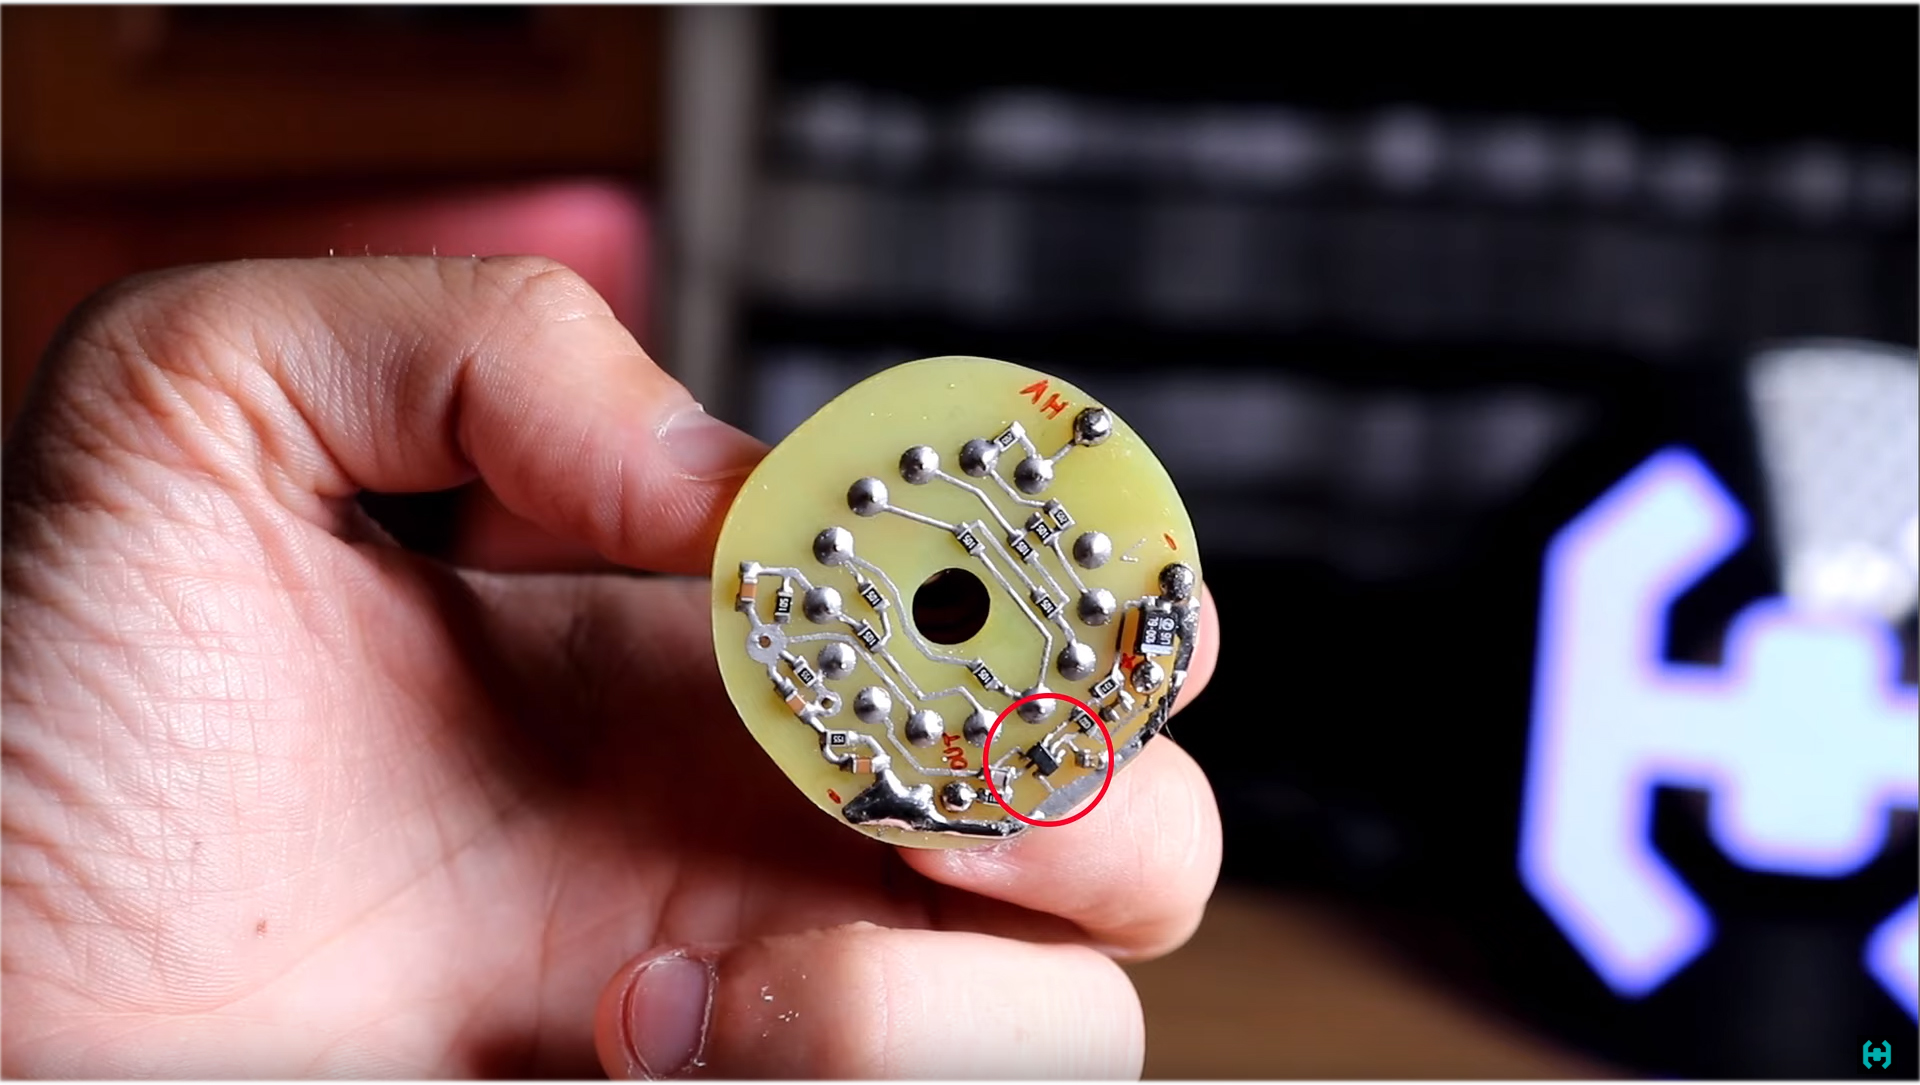 Now we turn exclusively to the assembly and tuning of the gamma spectrometer. The photomultiplier tube is most conveniently connected through a socket; this reduces the risk of damaging the glass bottle. One such lamp costs about 40 bucks. It will be a shame if something goes wrong.
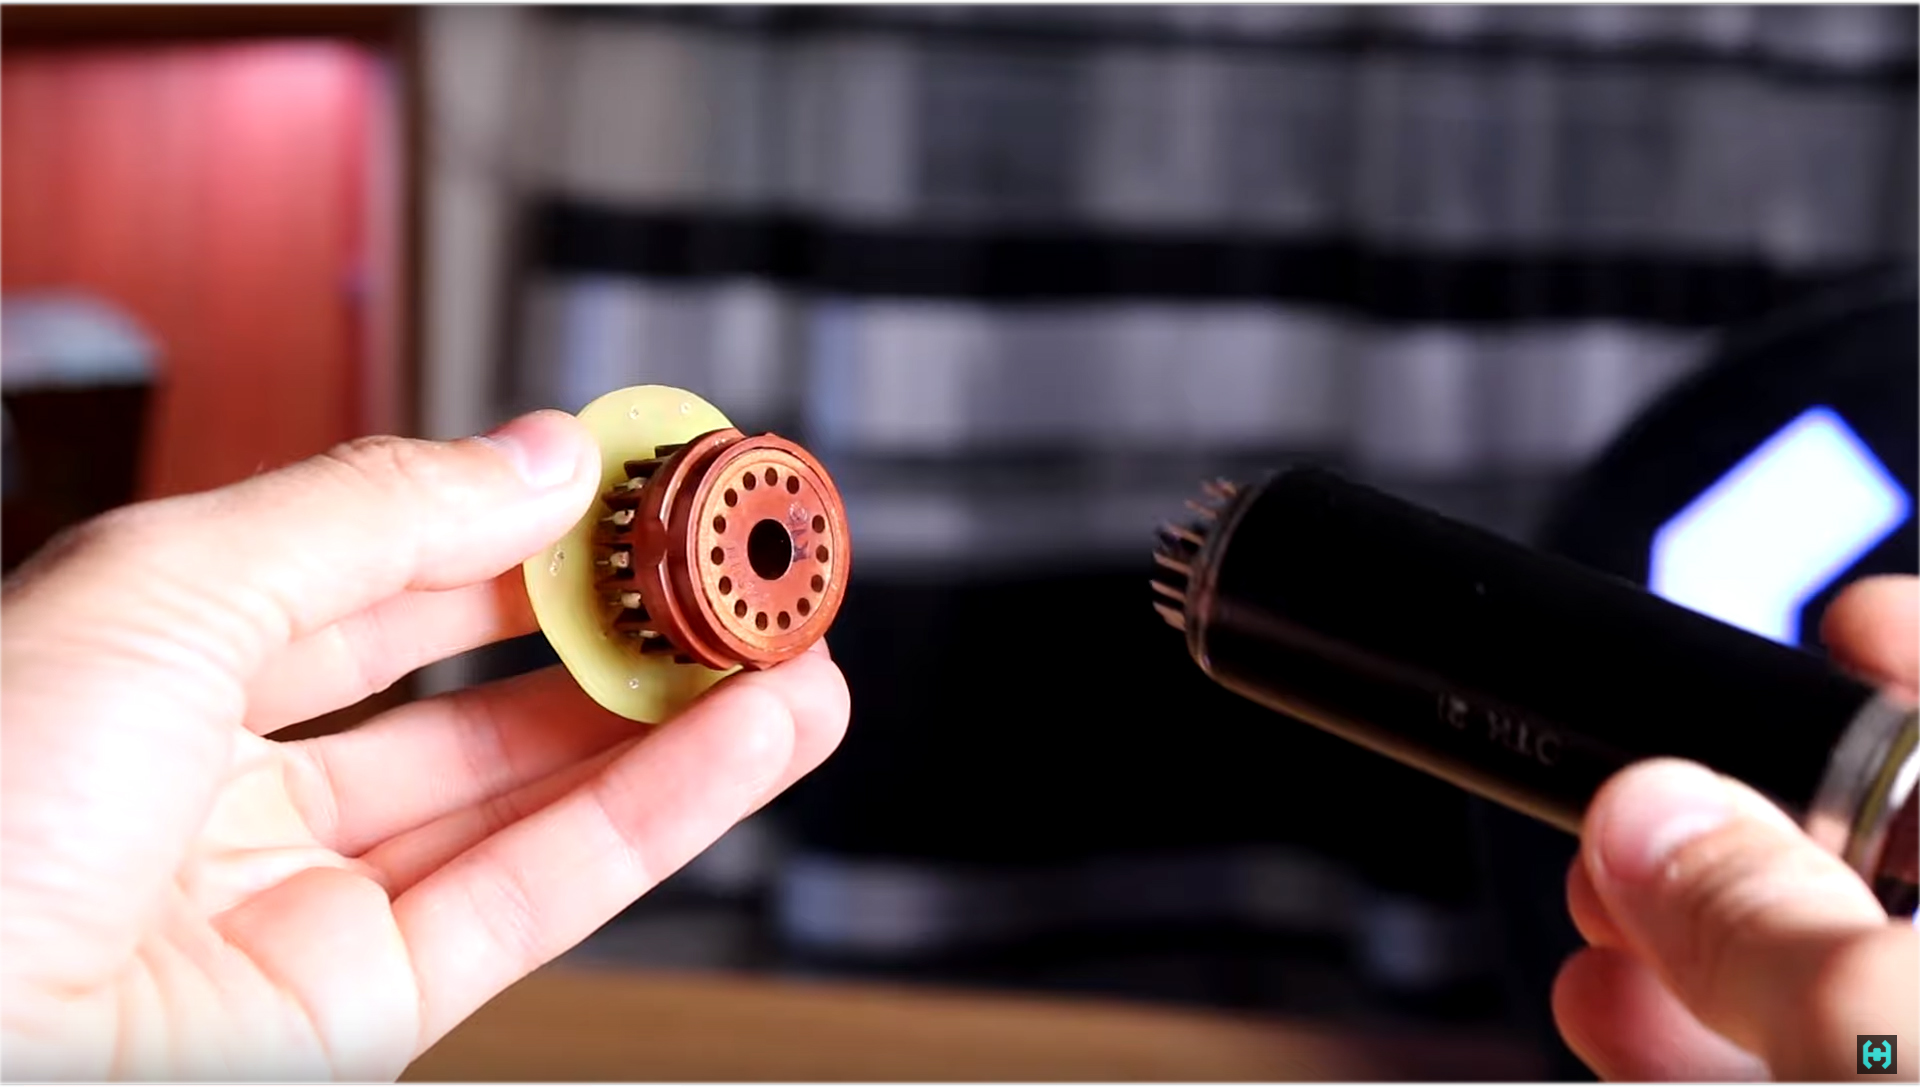 Next, wipe the glass window of the scintillator with a soft cloth, and pull rubber of a suitable diameter onto the body. It will center the PMT relative to the window. When asked where to get it, this is a piece of rubber from a bicycle camera.
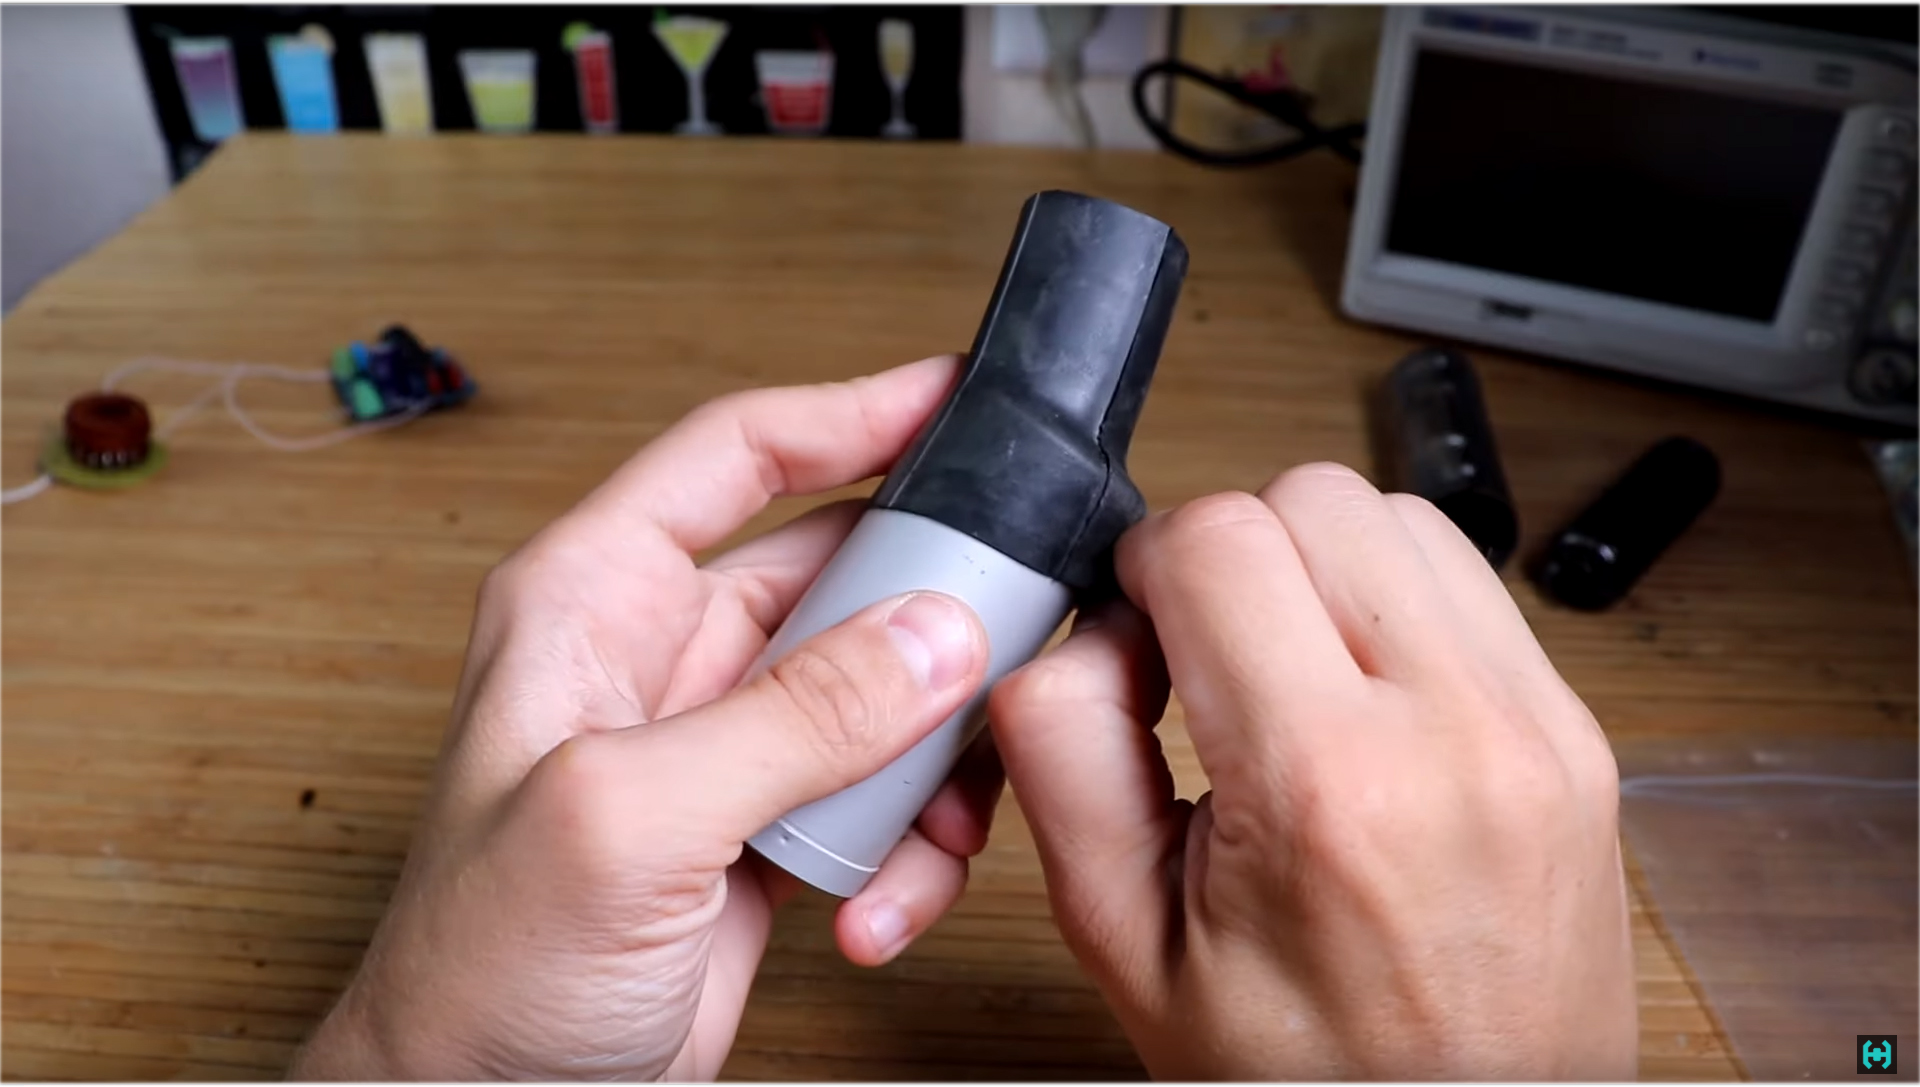 To ensure good optical contact, a special fluid is located between the PMT and the scintillator. Which one? Silicone grease, the thickest that was found. You may ask why I did not use the technical petroleum jelly recommended by the seller of the crystal? It's simple, it is not suitable in connection with the absorption of ultraviolet radiation, it will also absorb scintillator light, and will become not an optical lubricant, but an obstacle that worsens the output parameters. Pharmacy refined petroleum jelly has the same problem.Therefore, I recommend silicone grease on my own; during all experiments, it worked out with a bang. You don’t need to pour a lot of it, otherwise it will leak out and dirty you with something. You need to press down and scroll the elements relative to each other to squeeze out the excess silicone.
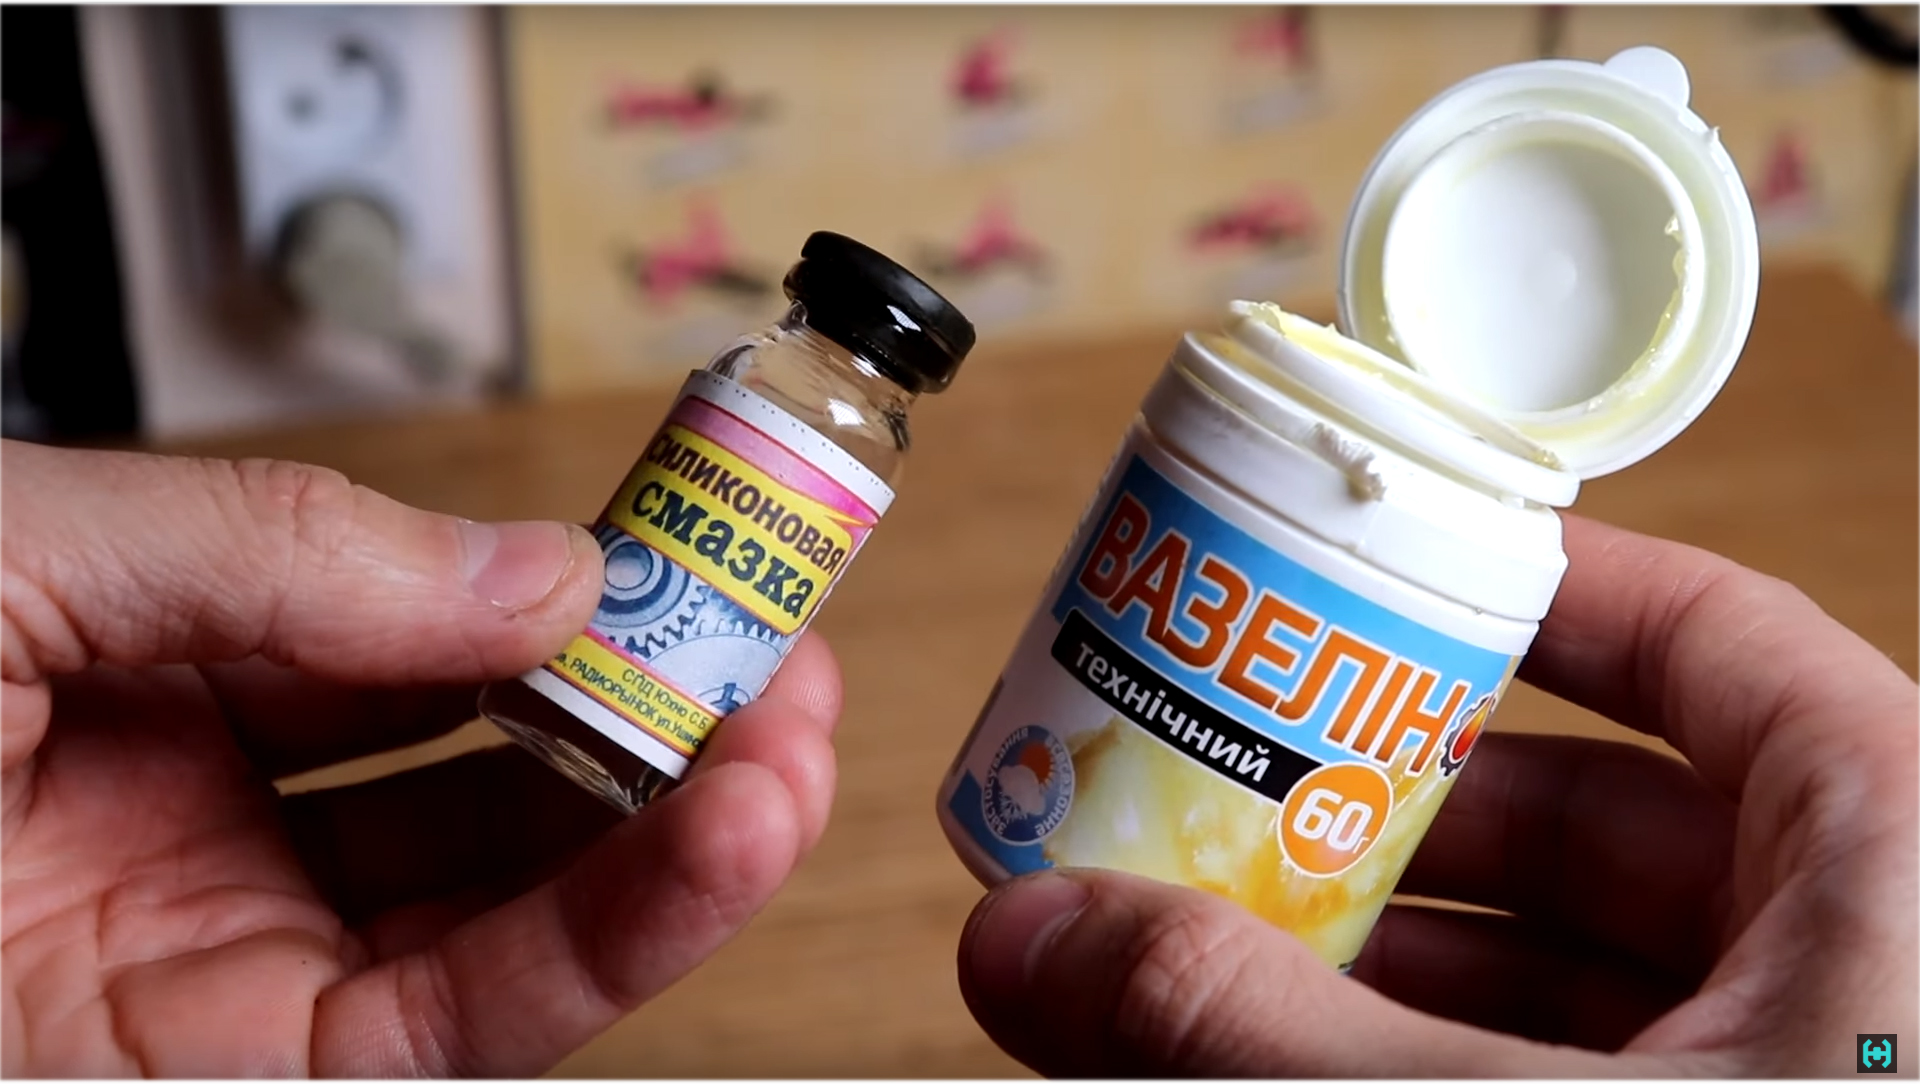 Great, we have such a beautiful build.To protect the PMT, wrap it several times with thin foamed polyethylene, and put on top a tube of permalloy - a soft magnetic material that protects the inside of the lamp from various external electromagnetic influences. How a magnetic field can affect cathode ray tubes, we showed in one of the previous posts. You can get permallah by rummaging in a flea market, from the old oscilloscope, around it is what we are looking for. Only there is a problem, the form does not fit here. It is necessary to work with a hammer. You need to align the edges, and form a cylinder. During deformation, the metal forms zones of tension, which must be released by heating the material to a crimson color.When heated, one can observe the so-called curie point, which characterizes the change in the second-order phase transition. Simply put, a metal after a certain temperature ceases to be magnetized by a magnet, quite interesting! In general, look for permalloy wherever you want. He is needed, without him it’s like going to the toilet without paper.
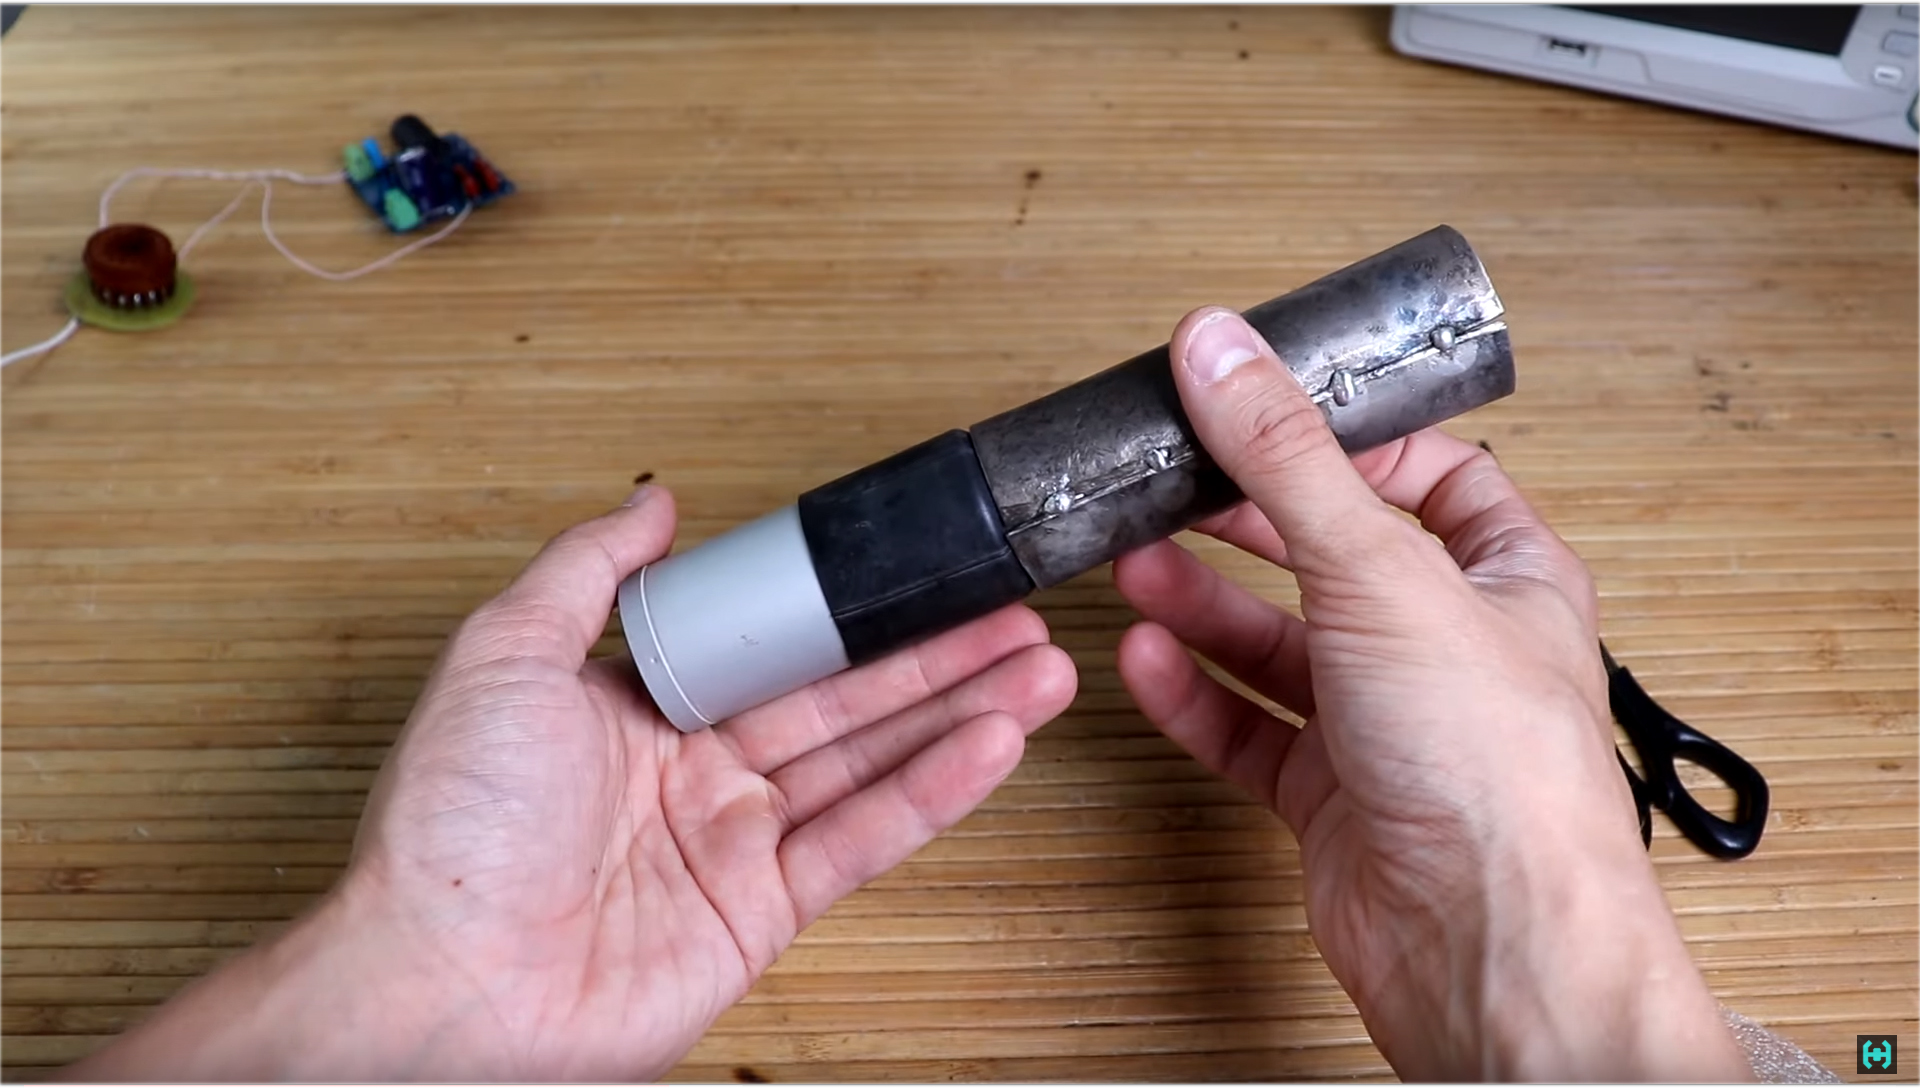 Now the power supply is negative high voltage. Here, all the details are easily accessible, with the exception of the IR2121 key driver, which was found only in the massive DIP case, and the high-voltage transformer, which you need to wind yourself. I am sure that at this stage half of the people in the hall will get up and begin to leave the cinema, but hey, it's simple.On the layout of the nearest market where everything is 10 rubles each, we find a Chinese electric lighter, inside it is an excellent sectional transformer. The task is to unwind its secondary winding, and to wind a new 0.2 mm wire. Turns approximately 200-250. We do not touch the primary coil on ferrite. After winding, we impregnate the finished transformer with wax or epoxy. The process takes about 20 minutes when you know what to do.It took me a couple of months to resolve this issue. Dozens of different types of high-voltage transformers were tried, including options from fluorescent lamps for monitor backlights, and ending with lowercase transformers from old TVs such as TVS. But there was too much noise from all this.The simplest and most reliable was the self-made option. From him, too, there was a slight noise, but it was minimal.
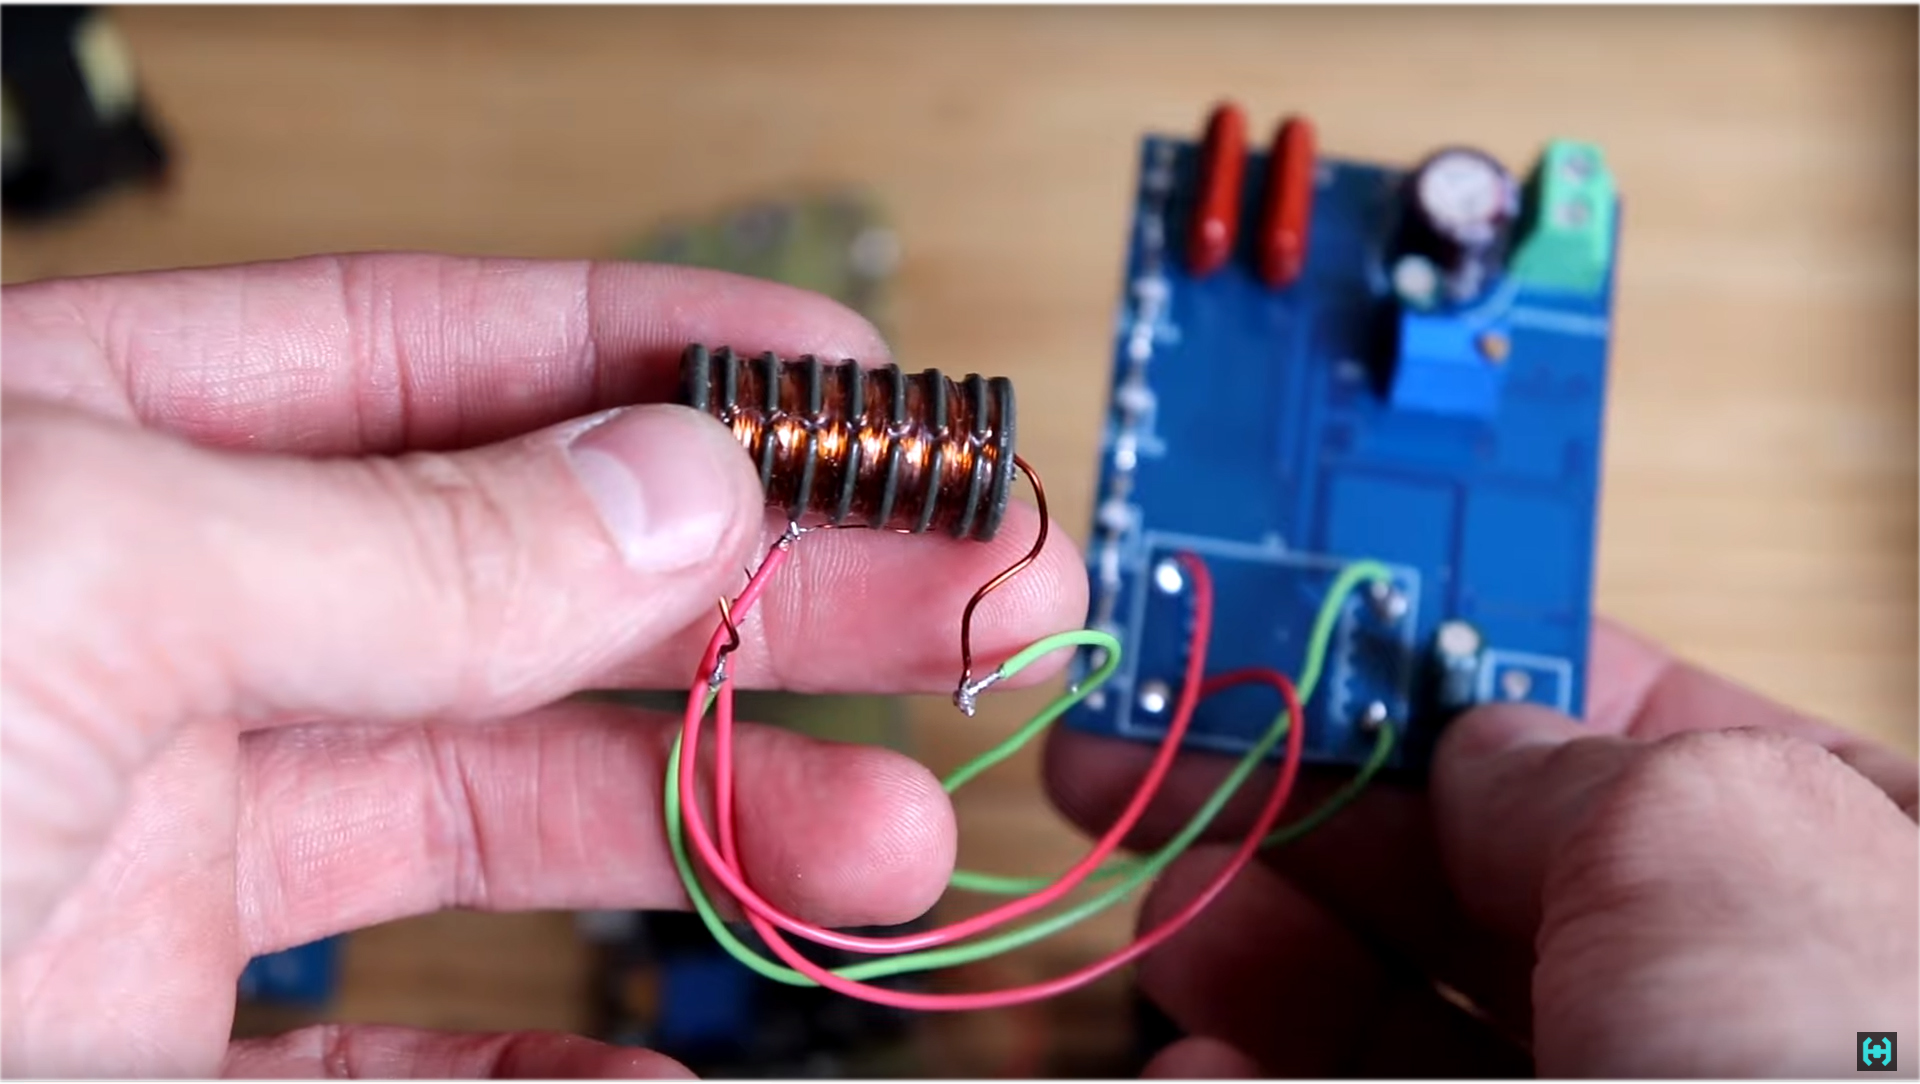 Revision. A snubber is added to the circuit, a filter that suppresses spurious inductive emissions and vibrations during transients. In short, this is a sequential chain of resistor and capacitor, which is selected individually in each circuit. The installation of such a filter allows to reduce the ripple of the power supply in the high-voltage part.If without snubber pulsations at 600 volts reached 1 volt, then the filter reduces them to half a volt. The result is 2 times obvious.The article recommends that when you turn on the converter for the first time, unscrew the tuning resistor to the minimum position, this is important, neglecting this item increases the risk of failure of the power part of the circuit.Voltage regulation in the circuit is carried out using a PWM controller TL494. By changing the resistance of the resistor, one can observe how the duty cycle of the control pulses changes. The maximum voltage that can be obtained from such a converter is approximately 3 kV. Himself more than 2 did not raise, there was no need.
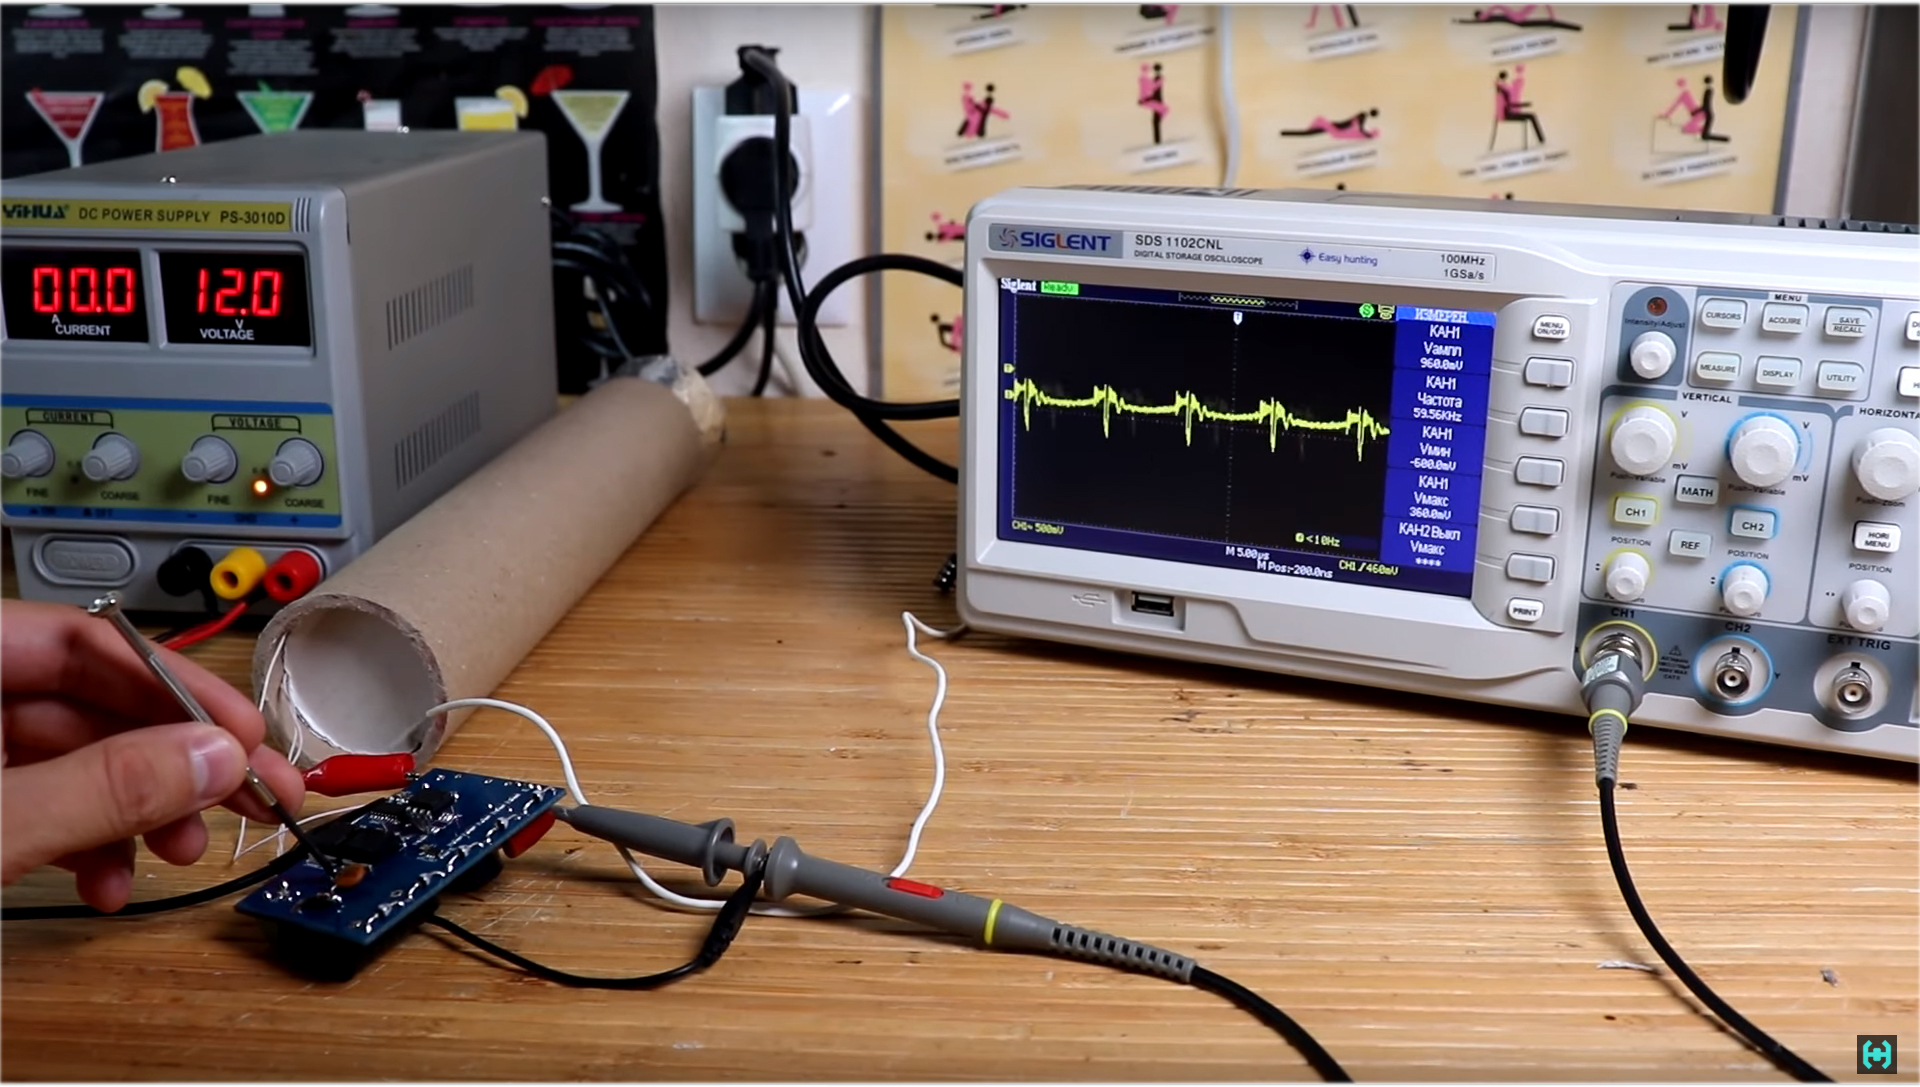 Stability.The circuit perfectly holds the set voltage regardless of the input power in the range from 8 to 14 volts. The same goes for climate stability. It is important that the voltage does not change with changes in the ambient temperature, otherwise this will lead to a deterioration in the rarefaction of the resulting energy spectra. This circuit was heated with a hairdryer. At 57 degrees, the liquid crystal indicator on the thermometer even turned black, but the voltage on the power supply is almost stationary. Level!When properly configured, at 600 volts, the circuit will consume only 33 mA. Assembling 18650 batteries with a current of 3 amperes is enough for continuous operation of the device for 90 hours.
 In fact, the scheme is quite simple, and with proper assembly it will work the first time. To facilitate setup, all the waveforms that were shown earlier in the movie are listed here.So, the power supply is ready. It remains to solder the signal wire to the output of the operational amplifier. It must be shielded. It can be either an audio cable, or the Soviet version with a silver plated braid.
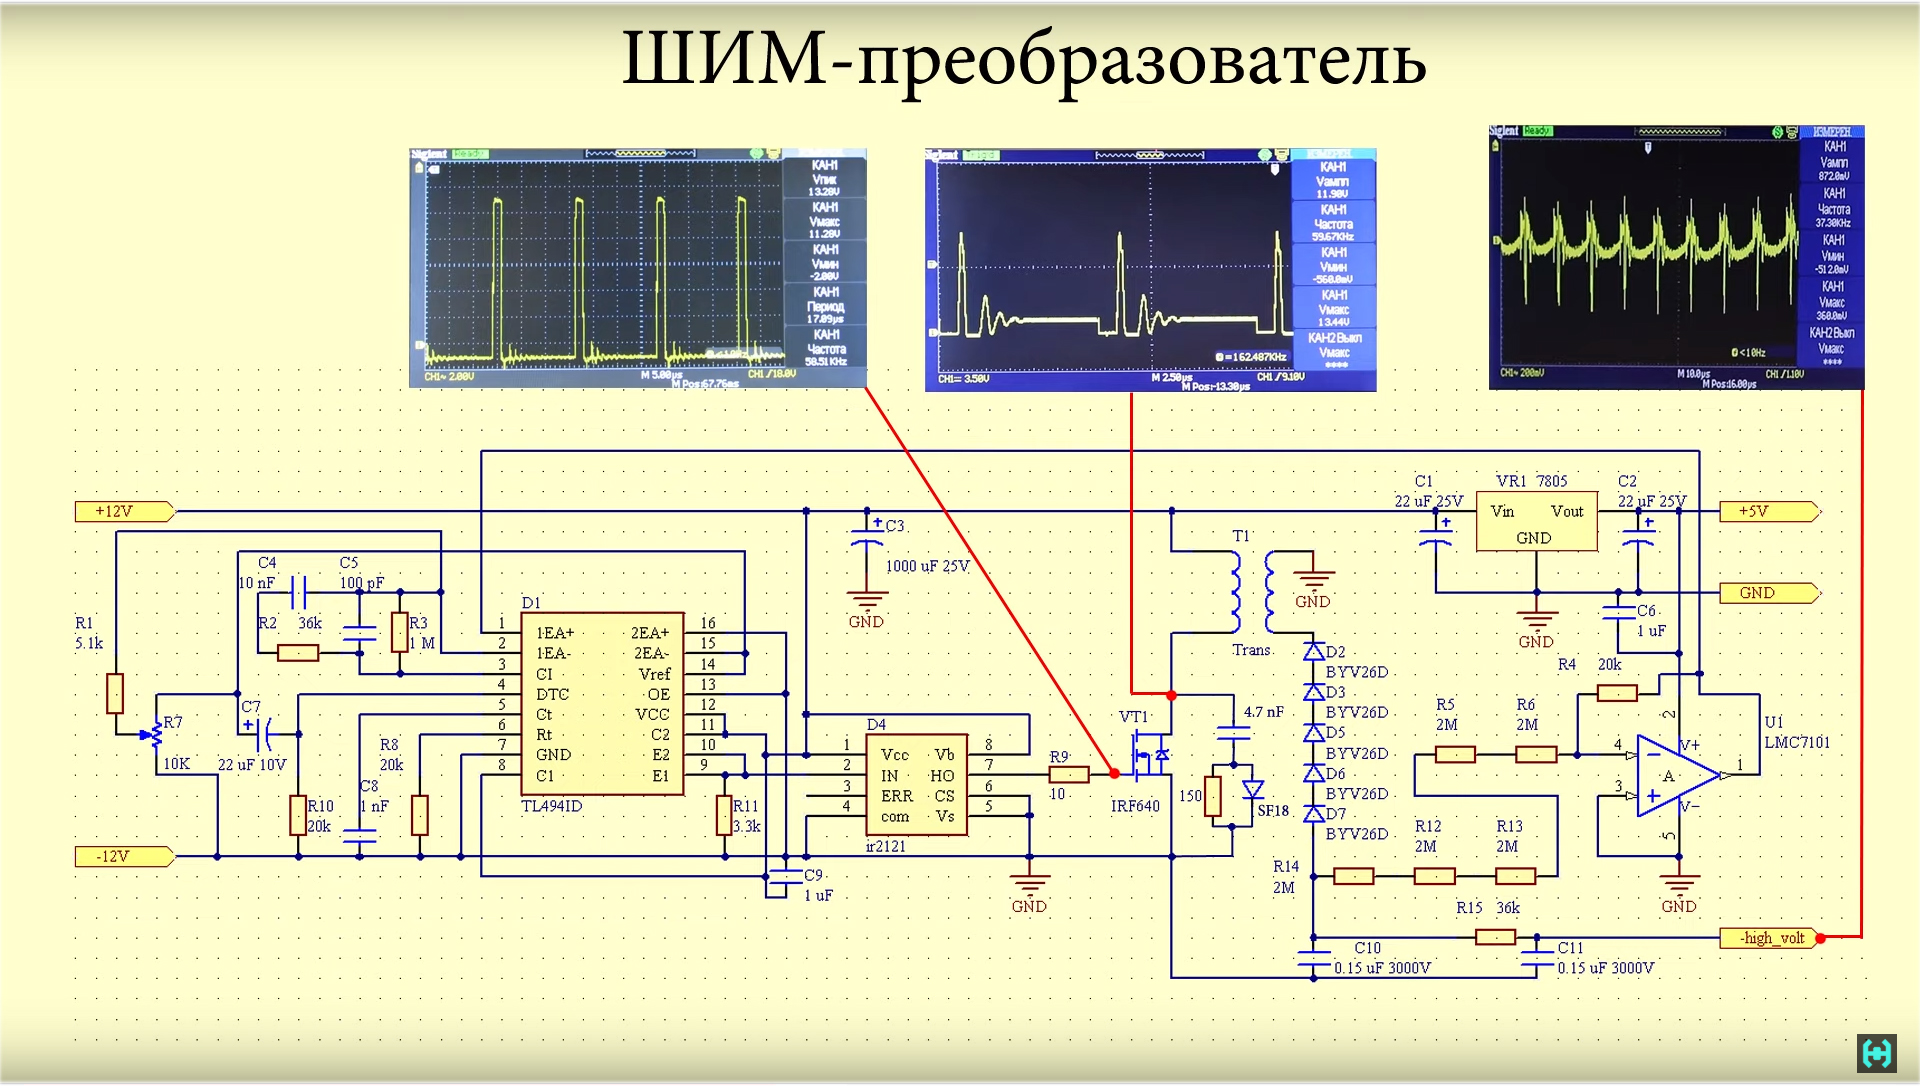 As a result, we should get such an assembly, consisting of a voltage converter board, and a divider board with an operational amplifier, on which there is a bakelite socket.The electronic part is ready and awaits reunion with the detection unit.We will help this to happen and place the panel on the ass of the PMT. Also, do not forget to connect the permalloy to the general output of the circuit with a thin wiring. An important point, the multiplier board should not contain flux residues and other electronic products of vital activity. Maybe something to break through. For reliability, the detection unit is pulled together with elastic bands. You don’t need to be zealous, otherwise you can push through the scintillator optical window, damage the PMT or something else. That's all. The gamma spectrometer is ready to go.
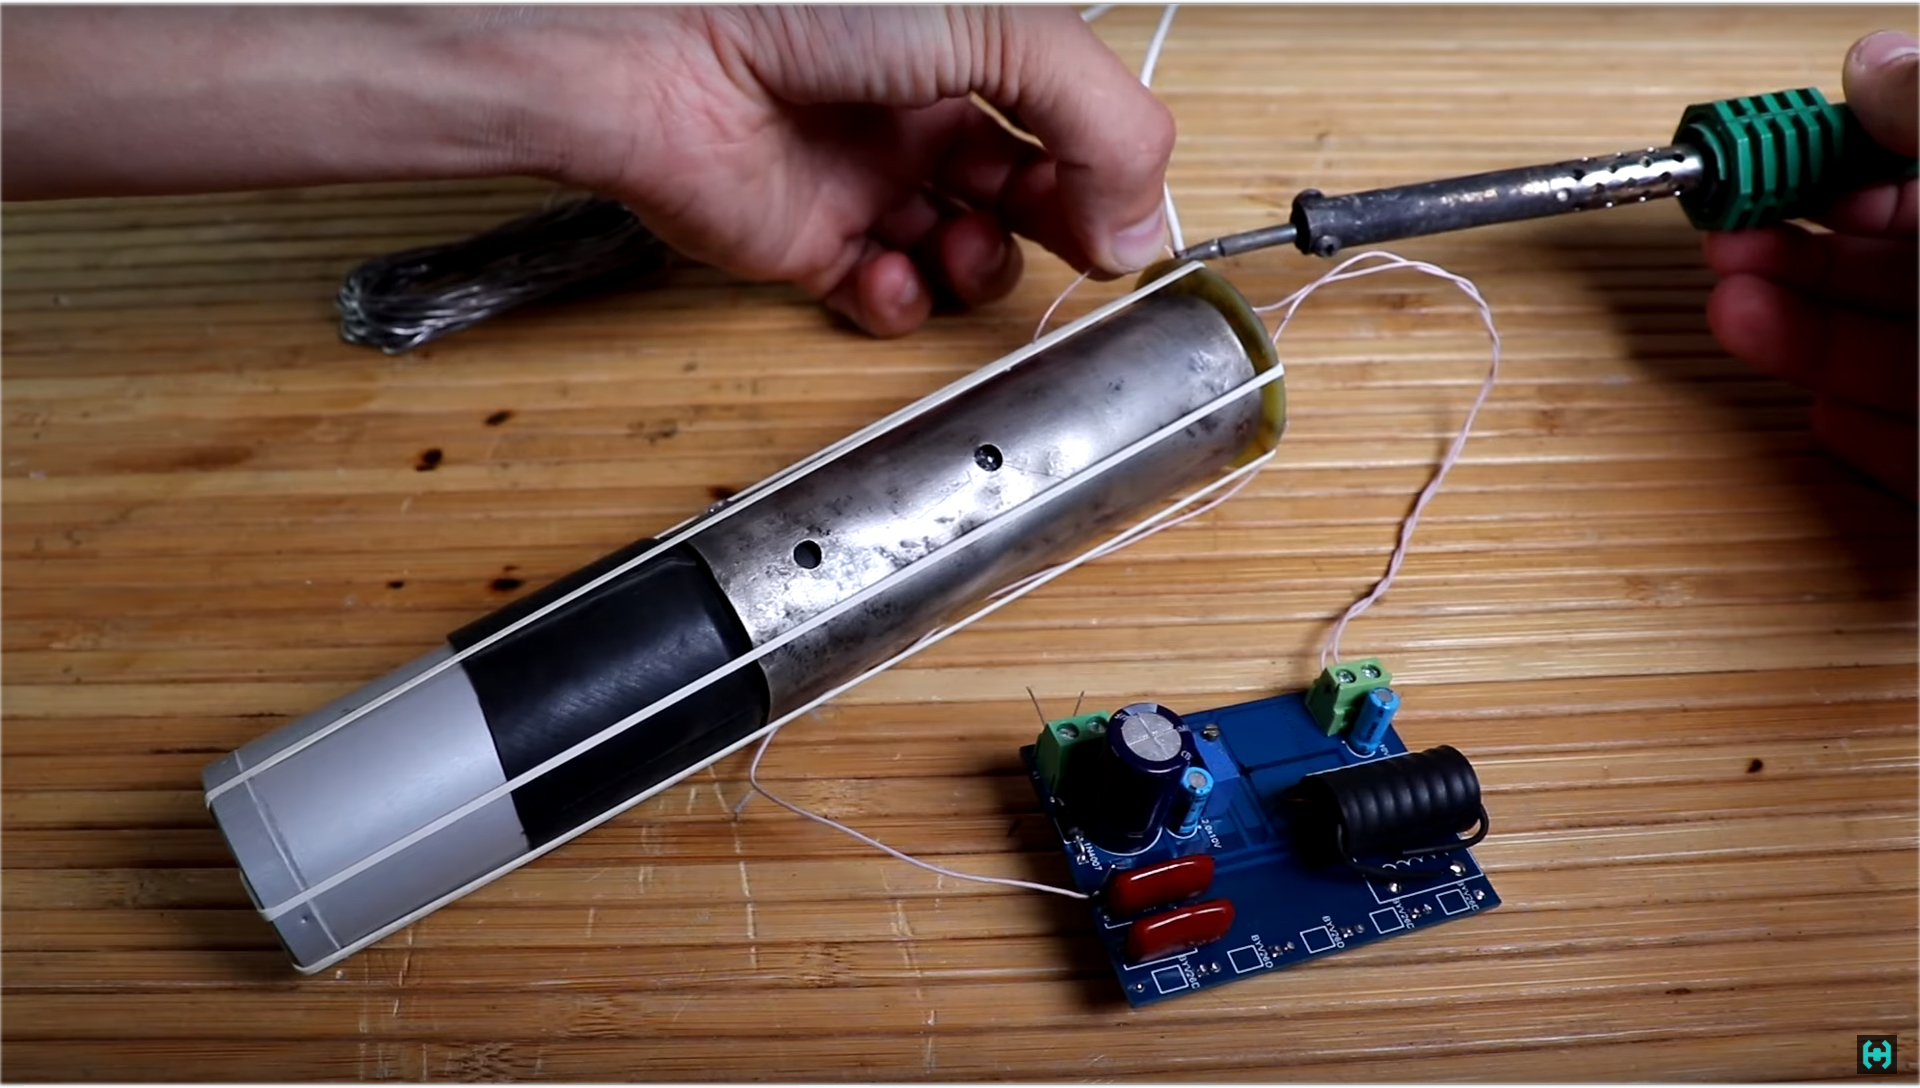 The photomultiplier tube is very sensitive, and it can literally go off scale. In general, I stopped on a cardboard tube. Stylish trendy youth.We set the voltage of the converter in the region of 600 volts, and look at what signal we get from the output of the operational amplifier. On the oscilloscope we will observe pulses with different amplitudes. This is all background radiation. Natural radiation in the form of gamma rays trapped in a scintillator crystal.The current pulses coming from the PMT anode are quite short, because the operational amplifier forcibly stretches them to about 200 microseconds, so it will be easier to process them with a sound card.If you bring to the scintillator a switch with a constant-current light mass based on radium-226 , then there will be a lot of pulses. Digital oscilloscopes are a good thing, but in some modes of operation they are so dumb that sometimes you want to bang your head against a wall.In the Soviet version, the pulses are visible in real time, they are simply excellent ...Radio phobia, have you not yet pressed into a chair from the sight of a normal radiation background? Natural radiation exists everywhere, you cannot hide from it, it ionizes and destroys your DNA cells. Fearfully? Me too! We must somehow deal with this. We will build a lead house. Its task is to isolate the spectrometer from the external natural background.
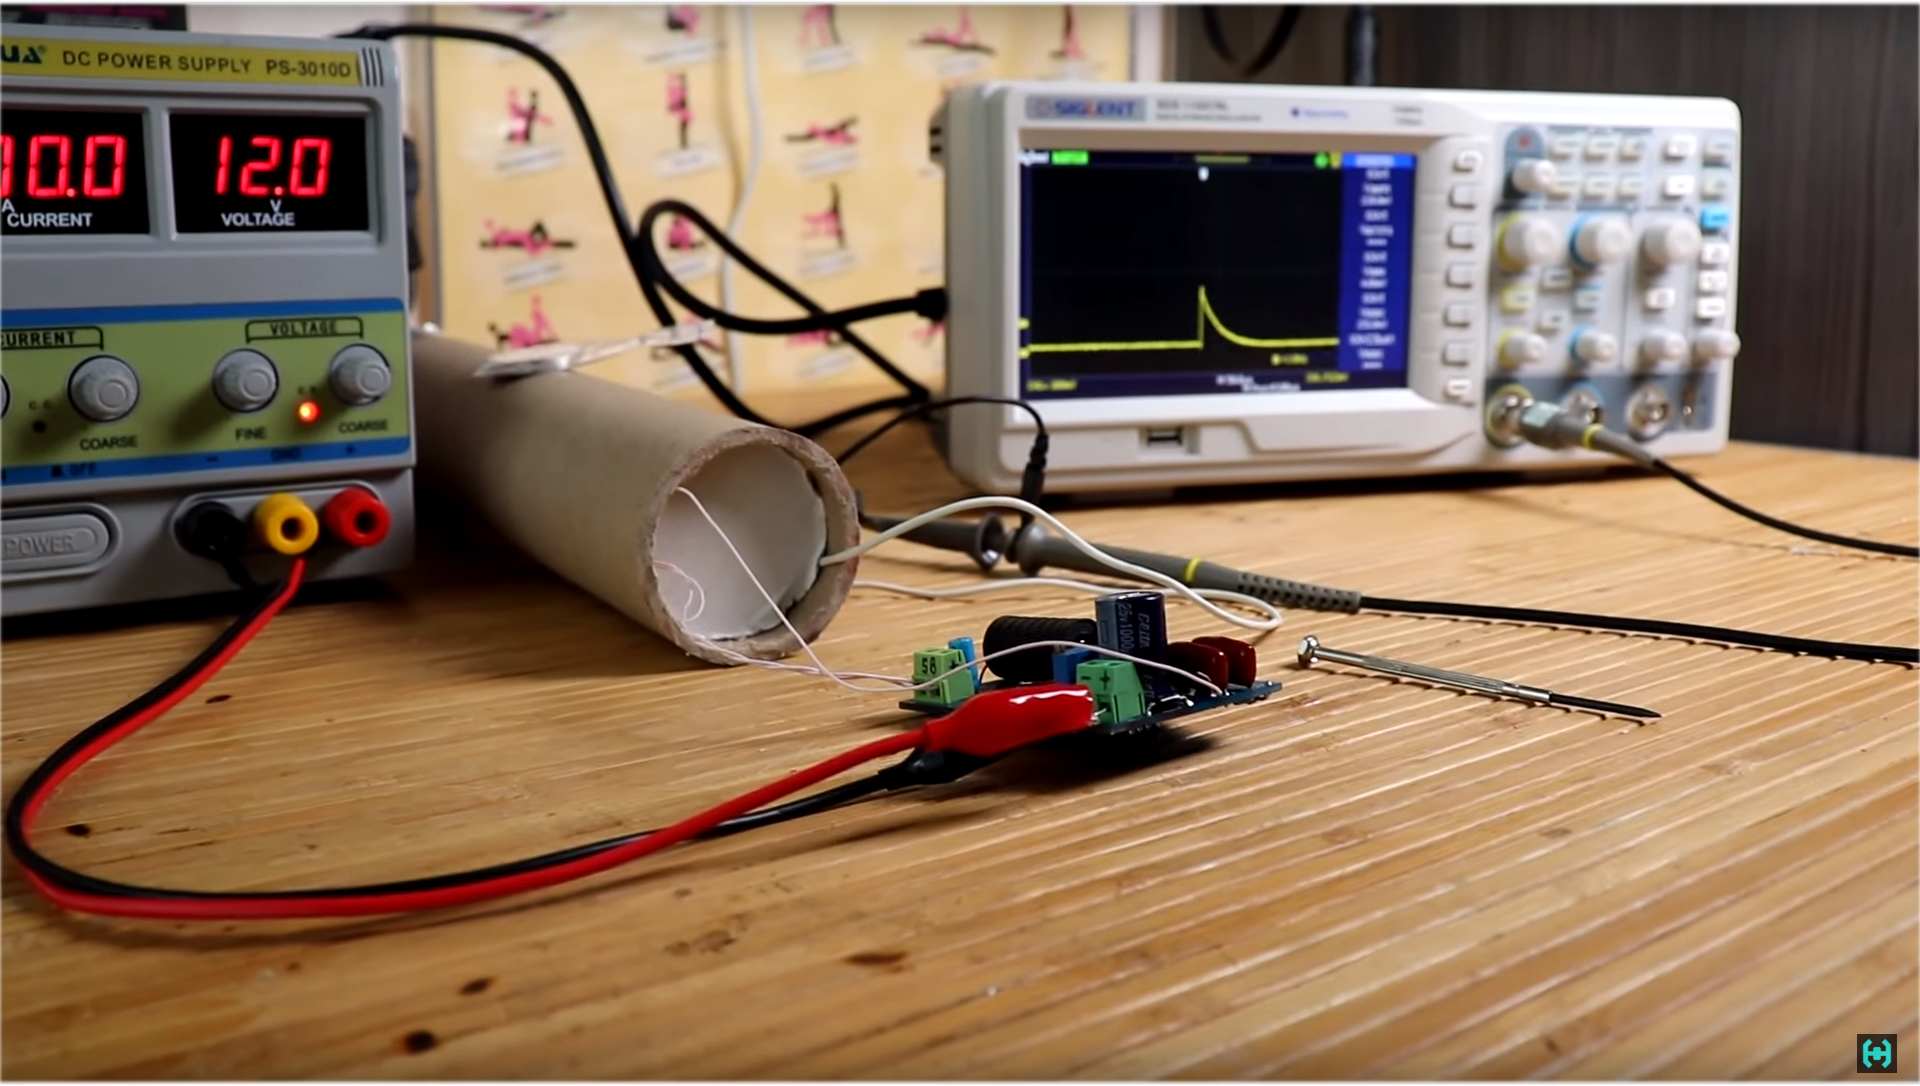 The second part of
Archive with gerber files and other utilitiesFull project video on YouTubeOur Instagram Source: https://habr.com/ru/post/undefined/
All Articles