 I am a beginner front-end developer. Now I am studying and training in a Minsk IT company. Learning the basics of web-ui takes place using the Webix JS library as an example and I want to share my modest experience and save it as a small tutorial for this interesting UI library.
FOURTH CHALLENGE
When working with data, it is important to be able to perform several types of operations. In web development, CRUD is responsible for this - four basic functions. The Webix library has all the tools for implementing CRUD. The basis for solving new problems will serve me as material from previous publications: creating an application interface , project modules and working with forms .This article will cover the following tasks:- editing table data through a form;
- installation of the built-in line editor ;
- adding data to the list and chart;
- delete items;
In the documentation you can find the List , Treetable , Table widgets used in the article .Sources are on the link .The resulting demo application can be found here .Step 1. Editing data through the form
In this step, I will work with the “Dashboard” tab in which the table and form are drawn. The table code is in the table.js file, the form code is in form.js.In the article “ Working with forms ”, new entries were added using the add () method , which was supplemented by form validation. Now the form will be used for editing entries.Widgets Table I add event onAfterSelect .When this event is triggered, I will receive data from the table and transfer it to the form fields.const table = {
view:"datatable",
id:"film_list",
scroll:"y",
select:true,
url:"data/data.js",
hover:"myhover",
columns:[
{ id:"rank", header:"", width:50, css:"rank"},
{ id:"title", header:"Film title", fillspace:true},
{ id:"year", header:"Released", width:100},
{ id:"votes", header:"Votes", width:100},
{ id:"rating", header:"Rating", width:100}
],
on:{
onAfterSelect(id){
let values = $$("film_list").getItem(id);
$$("film_form").setValues(values)
}
}
}
The setValues () method , in the above code, is responsible for passing the received values to the form.I run the code and check the result: As soon as a row in the table is selected, its data automatically gets into the form and is ready to work.Now I complicate the process: the new record, as before, will be added to the table; if the data is taken from the table and edited, then I save these changes.I will rewrite the saveItem function and add new methods to it:
let saveItem = () => {
    let form = $$( "film_form" );
    let list = $$( "film_list" );
    let item_data = $$("film_form").getValues();
    if( form.isDirty() && form.validate() ){
        if( item_data.id )
            list.updateItem(item_data.id, item_data);
        else
            list.add( item_data );
    }
}
The function now has the following algorithm:- at the beginning, a check is started for two conditions - whether the form data has passed validation and whether the form has changed. Changes in the form are monitored by the isDirty () method ;
- after that, the condition "item_data.id" allows you to define a new record. A string is sent to the form with all its data, including id, for which there is no text field in the form, but it is required for data. The form stores and allows you to read all the submitted values, so we use id to verify;
- after reconciling records, either a new record is added - by the add () method , or the current element is updated with new properties.
To update the edited data, the updateItem () method is used . The method takes two parameters: id of the selected element and a set of new properties taken from the form. When the function is called, the current data is replaced and supplemented with new ones.Result:
Step 2. Installing the built-in editor
In the previous step, I considered the option of editing table data using a form. But the form on the page is not always needed, so I implement the editing method directly in the element. This method is applicable both in the table and in other components for working with large amounts of data - for example, in a list.I'll start with a tree view in the “ Products ” tab. The code for the table is in the products_module.js file.The Treetable widget allows you to edit the contents of tables, but this function is disabled by default. Editing is configured in two places: in the table configuration editable:true, in the configuration, and in the configuration of each column. The speakers are set up editor:”text”. The “text” attribute sets the type of editor. For more information on editor types, seedocumentation .const products = {
editable:true,
view:"treetable",
scrollX:false,
columns:[
{ id:"id", header:"", width:50 },
{ id:"title", header:"Title", fillspace:true,
template:"{common.treetable()} #title#", editor:"text" },
{ id:"price", header:"Price", width:200, editor:"text" }
],
select:"row",
url:"data/products.js",
rules:{
"price":webix.rules.isNotEmpty,
"title":webix.rules.isNotEmpty
}
}
In the code, I added editors for the Title and Price columns. By clicking on any cell, an editor will open in them - a text field: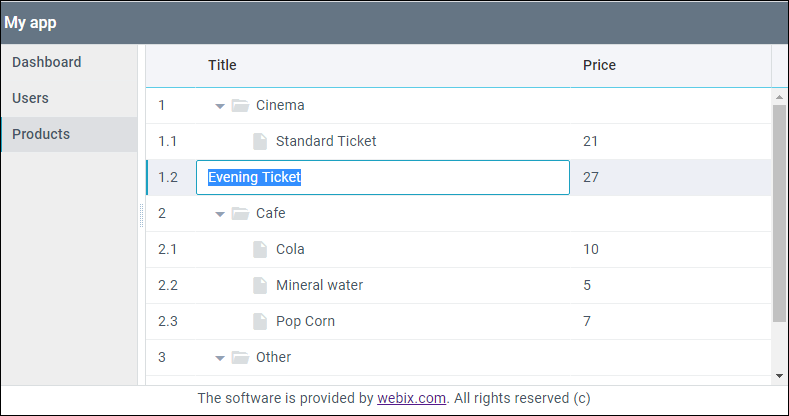 Now I will go to the “ Users ” tab , and I will analyze the option of editing the List widget . The widget code is in the users_module.js file.Data editing is available by default for TreeTable and DataTable widgets. To use the built-in editor in other widgets, you can use the special EditAbility module . I use this module to edit the data of the List widget. To do this, based on the LIst widget, I will create a custom component using the protoUI method .I write down the name - the name property - of the future widget and inherit the necessary modules for the base widget.List widget prototype:
webix.protoUI({
    name:"editlist"
}, webix.EditAbility, webix.ui.list);
After calling protoUI, I get the finished component. It is embedded in the widget in the same way as all the others - by setting view:"editlist".view: "editlist",
editable:true,
editor:"text",
editValue:"name",
id:"user_list",
select:true,
url:"data/users.js",
template:"#name# from #country# <span class='webix_icon wxi-close'></span> "
}
Since there can be many fields in each record, and name and country are immediately drawn in the template sheet, the - setting is added in the configuration editorValue:”name”, indicating which field can be edited.Result: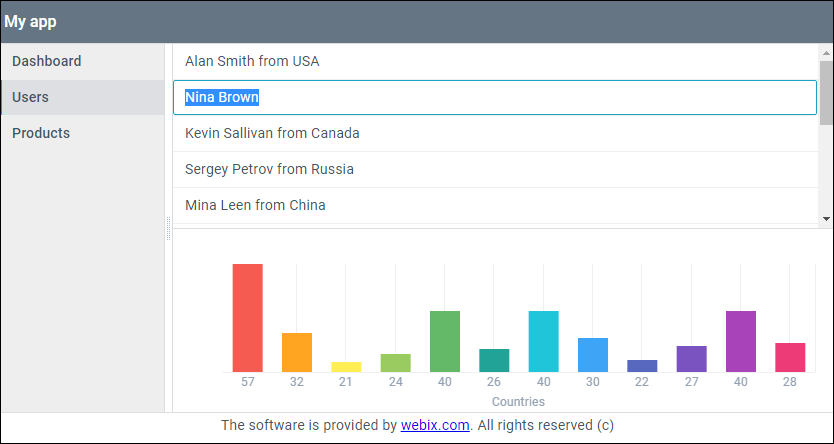
Step 3. Adding data to the list and chart
This part of the article uses List and Chart. Widgets, the code of which is located in the users_module.js file and rendered in the " Users " tab.Chart and List widgets use the same data - a JSON array. Therefore, when I implement the ability to add data, it is necessary that they fall into both components.To do this, in the users module, I will draw the "Add new person" button.{
cols:[
{
view:"button",
id:"btn_add_person",
value:"Add new person",
width:150, css:"webix_primary",
click:addPerson
},
{}
]
}
Clicking on the button calls the addPerson function adding a new record to the list.The chart displays the age of each record, so a random number will be generated for a larger spread.Function to add a new record:let addPerson = () => {
let obj = {
name:"Some name",
age:Math.floor(Math.random() * 80) + 10,
country:"Some country"
}
$$("user_list").add(obj);
$$("chart").add(obj);
};
Result: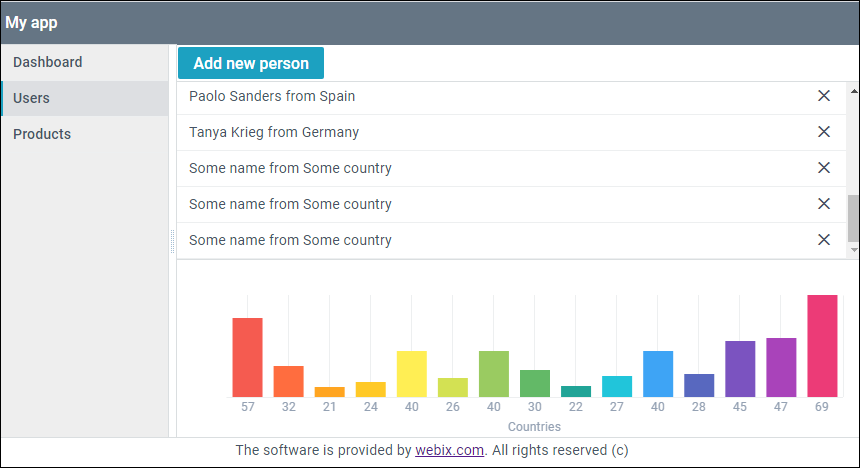
Step 4. Deleting Items
Removing elements will be demonstrated using the List widget as the Users tab and the Table widget as the Dashboard tab.To begin with, in the Table widget I will create a new column in which I will place the html tag with the icon.To track clicks on icons, you need to use the onClick table property . This is an object that stores handlers associated with elements according to one of their CSS classes - I have it "delete_icon".To process clicks on icons, I take their delete_icon class and write it to the onClick object as a key, the value of this key will be a function - our handler. Among the arguments comes the id of the record, so nothing prevents it from being removed using the remove () method .Table widget code:const table = {
view:"datatable",
id:"film_list",
scroll:"y",
select:true,
url:"data/data.js",
hover:"myhover",
columns:[
{ id:"rank", header:"", width:50, css:"rank"},
{ id:"title", header:"Film title", fillspace:true},
{ id:"year", header:"Released", width:100},
{ id:"votes", header:"Votes", width:100},
{ id:"rating", header:"Rating", width:100},
{ header:"", template:"<span class='webix_icon wxi-close delete_icon'></span>",
width:35}
],
onClick:{
delete_icon(e, id){
this.remove(id);
return false;
}
},
on:{
onAfterSelect(id){
let values = $$("film_list").getItem(id);
$$("film_form").setValues(values)
}
}
}
The row deletion algorithm for the List widget is the same as for the Table widget:{
view: "editlist",
editable:true,
editor:"text",
editValue:"name",
id:"user_list",
select:true,
url:"data/users.js",
template:`#name# from #country#
<span class='webix_icon wxi-close delete_icon'></span> `,
onClick:{
delete_icon(e, id){
this.remove(id);
return false;
}
}
},
The result of deleting lines in the Users tab: You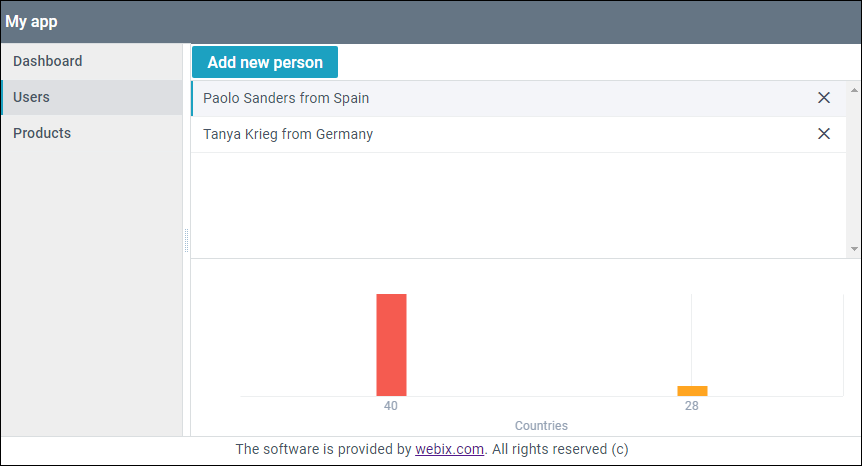 can find the finished application here .
Conclusion
Implementation of CRUD using the jix library of Webix is achieved in various ways: There are built-in editors for changing data, and an API that allows you to do the same, but through a third-party form. Adding data has various scenarios, and in the form you can implement the whole set of CRUD functions. Methods are implemented with a few lines of code. The library architecture makes it easy to combine various functions with each other.