Zabbix: network topology is clear and automatic
Manage a larger network than a localhost? Do not control, but want to learn? We invite you to the course “Linux. Level 5. Zabbix. Monitoring IT infrastructure of an enterprise . ” At the free seminar of the Specialist training center at Bauman Moscow State Technical University, you will learn how to teach Zabbix to monitor the network automatically: find existing and add new nodes, draw and update the topology. The seminar will be held by the leading teacher of the "Specialist" center at Bauman MSTU, the main system administrator of the network of MSTU. N.E.Bauman Vyacheslav Aleksandrovich Lokhturov. Sign up (or look at the recordings) for our free seminars .Hello everyone! My name is Vyacheslav Lokhturov. I work as an engineer at Bauman Moscow State Technical University. Since graduating in 1997, I have been working as an engineer. At the same time I teach at the training center No. 1 "Specialist" - a company that is friendly MSTU. Many other teachers and staff work there.The theme of the webinar will be part of my work as an engineer - a wonderful monitoring system ...
Network topology: background, Baumanka Wikipedia, sources
The webinar recording can be viewed at this link: https://wiki.val.bmstu.ru - a wiki format. My email addresses are: val@bmstu.ru, val@specialist.ru. This tutorial I use as an engineer. There are a lot of different materials. If you don’t like it, there are a lot of materials on the Internet on your topic with us (“Zabbix”).From the point of view of teaching material and teaching, I use the section "Materials on the methodology of reading courses": And there is a section with webinars. For each of the readings by me there is a record here:
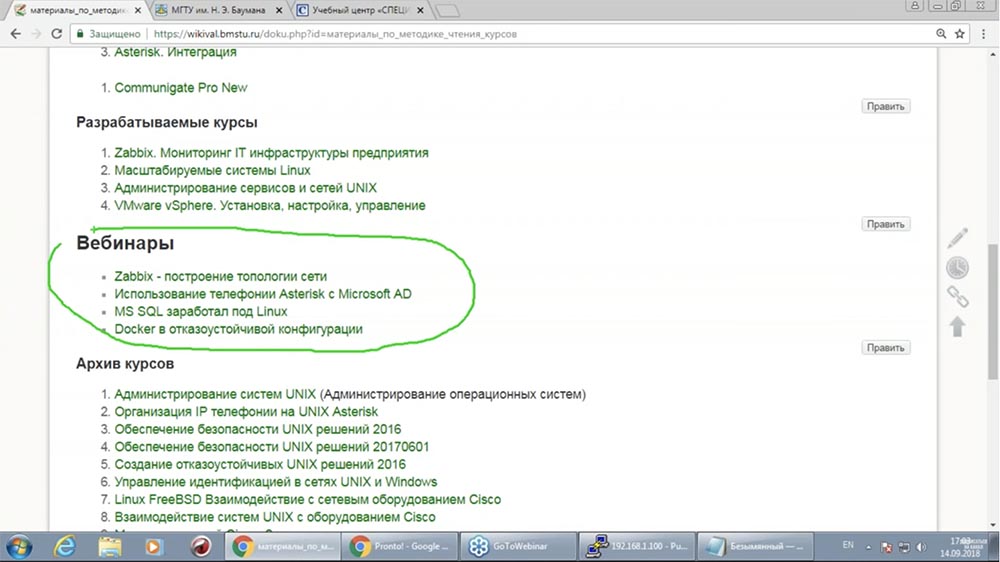 I immediately said: “If we do, let's do the coolest! Let's show how the network topology is automatically built in Zabbix. In 45 minutes I have to tell this.Regarding the network topology: at Bauman MSTU a huge network; accordingly, the network topology is what we really needed for a long time. Historically, Zabbix was not the system that we used at the initial stage. Like all people from departments like computer science, management, computer system, complex and network, we all liked to program ourselves, and now we programmed ...We have a small Wikipedia that is used for work. And among the elements of this Wikipedia there is a section devoted to network switching. Access to this Wikipedia is still closed by a small VPN:
 I’ll now show you what the network topology looks like at our university. It is worth it to see; and then compare with the result:
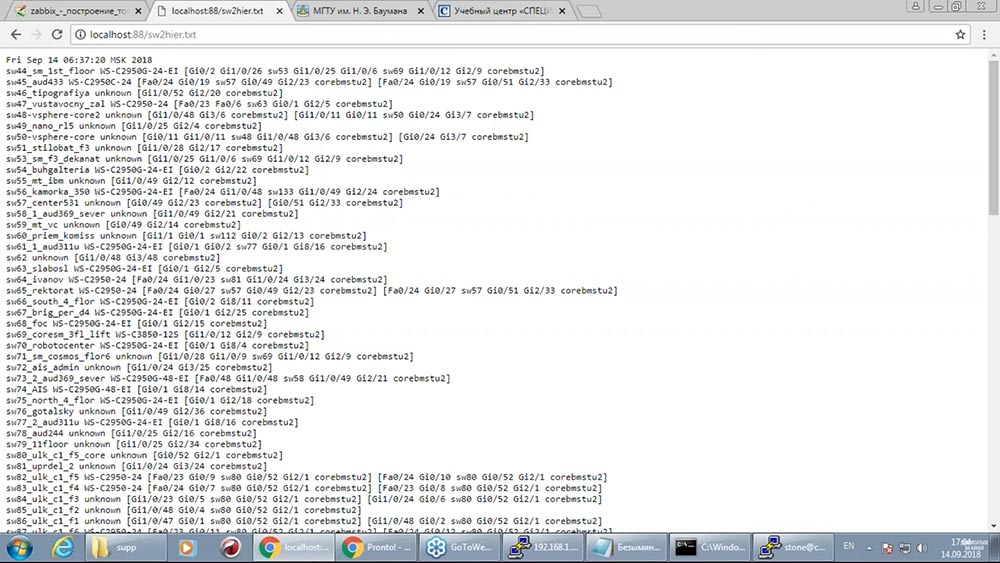 It seems to me that everything is clear: all the switches and their path to the root switch; if something is missing, we will quickly recover from this text file. The network topology is built on a daily basis. All is well, but not spectacular, of course. It’s hard to sell. Therefore, we have such a scheme at the university.
The network topology is needed when some switch has disappeared. To understand where he was connected
We will try to see something more spectacular. And a certain reference to what we will do is this article on the forum:
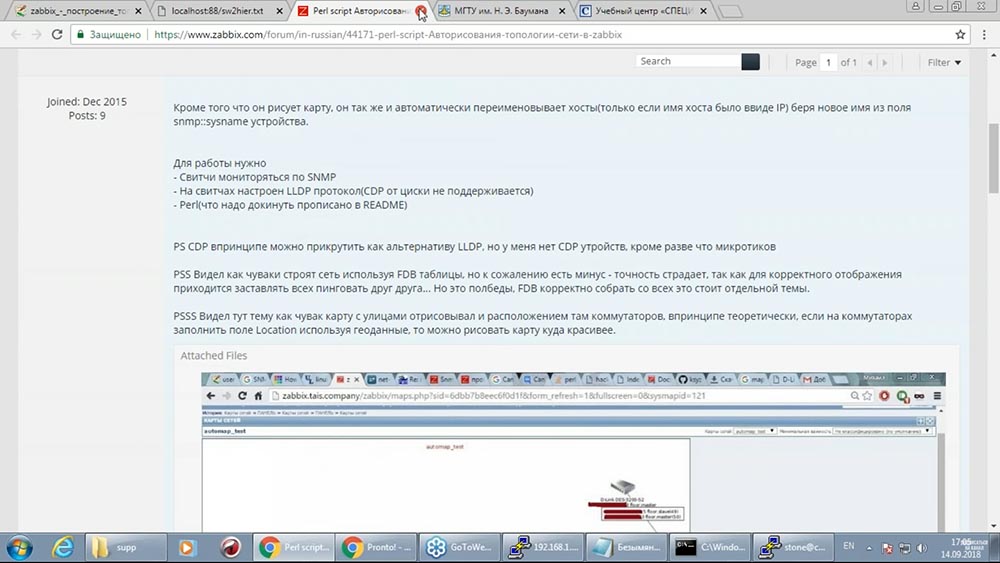 It tells that there is some kind of wonderful script written in my former favorite Perl language, which the network equipment polls for, makes some conclusions and somehow miraculously feeds the results to Zabbix. But we will not use Perl, but we will use something else.We say goodbye to what we have. Let's move on to practice.
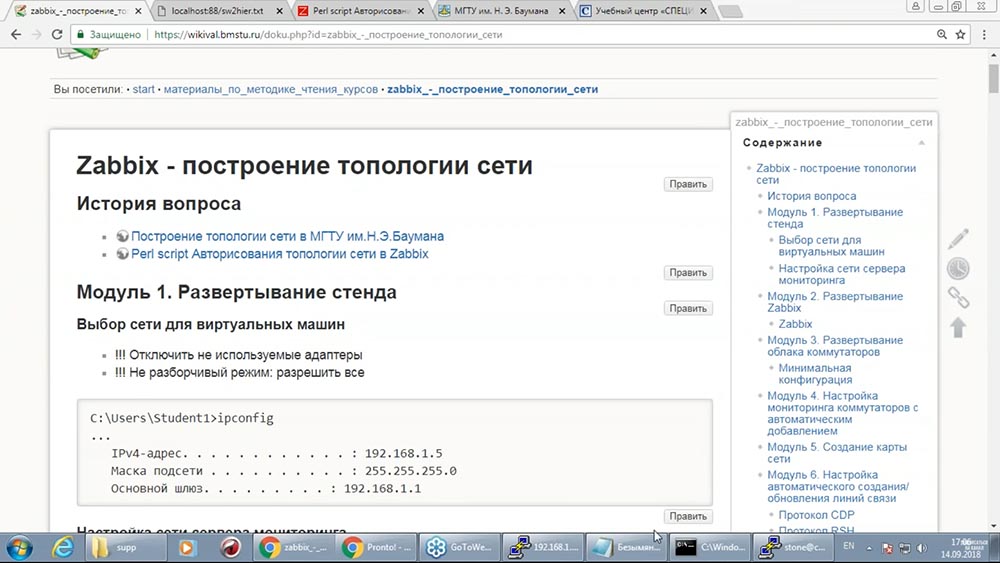 I will be happy if you can reproduce all this at home and try to prepare for this all that is possible. After the webinar, you will want to repeat everything and start with the fact that you need to deploy Zabbix, a virtual machine, a network. How to do this?At home, you type the ipconfig command and you see that you have such an IP network at home (maybe a different one, but most often this one): I have the
 fifth address (192.168.1.5) here, and you can have the 20th or 30th ... Surely there is a Wi-Fi router that issues these addresses. Therefore, I will now draw a topology based on what may be in your home so that you can reproduce it:
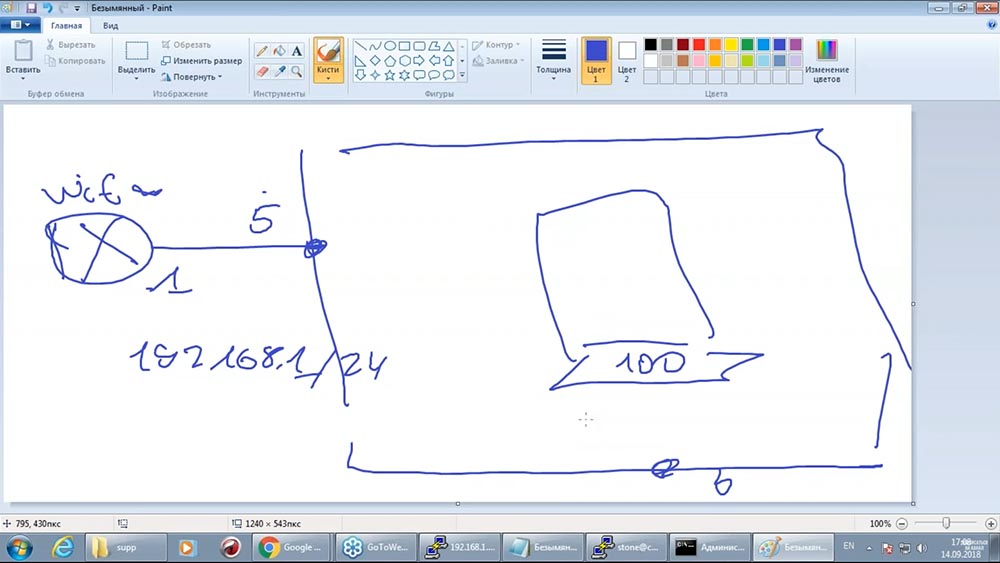
- You have a WIFI router.
- The system in which you want to play the webinar.
- 192.168.1/24 – 1- WI-FI-, 5-, , – .
. , – , 2, 10, 20 , . , linux-, «». , 100. , 192.168.1.100.
Where to get a car? Nothing prevents to take the Linux distribution. I am a big fan of this distribution. We will not breed holivars - I love him, I choose him, I use him in courses. You can take and install from this site: So that we do not spend 45 minutes installing Debian, I will take a ready-made pre-installed image. Who needs it - write to the mail, I will send you this image, although there is nothing particularly outstanding in it (just so as not to waste time installing):
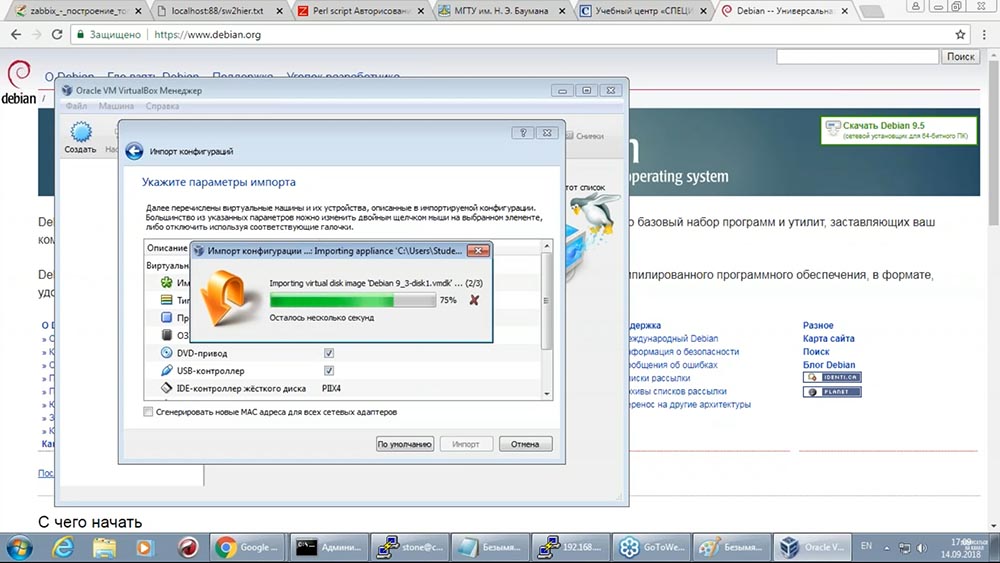 While it is installed, you can see the section in the manual ...
Booth deployment
There is a story about the ipconfig command: And then, when the machine turns around:
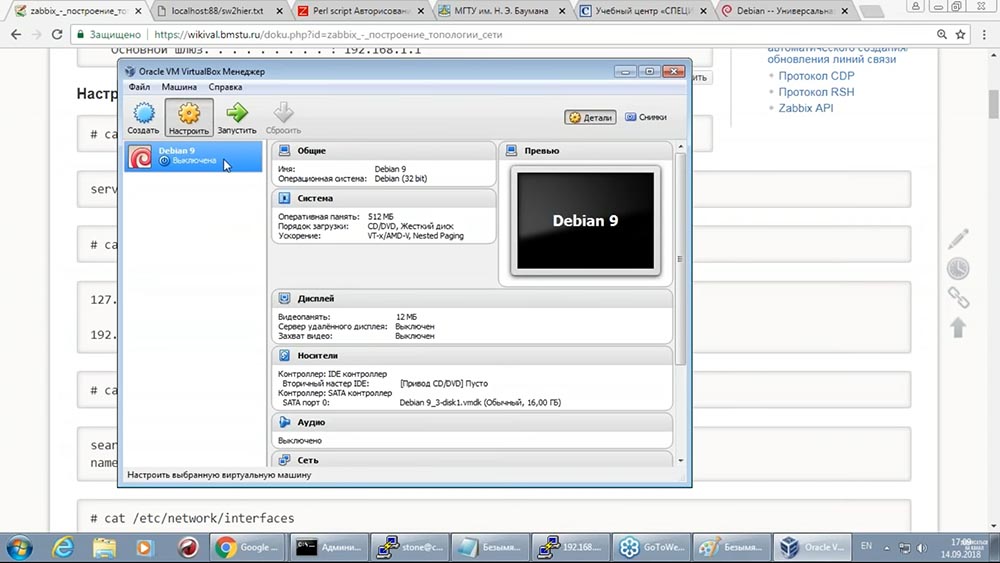 You can give a name in the settings, give it more RAM: There
 are different virtualizations - VirtualBox is good for home use. At the enterprise, we and my friends use VSphere (we are very pleased with the product from VMware), but there are more than enough courses for VirtualBox.Network:
 Since we are saying that this machine will be connected to our network, we can work with it - it must be connected by a bridge to a physical adapter. I’ll regenerate the Mac address. I launch our virtual machine:
 And after starting, I make a configuration. The manual lists the files that need to be edited: assign a name to the machine, it is desirable to edit the hosts file, resolv.conf (responsible for the DNS client) and the ip-address chosen by us - these four files must be edited. I will try to do it as quickly as possible.
Zabbix deployment
The password of this user (root) is immediately set in the image - never use it in practice! Just to save time, I use a privileged account: The manual lists the files that need to be edited.
 Next, I give the name to our machine (Zabbix monitoring server):
 Hosts file:
 Change the address to the 100th and the name of our invented domain (each listener on our courses has his own, individual, like a network with a domain):
 What else remains? Resolv.conf (DNS client):
 Corp1.un will dock to short names, and your WIFI router will usually work as a DNS server:
 What is left? The most important, large file is network / interfaces. Here is a template for different courses, many interfaces:
 But our car will have one interface. It will be a monitoring server with the 100th address and go to the Internet through the 1st:
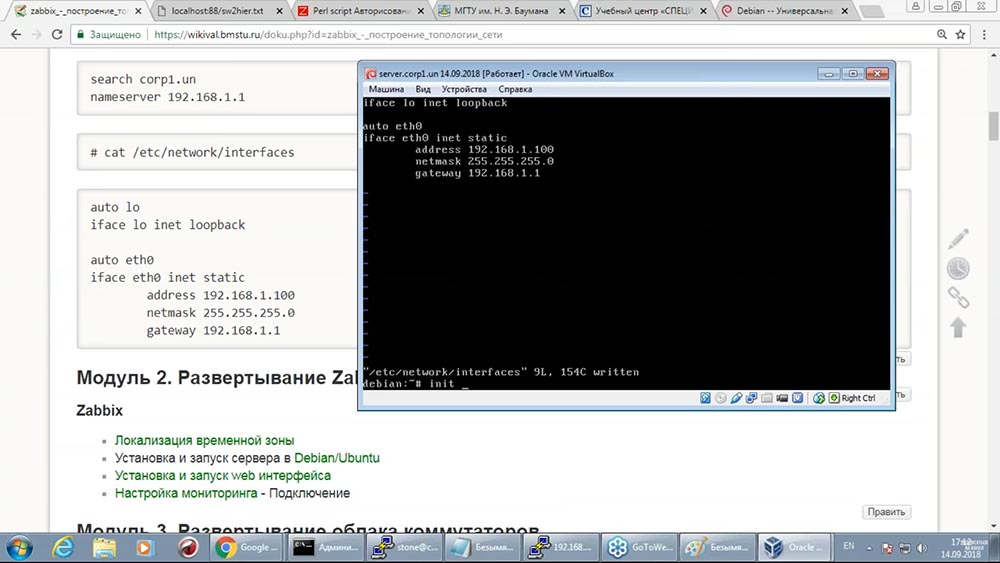 Perhaps, it is not necessary, but faster to use all the files - restart the machine.
Installing and starting a service in Debian
Zabbiks can be installed in various ways. According to Zabbix, there is an excellent website with documentation (by the way, in Russian the active section is supported). Accordingly, various options are offered here. I am a big proponent of installing software from a regular repository. It is no coincidence that is why I chose Debian: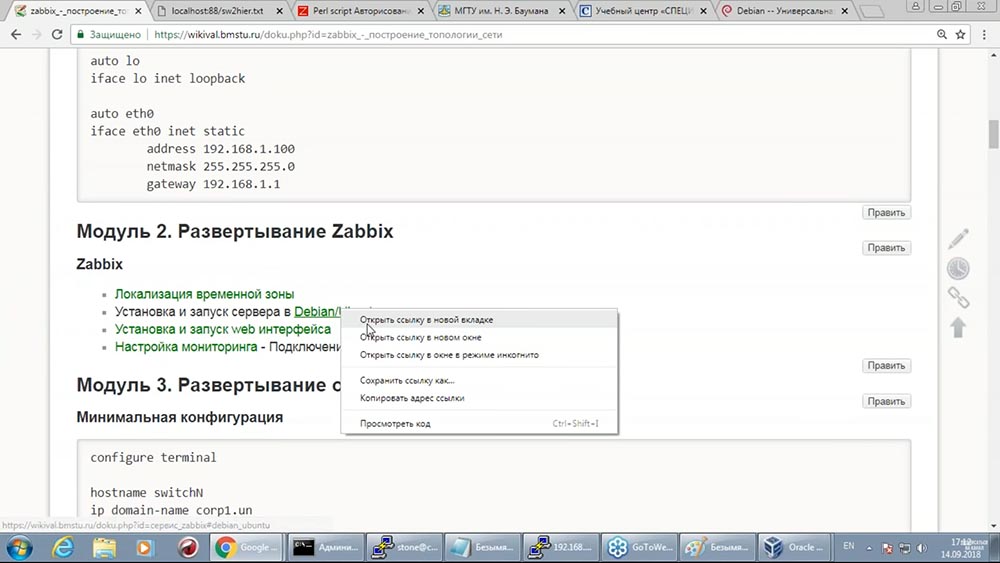
 By the way, if everything is done well, now I should be able to connect to my system. Let's try to do it. I take my favorite SSH client and connect to the 192.168.1.100 system:
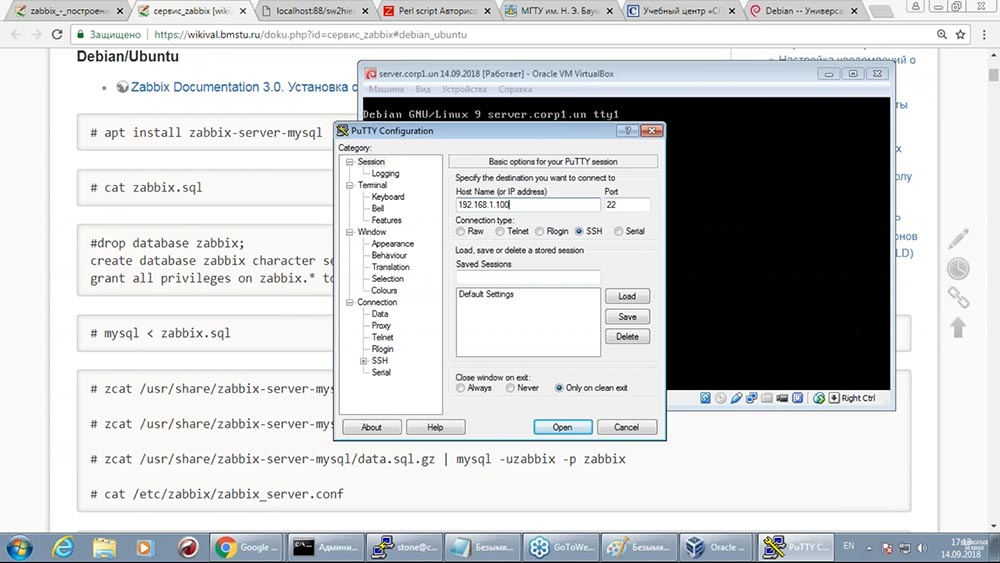 Lucky:
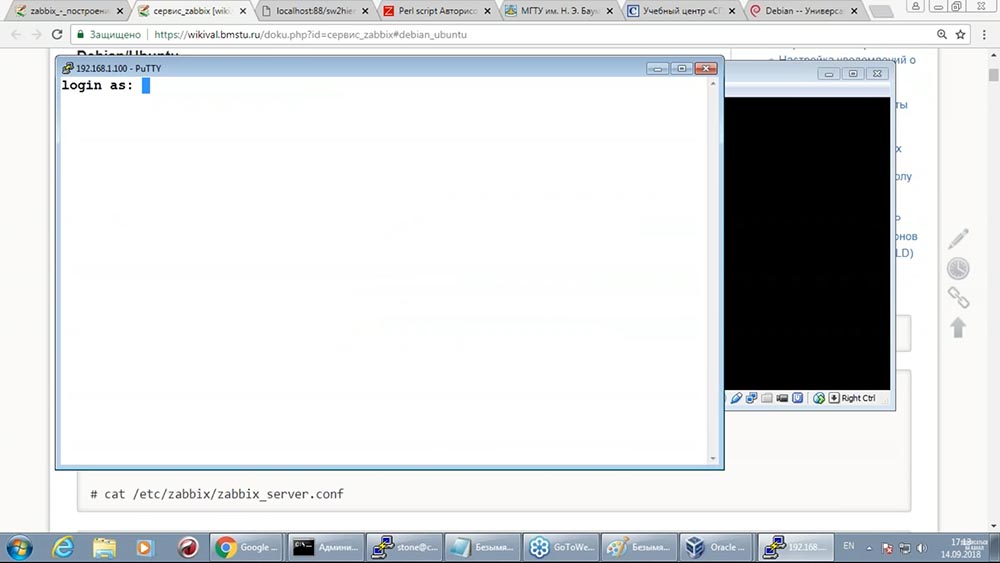 Again, it is not very correct that root is allowed here:
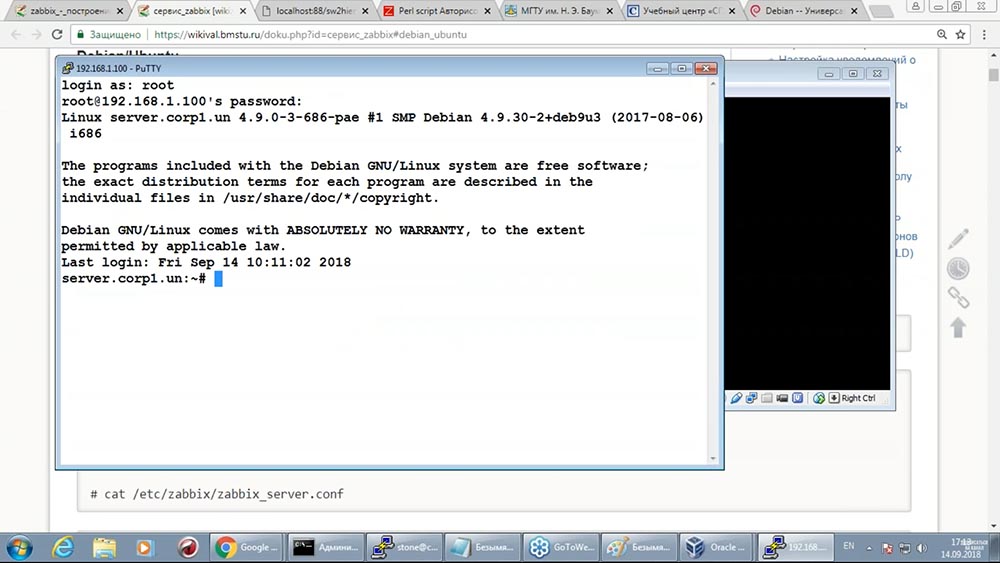 Never do this in an enterprise! Here is only time saving.
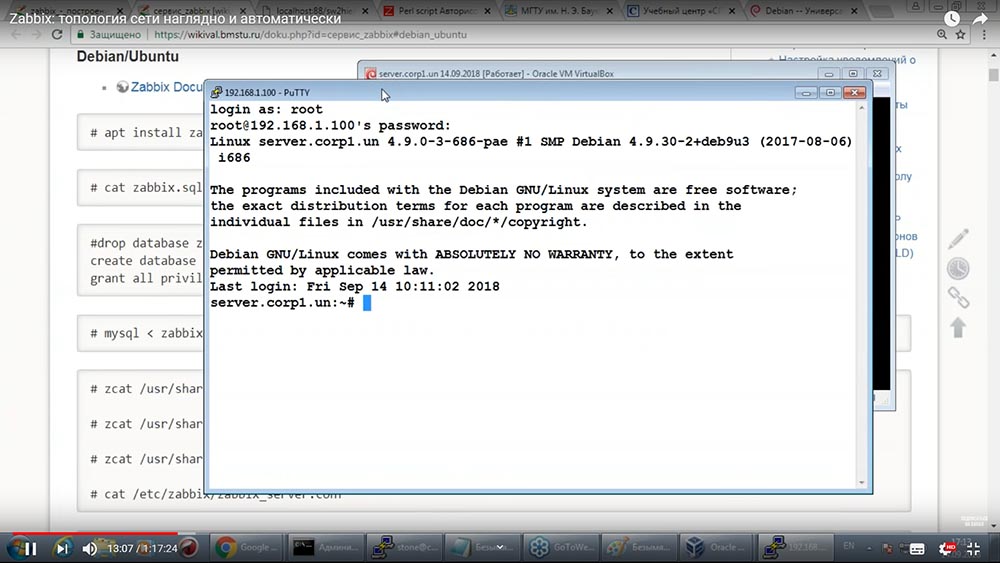 Now we have to install Zabbix. Being a great lover and supporter of the use of basic software and an opponent of connecting any third-party repositories, I will put the version that is in this Debian. Again, thanks to the authors of "Debian" - just dial the installation of such a package: I
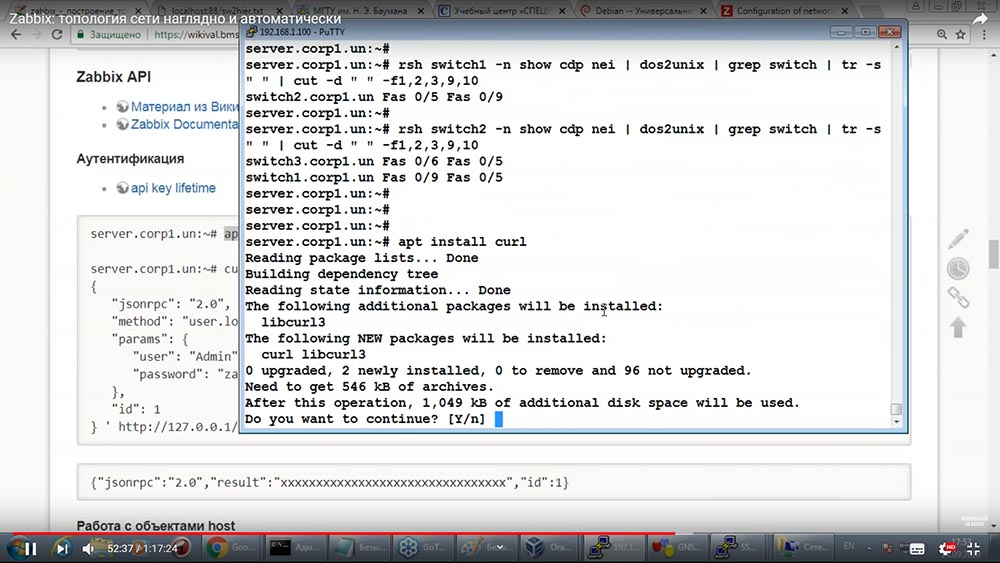
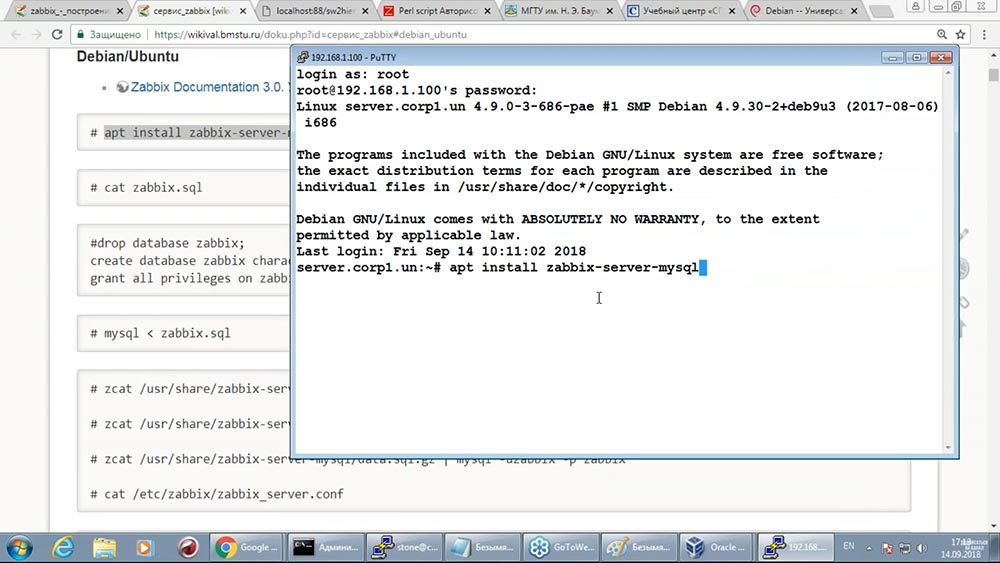 remembered one more thing! We just installed the system - we need to synchronize the repository (apt update):
 Thus, it is enough to type the zabbix-server installation command with support for the database (DB) of your information in SQL, as many components will be installed (it should take a couple of minutes to install) :
What does Zabbix consist of
Zabbix consists of the following components:- "Zabbix" server;
- He is actively working with the configuration, which we will configure manually and automatically;
- , ; MySQL ( – ), ( «» – PostgreSQL, Oracle ).
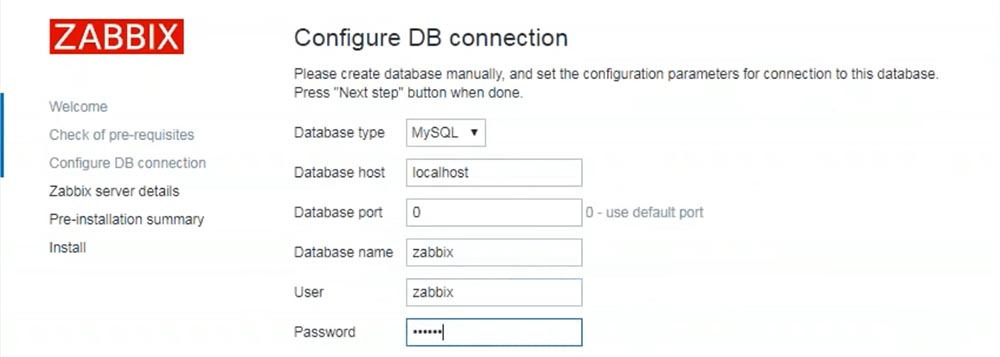
In order for us to work with Zabbix, the so-called frontend is used. Frontend Zabbix is an application written probably in PHP (maybe not everything, but most). Accordingly, the application itself uses a web server. So far, only this part has been put (now we will wait for its installation): Finished. Now, since Zabbix uses the database, we need to create it by following the documentation. To create a database, I will use a simple script:
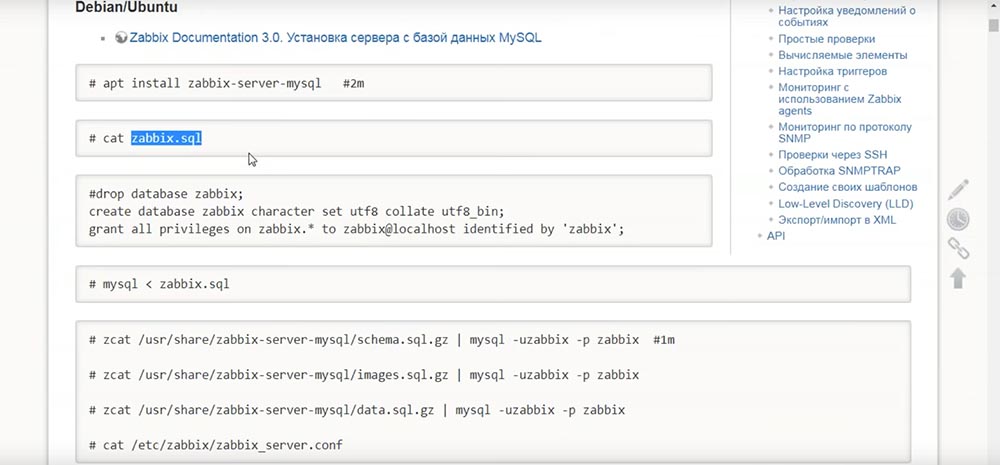 I will not detail what commands mean what. If someone worked with the DBMS, they will see something familiar - the name of the database and so on ...
 Now, using this script, I create the database:
 And fill this database with metadata. There are several files that describe which tables should be, which attributes, parameters, and so on (all this is done, again, according to the documentation):
 That is, now in MySQL we are piling metadata that Zabbix will use to store the configuration and results:
 Not I will spend time looking at what he will create there (there will be a huge number of tables created). Zabbix as a product has been developing for more than ten years and is constantly striving to become better and better, therefore the data structure there is quite heavy. But all this is "under the hood." We, as administrators, will work with an external front-end application, with which everything will be simple, clear and accessible.According to the documentation, for some reason, several files. But since they did so, that means they know what they need! The database is ready:
 Now, according to the documentation, this component needs to be explained:
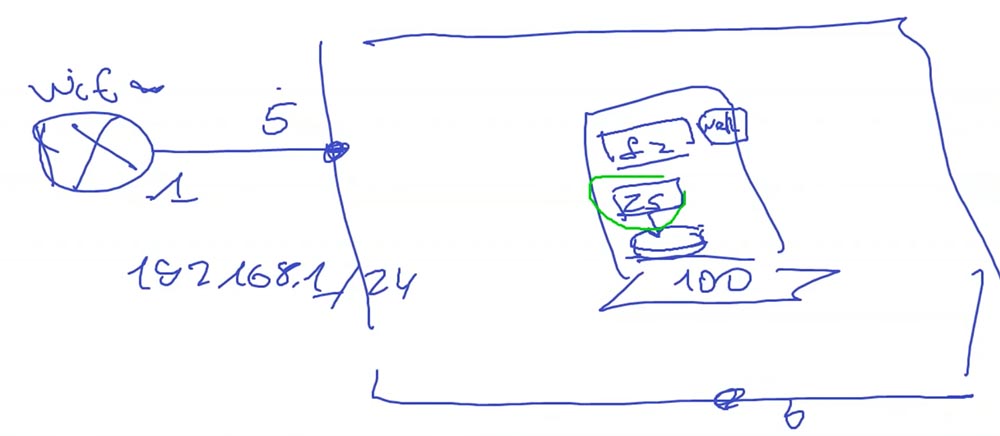 Explain that it should work with the database, connecting under a specific login and password. This is done through the configuration file: Insert at the
 very end of the file:
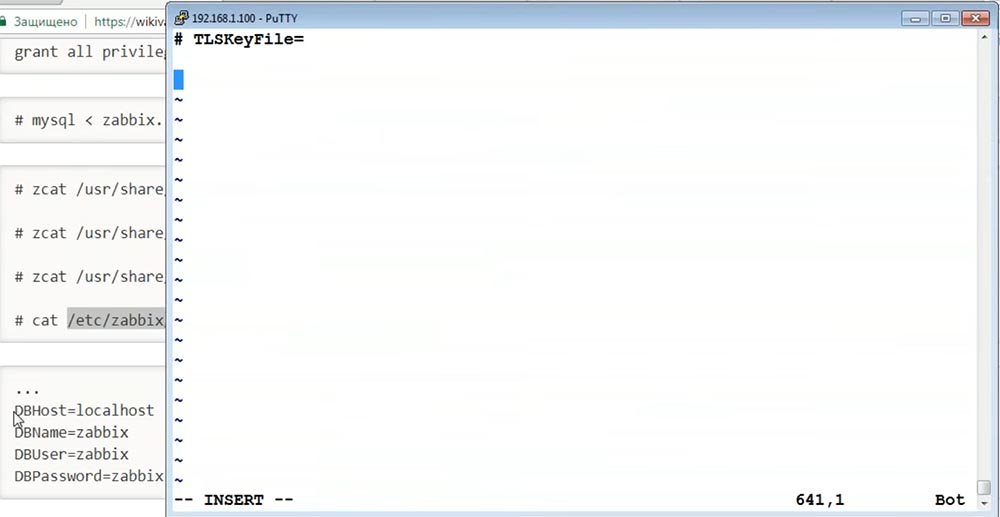 Here we describe that the database server is here under our account:
 “Debian” -package for “Zabbix” does not mean auto-start. Here is a team of the great and terrible SystemD, about which there are a great many holivars:
 It makes the launch of Zabbix automatic after the server boots. Launch Zabbix:
 These two components are running:
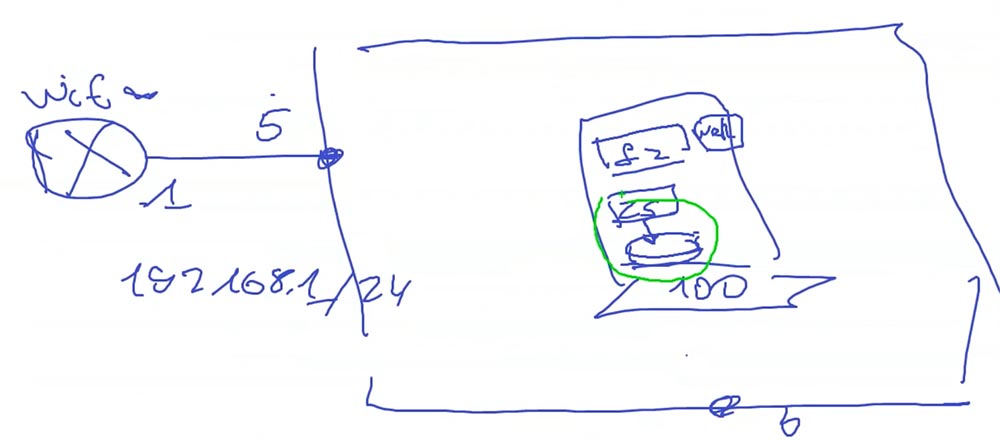 You can already monitor, fill out the configuration. But it’s hard to do something good until the frontend is set ... However, at first - the missed stage ...
Zabbix deployment Time Zone Localization
I unfolded the image, and the wrong time in it: The date is correct. Our time zone is wrong, so I corrected it in such a swoop:
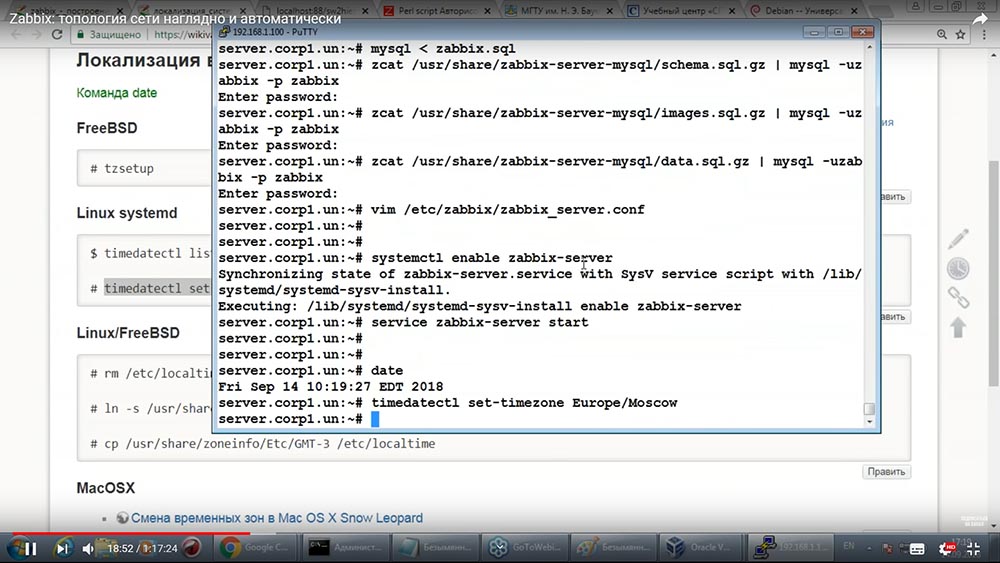
Getting to the frontend. Installing and launching the web interface
Debian should install such a package (after the Apache web server is installed): PHP, a library for connecting programs written in PHP with MySQL, will be installed. In general, I’m launching:
 You don’t need to perform any actions for a long time, everything will be done automatically:
 Now we are putting this component here - the Zabbix frontend; a web server, and we will explain to him that he needs to work with the Zabbix server and DBMS:
 Through the web server we will manage the Zabbix and through it we will see what he monitored there.It is almost established, and now we will see that it has a close relationship with our country. It was developed as an application of some person who worked in a bank. He decided to set up monitoring and took it and wrote his program instead of using the finished one. He worked in Riga, and you and I are in Moscow:
 In this file ↑ PHP initialization is necessary ↓ to do this:
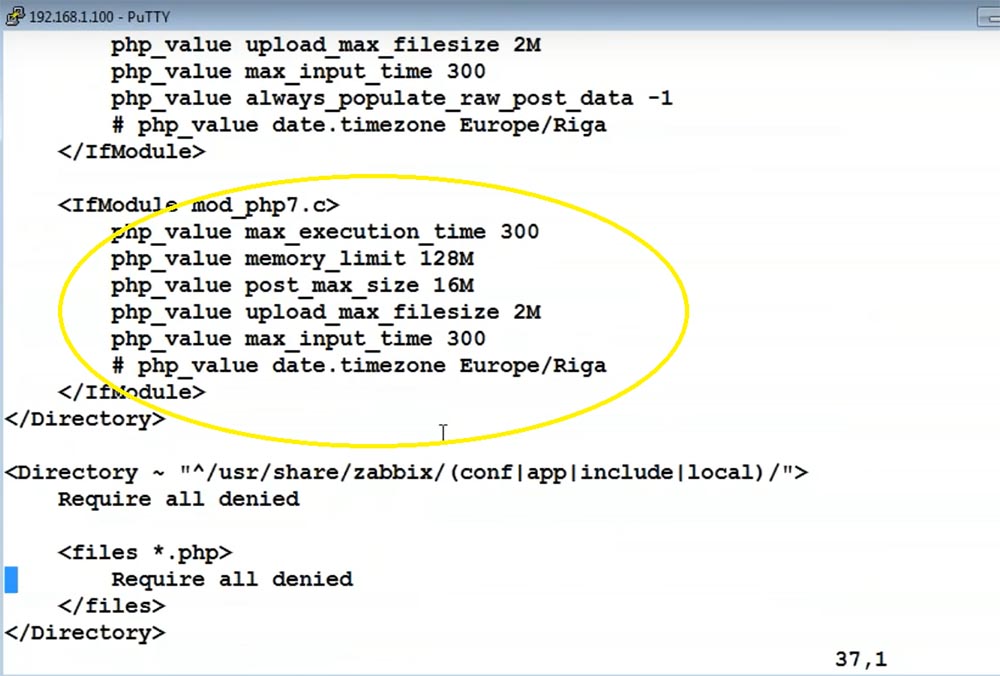 I won’t go deeper about how the web application is configured in Debian. It’s enough to connect the configuration that came from the Zabbix package and restart the Apache web server:
Connect to frontend to configure Zabbix
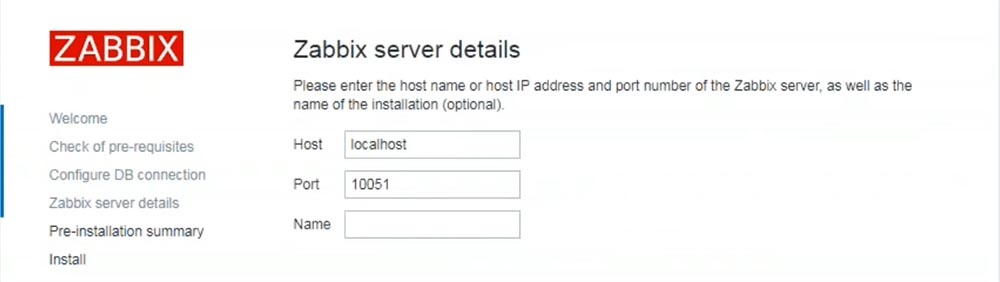
Almost ready to connect to the frontend. It remains only to explain to him where the database server is located. There are two options, and we will do it through the Wizard. For it, you need a file where the configurations will be written: A web server must have write permissions to this file:
 After which you can try to connect in a browser. You can by IP address. My DNS is configured, so I will take this opportunity:
 We have the Zabbix Wizard, where I will click Next, since most have already installed it:


 Our Zabbix is ready to connect. We enter the username and password:
 Configuration, hosts ... Does not monitor any hosts - “Zabbix” is so far only ready to monitor itself, if we install the Zabbix Agent:
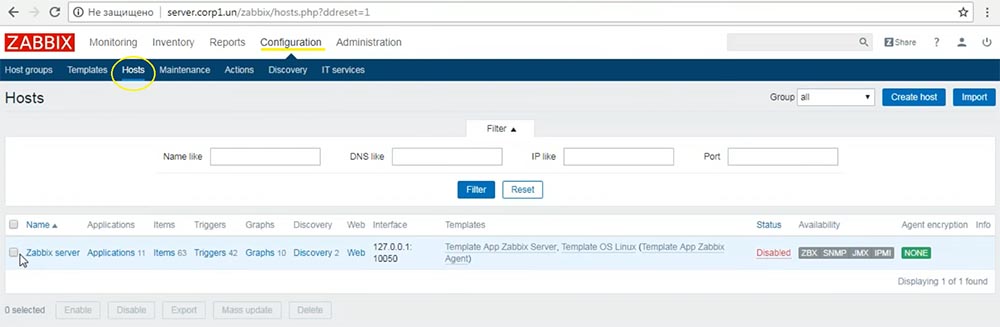
Expand the cloud of switches
But there will be no Zabbix agents for our webinar. It is too simple and uninteresting! You and I will be monitoring a distributed network, chains of communication switches, so we need this chain of switches. Where to get them?I suggested using Virtual Box virtualization. It allows you to emulate PCs (computers), and now I will introduce you to another emulator, also used in our courses. A great product is called Graphical Network Simulator (GNS):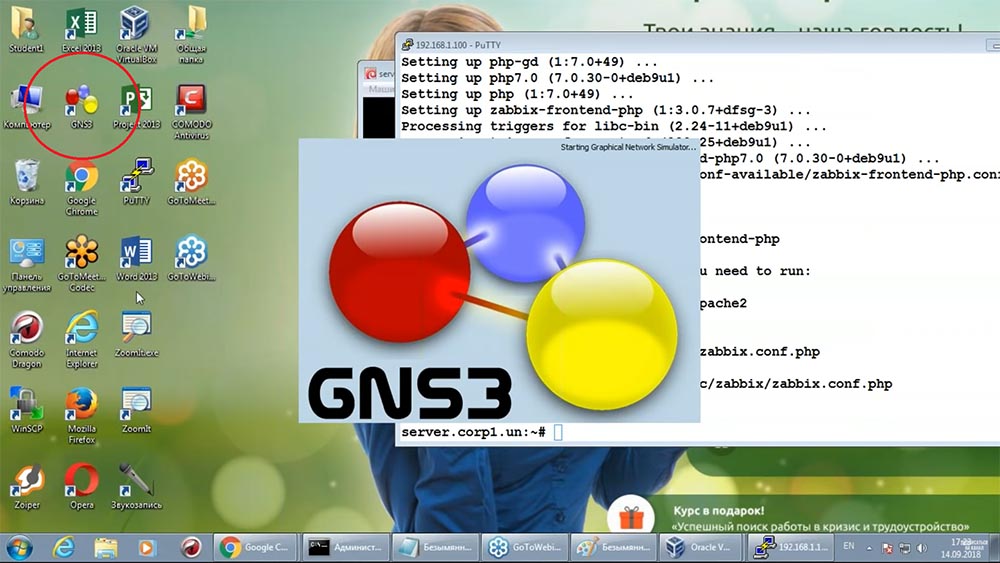 This emulator allows you to emulate Cisco equipment. Here we will deploy our cloud of switches. It will be necessary to come up with the name of the project again (let's save the configuration, what if tomorrow is needed):
 If you want to learn how to work with Cisco equipment at home, install this GNS for yourself and do as we do at the seminar, namely, we will now deploy a cloud of switches. The problem is that GNS does not have switches (there is no emulation here) - only router emulation. Therefore, we have to put the router (drag with the mouse cursor):
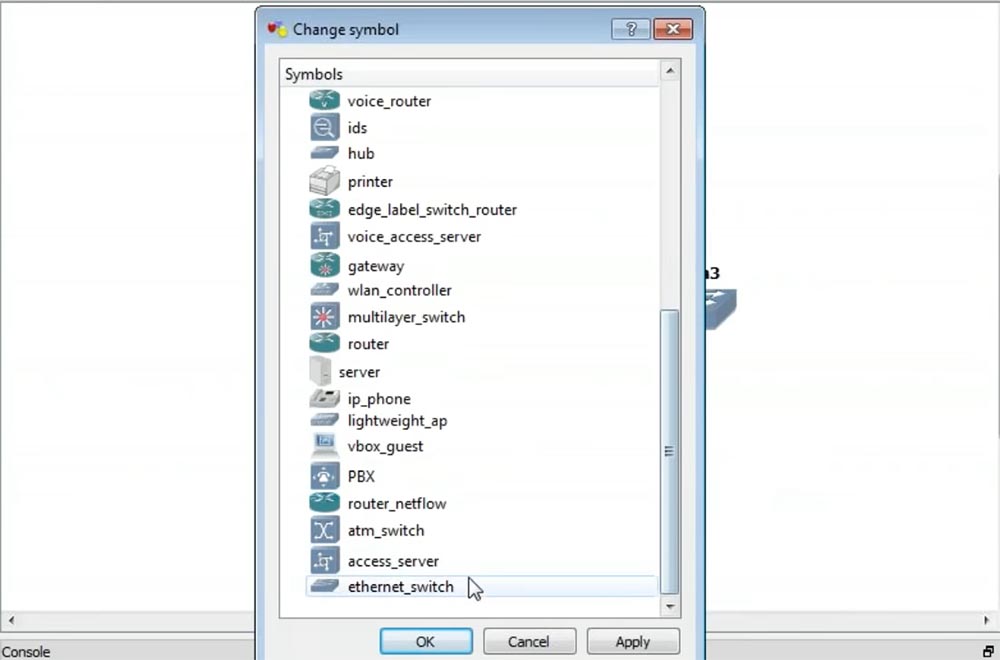
 And somehow make it a switch. How to make switch emulation in GNS? We need to take the router of the 36th series. You can call it a switch (right-click on the switch):
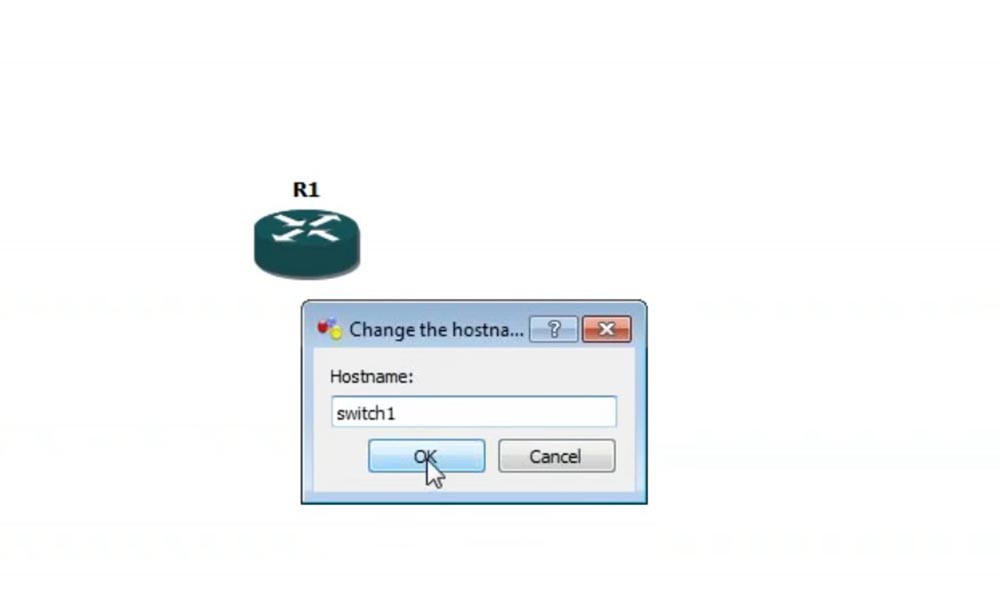 You can draw a switch:

 Looks like? But it will become a real switch only when you add such a board there:
 In this line of Cisco routers, you can put a 16-port Ethernet-board. And for a large number of laboratory work related to switches, this board is quite suitable.We must have a cloud of switches, so now I’ll make this cloud (change the name, picture and insert the board). Let's start with three switches, and if we have time, then we
 ’ll add a fourth one: We’ll connect, not particularly aiming where. Our topology will have to be automatically built:
 Done:
Done: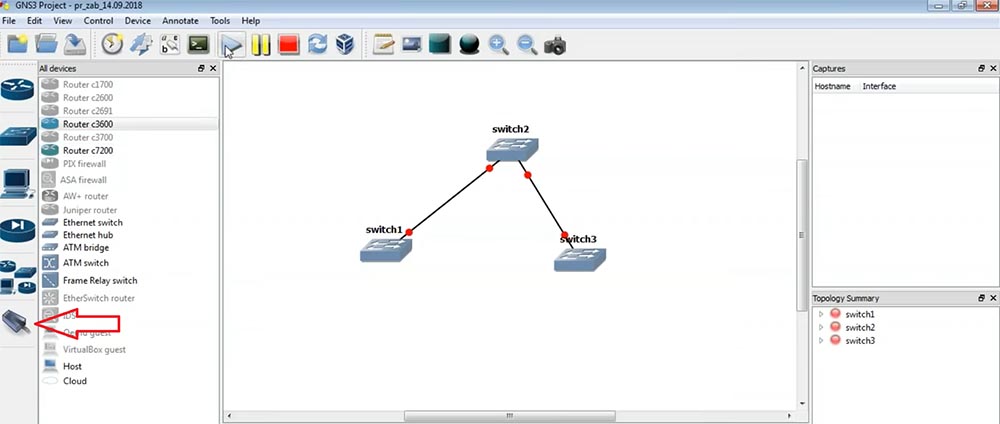 Now I am starting this business:
 Congratulations to those who are watching for the first time how Cisco works - so you can quickly configure the Cisco switch. In the meantime, they start up with us ...This is our Windows-system (Windows 7) and Debian:
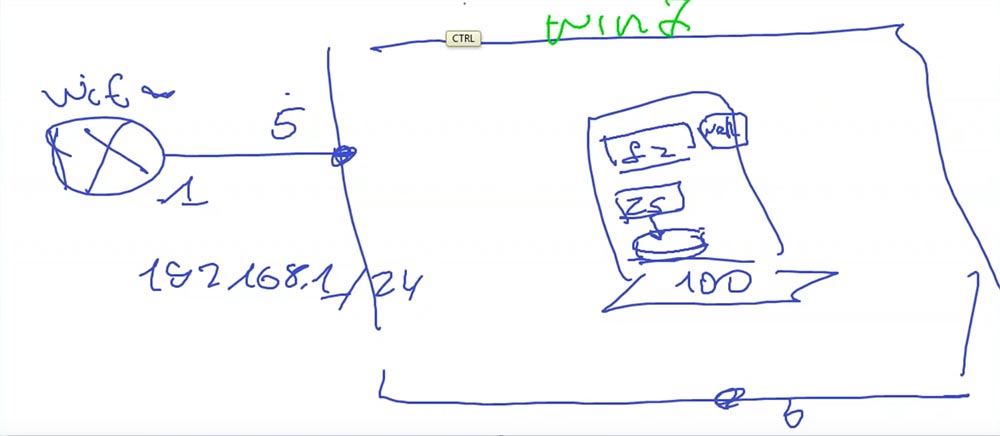 Here GNS3 virtualization and the cloud of switches:
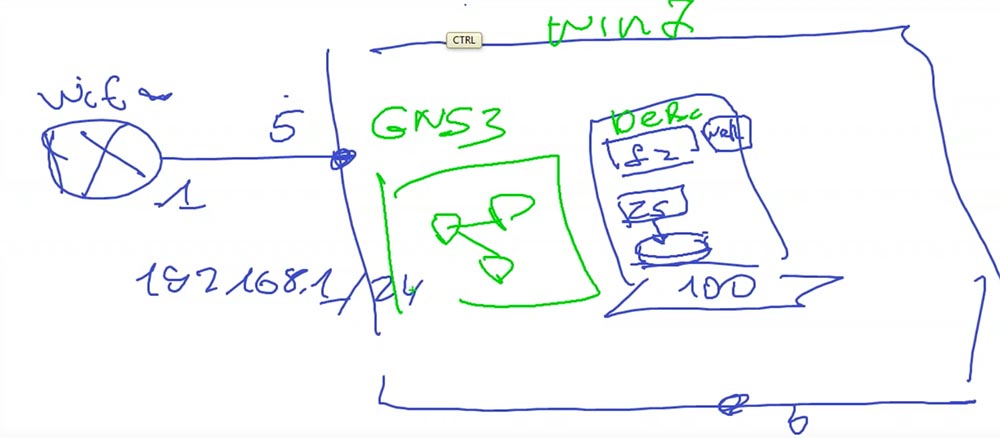 Now it’s clear what is happening: two virtualization systems are used within the framework of one machine. Virtualization of PC-systems (on the right) and virtualization of Cisco-systems (on the left):
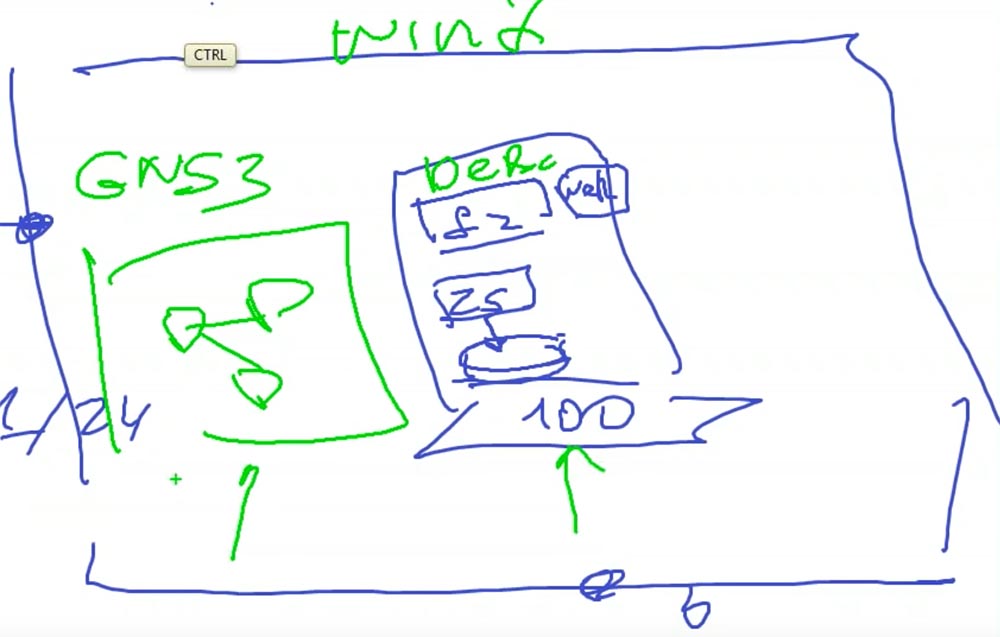 It is necessary to make the server monitor the equipment:
 And so that it can monitor it, this equipment should have addresses in the same network:
 Therefore, without thinking for a long time, I I decided to give these switches addresses (points 101, 102, 103 for the 1st, 2nd and 3rd switches, respectively). 100th is our Linux:
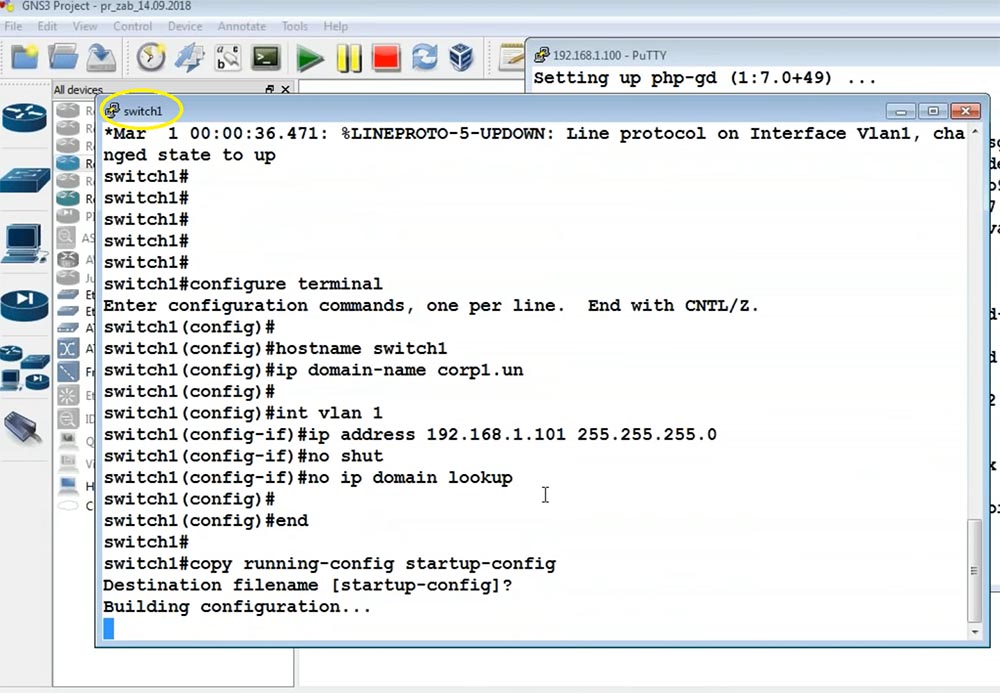
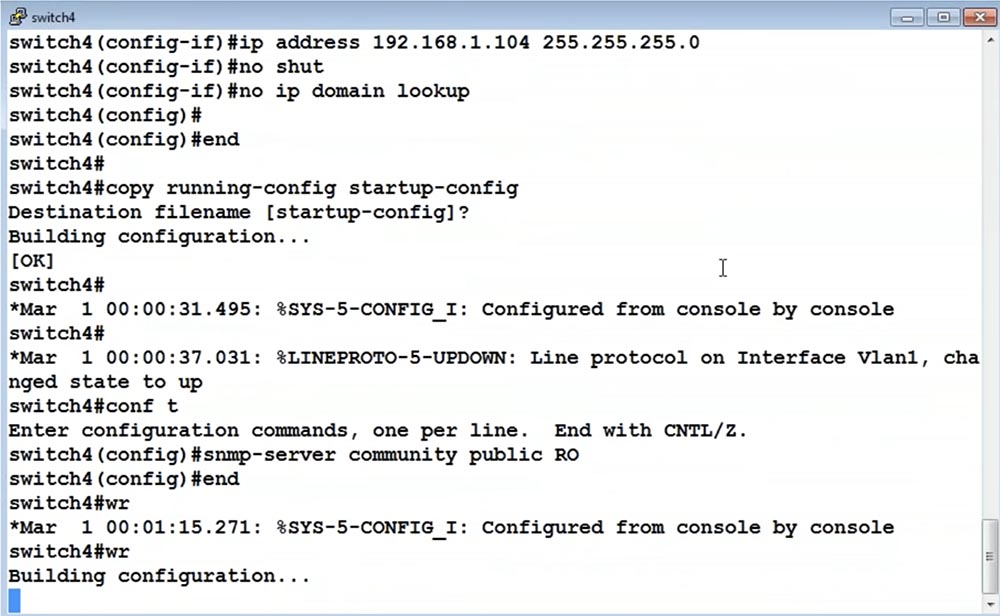
 You can configure this as follows: go to an authorized Cisco course and they will tell you for inexpensive.In order for the switch to be accessible for administration, you need to make the following settings - go into configuration mode, give a suitable name, assign an IP address to the interface and copy the result to long-term memory:
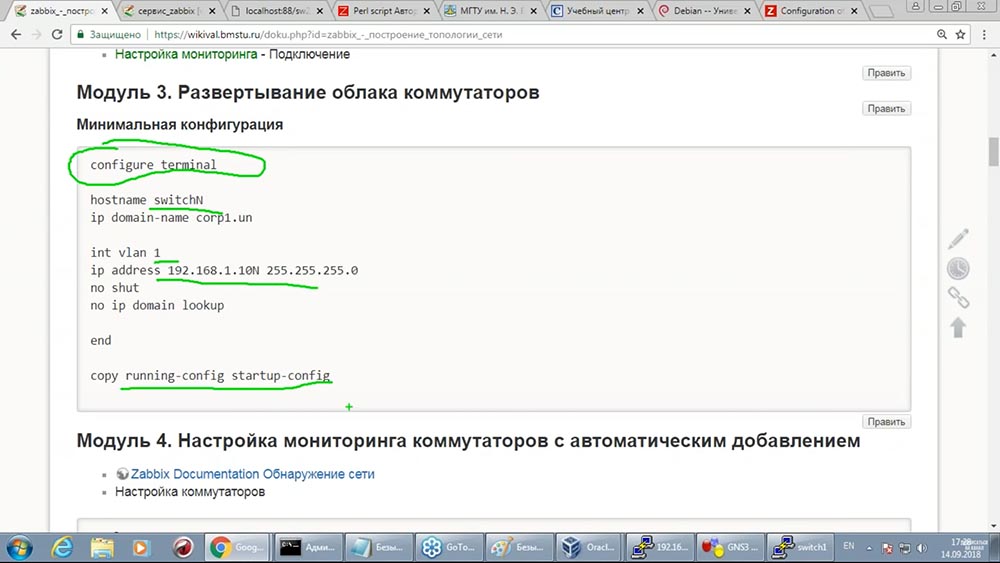 I will prepare the fish so as not to spend a lot of time on it. The first switch will be called switch1, the IP address is the 101st. I copy this configuration to the switch:
 Double-click on the desired switch (now - switch1):
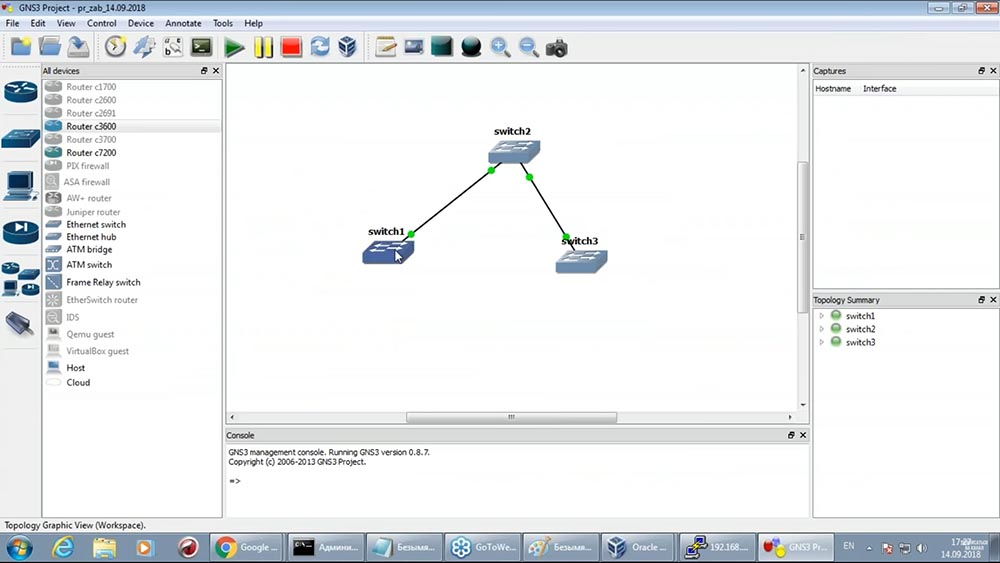
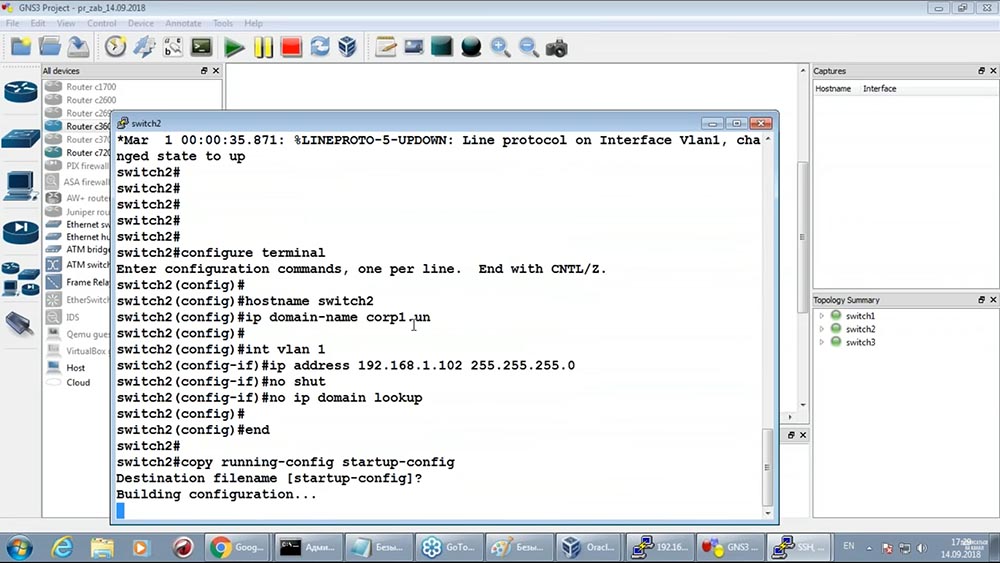
 Set up switch1. Now - the configuration for the second switch: called switch2, IP - 102:
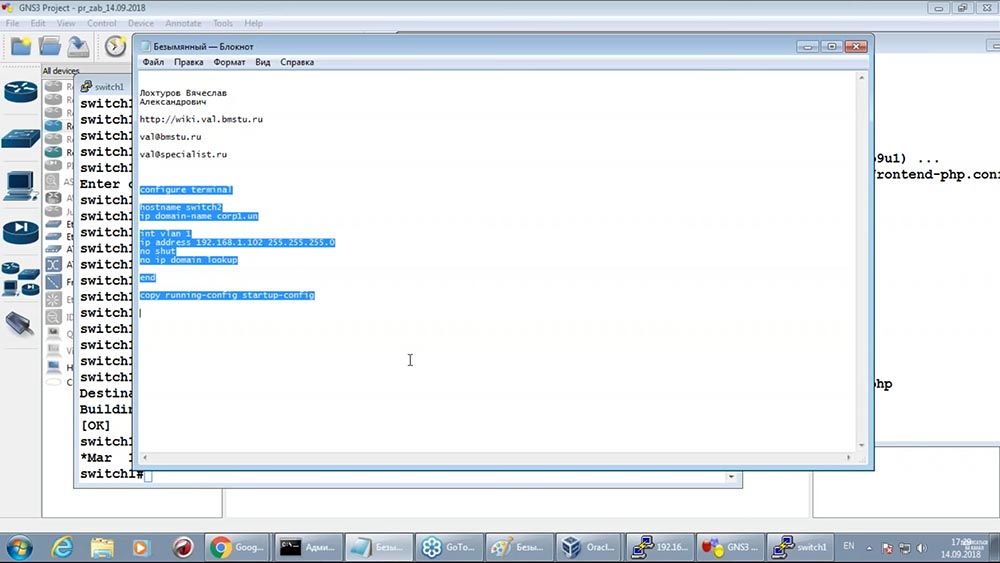
 Accordingly, we act with the third switch.Well, it will be very cool if not only our server is available from our Windows computer, but also what we have configured now:
 GNS3 is a good system. I make such an emphasis because there are enough problems with it: it’s a bit buggy, a little ... But in order to learn, it’s enough. This pause is alarming for me - I hope everything will work out, and our switch will answer after some time: But
 no, it will not answer, no matter how much I wait! Communication is not enough between our computer and GNS. GNS itself, so one more element is missing:
Connect Cloud
In order for these switches to become available, you must use the Cloud object: Today, Cloud uses it in a completely different sense. GNS authors as an internet service provider. In the settings of this object, I can connect it to my network card:
 It looks scary, but this is the same network card:
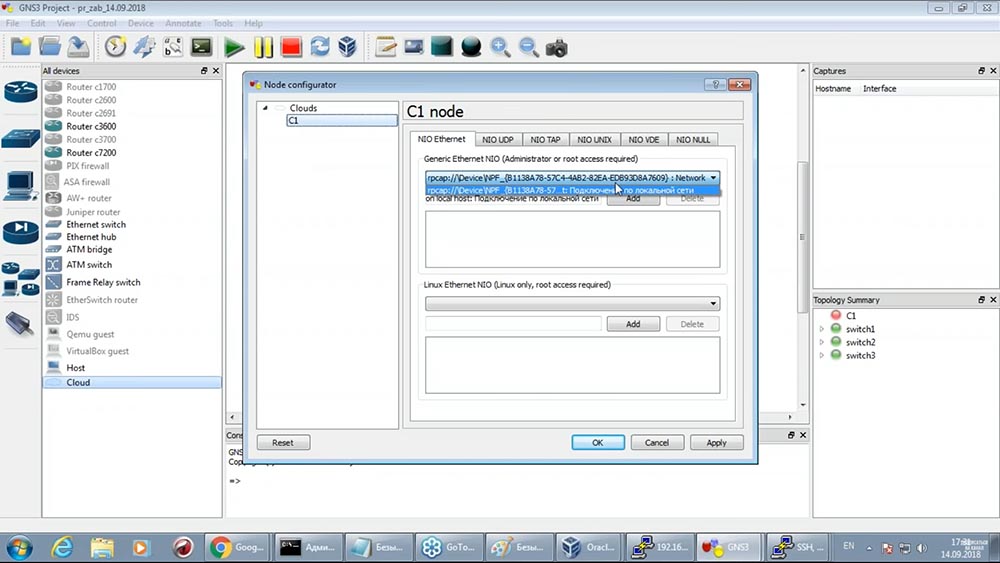
 I put Cloud. Now you need to connect one of the switches to the Cloud (only then a connection may appear): I
 suspect that in our case it is faster to reboot the switch so that everything is up. The only thing I want to make sure that its configuration is saved. By the way, inside the ping switches should already go:
 Real Cisco! The first package disappears, everything else is there:
 Actually, not natural emulation is used here, but iOS. Therefore, I stop the 1st switch and start again:
 If everything is in order, then we should see the connection through the cloud - my Windows 7 will be connected to this equipment through a network card (the equipment has IP addresses on the same network as Windows) . In general, this is the point of connection between GNS and Windows. Let
 's check that there is a connection: Let's see how he feels ... From here he responds: Fuck
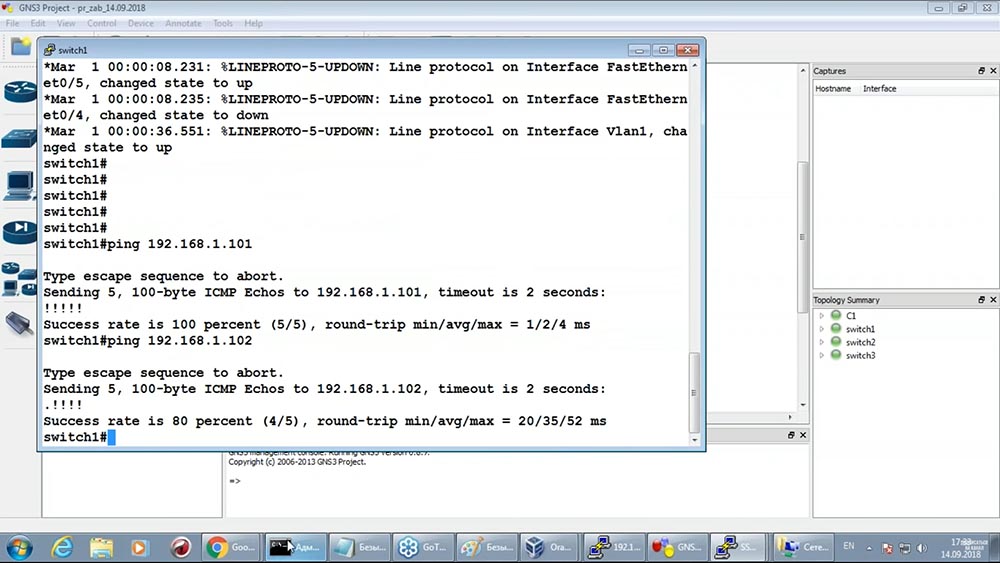 ! You see, the connection has appeared:
 I love GNS because it is free, it works ... But not everything is simple! Here's a funny situation: our Linux responds to the Windows system, our switch responds to Windows, but the switch does not respond to the Linux system:
 So the teacher can turn gray! You are conducting a lesson, but the stand doesn’t work for people ... Well, nothing, we will convince! Free, cheap and cheerful.Experience has shown: in order for the connection to be between all three elements (from Windows - to Linux, from Linux - to GNS), you need to go to the network card settings and select the strange option - “Inaudible mode” (“Allow all”):
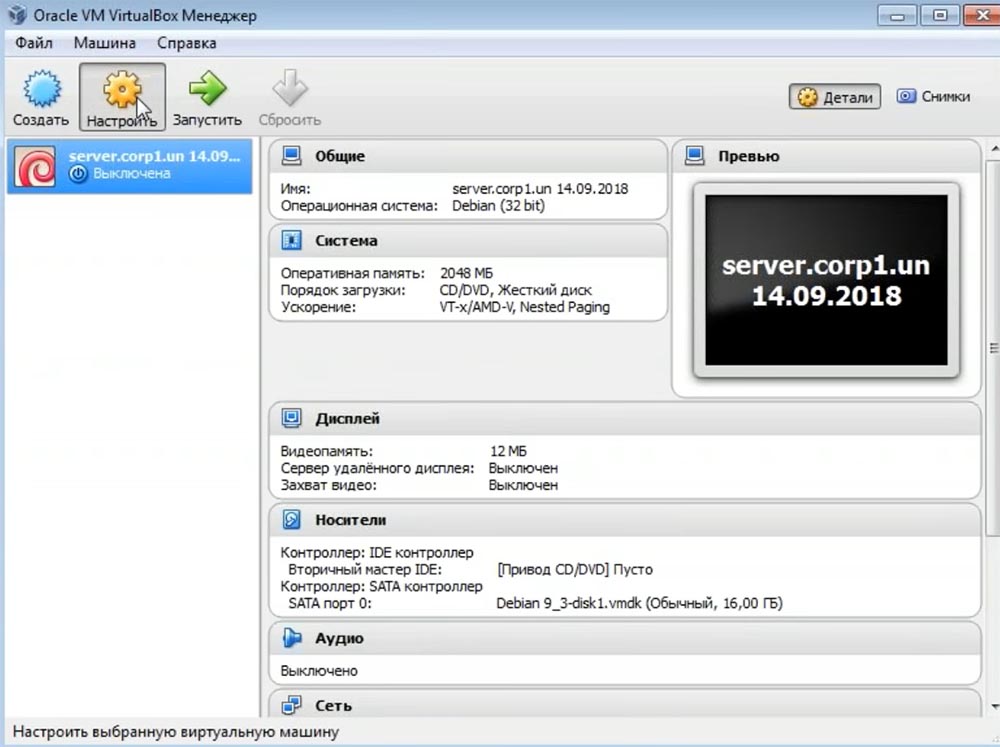
 Come to Virtualization! This indiscriminate mode is in all decisions (and in the "Sphere" too). It is associated with the passage of Ethernet packets, mac addresses, and so on. Come on course on virtualization, the details are there.We start our system again in the hope that the connectivity will be restored:
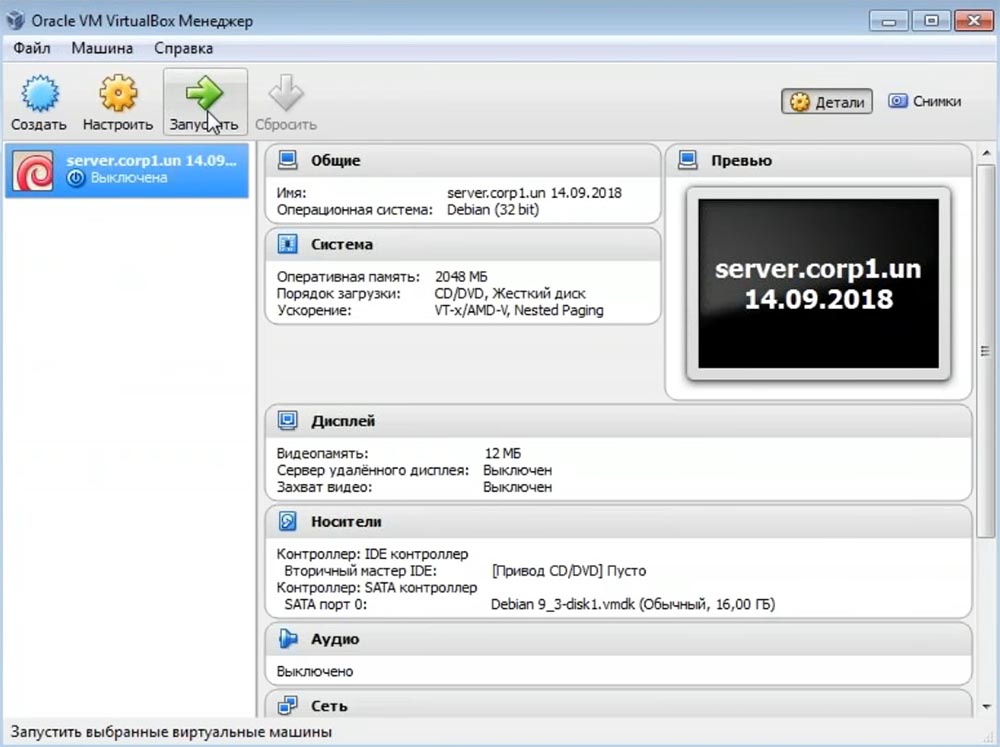 Only now will it be possible to configure the monitoring of our switches from Zabbix. Let's see how this happens:
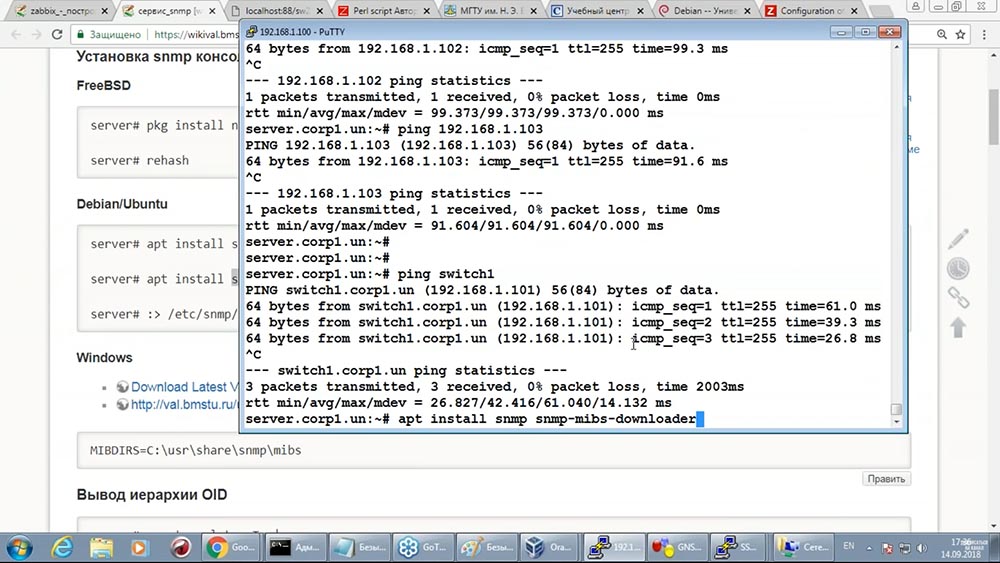
 The foundation is laid. If we have a connection now, then everything will be ready. In "Zabbix" a lot of "Tsiska", cleverly connected to each other - you can start monitoring. We connect to the root user with a password and check the ping:
 Everything is ready:
 As the administrator of the local DNS, I also made it possible to send by ping names.
How can Zabbix monitor Cisco equipment?
Agent cannot be installed on Cisco equipment. Many of you know that Cisco equipment is perfectly monitored using SNMP. Now we will set the stage for this.Now we will set the stage for this. To monitor equipment using the SNMP protocol, firstly, you need to install SNMP support on the monitoring server itself: Zabbix does not include this support, it uses external libraries included in these packages:
 I won’t tell you what management information base is - come to courses on interaction of Lunux and Cisco, there it is in detail described. And now we just put the packages necessary for monitoring on Linux:
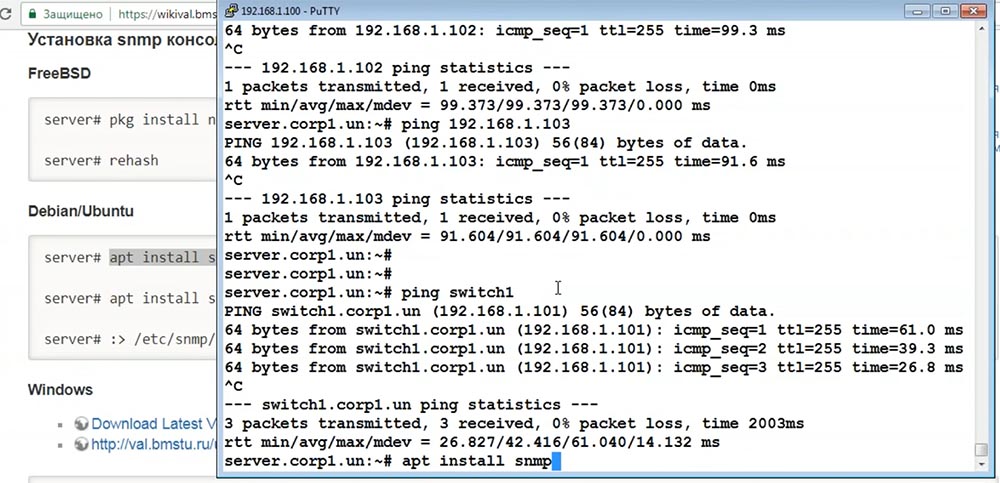
 And we put configuration elements on our Cisco that will allow us to monitor them in turn.
 Here, the SNMP server simply starts with the following password:
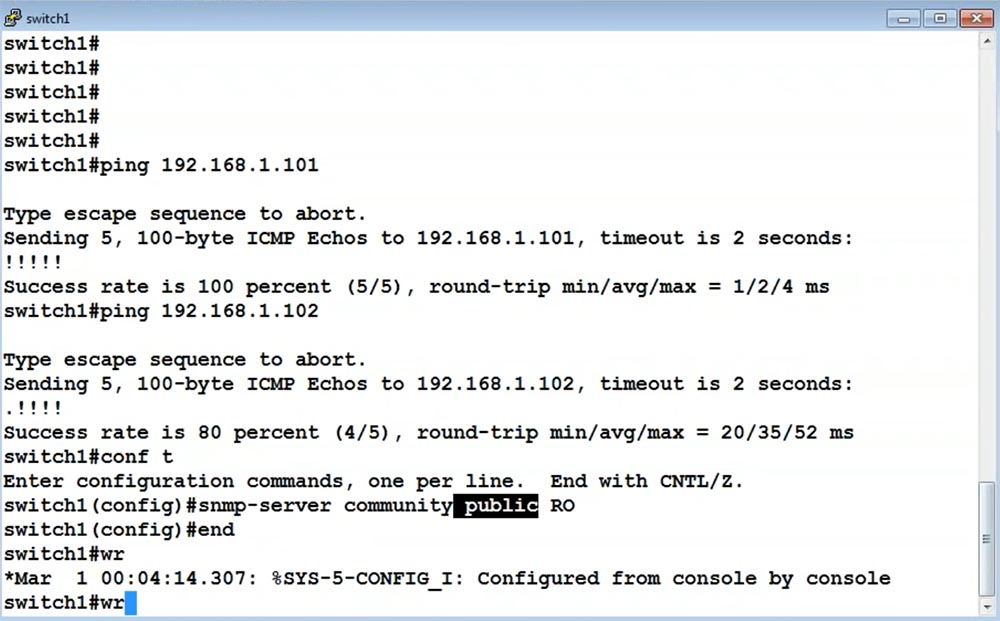 And we do it on all three of our switches:
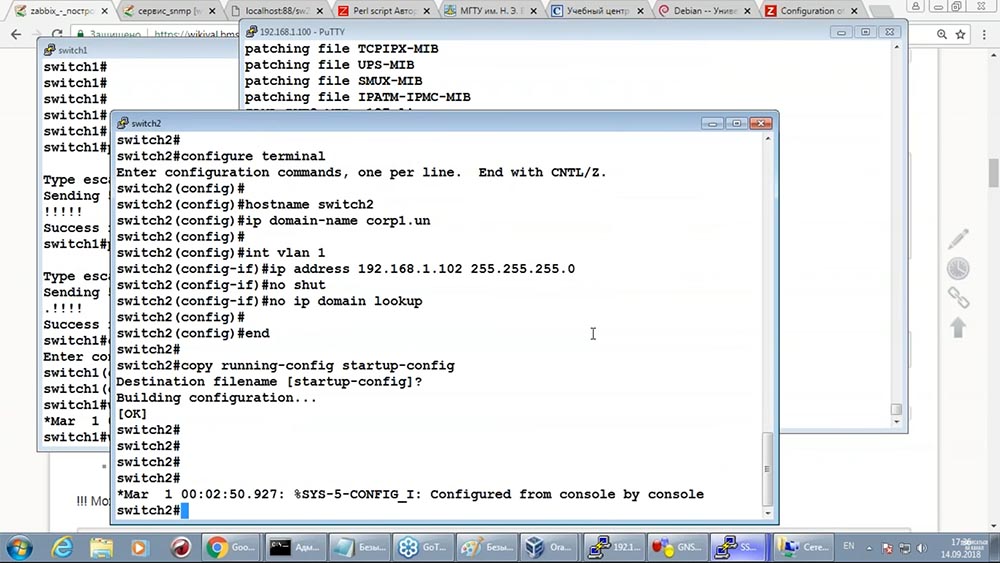 After these steps, we will check whether our monitoring server can access Cisco equipment (any of these switches) via SNMP and, for example, find out something. There are test options here:You can poll our switches using the so-called OIDs (object identifiers). Here we interrogate the switch (we request the values of switch1 parameter):
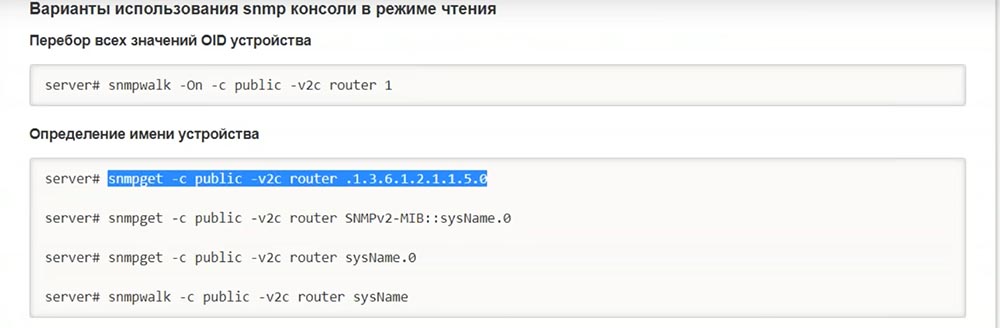 And we see that this Oid refers to the name of the switch, that is, we can pull its name from each switch (it’s very useful for the topology):
 And you can use more human, textual ones - we request sysName from the switch (the same can be asked from switch2, etc.):
Install SNMP Console
Another action is not obvious:

 According to the license agreement, you need to comment out the lines in this file ... This is a wonderful woodpecker command that cleared the contents of the file, which said: “To confirm the license, comment out everything that is there”.Accordingly, the Zabbix server must be rebooted because we have installed the libraries that will be used by it:
 Many people know that now it’s enough to enter the Host section, create a host and select the SNMP protocol. Specify IP Address:
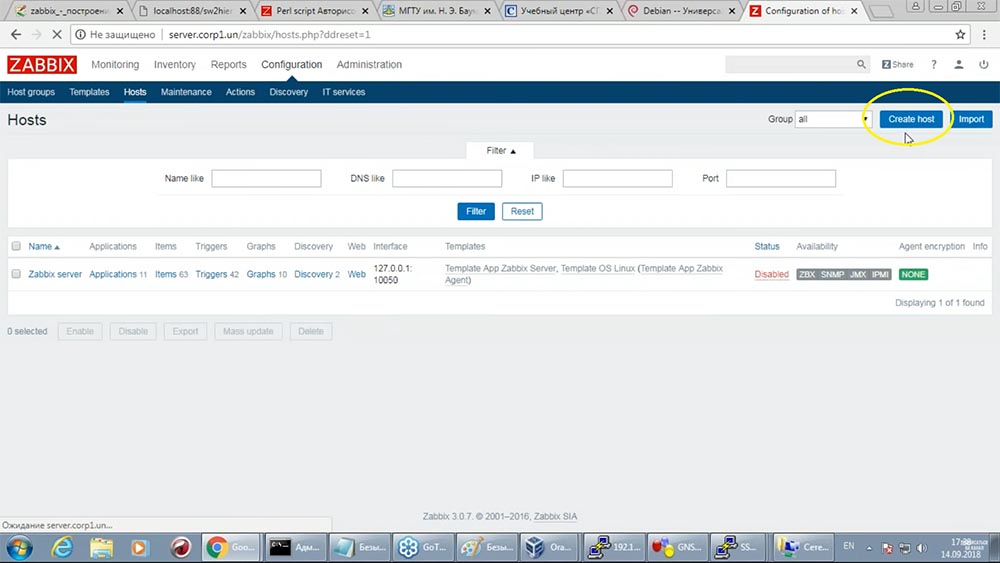
 But we are not here for that. Let's try to get Zabbix to automatically find all of our switches. We have three of them, and in Baumanka there are more than a hundred of them (120, it seems). It would not be so fun to add 100 switches, so it’s a bonus: we will see how Zabbix finds our switches.
Automatically add devices to Zabbix
Page "Automatically adding devices to Zabbix":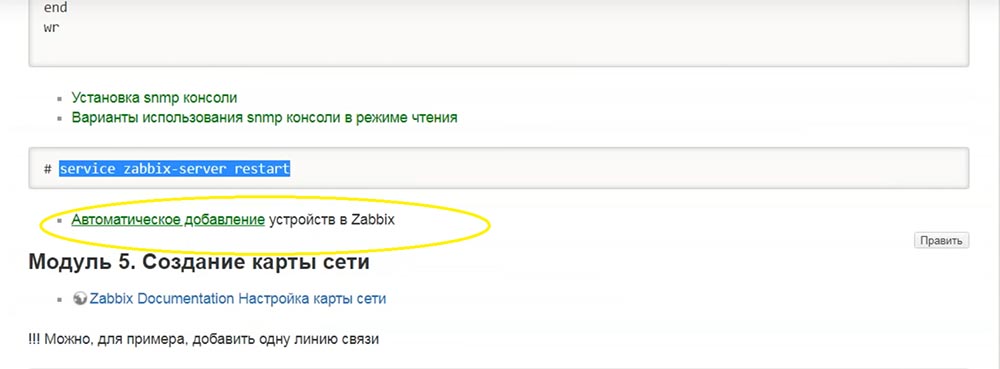 To do this, we will go to the "Configuration" section (Discovery subsection) and we will not create a new rule there, but we will use the existing one:
- This correctly says that you need to scan this network ... Do you recognize ours? In order not to wait long, I will indicate a limited range of 100-110 (enough for me).
- Scanning once an hour is a bit much; put - every 60 seconds.
- On scanned devices, our Zabbix is now looking for a Zabbix agent. I promised that you and I will not have any agents, so I delete it.
- And I say that in fact, our device is accessible via SNMPv2, community - public; we requested such an OID:
- , . , . ( ):
Now every minute Zabbix runs through these IP addresses and asks for the device’s name via SNMP. If there is a device and supports the SNMP protocol, then it will answer: This is not enough for our devices to appear in this list: You
 need to configure actions. We will create a new one (I’ll name it, copying from the training manual):
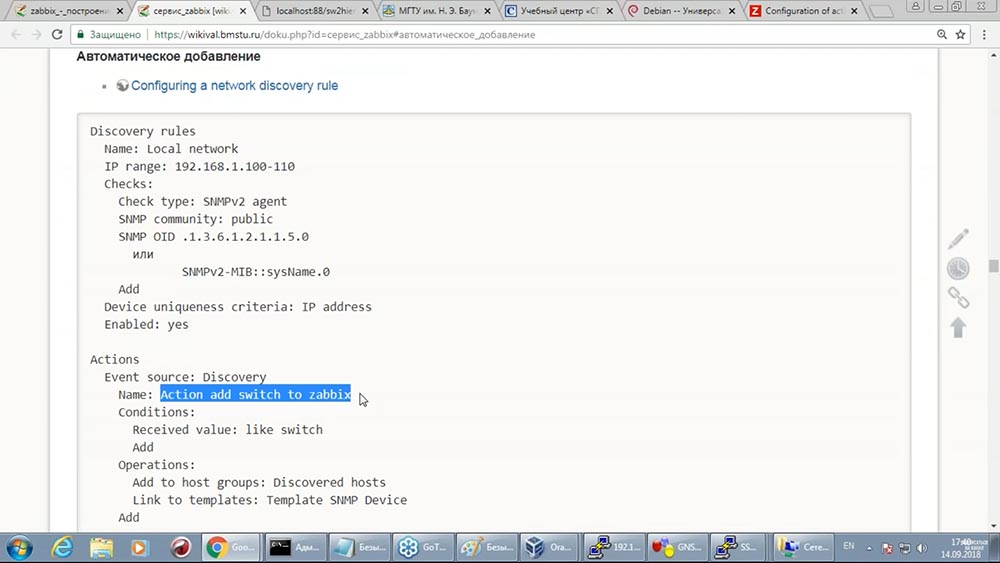
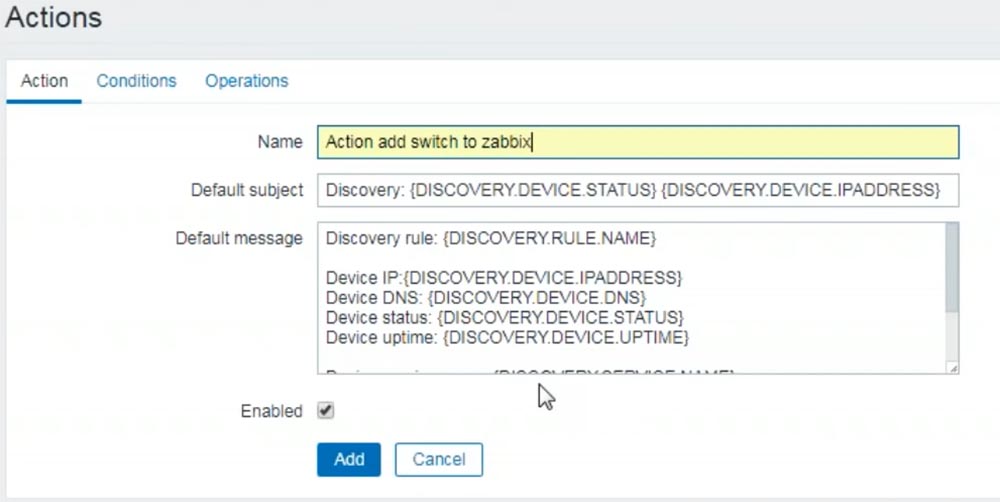 Condition: the request must return information that this is a switch. By “lucky coincidence”, we have all the switches called switch (switch1, switch2, switch3), so the Received value should look like (like) on switch:
 All this is in the training manual. It remains to indicate what to do with it - “Operations”:
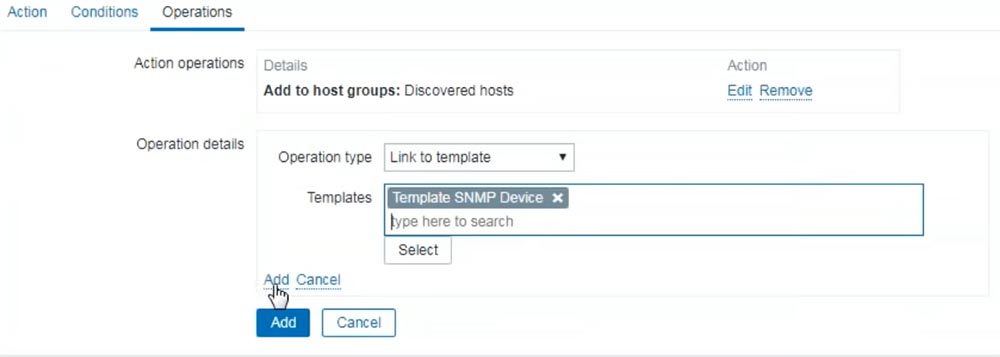
 First of all, you need to add it to some group. I will use the ready-made Discovered hosts group:
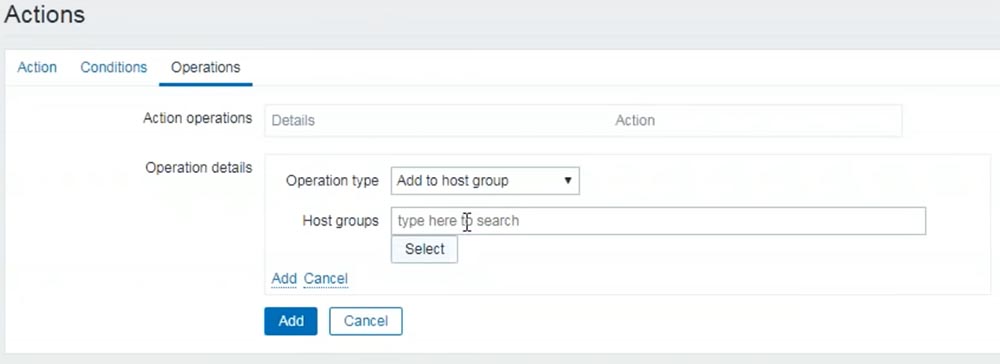
 The following, most important, we must explain what to monitor on this equipment. In this case, we will use a ready-made template that is suitable for a large number of various SNMP devices:


 If everything is done correctly, then after some time 3 switches will miraculously appear in our Zabbix. We wait. They will appear in the Hosts section. There is a connection (checked just in case):
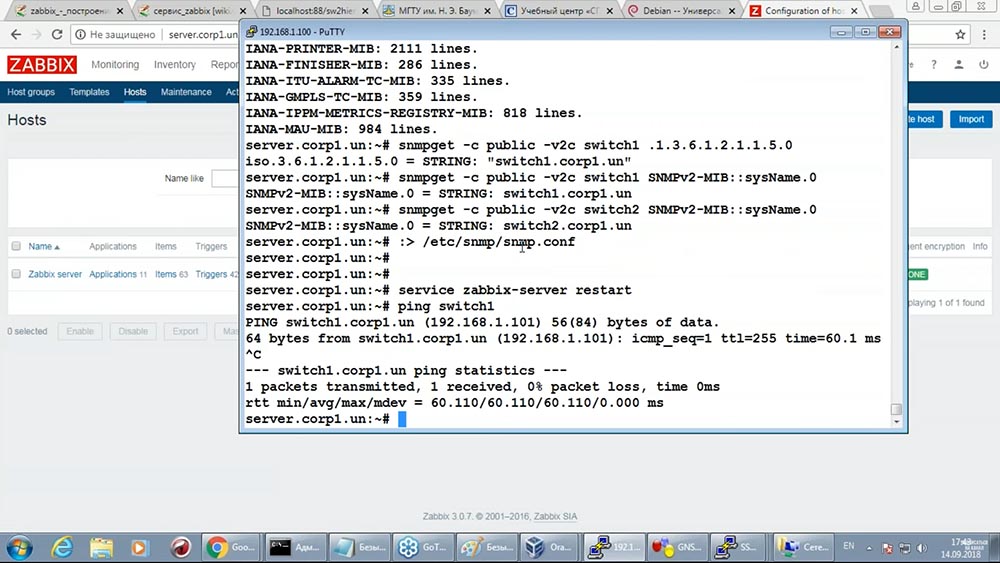 Appeared:
 If we had 100 switches, 100 switches would appear. Now we can talk about the main topic - the automatic construction of the network topology.
Create a network map
In "Zabbix" in the "Monitoring" section - subsection "Network maps". You can create your own map with any arbitrary name (I’ll call it, as in the manuals - Switches map):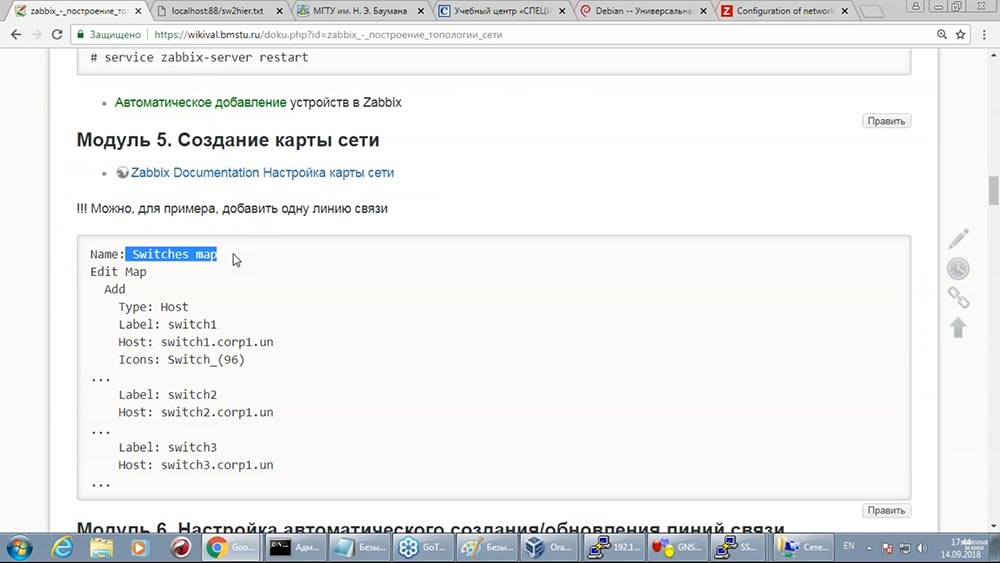

 You can add devices to this map:
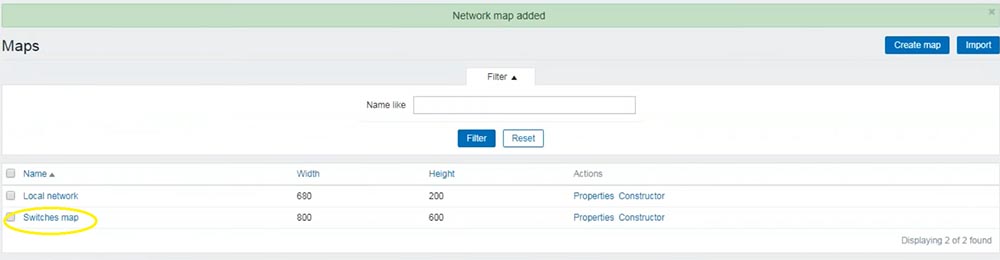 We have a rather boring operation to add our entire hundred switches here: I add a
 new element and tell the system that it’s on actually the host you are monitoring; host switch1:
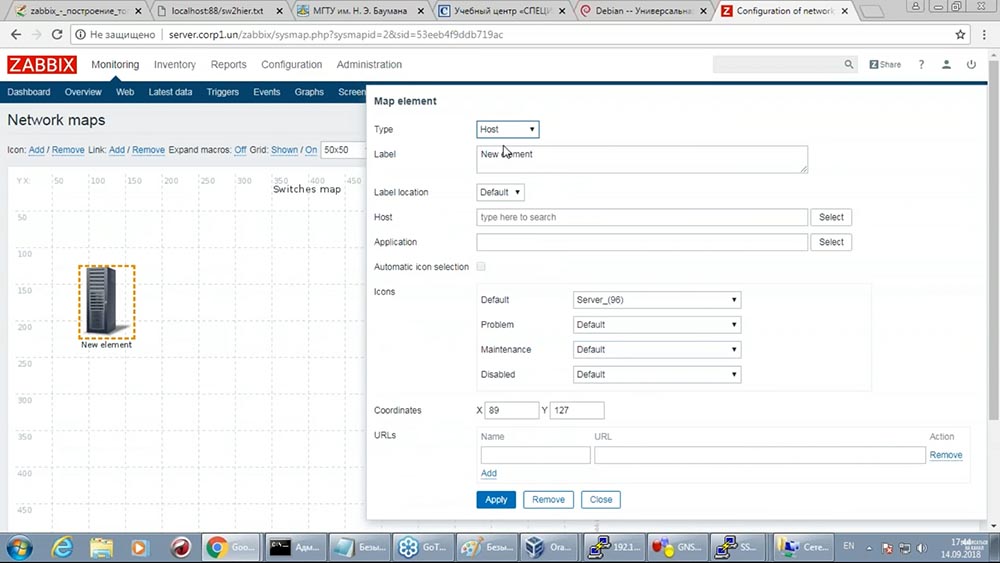
 People often ask if this process can be done automatically. Answer: “It is possible!”. But then we need to solve the fascinating problem: "How do we understand where to put which switches?" That is the geometry. A potential solution: you can specify a geolocation mark in the switch (a parameter such as “you are standing on the 6th floor, AZLK building, 666th auditorium), draw the educational laboratory building, all of its audiences ... In general, this is a good student for the 4th student Computing course. We have no plans for this!I will now add all 3 switches manually, but I promise that I will not draw communication lines between them. You add the 101st switch, we automatically add it to Zabbix - if you please draw it in the map with pens. An unpleasant moment, but there is a place to be. There is no simple solution to this problem, for 45 minutes for sure. And what we get will seem interesting to me.I quickly add 3 switches:
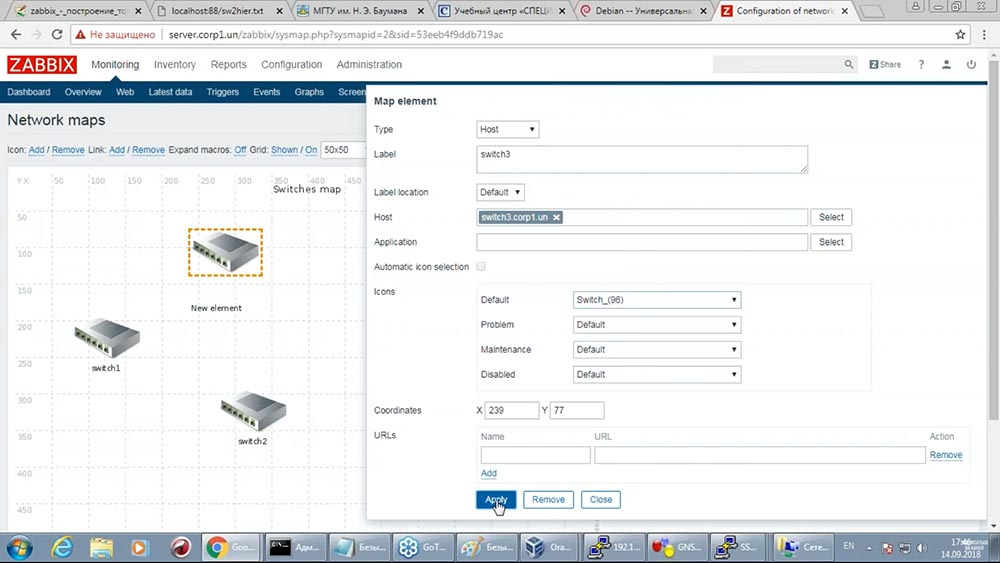 I said that I will not add lines? I’ll, but only so that later we can understand how to draw them. I will connect these two switches (we do not
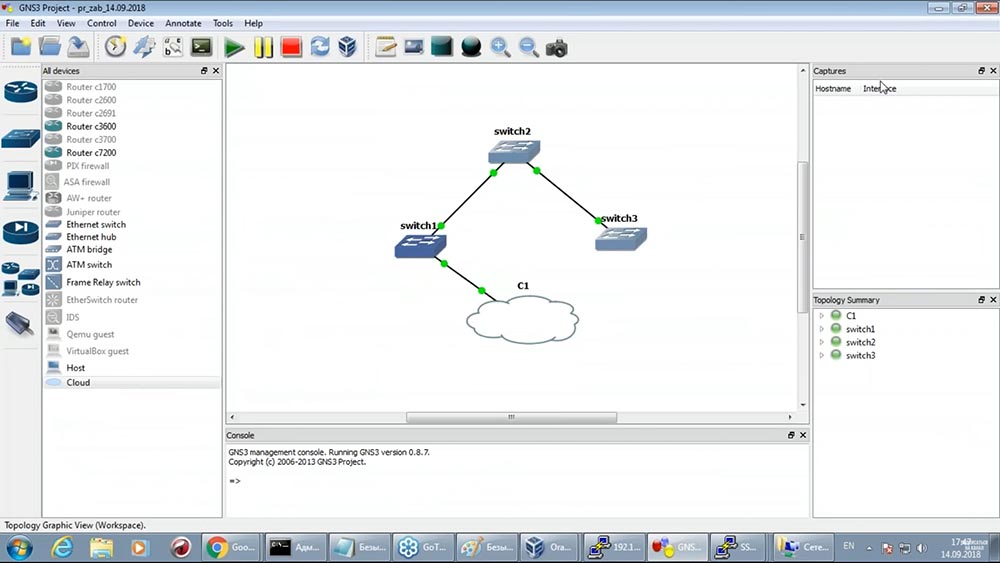 connect the 1st to the 3rd): I will connect them (switch1 and switch3 are highlighted):
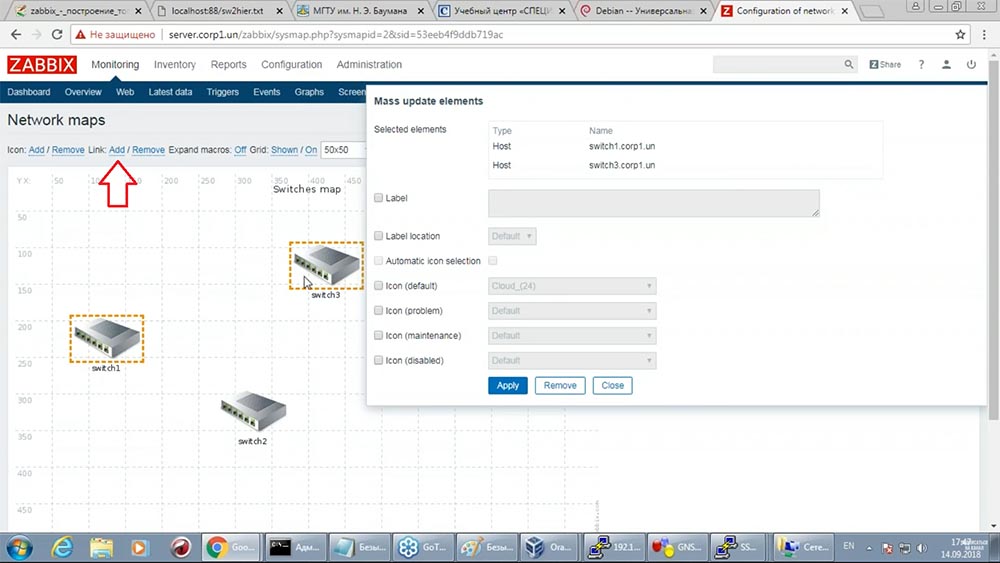 Our system will have to fix this matter:
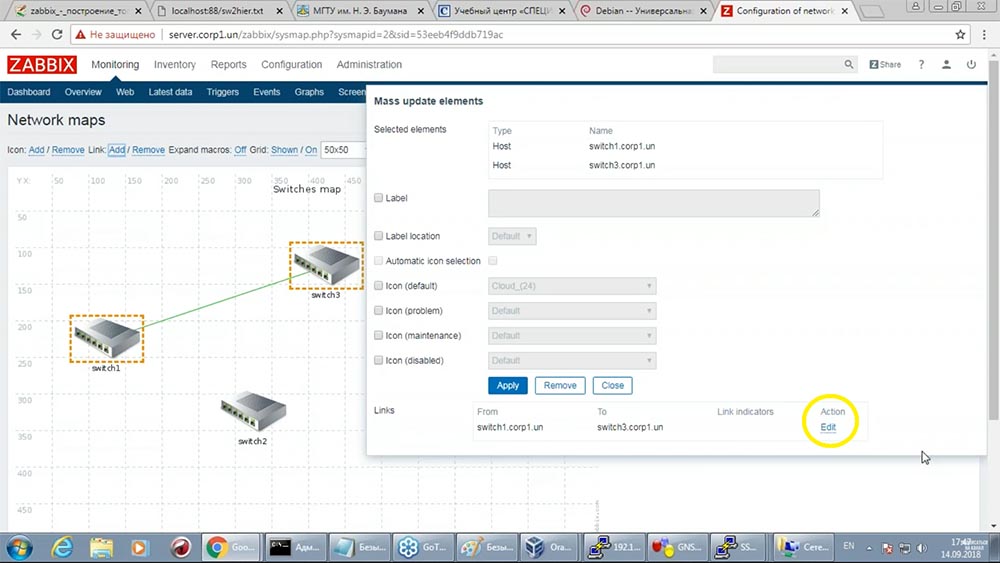 It is important not to forget to save the result:
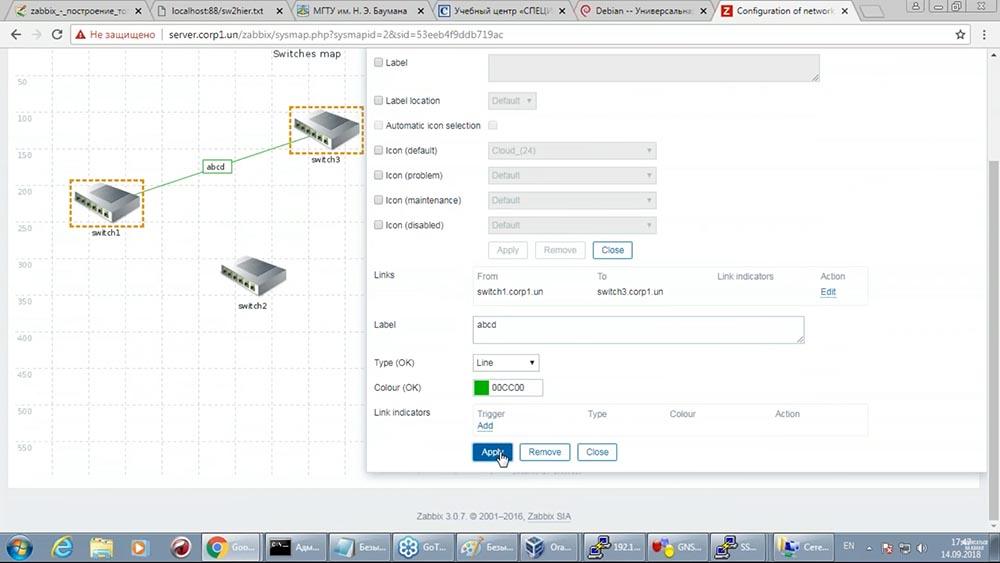
 By the way, about GNS - you can beautifully do it ... Hide its hostname, make it a switch and put it under one another, making a cloud of switches:
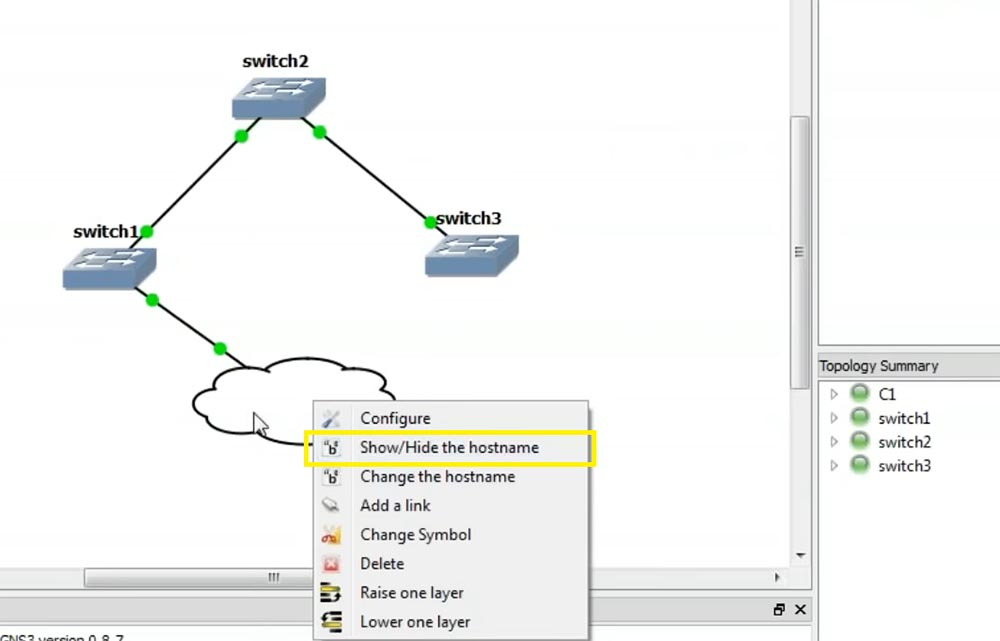


How do we build a topology? Configure automatic creation and updating of communication lines
In order for the topology to be built automatically, we need to receive information about it automatically. At the university, we use Cisco equipment, so we fell in love with the protocol called the Cisco discovery protocol - just type show cdp neighbors on any device and it will tell you that switch1 is connected to the 5th interface: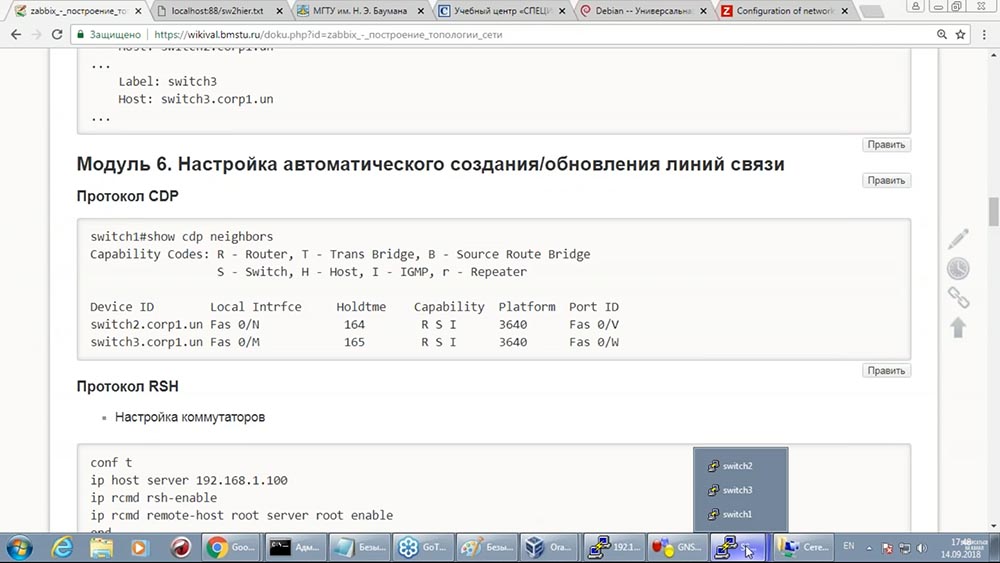
 Alternative to cdp is lldp (we have a segment switches of the "scary" company Nortel - there lldp). You see, there are two switches:
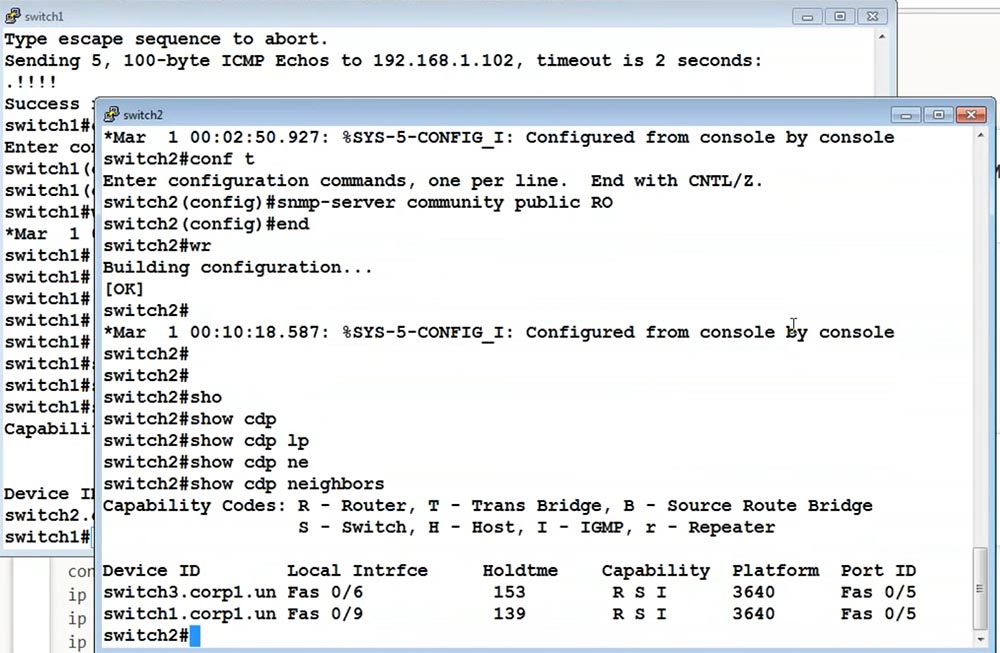 the Zabbix server must somehow pull out this information (I see it on Cisco itself). There are many ways. One of the fastest, but dumbest is to use the RSH protocol. A very dense protocol, and I know about it only because of my age:
 Normal RSH people do not know, but you can quickly use it to remotely do something with Cisco. Or, if we are talking about some kind of management network where there is no stranger, then you can use it in production. However, safety points are still a complete seam!So, I set up support for accessing the RSH protocol to my Cisco servers from this IP address:
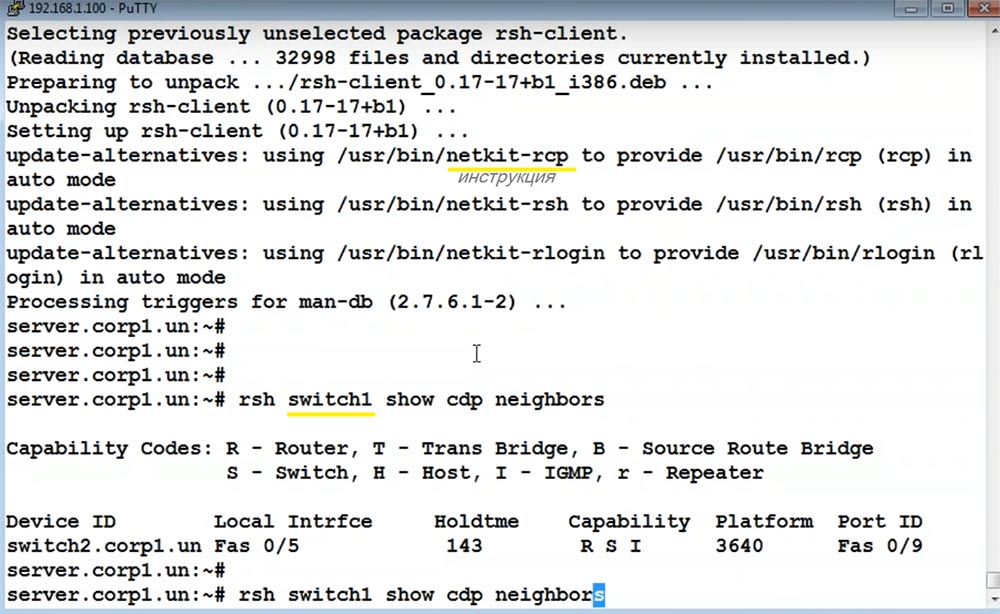
 Now I can install the RSH client on the server ...
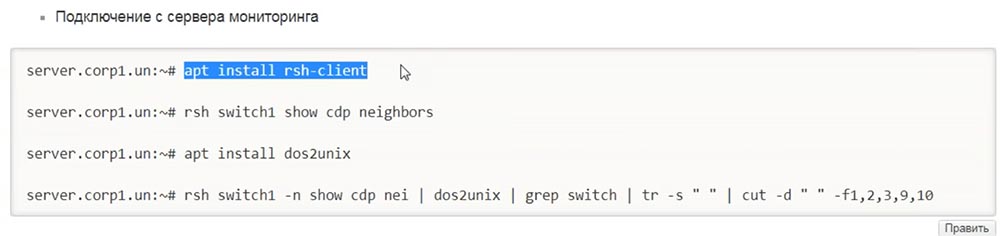
 ... and demonstrate how easy it is now to follow the instructions that we just followed by connecting directly to Cisco equipment from the management station - on switch1 I will follow this instruction:
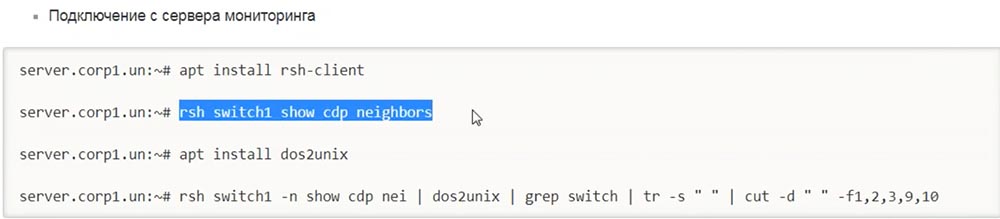
 Accordingly, it should appear on switch2:
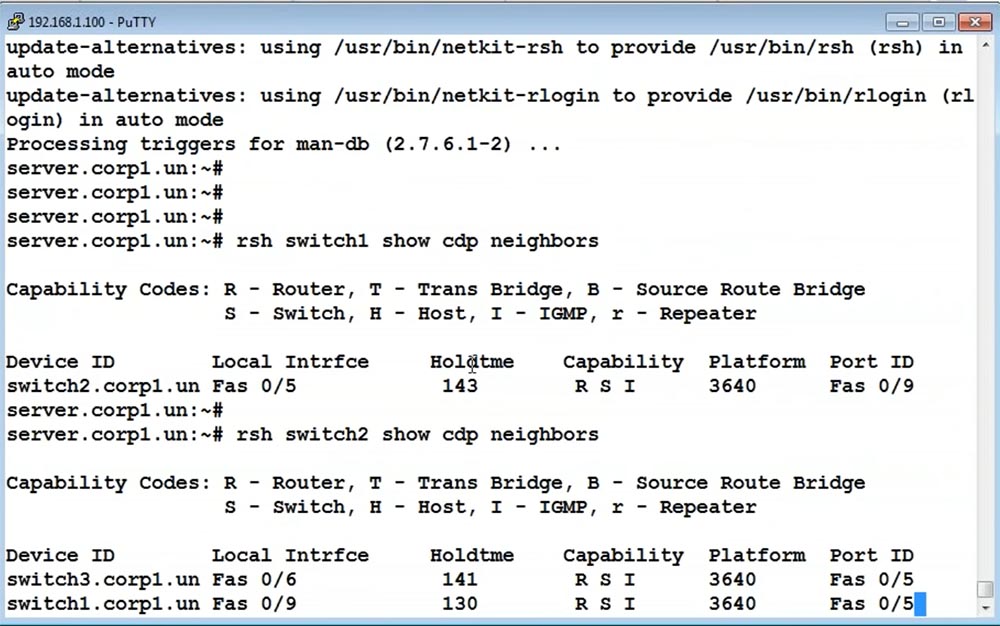
Connection from the monitoring server
Further. Managers write to me: “Vyacheslav, a request has arrived from the listener. He wants to go deep into Bash, Csh, Sed and Awk. ” These are dense Unix utilities that people knew in a shaggy year. Right now there will be a bit of a dense Unix. We will install this package (we need to format the output so that it is better structured):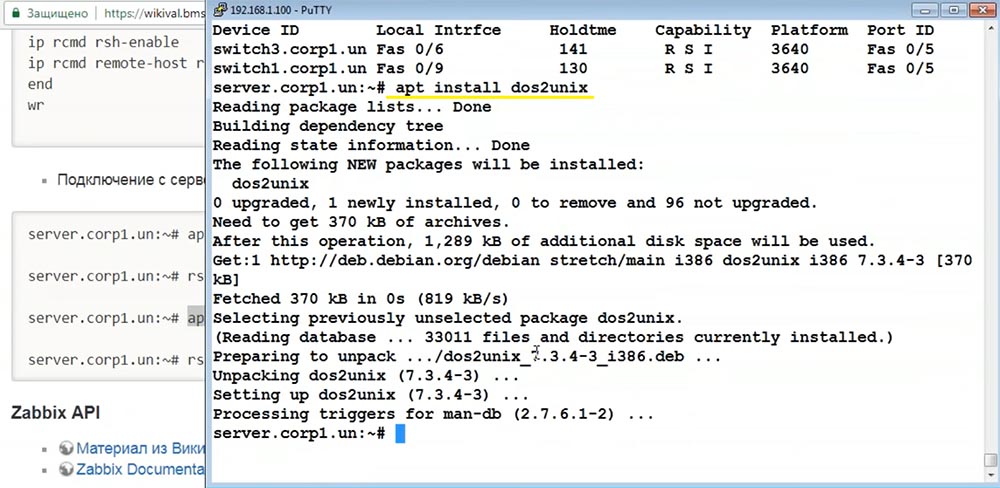 And the whole team will look like this:
 I will not tell how the return code in Dos differs from Unix. Next, I will filter out only the lines that contain the switch, delete the extra spaces and cut the necessary fields through the spaces:
 Let's see the result, and you will see how it differs from the previous one. A little more “magic” Unix. Processing the transformation of information into structured (for example, switch2). Instead of this unstructured information (a lot of spaces, some strange keys):
 The output appears:
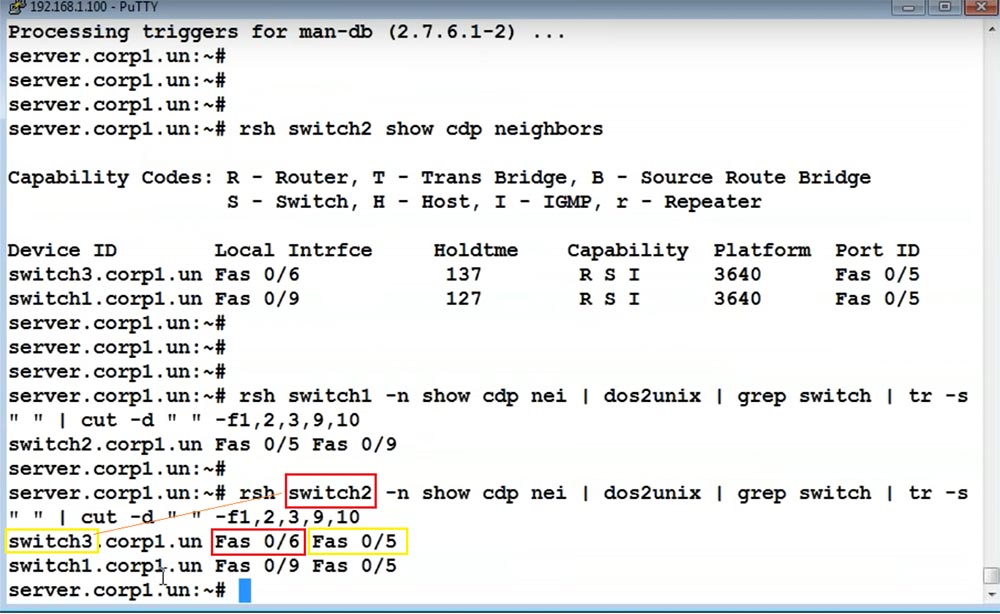 Switch2 is connected to switch3 through the interfaces Fas 0/6 (from switch2) and Fas 0/5 (from switch3). The table turns out: some kind of switch with which through which interfaces it is connected.While on this protocol RSH and CDP leave. Now we, having received this information, draw these links on all switches. To do this, we need information on which switches to connect to. You can get a text file, where to list all the switches ... But it's not sports!We only need to add the switch physically, and it should automatically be detected by the Zabbix. We already have a database of switches in Zabbix. How can an application get information about switches from Zabbix?
Zabbix API
The Zabbix API is written using the "wonderful" JSON protocol. I finished programming in those days when JSON was not yet, therefore for me, as for the administrator ... Nowadays, there was no such garbage! Here is a text file for me - this is normal, but JSON ... (just kidding ) JSON is so JSON!JSON is the format used for exchanging data with the web server, and the cURL utility is one of those handy utilities that allow you to send any request to the web server: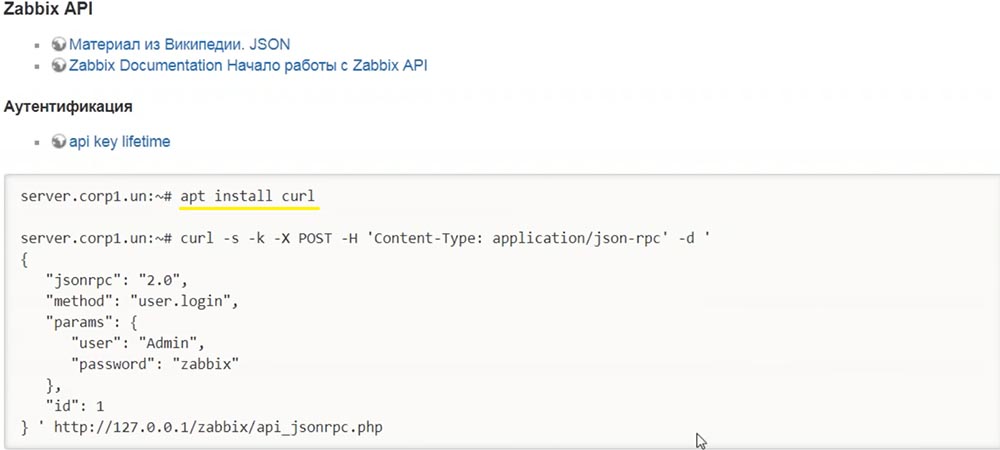
 I will not go into depth about what a POST request, GET request, and I will say briefly. In Zabbix, which works here:
 This application comes in:
 Which is ready to accept such a request in “scary” curly braces (this is JSON):
 This request indicates what I want to do with Zabbix, the parameters are indicated:
 A Zabbix gives an answer. Here is an example that says: “Zabbix,” please give me an authentication string so that I can send you further requests. ” I confirm my credentials with login and password:
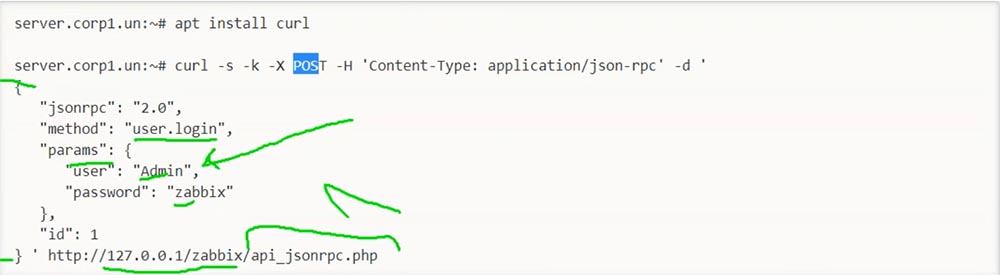 Such a JSON request will now return a JSON response to us:
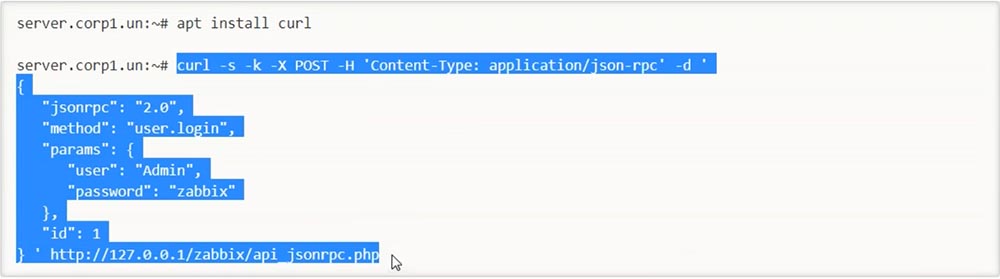 And in this JSON response there will be such a line:
 This is an authenticator that can be used for the remaining requests.
Work with host objects
We recall why we began to study JSON: we want to get the switch database from Zabbix. Which switches to interrogate? Let's get it out!Get to know: the Zabbix-API includes, among other things, the host.get: Host method - these are our hosts. Get is a give. Then I point out: give me host information!
 In the parameters I say: output everything you know about hosts:
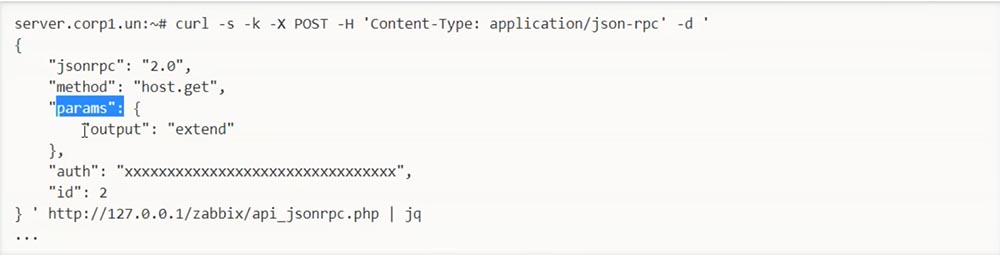 But I must accompany my request with this line:
 Let's demonstrate. To make it convenient for me, I will
 copy this request: And I will insert the authenticator that Zabbix returned to me:
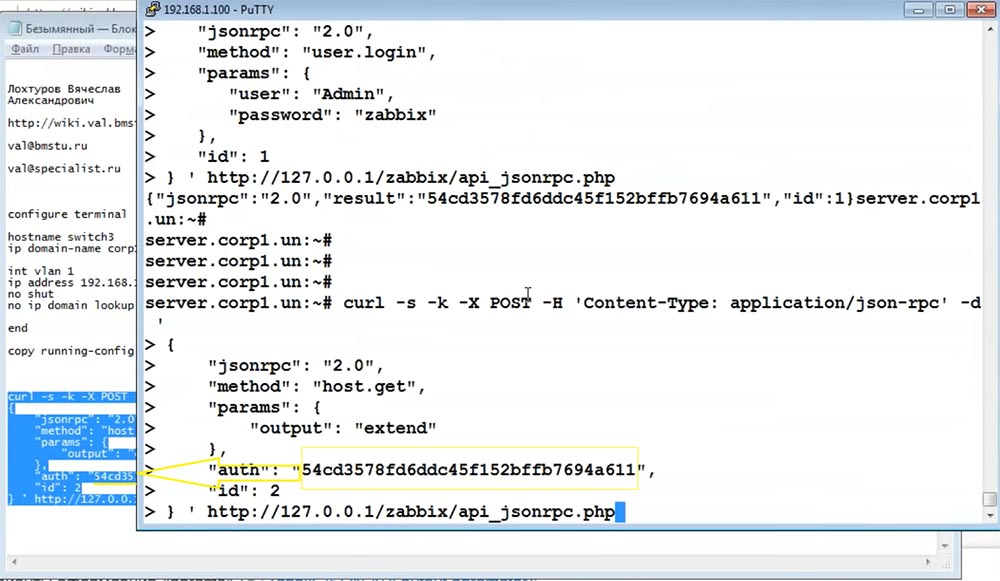 So, Zabbix Api: we looked at how to ask the Zabbix for an authenticator for access. And then I demonstrate how to use this authenticator to get some kind of answer:
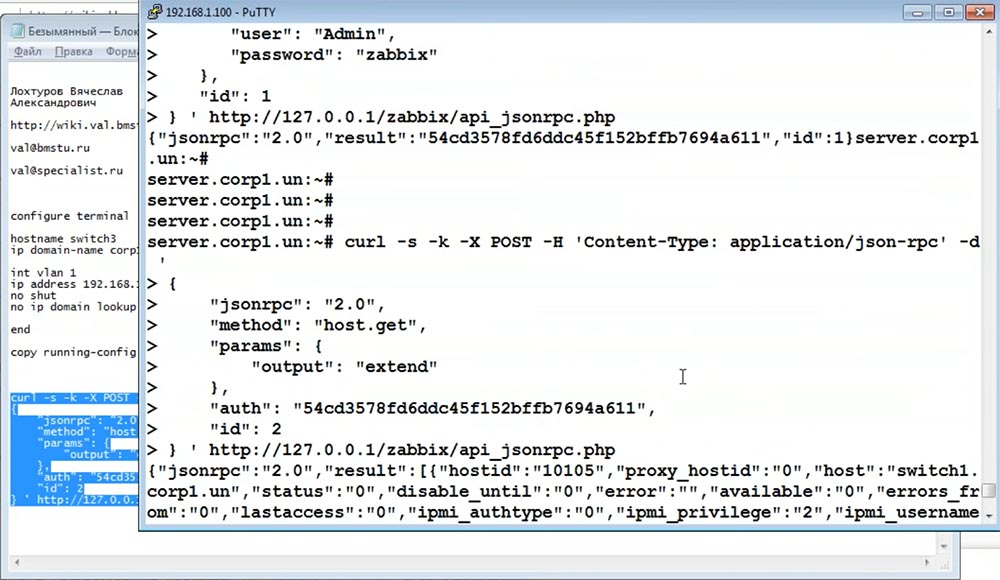 I think everything is clear. You can even see if you take a magnifying glass. Do you recognize switch1? Somewhere there is a switch2 ...
 I broke my eyes for a long time, and then decided to read how to work with this JSON on the command line. And one of the recommendations was: use JSON Query. She is very healthy, brightens up the answer, see:
 Firstly, everything has become colored - it’s already good; secondly, switch2, switch1 are clearly visible here:
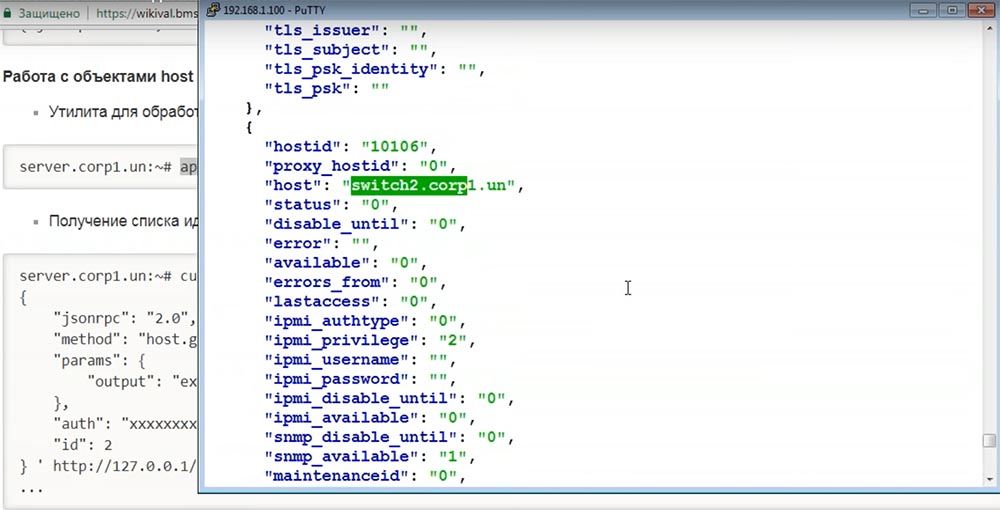 Further, a little tinkering with JSON Query, we will see a lot of interesting things. And in order not to copy these “crocodiles” from the notebook every time, I propose to determine what we will program work with our “Zabbix” on. There is a Zabbix API - this is JSON, there are a bunch of programming languages. JSON seems to refer to a Java script, but in fact, other languages are most often used to work with Zabbix - for example, Perl, a Perl script that does something.
Making requests in the form of Bash scripts
Perl is not a fashionable language today, obsolete. If I started life all over again, I would probably start learning Pyton. And it is definitely known that under "Python" there is a convenient library for working with "Zabbix". But, since we have gathered here and will not give preference to any languages, I use this language: The language of the system administrator, that is, me - Bash! Therefore, I will make these requests to Zabbix: I will
 issue them in the form of scripts: The
 scripts are ready, I will copy them. They look like hell. I think good Python code will be much more readable. But, since I myself do not know "Python" and do not want to give any preference, I will write on what is close to the heart of the system administrator:
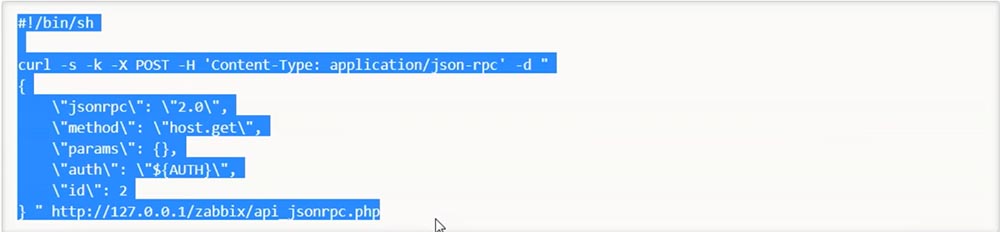 I will not tell you what these backslashes are (and God bless them). But the authentication string will be framed in the form of a variable that we need to export before:
 What value did it have for us? And now, instead of copying the long lines, I can simply run the script:
 The script returns a complete seam. Using JSON Query, you can get this beautiful:
 Remember the task: get the database of switches that are in Zabbix!I will immediately draw the result. I won’t be talking about what is here and how for a long time. We have a daunting task:
 Here is such a result, see what it contains. It says here that we have such switches in Zabbix, and this (10105, 10106, 10107) is the internal “Zabbiksk” switch identifier:
 The result was a flat file. When you add each new switch, you must run this script to create a file. So that we don’t have such “crocodiles”, I will include this line in the script itself:
 And it will return a neat table view with us. Now I will show. I run the script, it displays and immediately saves this file:
 The tee utility is a good utility that writes the result to a file and passes the result out. We now have 3 switches and we have a text file in which all the switches are listed:
 Now you can query each of these switches through RSH and find out who is connected with what.So, we got the switch database. Our ultimate goal is maps!
Getting a list of maps and their elements from Zabbix
How to work with cards? Let's learn how to read information about cards from Zabbix. I’ll copy this script:
 Whoever likes it, you can take all these scripts. I tried to simplify them as much as possible - it doesn’t work easier. If you find how to simplify it, write, I will correct it:
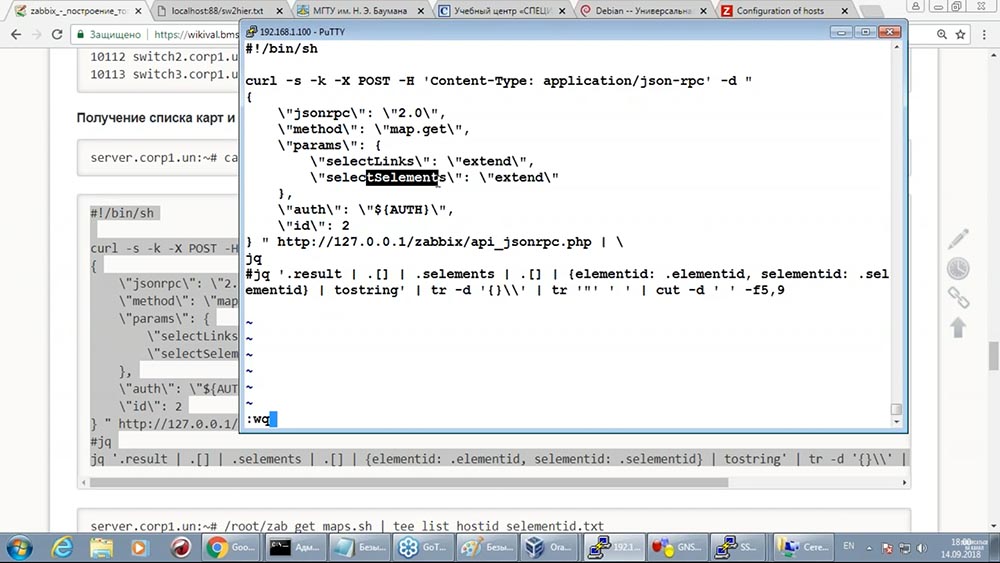 This script ↑ turns to Zabbix with a map.get request and says: “Tell me about the links and tell me about the elements that these links connect to each other.”Now I run this script:
 And I show the result:
 Just like information about hosts, it is very easy to get information about cards from Zabbix. Each card has its name: The
 following are the elements in this card. Do you recognize the number? This is the internal element of Zabbix:
 The most unpleasant thing is that in Zabbix the elements are numbered again. On the left is the id element, on the right is the numbering of the element inside the map:
 That is, in Zabbix each host has a number, and on the map there is another number - this chain is obtained. That is, the switch1 switch is called 10105 in the Zabbix, and 2 on the map (a slight complication of the task is obtained).
We bring everything together through CDP and RSH, find out the connection of switches with interfaces
The final part of this script is that I have to get information which identifiers of Zabbix are associated with which identifiers on the map. Look, in “Zabbix” here is this identifier (10105, 10106, etc.), and on the map - 2, 3, etc.: Traditionally, I will save this in a text file:
 Now we have almost everything. There is information about which switches are in this file (which identifiers inside Zabbix are used):
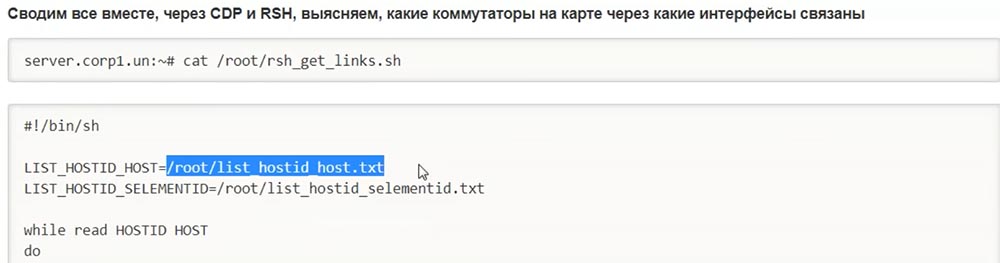 And we have information which identifier on the card is associated with which Zabbix identifier (for example, switch1 has number 10105 in Zabbix, and on card number 10105 has the identifier 2):
 That's not my fault! The guys wrote this in Zabbix. But I'm sure there is a reason why they do not use direct identifiers on the map. Perhaps because the same object can be displayed on the map several times, and it must have a unique identifier. Therefore, the chain is longer.And here, I’ll probably comment on this hellish little. Play it:
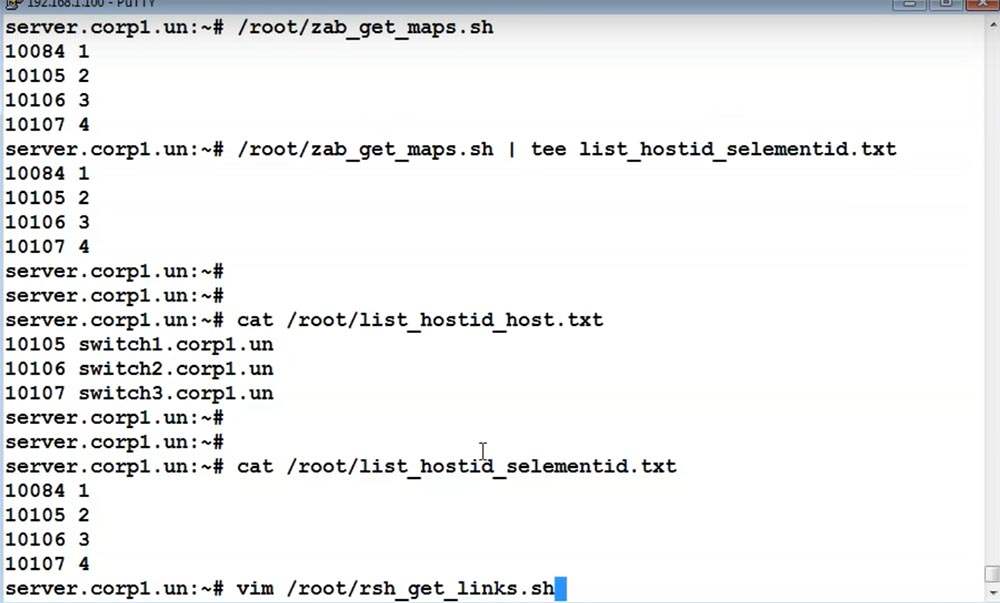 In the loop, I read the lines that describe which switch with which identifier "Zabbiks"
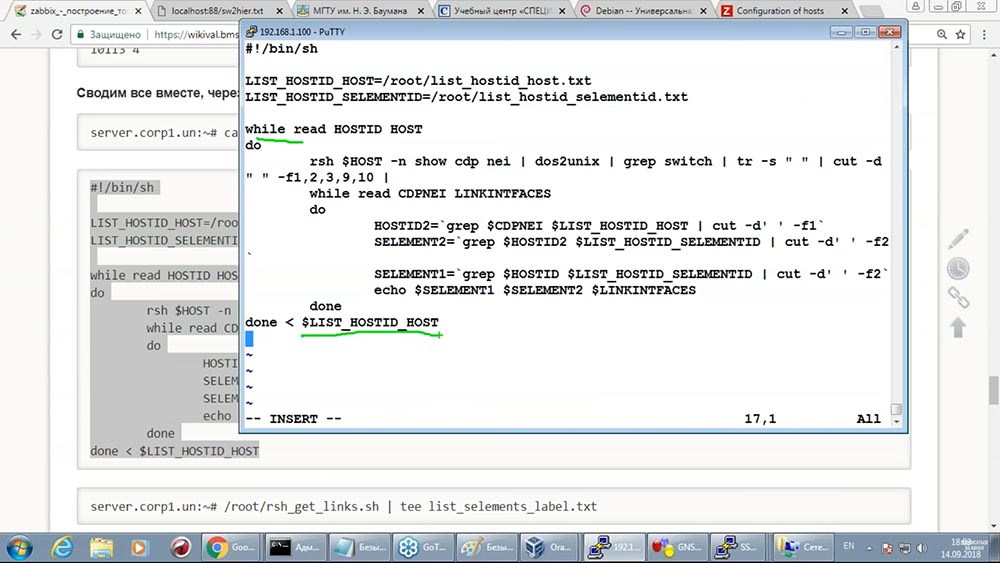 :
: I connect to each switch from "Zabbiks" via RSH: I read which hosts it is connected to. I redirect this result to another cycle:
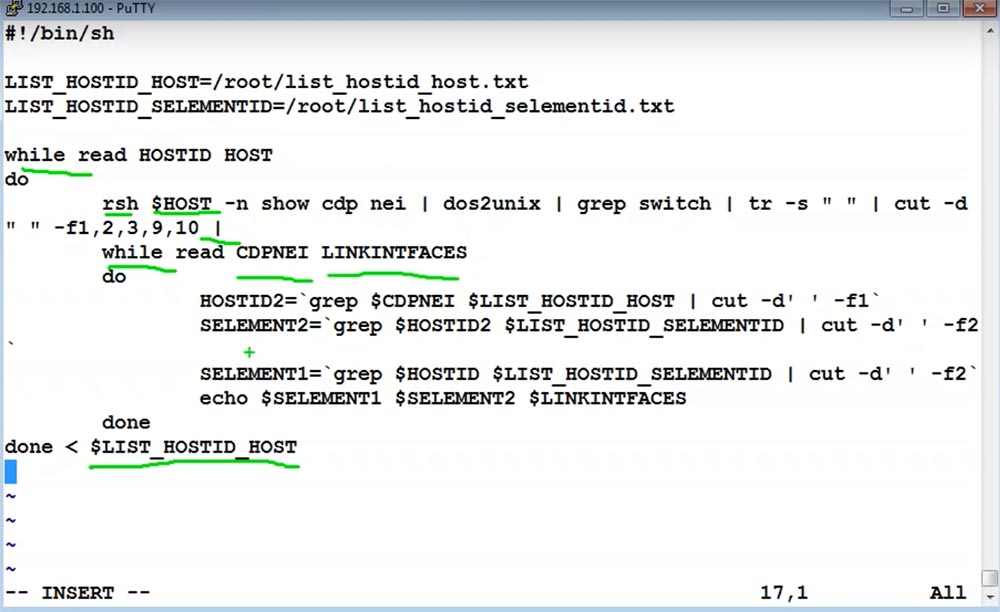 Which, in turn, reads the identifiers and finds out who is connected with whom: I will
 show the results of this script (chmod + x):
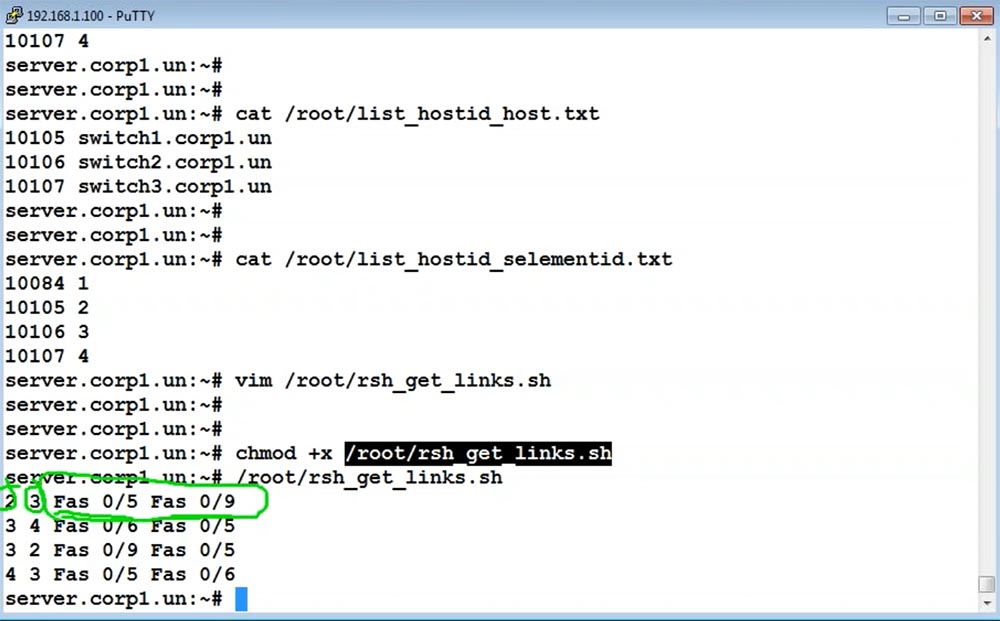 On the map, the second switch is connected to the third (remember that the identifiers on the map) through the corresponding interfaces (Fas 0/5 - for the second, Fas 0/6 - for the third ↑). We must draw these names on the links, create.If until this moment we only read information from Zabbix (hosts, cards were read, etc.), now we will have to write information to Zabbix.Let's save the result:
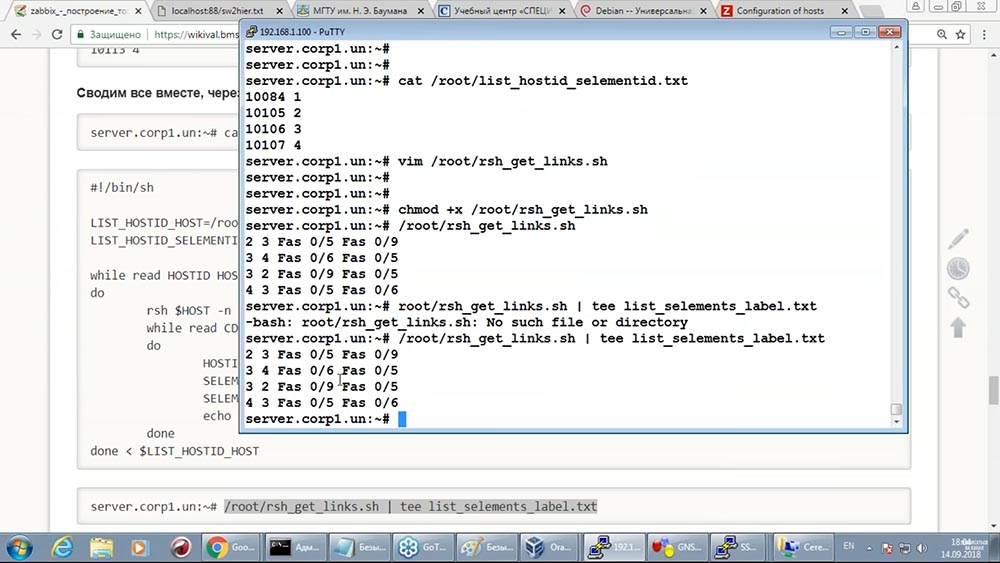
Drawing communication lines in Zabbix
I decided to write a simple script that will change something in Zabbix. Honestly, I studied the API this way - it was important for me that something simple worked:
 The first script will not be related to tasks - it will change the name of the map (to see how it is done). If we want to change something in Zabbix, then we must also apply through the POST request and describe it in JSON, but using the map.update method. Among the parameters, we must explicitly indicate: MAPID, which will find the desired map, and MAPNAME, which will change the name of the map:
 This is the minimum set of parameters. These parameters themselves:
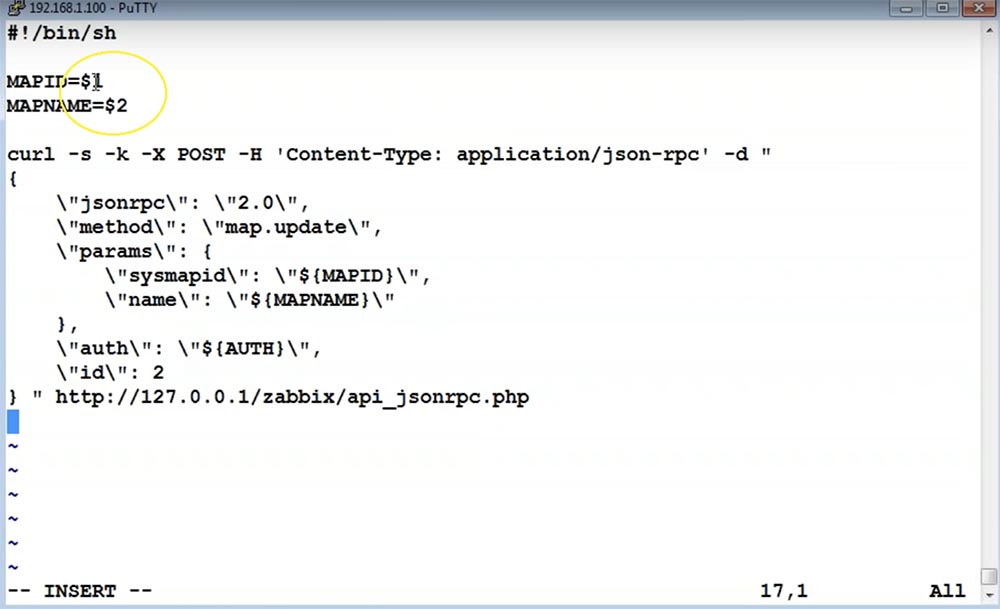 Pass through the variables the script arguments. I make the script executable (chmod + x): I run it
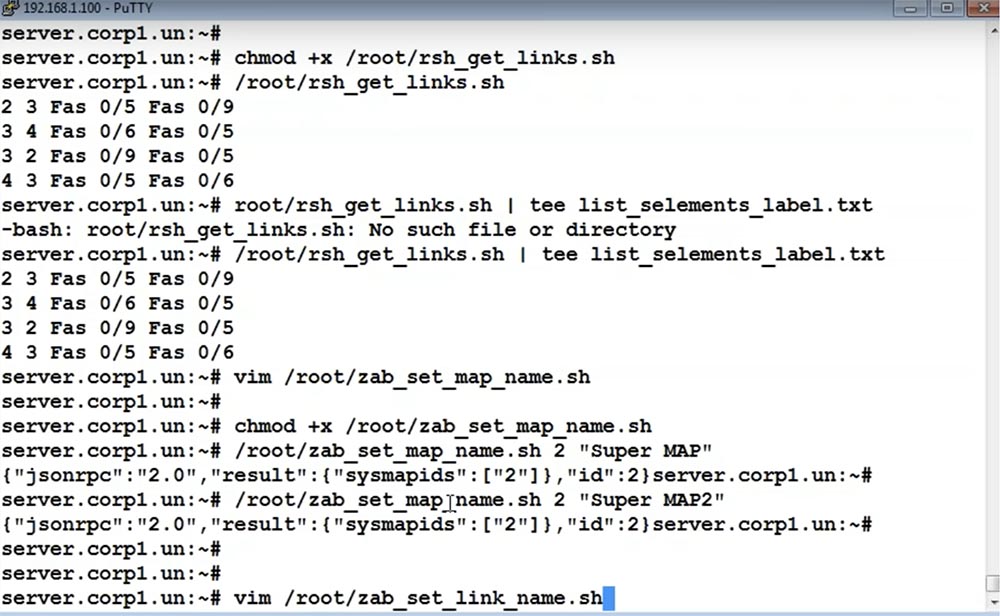
 , as written in the training manual. If everything is correct, the card should be called Super MAP:
 Monitoring - Maps - voila:
 Easy to change - Super MAP2:
 Everything works:
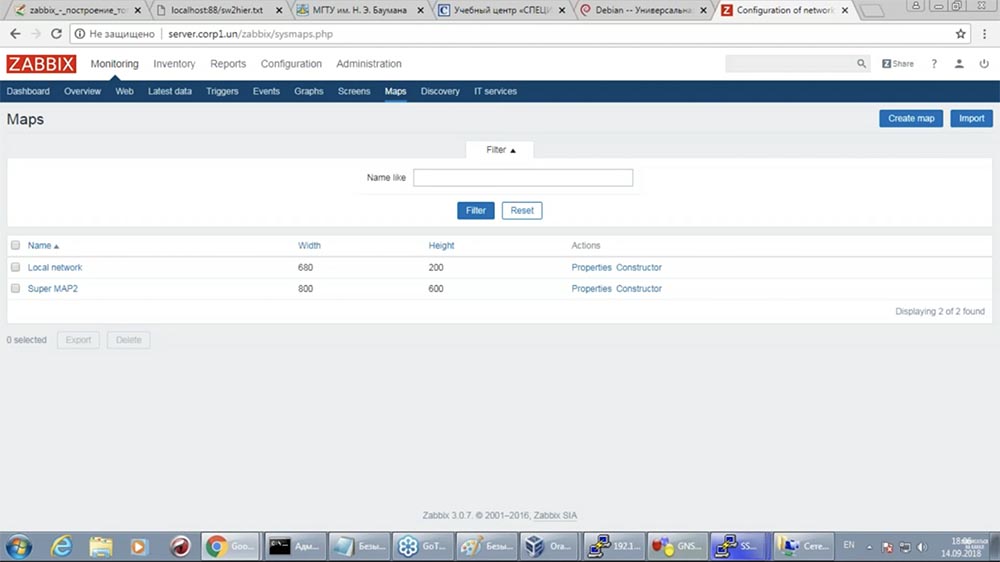 But our task is complicated - to change communication lines!
 It is necessary to generate JSON, which will describe our map and all communication lines. To do this, I make another script:
 The fact that I have many scripts does not mean that this should be done in the enterprise. At the enterprise, you need to take a normal language that you know ("Python", "Pearl" or something else), and program what is here using a normal language. These bricks, each of which is simple, make it possible to understand what, why, and how to do it.Another script that serves more to understand what needs to be done, and not to copy (I will not sell the finished product to you here):
 This script reads this file:
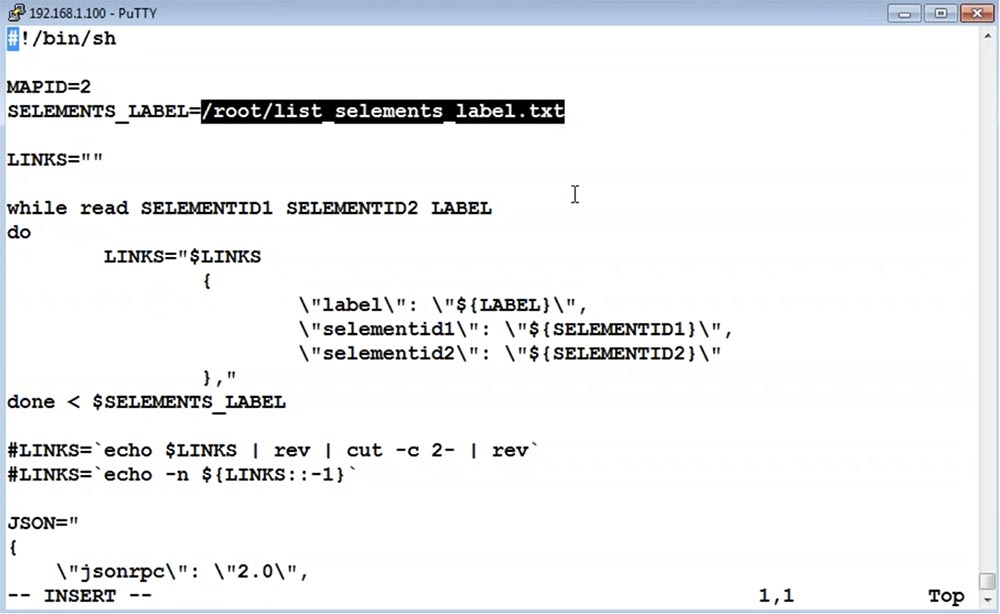 Which states which element on the map with which element on the map through which interfaces it is connected. More precisely, we will take an element on the map, an element on the map and a label. This is an element on the map:
 And this signature should be:
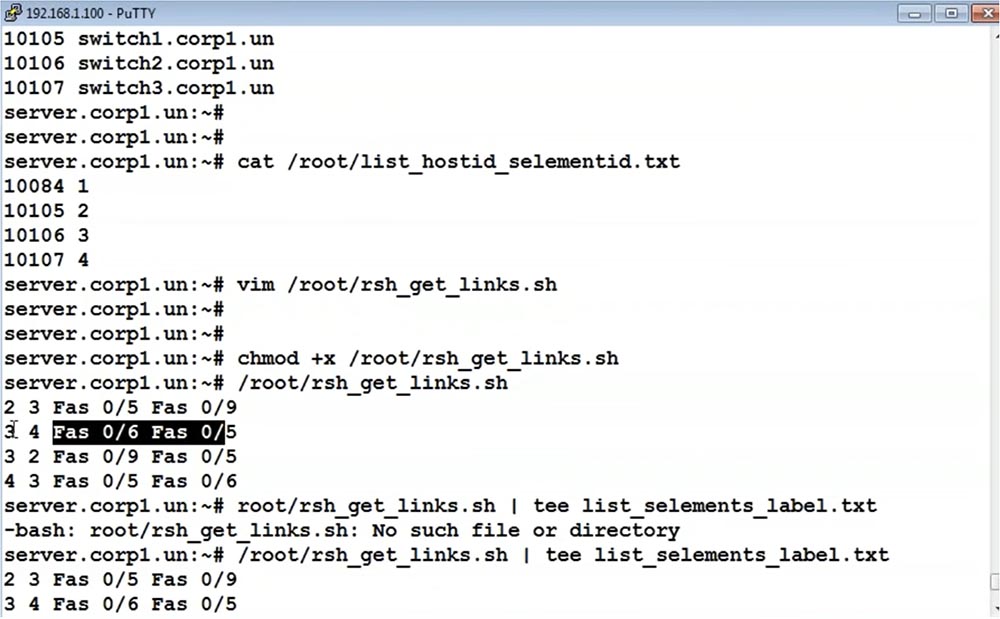 I am reading this file. I sort through all the elements on the map: I
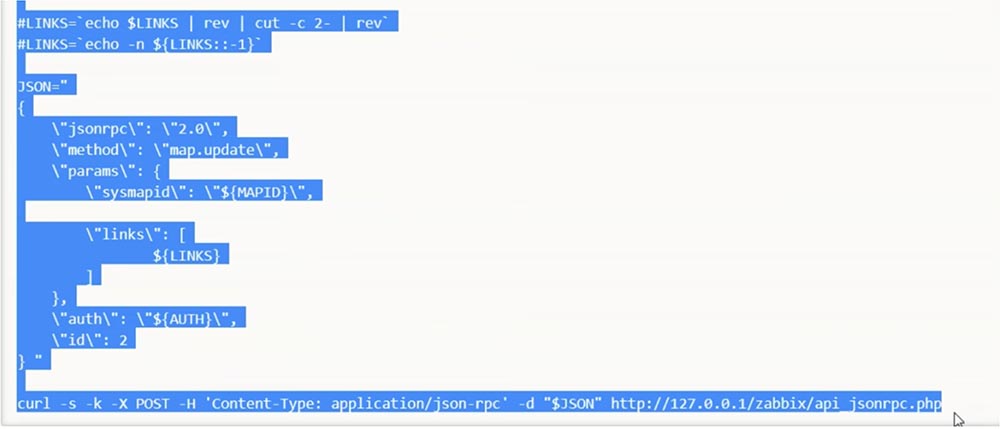
 program links - description of links in the form of JASON. The final request looks like this: update the map (card number ↓):
 Links will be described in this variable:
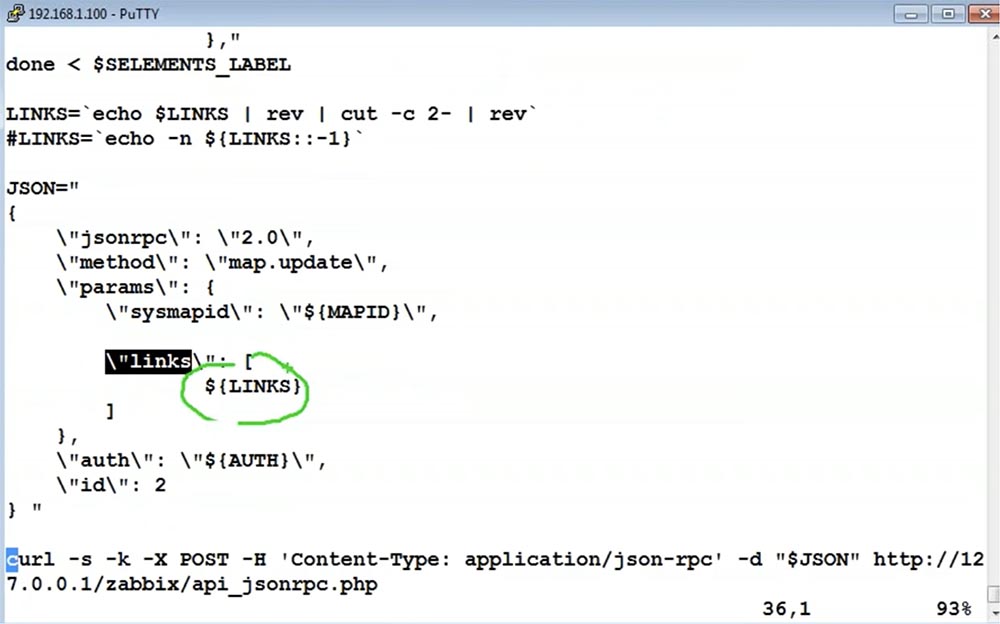 Which was formed in this cycle (all elements and signatures of the cards were enumerated):
 Again, we have a daunting task, and describe it in detail on Shell ... Surely many of you did not program on Shell. You just need to look at these texts and program on whatever is convenient for you.I have an expectation that now everything should happen. Launched a script:
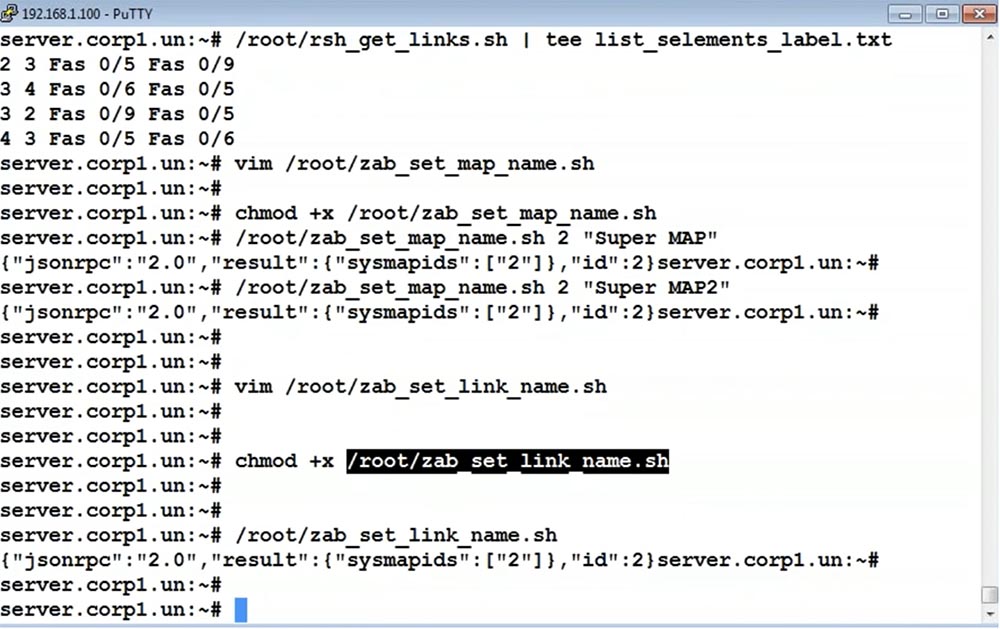 Reload the Maps page:
 Well, how? At least it works! Let's add another switch and run the script again.We take the switch, call it switch4:
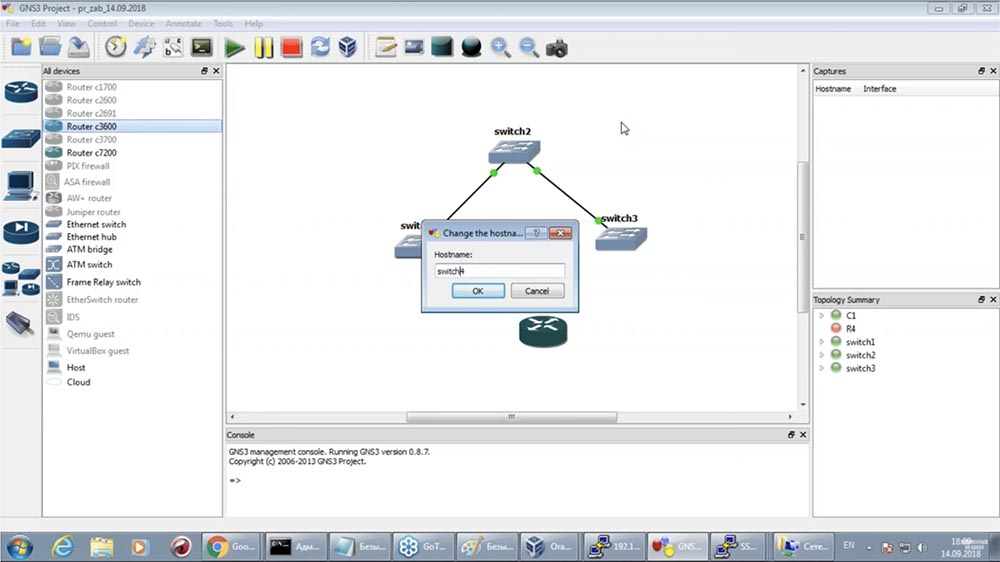 We draw that it is the switch:
 Configure : We connect
 it as we want (with an asterisk, you can draw a sausage): We configure the
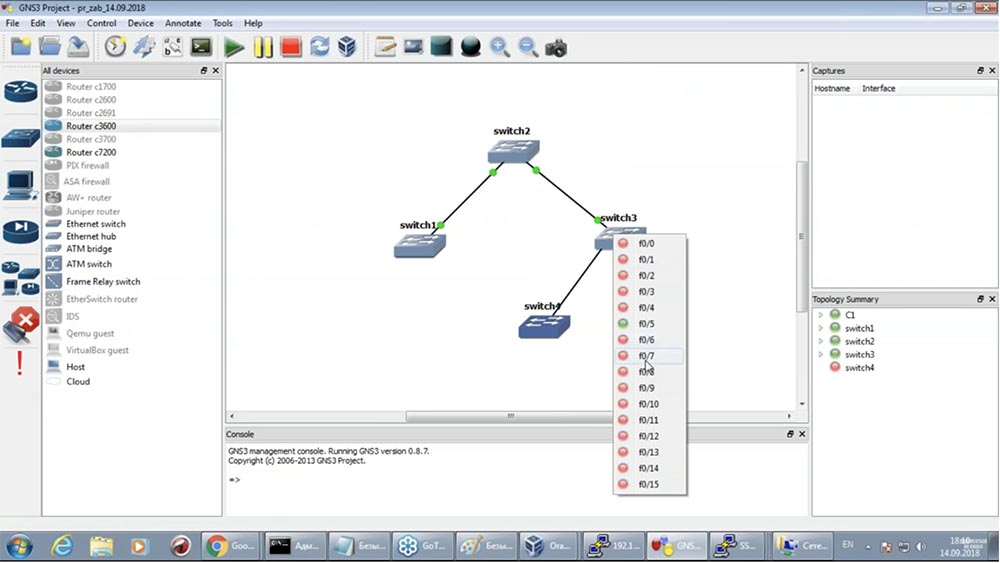 switch. I launch:
 Everything that we previously did (just change to switch4 and the address is 104):
 Double-click on the switch (paste what you copied):
 Again, it will be faster to restart the third switch (switch3), saving the configuration:
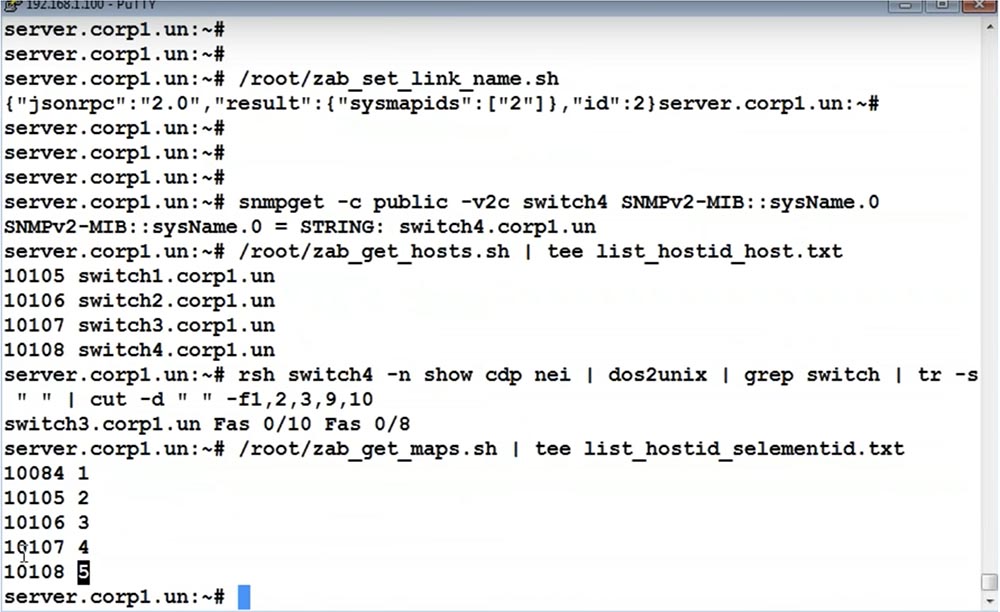
 In the meantime, it reboots, check to see if it is available on our new switch via SNMP. When Zabbik finds it, the first thing to ask is the hostname SNMP. Therefore, we add this design to our new switch:
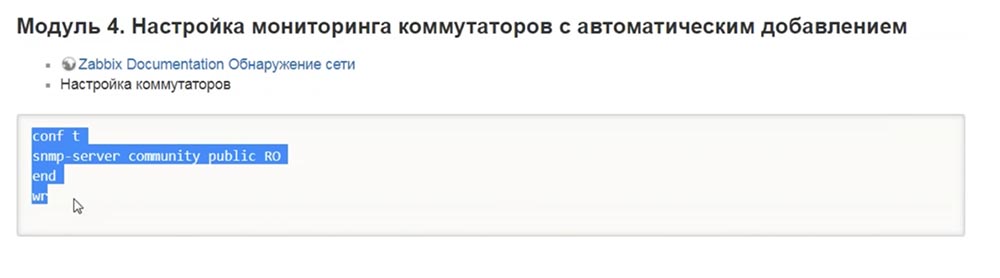
 Now we are waiting for the switch to be available. The 101st, 102nd are available, the 103rd reboots:
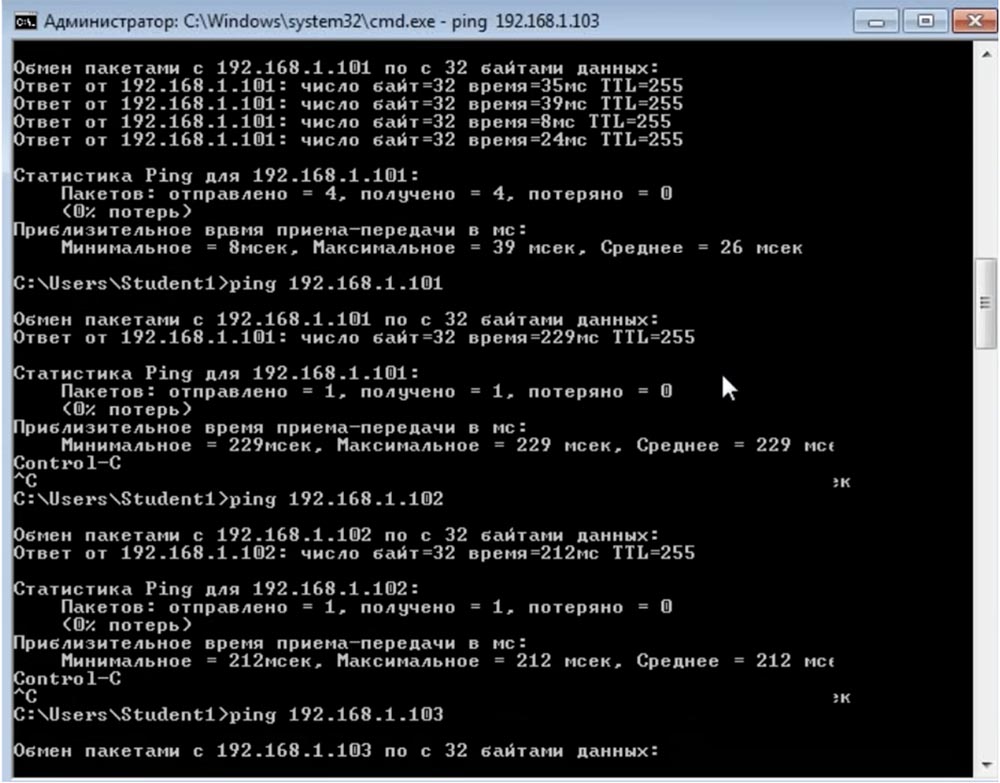 The 103rd
 responded : the 104th responded. Check if SNMP is available via SNMP4:
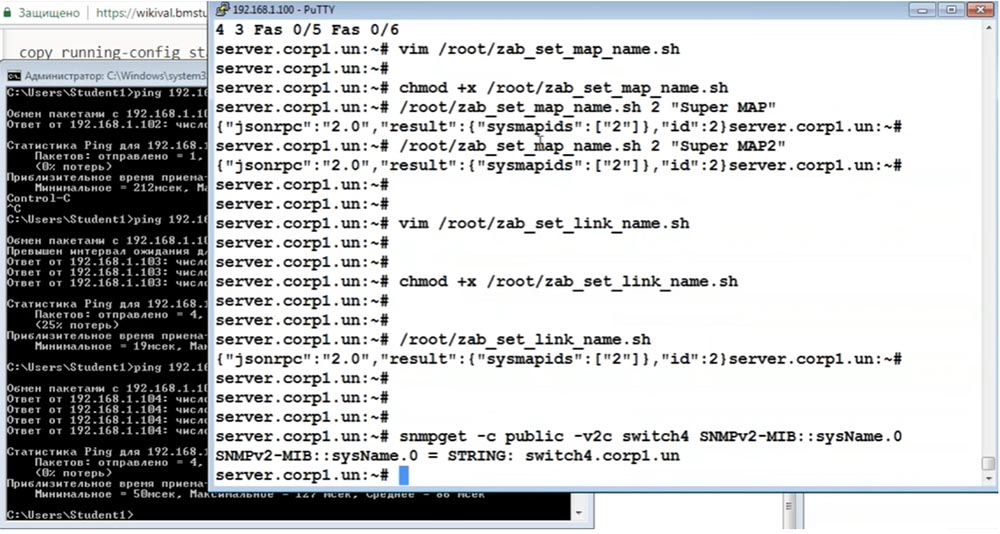 Available! We have every chance to see it in the list of hosts. Let's wait a minute (every minute we have a network scanned):
 Once it has appeared, we return to the first script. He unloaded information from us which switches in general are:
 Your cable men ran, they stuck a new switch, you lifted the link and it appeared automatically in Zabbix. Accordingly, here we should see that the fourth switch has appeared:
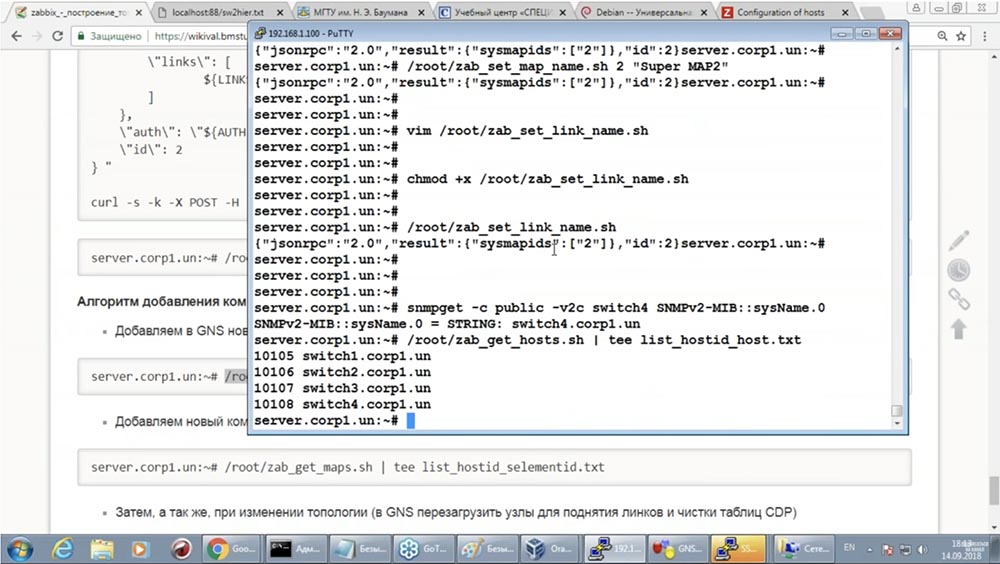 Our database is automatically populated.
We fix the material (add switch4), execute the final script
Then, unfortunately, you have to run away and display our switch on the map: Not only did your cable men run, not only did you configure the link - you still have to go here and say: “We are adding a new switch”.
 Locate where it should be and indicate that we have the host, switch4, and also draw what this switch is:
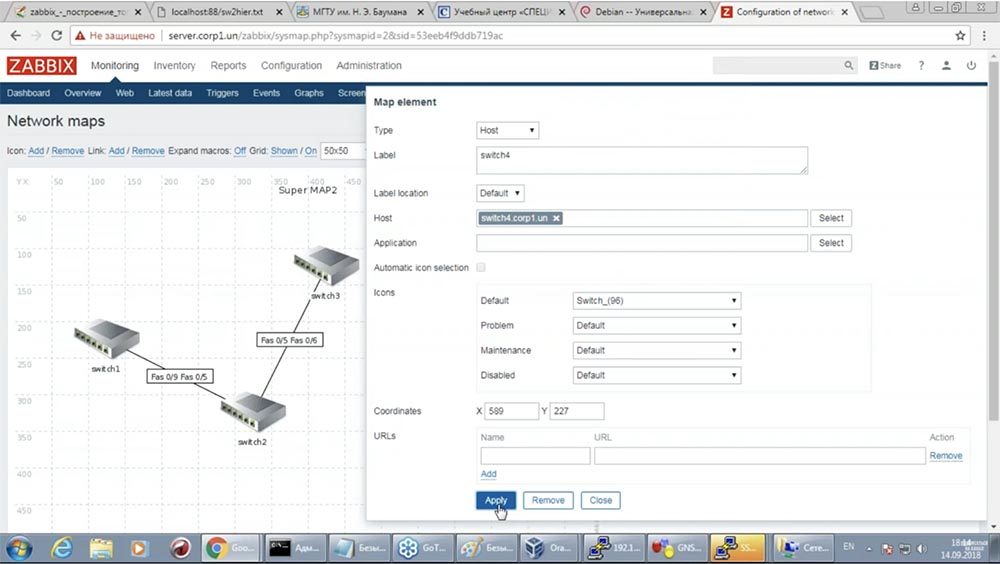 And update (we are not drawing the communication line yet!):
 Now we recall that our communication line scripts are built on the basis of the CDP protocol. And to get CDP information from the switch, you need to configure RSH access to it. Remember, I decided to use this method?
 If all is well, then I can try, then I can try RSH - request information about its connection from the 4th switch. Here he says: "I’m connected to the third, on my side - the 10th, on the other hand - the 8th interface."
 They added it to the card, and we have a table of correspondence between the identifiers in the Zabbix and the identifiers in the card (see, it’s the 5th on the map): they
 raised RSH. Now we can build a connection: which switches are connected via which links (we got the text file):
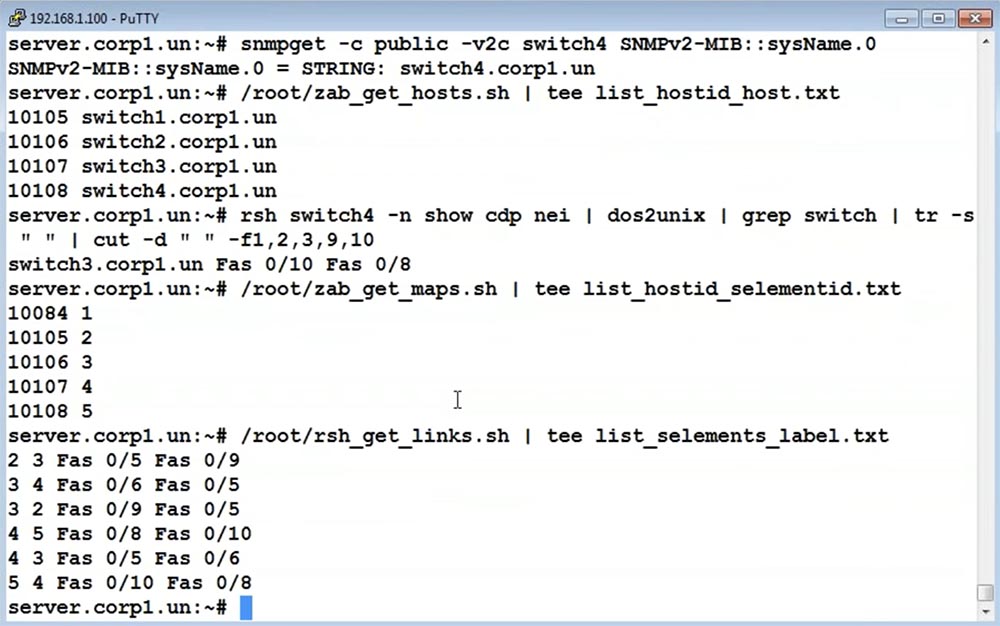 Let's try to run the final script, which will read this text file and generate a JASON request for updating the maps, redrawing all the links on the map:
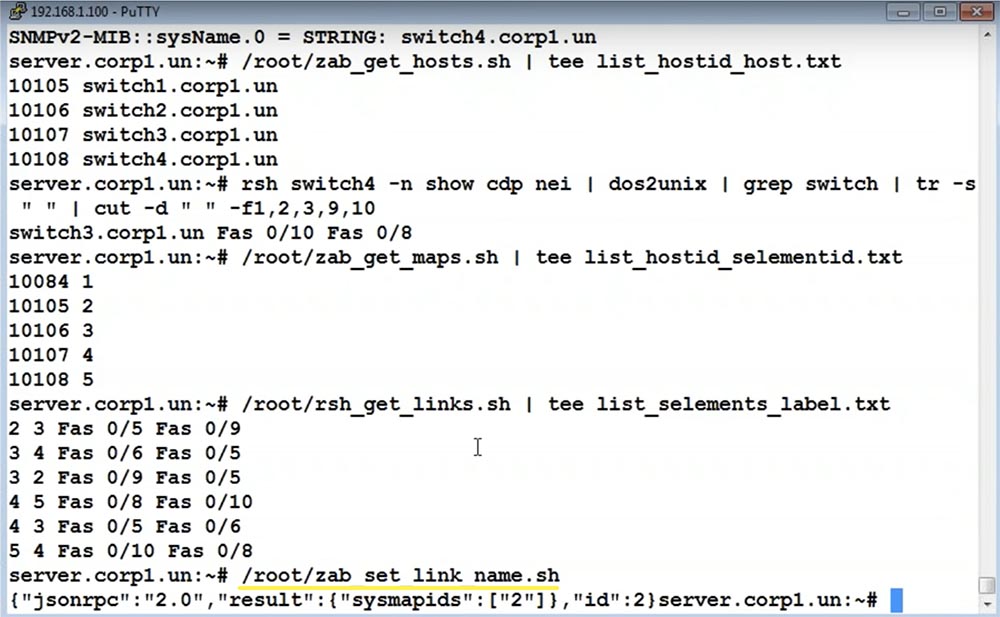
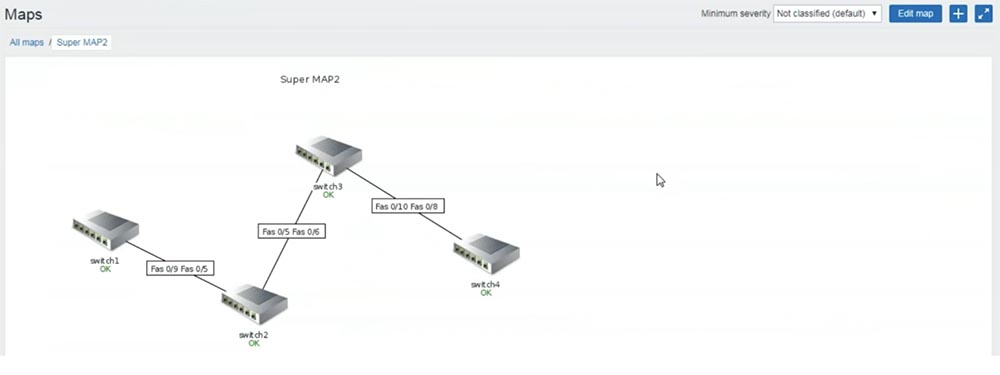 Well, how? Impressive? I didn’t manage in 45 planned minutes, but still quickly (about 75 minutes) - probably, it will not work faster.All! I am very happy friends - it worked out. The training manual is here: https://wiki.val.bmstu.ru . If you do not find it, write to the mail: val@bmstu.ru, val@specialist.ru - I will send it with pleasure. A webinar will appear on specialist.ru - I will check this for sure.And most importantly, my friends, that all this was not in vain, but with the cunning purpose of persuading you or your colleagues to our 2-day course, which understands a large number of tasks related to Zabbix: low-level detection and tuning ... Not at the top, as it is now, but in detail, with laboratory ones - you will do it: until you do it, I will not let you out.I will be glad to see you, your colleagues! Write letters.See you soon!
A bit of advertising :)
Thank you for staying with us. Do you like our articles? Want to see more interesting materials? Support us by placing an order or recommending to your friends, cloud VPS for developers from $ 4.99 , a unique analog of entry-level servers that was invented by us for you: The whole truth about VPS (KVM) E5-2697 v3 (6 Cores) 10GB DDR4 480GB SSD 1Gbps from $ 19 or how to divide the server? (options are available with RAID1 and RAID10, up to 24 cores and up to 40GB DDR4).Dell R730xd 2 times cheaper at the Equinix Tier IV data center in Amsterdam? Only we have 2 x Intel TetraDeca-Core Xeon 2x E5-2697v3 2.6GHz 14C 64GB DDR4 4x960GB SSD 1Gbps 100 TV from $ 199 in the Netherlands!Dell R420 - 2x E5-2430 2.2Ghz 6C 128GB DDR3 2x960GB SSD 1Gbps 100TB - from $ 99! Read about How to Build Infrastructure Bldg. class c using Dell R730xd E5-2650 v4 servers costing 9,000 euros per penny? Source: https://habr.com/ru/post/undefined/
All Articles