Unique WSGI web server using ESP8266. Part 1
 Hello everyone!This article is the first part of my tutorial on developing a rather unusual WSGI server. In this article I will explain the theoretical part of my idea.The main audience is novice developers who are familiar with Python but want to know the zen of the http protocol.Ready? Let's go under the cat.
Intro
Yes, this article is a textual accompaniment to my video (I'm trying to maintain a video blog). If interested, a video on Youtube .Have you ever had the idea to write a program that no one else wrote? Something to the point of madness unique, absolutely (or close to absolute) useless, but interesting?No? Well, thank God, normal people read me.And I conceived a unique and very interesting project, the implementation of which will allow me and the reader to understand in practice how http and the web server actually work. This project will plunge the reader into the world of madness http specifications, the paradox of regular expressions and driver imperfections :-). What will allow you to know all the pain of low-level development and enjoy simple dumb user requirementsBy the way, maybe you will be surprised, but the idea of this project was not born out of nowhere. The fact is that I have a Raspberry PI Zero without Wi-Fi and NodeMCU with wi-fi. So I thought - is it possible to write a web server on Django and host on a Raspberry PI while connecting to the network via Wi-Fi. A normal person would have thought of either buying a raspberry with Wi-Fi or connecting a Wi-Fi adapter to a raspberry. I came up with the idea of connecting the ESP8266 to the raspberry, but since the ESP8266 cannot work as a network adapter, the idea came to me.Fuh, I hope I justified. Now to the pointTheory
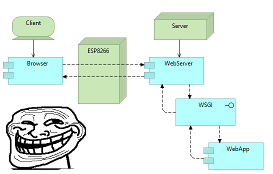
A web server is a rather complicated thing that works at a low level with sockets, parses raw http requests, parsing headers, manages connections, balances the load, etc. And it’s better to keep this complex module separate because the web application is already operating with higher-level concepts of models, controllers and views. Both components are necessary and important for the work of the web, but the areas of knowledge necessary for their development do not overlap much, so it is better for them to know as little as possible about each other.As you know, there are many compatible with written in Python web server applications (Gunicorn, Bojern, CherryPy, but not many of them).As well as there are many web frameworks that can work with any of these web servers.How does this happen? It's simple - we need a standard and this standard is called WSGI.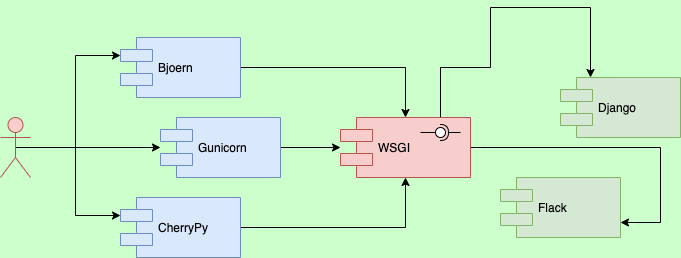 Figure 1 WSGIWSGI is part of the PEP specification and allows you to use various frameworks and web applications with almost no concern for their compatibility.And the following illustration perfectly demonstrates my idea of a Python web server
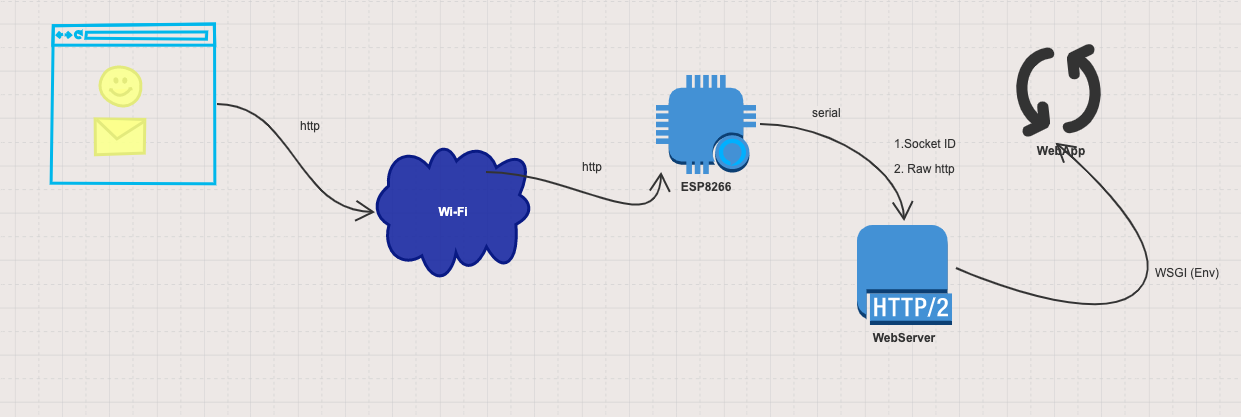 Figure 2The reader could notice ESP8266 in the picture - no, I won’t place the web server on this device, since it would be too commonplace compared to my idea.ESP8266 is flashed with factory AT firmware, and accepts only AT commands. But most importantly, with the help of AT commands, he can raise sosket north, which will receive http requests from the client (receive via WiFi) and broadcast them via the serial portOn the serial port, ESP transmits 2 important parameters - the socket ID, indicating that we will return a response to the client. ESP8266, by the way, supports a maximum of 4 simultaneous socket connections. And of course, the http requestOur python 3 web server parses http by folding the headers into a special environment object and raises the application object by passing it the start_response method with which our application will return the response and the environment dictionary which contains all the necessary headers and the body of the http request (necessary methods and the required environment dictionary keys are a key part of the WSGI specification)After the framework processes the request and forms the response, it pulls the start_response method, in this method we get the parameters needed to form the http response, build the raw html string, and transfer thewhole thing to the client via the serial port in ESP8266. ESP8266, in turn, I found the correct way to flash ESP8266 AT with factory firmware in an excellent article, the link to which you will find under number 2 in the “Useful URLs” section.For AT commands, communication with ESP8266 is as follows (I use ESPloter shell for communication) I assume that the ESP8266 has WiFi. If Wi-Fi is not raised - it is also easy to do through ESPloter
- Command AT + CIPMUX = 1 - opens multiple connection
- Command AT + CIPSERVER = 1.80 (port 80, which we open)
After entering these commands, we raised the TCP server to ESP8266 and can receive requests from the client.We also return the response to the client with 2 commands- AT + CIPSEND command = socket number, number of bytesAfter this command is completed, the terminal will wait for a message of the specified number of bytes.When we enter enough characters, the transmission session will end and we will need to enter a new commandAT + CIPCLOSE = number socket.After that, the browser ends the session and displays the transmitted text.That's all for today. I hope in the next week I will add and lay out the practical part. I have a number of problems, mainly with the operation of the terminal and http parsing, but they seem to be solvable.Thank! Till.Useful URLs
- This article of Let`s Build A Web Server helped me a lot in this project.
- The article Restoring AT Firmware on the ESP8266 helped me flash ESP8266
- Do not underestimate the power of official documentation. Examples of AT commands
Source: https://habr.com/ru/post/undefined/
All Articles