I want to talk about my little experience working with Home Assistant (hereinafter referred to as HA) on the Raspberry pi and about connecting the video registration function, motion sensor and, accordingly, the home security function to receive images by mail in the event of a “security” operation.Of course, one of the reasons is the desire to understand from your feedback that what I did “did wrong” after all, implementing this scenario.There are three ways to configure the above functionality: “without troubles”, “short” and “independent”. In the first case, you, having downloaded the finished image from the site https://ViaMyBox.com/downloadpagefor your Raspberry pi, you can see how everything looks in the already configured form. In the second case, you can download the zip from the website or from the github project, install and install the HA docker image through the utility (sudo via-setup.sh) to see how everything is configured. And finally, the third way is to set up “everything in your own way”: take something useful from the site or githab of the project, or from this tutorial. Links to everything at the end of the article.Suppose you already have a working Home Assistant (HA). In this article, we will consider only aspects of the formation of yaml configurations and a description of the sequence of rules and conditions that lead to a specific action, in our case, the connection of “house security” and a script that starts taking pictures within 5 seconds after the motion sensor is triggered. And as a result, Home Assistant sends the taken pictures by mail. I am not a specialist in yaml or in creating configurations for Home Assistant, but following the working examples, I got a working configuration, which I want to share.All the files that we will refer to, I will lay out at the end of the article for a more convenient review. I will not deal here with the work of scripts for recording video in bash or python in this example. Only Home Assistant. But if you have questions - Wellcome!In the end, everything looks like this for me (highlighted in red that we will consider in the article):
 I use Raspberry pi as a platform. And my path to the configuration files is / usr / share / hassio / homeassistant /. The path to your configuration files may be different from my path. At that time, I had Home Assistant 0.101.3. We will be interested in the configuration files in this directory: configuration.yaml and automation.yaml.After each change to these files, it is important to remember that it will be necessary to check the configuration after our changes for any errors made in it. This is done in the tab Home Assistant dashboard -> Configuration -> Server Controls -> Check Config. And then, in the same place we do Reload Automations and Reload Scripts, if the verification was successful. And, if in doubt, - Server Management restart in the same tab accurately updates the configuration.The HC-SR501 motion sensor is connected to the Raspberry pi GPIO bus. It is necessary to correctly connect the three contact wires to the GPIO, and we can use our sensor in action. The sensor has three contacts: power gcc (+), zero gnd (-), control contact (data). After reading the description of the GPIO, I connected them to my raspberry as follows. I connected hc-sr501 to the GPIO connector: pin # 2 - 5.5vvcc; pin # 26 (13th row) - data contact and pin # 6 - gnd (-) of the sensor.I use either a usb camera or a csi camera in conjunction with mjpg-streamer as the source of the photo. How to install and configure mjpg-streamer on Raspberry pi, we will not consider here. Examples of quick installation on the Internet a lot. However, I want to say that I use data from this projectThe installation of this module is also described in detail there. Or use any method convenient for you to take photos and videos. After all, what bash script to fasten to HA, ultimately, is up to you.We will now describe our sensor in configuration.yaml, say, through the command line:
sudo nano /usr/share/hassio/homeassistant/configuration.yaml
although using notepad ++ with winscp may be more convenient ...We describe the sequence of settings for the HC-SR501 like this:binary_sensor:
- platform: rpi_gpio
#name: HC-SR501
ports:
7: Sensor HC-SR501
invert_logic: false
It should be noted that here the important thing is the settings in the lines that describe the connection to the control (data) contacts of the sensors: pin # 7ports:7: Sensor HC-SR501The Home Assistant has a built-in tool for activating the home security function. We will describe it in our configuration.yaml, using the description: www.home-assistant.io/integrations/manualalarm_control_panel:
- platform: manual
name: Home Alarm
pending_time: 60
delay time 40
triggered:
pending_time: 0
code: 1234
This setting means that we have 60 seconds to leave the house (after this time the alarm will turn on), and 40 seconds to turn it off (with a password of 1234) upon returning home. For some reason, you always leave longer than you come.)Now we will describe the mechanism of turning on and off photographing when the motion sensor is triggered in our configuration.yaml (more about the switch - command_line platform can be read here ): - platform: command_line
switches:
start_stop_motion_rec_timelapse:
friendly_name: 'Record motion timelapse video'
command_on: 'curl http://localhost/start_mjpgstrm.php && curl http://localhost//rec-motion-mjpg.php'
command_off: 'curl http://localhost/stop_mjpgstrm.php && curl http://localhost/rec-motion-mjpg-stop.php'
Here we connected the commands to enable command_on and disable command_off with our scripts that control camera recording. In this case, when the command_on is executed, 2 scripts are executed sequentially. This is launching mjpg-streamer and triggering motion sensor recording. Access to bash scripts goes through the php file of the working site on Raspberry pi. To do this, I configured nginx and web access, and when accessing through a browser in the form http: // <ip address of your Raspberry pi> /start_mjpgstrm.php, our php script should be executed. This script executes mjpg-streamer in this situation.We do not consider web access configuration in this article. Definitely, this is not security, but due to the fact that I have HA on docker, I was faced with the fact that I have an isolated docker environment and the “outside world” of the OS I can see by contacting my site through php. There are probably a bunch of good solutions from docker or HA gurus. Write, it would be interesting to know!I will leave a listing of these scripts under the article, we will not dwell on them. In this article I want to trace only the formation of the sequence of actions in the Home Assistant.All this is placed in the start_stop_motion_rec_timelapse object. It will be our visual switch, with which we will control the recording of photos when the motion sensor is triggered. We can visualize these objects created by us in the tab Home Assistant -> Overwiew, switching the activation of the Configure UI configuration mode in the upper right corner.
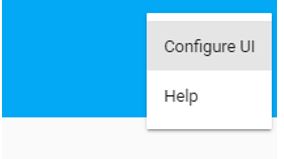 Restart HA in the browser in the “Configuration -> Server Control” tab to pick up our configuration.yaml.Next, select the yellow plus at the bottom of the browser window, click on the Entities card and attach our created objects to the maps.
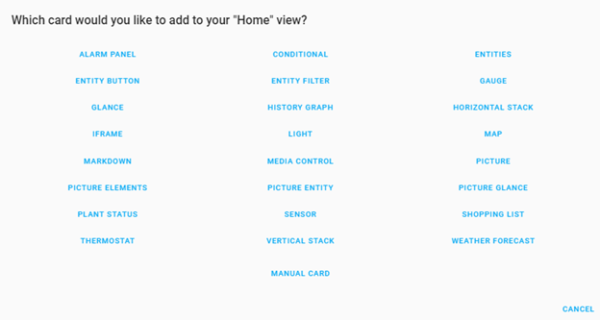 For our sensor, select the sensor card. It will look like this:
 As you can see in the picture, in the second field of the entity the above switch is: switch.start_stop_motion_rec_timelapse.It allows us to turn our recording on the motion sensor on and off, regardless of the inclusion of the “home security” function. And, in general, it should already work after all the above actions.Well, and accordingly, the alarm panel map:
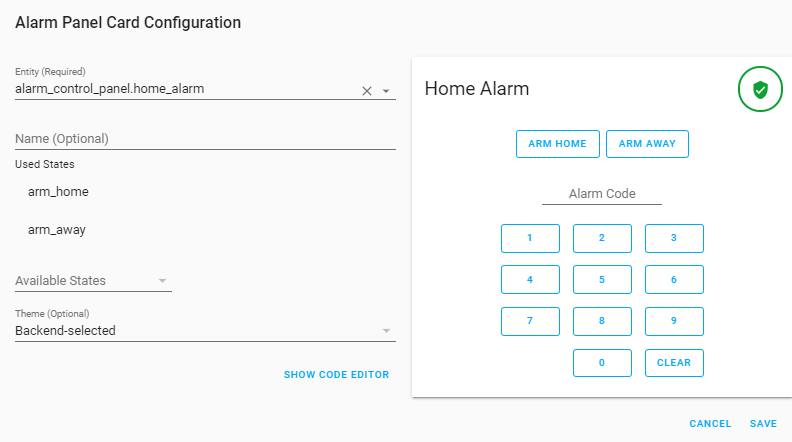 There is another interesting point. I use Home Assistant as a docker container. In this regard, the path to our script will be different from the real path to the script file. After all, the file structure inside the container is virtualized and connected with the real file structure through mounted docker volumes. It looks like this: Path inside the container: / config / scripts / Path inside the OS: / usr / share / hassio / homeassiatnt / scripts. So look at your container settings, how these volumes are configured in the Binds field. If HA you have there.
sudo docker inspect homeassistant|less
When the motion sensor is triggered, at the moment when the alarm is turned on: I want, in addition to the fact that we are starting quick photography (timelapse snapshots), I would receive a warning by mail and a picture. I parallelized the processes. In the first photo, logging (timelapse snapshots) occurs within a few seconds after the sensor is triggered. To do this, I run mjpg-streamer curl localhost / start_mjpgstrm.php , start php: surl http: //localhost/rec-motion-mjpg.php . He, in turn, runs the python script mov.py. All described files and links are at the end of the article by reference. And another takeSnapshotWebcam.sh script takes a snapshot, which I send in an email. I describe these scripts in our configuration.yaml like this:shell_command:
#
take_snapshot_webcam: '/config/scripts/takeSnapshotWebcam.sh'
# mjpg-streamer
start_mgpg_streamer: 'curl http://localhost/start_mjpgstrm.php'
# mjpg-streamer
stop_mgpg_streamer: 'curl http://localhost/stop_mjpgstrm.php'
# 5
start_motion_rec: 'curl http://localhost/rec-motion-mjpg.php'
#
stop_motion_rec: 'curl http://localhost/rec-motion-mjpg-stop.php'
There, in configuration.yaml, we describe our object for mailing:notify:
- name: ha_sendmail
platform: smtp
# gmail
server: smtp.gmail.com
port: 587
timeout: 15
#
sender: user@gmail.com
encryption: starttls
username: user@gmail.com
password: passwd
# ( , )
recipient:
- user@gmail.com
sender_name: My Home Assistant
An important point! In order for our HA to connect and send letters (sender field), we must allow gmail to use this box to our HA service. How to do this is the link here: myaccount.google.com/lesssecureappsAnd then, we describe the automation mechanism itself when the home_alarm alarm is turned on in automation.yaml:# (alias) “ , ”
- alias: 'Trigger alarm while armed away'
#alias , “on”
trigger:
- platform: state
entity_id: binary_sensor.sensor_hc_sr501
to: 'on'
# , “armed away”
condition:
- condition: state
entity_id: alarm_control_panel.home_alarm
state: armed_away
#
action:
# mjpg-streamer ( )
- service: shell_command.start_mgpg_streamer
# ,
- service: shell_command.start_motion_rec
# “ ” HA “ ”
- service: alarm_control_panel.alarm_trigger
entity_id: alarm_control_panel.home_alarm
The following bunch of conditions and actions is to send a console message when disabling “security” and turn off our motion recording scripts:- alias: 'Send notification when alarm is Disarmed'
trigger:
- platform: state
entity_id: alarm_control_panel.home_alarm
to: 'disarmed'
action:
- service: shell_command.stop_mgpg_streamer
- service: shell_command.stop_motion_rec
- service: persistent_notification.create
data:
message: The alarm is Disarmed at {{ states('sensor.date_time') }}"
And finally, the third bunch - we send a letter with a photo:- alias: 'Send notification when alarm triggered'
trigger:
- platform: state
entity_id: alarm_control_panel.home_alarm
to: 'triggered'
action:
- service: persistent_notification.create
data:
message: Notification when alarm triggered. Motion sensor HC-SR501 detected.
- delay:
seconds: 4
#
- service: script.webcam_snapshot
# configuration.yaml: notify.ha_sendmail
- service: notify.ha_sendmail
data:
title: 'Intruder alert'
message: '{{now().strftime("%H:%M %Y-%m-%d")}}:Notification when alarm triggered. Motion sensor HC-SR501 detected.'
data:
images:
# script.webcam_snapshot
- /config/camera/snapshot.jpg
Remember that line layout is important in yaml files, and space characters before commands play an important role in the formation of code blocks, their structure. Check all changes to your yaml through the Home Assistant (HA) Configuration -> Server Controls -> Check Config.Everything seems to be, and your Raspberry pi turns into elegant ... if the lightning has not stuck!)Here it is - a working HA automation, Custom-made! Be sure to write to me what you think about this!And, if you still read to the end, I offer the promised links:https://viamybox.com/downloadpage
https://github.com/viatc/viamybox Theconfiguration files described here:automation.yaml, configuration.yaml, takeSnapshotWebcam. sh, rec-motion-mjpg.php, mov.py