This article is a guide on how to quickly and painlessly start using AWS Lambda with a simple example. Suitable for both a developer who did not work with Lambda at all, and who knew Cloud to evaluate another vision for developing Serverless applications.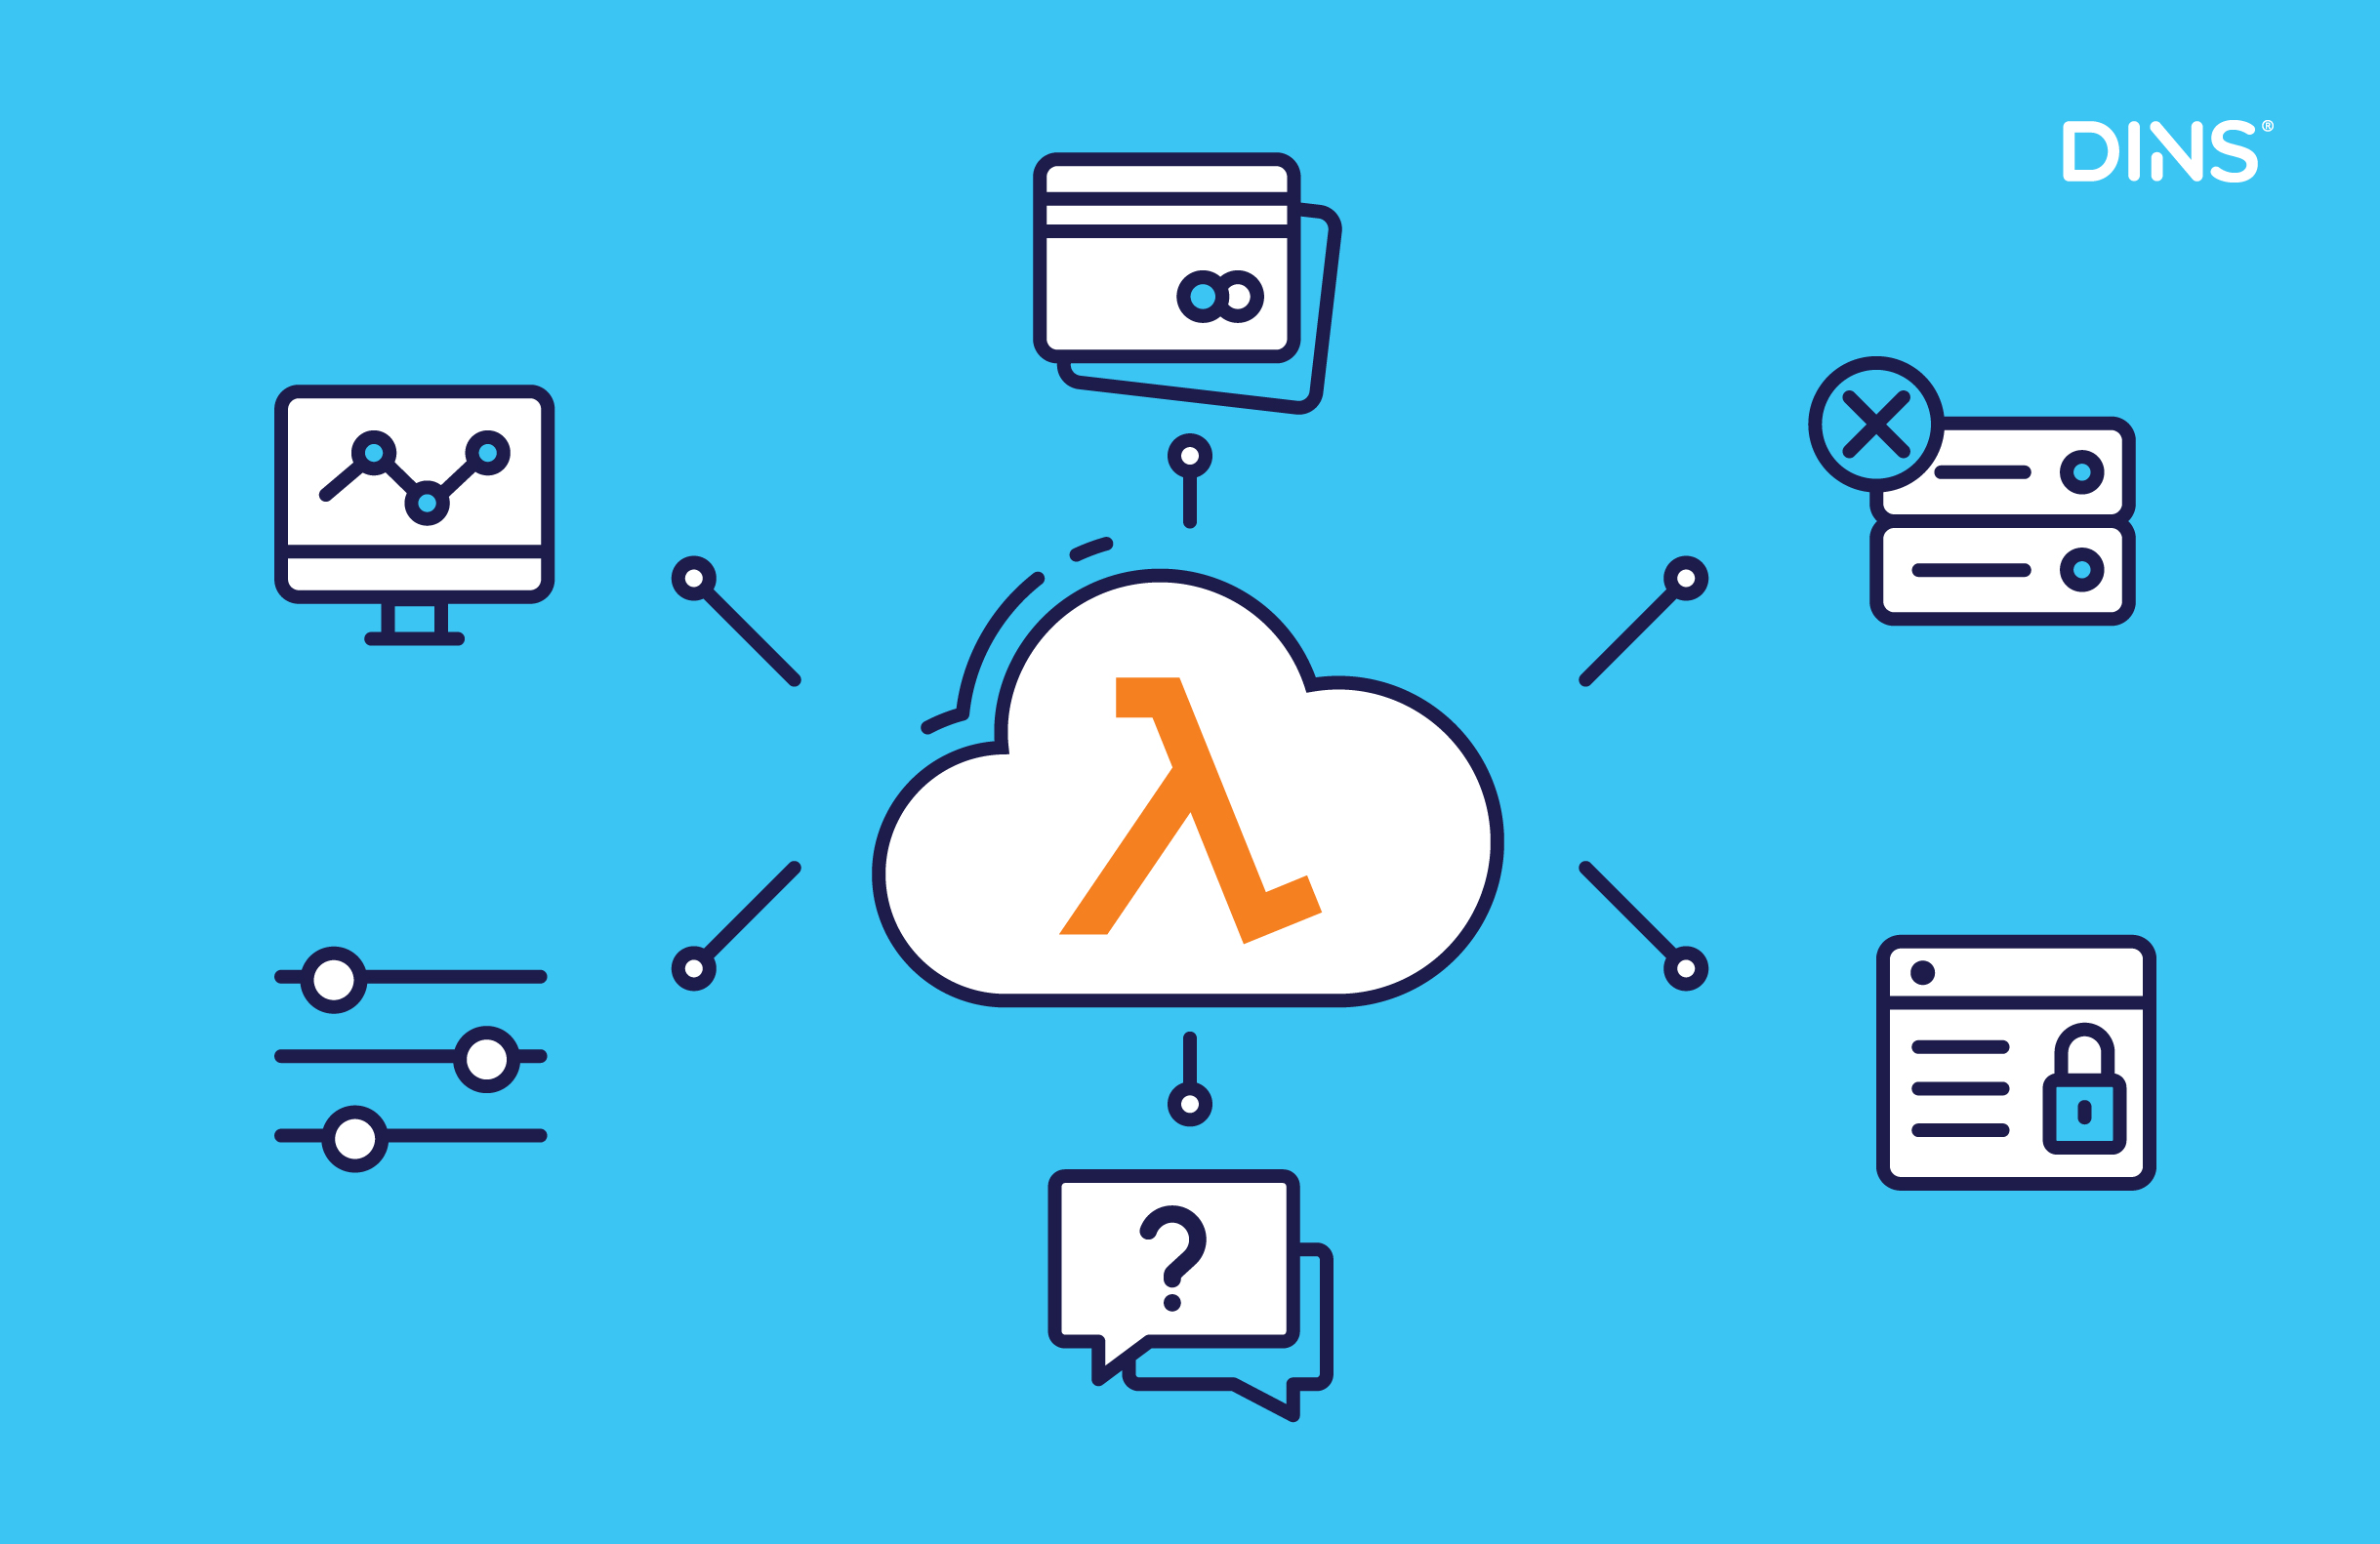
Introduction
Hello everyone.My name is Alexander Gruzdev, I am Java Team Lead at DINS. For more than two years, I have been working closely with the AWS infrastructure and have experience both in writing applications for AWS and in deploying these very applications. In my work I had to use ElasticBeanstalk, ECS, Fargate, EKS, and, of course, AWS Lambda.Each of these services is good in its own way, and within the framework of this article I will not urge to use only AWS Lambda as a replacement for all other options. I just want to show how easy it is to start using Lambda, and in what cases you will get the benefits of using it.Everyone, from developers to managers, wants a clear process for delivering changes to customers. The more transparent this path and the less effort is required, the more profitable. Most often, developers and testers do not want to know where the application will be deployed, which piece of hardware to choose, in which region you want to put replicas, etc. In the following diagram, you can see “aaS” class of services (as a service), where AWS Lambda represents the FaaS category.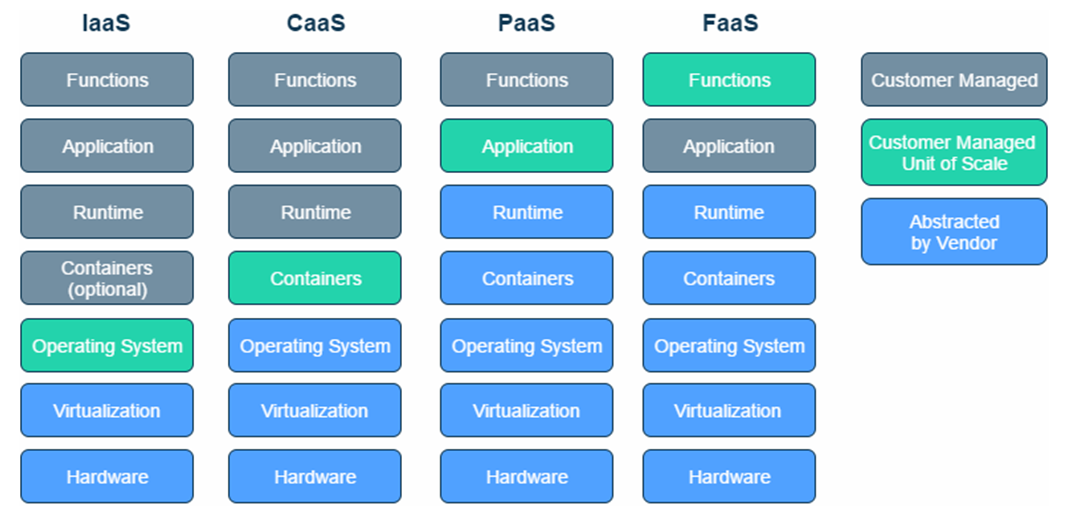
FaaS in a NutshellFaaS , . , , CRUD C, R, U, D Create Read. , — .
Idea
To demonstrate what the development of a Serverless solution is, I decided to take a rather banal example. I think you have seen Contact Us feedback form on many sites, where you can leave your mail or phone and ask a question to be answered later. The screen below, the form is not super, but the subject of this article is not material design.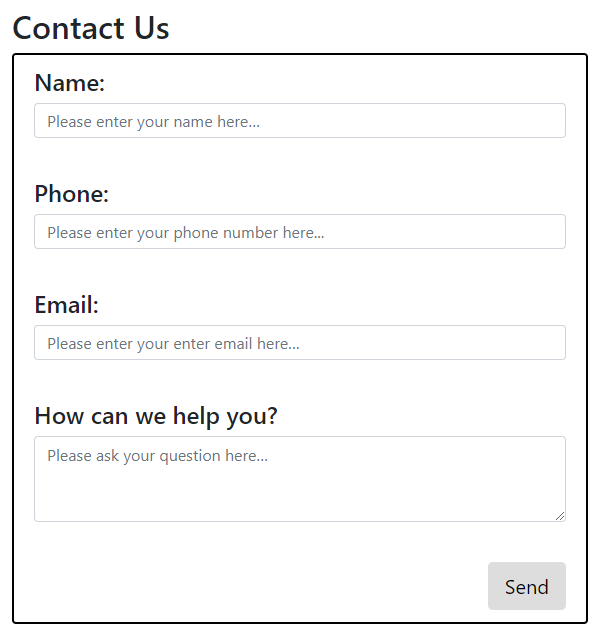 By filling out this form, a potential customer will be waiting for a call or letter from you.From the technical side you need:
- save data from the form to the database;
- send a letter to an agent who will answer the question;
- perhaps write another service where the agent will mark the work done on the basis of the same database (not included in the scope of the article).
The implementation of the idea is available on GitHub .Architecture
The first thing that comes to mind during implementation is what we need:- machine under back, front, images, etc.,
- car with base
- machine with email service.
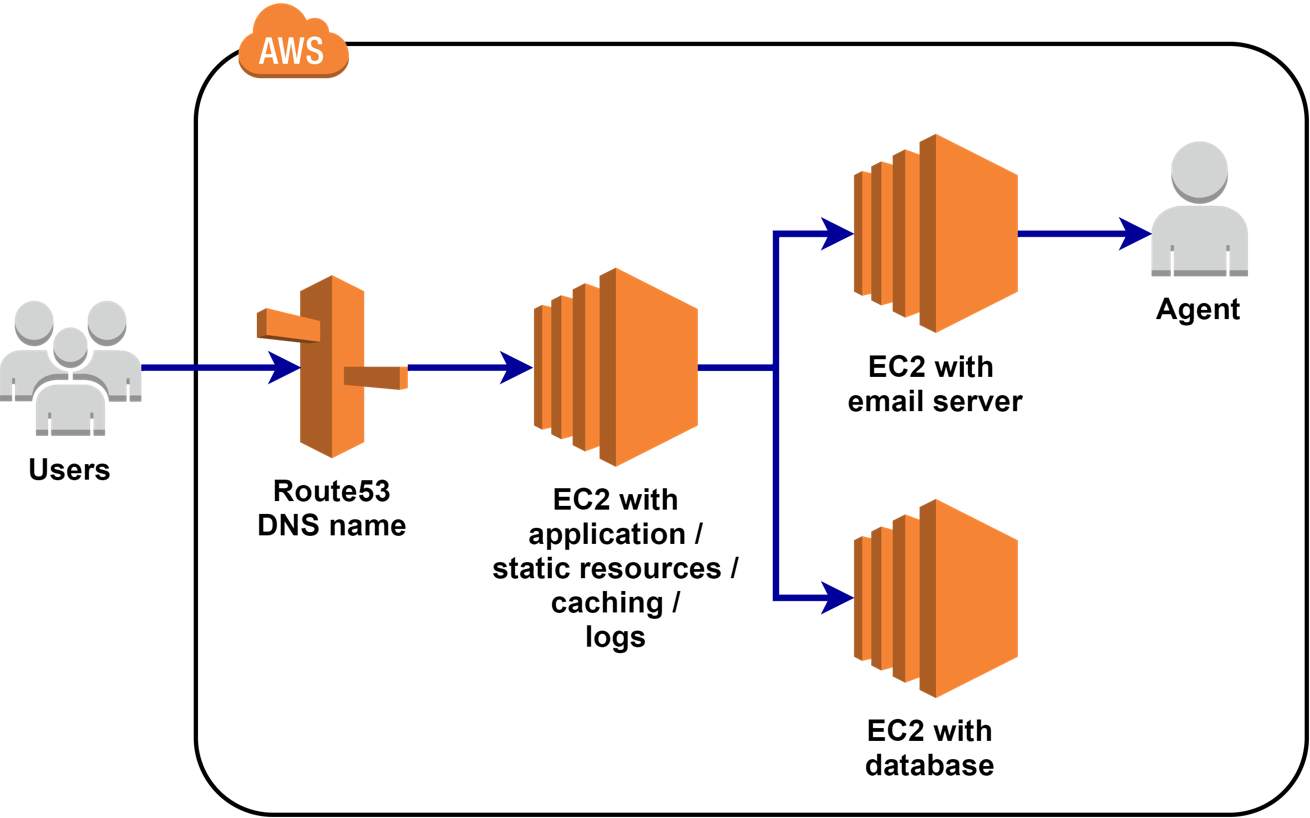 The back and base, in a good way, need to be replicated, but suppose we do this for our mini-store and the load on this form is minimal. Therefore, all these machines can be combined into one and deployed in a single set.But since we are considering Serverless, let's build the architecture entirely on serverless components.No matter how promising Serverless may sound, we all understand that the servers are still here, they just disappeared from your field of vision. And now that cloud work that you could do the chores that you could do on your own. But let's try to use only such serverless components:
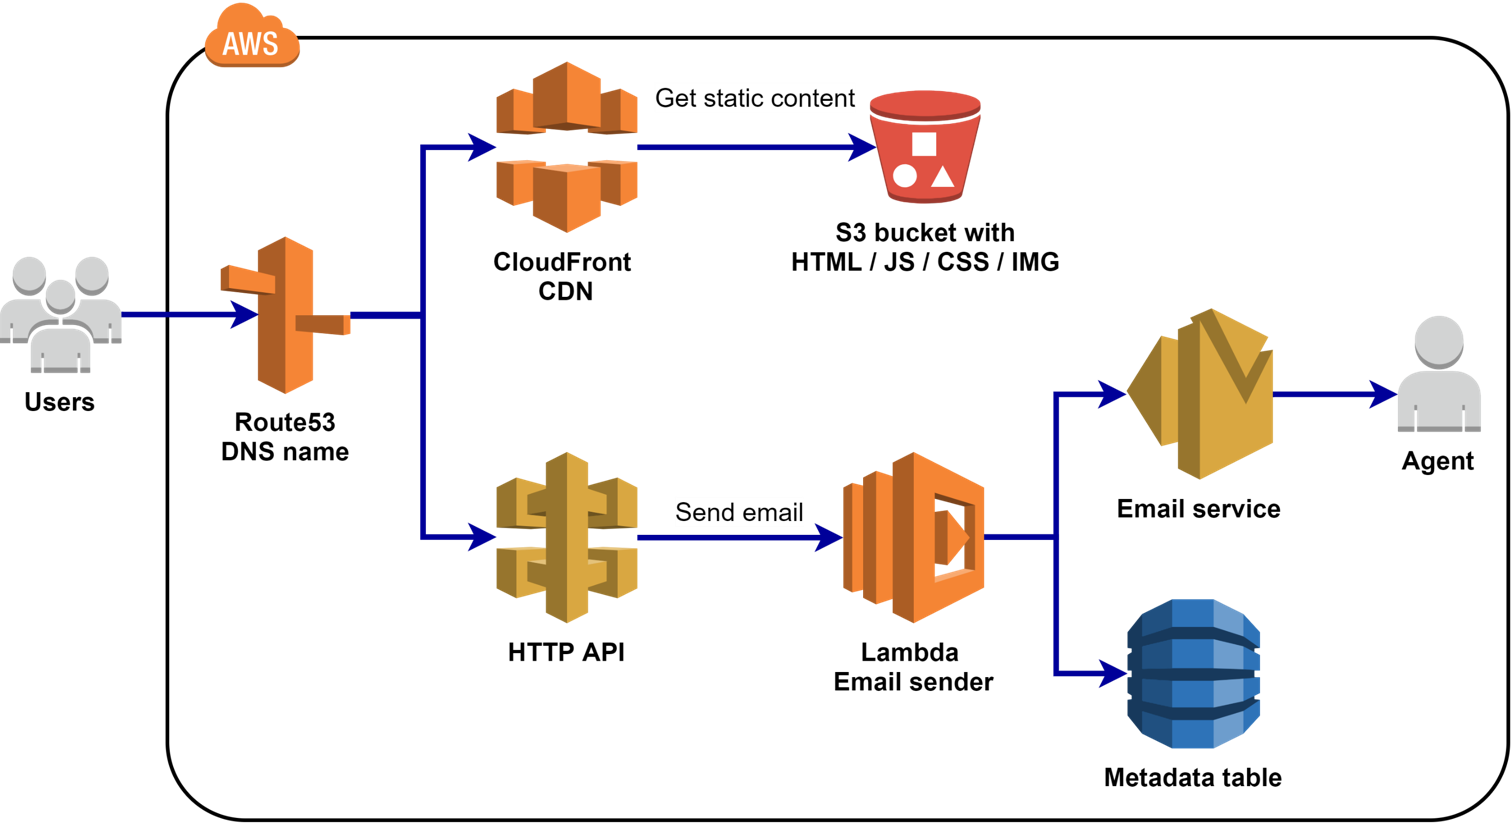 The diagram shows a very clear separation of the functionality of each component.
- AWS Lambda is the main component that contains code / logic,
- S3 is responsible for storing static resources and JS scripts,
- CloudFront - for caching mechanisms and multi-regional support,
- SES - email service,
- DynamoDB - the base for storing data from the form (from whom, what question, where to send the answer),
- Gateway API - HTTP API for our lambda,
- Route53 - needed if you want to add a beautiful domain name.
Not all of these components will be used in our next guide, just so as not to stretch the article.Route53 and CloudFront are fairly simple components that you can read about separately.A little spoilers that will give us such a solution:- We are moving away from supporting EC2 machines, no debugging via ssh,
- Easy configuration: configure throttling / caching / accesses in one click,
- Supports access policies: restrict rights and give access,
- Logging / monitoring out of the box,
- Pay only for used resources / requests.
Demo
Training
To begin developing our Serverless solution, you must meet the following requirements:After installing all of the above tools, you need to configure your aws-cli for remote access to AWS. Follow the instructions . This will require creating a new user and unloading his Access Key and Secret Key.Project assembly
1. Create a project from a template
Open the directory for the future project and from it launch SAM CLI. Follow the instructions: Note: Depending on the SAM-CLI version, the commands may be slightly different, but they all remain intuitive. Just choose the ones most similar to those that were used above. You can also choose a different build tool if Gradle is not suitable for you.The project "Hello, World!" ready. Now you can work on the name of the project and packages, dependencies and source code.
2. Let's deal with addictions
Add the following dependencies to build.gradle:dependencies {
implementation group: 'com.amazonaws.serverless', name: 'aws-serverless-java-container-core', version: '1.4'
implementation group: 'com.amazonaws', name: 'aws-lambda-java-core', version: '1.2.0'
implementation group: 'com.amazonaws', name: 'aws-java-sdk-ses', version: '1.11.670'
implementation group: 'com.amazonaws', name: 'aws-java-sdk-dynamodb', version: '1.11.670'
implementation group: 'com.amazonaws', name: 'aws-lambda-java-log4j2', version: '1.1.0'
implementation group: 'com.fasterxml.jackson.core', name: 'jackson-core', version: '2.10.0'
implementation group: 'commons-io', name: 'commons-io', version: '2.6'
testImplementation group: 'org.mockito', name: 'mockito-core', version: '3.1.0'
testImplementation group: 'org.powermock', name: 'powermock-api-mockito2', version: '2.0.4'
testImplementation group: 'org.powermock', name: 'powermock-module-junit4', version: '2.0.4'
testImplementation group: 'junit', name: 'junit', version: '4.12'
}
The main ones are the AWS SDK. They will allow you to work with specific services, such as SES, DynamoDB, etc.3. We write a lambda
We change the template request and response classes for RequestHandler to AwsProxyRequest and ContactUsProxyResponse.public class App implements RequestHandler<AwsProxyRequest, ContactUsProxyResponse>
...
public ContactUsProxyResponse handleRequest(AwsProxyRequest request, Context context)
AwsClientFactory AWS SDK-.
public class AwsClientFactory {
private static final Logger LOG = LogManager.getLogger(AwsClientFactory.class);
private final AmazonSimpleEmailService sesClient;
private final DynamoDB dynamoDB;
/**
* AWS regions should be env variables if you want to generalize the solution.
*/
AwsClientFactory() {
LOG.debug("AWS clients factory initialization.");
sesClient = AmazonSimpleEmailServiceClient.builder().withRegion(Regions.EU_WEST_1).build();
AmazonDynamoDB dynamoDBClient = AmazonDynamoDBClientBuilder.standard().withRegion(Regions.EU_WEST_1).build();
dynamoDB = new DynamoDB(dynamoDBClient);
}
DynamoDB getDynamoDB() {
return dynamoDB;
}
AmazonSimpleEmailService getSesClient() {
return sesClient;
}
}
ObjectMapper .
private static final ObjectMapper OBJECT_MAPPER = new ObjectMapper();
private static final AwsClientFactory AWS_CLIENT_FACTORY = new AwsClientFactory();
.
 private SendEmailResult sendEmail(ContactUsRequest contactUsRequest) {
        String emailTemplate = getEmailTemplate();
        String email = fillTemplate(emailTemplate, contactUsRequest);

        SendEmailRequest sendEmailRequest =
                new SendEmailRequest(
                        System.getenv("SENDER_EMAIL"),
                        new Destination(List.of(System.getenv("RECIPIENT_EMAIL"))),
                        new Message()
                                .withSubject(
                                        new Content()
                                                .withCharset(UTF_8.name())
                                                .withData(contactUsRequest.getSubject()))
                                .withBody(new Body()
                                        .withHtml(new Content()
                                                .withCharset(UTF_8.name())
                                                .withData(email))));
        LOG.info("Email template is ready");
        return AWS_CLIENT_FACTORY.getSesClient().sendEmail(sendEmailRequest);
}

private String fillTemplate(String emailTemplate, ContactUsRequest contactUsRequest) {
        return String.format(
                emailTemplate,
                contactUsRequest.getUsername(),
                contactUsRequest.getEmail(),
                contactUsRequest.getPhone(),
                contactUsRequest.getQuestion());
}

private String getEmailTemplate() {
        try {
            return IOUtils.toString(
                    Objects.requireNonNull(this.getClass().getClassLoader()
                                               .getResourceAsStream("email_template.html")),
                    UTF_8);
        } catch (IOException e) {
            throw new RuntimeException("Loading an email template failed.", e);
        }
}

private void addEmailDetailsToDb(ContactUsRequest contactUsRequest, SendEmailResult sendEmailResult) {
        AWS_CLIENT_FACTORY.getDynamoDB().getTable("ContactUsTable")
                          .putItem(new Item()
                                  .withPrimaryKey("Id", sendEmailResult.getMessageId())
                                  .withString("Subject", contactUsRequest.getSubject())
                                  .withString("Username", contactUsRequest.getUsername())
                                  .withString("Phone", contactUsRequest.getPhone())
                                  .withString("Email", contactUsRequest.getEmail())
                                  .withString("Question", contactUsRequest.getQuestion()));
}
.
private ContactUsProxyResponse buildResponse(int statusCode, String body) {
        ContactUsProxyResponse awsProxyResponse =
                new ContactUsProxyResponse();
        awsProxyResponse.setStatusCode(statusCode);
        awsProxyResponse.setBody(getBodyAsString(body));
        awsProxyResponse.addHeader(CONTENT_TYPE, ContentType.APPLICATION_JSON.toString());
        awsProxyResponse.addHeader("Access-Control-Allow-Origin", "*");
        return awsProxyResponse;
}

 private String getBodyAsString(String body) {
        try {
            return OBJECT_MAPPER.writeValueAsString(new ContactUsResponseBody(body));
        } catch (JsonProcessingException e) {
            throw new RuntimeException("Writing ContactUsResponseBody as string failed.", e);
        }
}
. «// WARMING UP».
if (Optional.ofNullable(request.getMultiValueHeaders()).map(headers -> headers.containsKey("X-WARM-UP")).orElse(FALSE)) {
            LOG.info("Lambda was warmed up");
            return buildResponse(201, "Lambda was warmed up. V1");
}
handleRequest()
@Override
public ContactUsProxyResponse handleRequest(AwsProxyRequest request, Context context) {
        LOG.info("Request was received");
        LOG.debug(getAsPrettyString(request));

        if (Optional.ofNullable(request.getMultiValueHeaders()).map(headers -> headers.containsKey("X-WARM-UP")).orElse(FALSE)) {
            LOG.info("Lambda was warmed up");
            return buildResponse(201, "Lambda was warmed up. V1");
        }

        ContactUsRequest contactUsRequest = getContactUsRequest(request);

        SendEmailResult sendEmailResult = sendEmail(contactUsRequest);
        LOG.info("Email was sent");

        addEmailDetailsToDb(contactUsRequest, sendEmailResult);
        LOG.info("DB is updated");

        return buildResponse(200,
                String.format("Message %s has been sent successfully.", sendEmailResult.getMessageId()));
}
The basic logic is quite simple, so I do not think it is worth describing it in detail. There are several points worth paying attention to.The first is logging. One of the arguments of the Context lambda method contains a lot of auxiliary information, as well as a logger. Therefore, you can not create a separate logger, but use the provided lambda context. To do this, it is enough to call before use:LambdaLogger logger = context.getLogger();
The second point is warming up. Since creating an executable environment for a lambda is lazy, starting the JVM, loading the classpath and executing the code takes some time. The first call may take several seconds, which is not good if you write different synchronous APIs. For such cases, you yourself can tell AWS that you need to keep several lambda instances on alert. But this requires someone to call a lambda. If we do this with the basic version of the code, then, in fact, we will send a letter and write some inaccurate data to the database.To avoid this, we can add some kind of request processing to distinguish the real request from the warm-up request. For example, we can add a special header to the request. In our case, the “X-WARM-UP” header will be used with any value - to understand that this is a warm-up request and we only need to return some kind of response without executing business logic.The last thing I would like to draw attention to is the use of static variables. This does not make the stateful lambda instance in our case, it simply allows reusing existing and initialized objects. If the objects that you want to initialize statically change during the execution of the code, try to think again whether this will interfere with the operation of subsequent calls to the lambda. Also, if these objects use environment variables during initialization, you should not make them static.4. We write tests
Lambda code can be covered by the same types of tests that you use in most cases. But to keep the article from growing even further, I’ll cover testing Serverless applications in the next article on AWS Lambda testing and on-premises development. Although unit tests are already available in the repository .5. We write a template of SAM resources
After we wrote and tested our lambda locally, we need to write a SAM-template to deploy all these resources in AWS.A bit about SAMServerless Application Model – serverless . , CloudFormation DSL, – Lambda, Gateway, DynamoDB . .
SAM, CloudFormation, Terraform –
IaC-. SAM Serverless-, Terraform .
Terraform
DINS.
Actually, let's look at what resources we need to declare in the SAM-template .AWS :: Serverless :: FunctionThe main features are already filled in for us if we used SAM init to create the project. But here is how they look in my example:CodeUri: contact-us-function
Handler: com.gralll.sam.App::handleRequest
Runtime: java8
MemorySize: 256
Here I think everything is clear enough.CodeUri is the directory with ourHandler lambda - the full path to theRuntime method - what theMemorySize lambda is written on - speaks for itselfSpeaking of memory : up to 3GB of RAM is available in the lambda, which corresponds to a resource of 2 CPUs. That is, you cannot adjust the CPU separately, only increasing / decreasing the amount of memory.The next block is needed to select the deployment method.AutoPublishAlias: live
DeploymentPreference:
Type: Canary10Percent10Minutes
AutoPublishAlias - allows you to add an alias to each new deployed version . This is necessary in order to implement canary deployment.Canary10Percent10Minutes - a type of deployment that will allow you to hold simultaneously two versions of the lambda: the old and the new, but only redirect 10% of the traffic to the new one. If in ten minutes there are no problems, the rest of the traffic will also be redirected to the new version.You can read more about using advanced features on the SAM page .Next are the environment variables that will be used from the code. After that, another block for lambda:Events:
ContactUs:
Type: Api
Properties:
Path: /contact
Method: post
In it, we must describe the triggers for calling a lambda. In our case, these will be API Gateway requests .This is a rather simplified form of describing the API, but it’s enough for the newly created Gateway API to redirect all POST / contact requests to our lambda.Of course, we need to describe the security aspects. Out of the box, the created lambda will not have access to either the database or the email service. So we need to explicitly prescribe what will be allowed. There are several ways to give access inside AWS. We will use Resource-Based Policies:Policies:
- AWSLambdaExecute
- Version: '2012-10-17'
Statement:
- Effect: Allow
Action:
- ses:SendEmail
- ses:SendRawEmail
Resource: 'arn:aws:ses:eu-west-1:548476639829:identity/aleksandrgruzdev11@gmail.com'
- Effect: Allow
Action:
- dynamodb:List*
Resource: '*'
- Effect: Allow
Action:
- dynamodb:Get*
- dynamodb:PutItem
- dynamodb:DescribeTable
Resource: 'arn:aws:dynamodb:*:*:table/ContactUsTable'
Please note that for the database table we specified a specific name, therefore, we will need to create a table with the same name.Regarding SES: you see my email address. In your case, it must be your own confirmed address. How to do this, see here .Right after that, you can find the Identity ARN of this resource by clicking on the created address and replace it with the email in the example above.They sort of figured out the lambda. Now let's move on to the database.AWS :: Serverless :: SimpleTableFor our tasks, we will create only one ContactUsTable table:ContactUsTable:
Type: AWS::Serverless::SimpleTable
Properties:
PrimaryKey:
Name: Id
Type: String
TableName: ContactUsTable
ProvisionedThroughput:
ReadCapacityUnits: 2
WriteCapacityUnits: 2
Of the required fields - only Id, and also indicate ReadCapacityUnits and WriteCapacityUnits. We will not dwell in detail on what values to choose, since this is also a rather extensive topic. You can read it here . For a test application, small values of the order of 1-2 are also sufficient.GlobalsGeneral parameters can be taken out in this block if, for example, you declare several resources of type Function or API.Globals:
Function:
Timeout: 15
Api:
Cors:
AllowOrigin: "'*'"
AllowHeaders: "'Content-Type,X-WARM-UP,X-Amz-Date,Authorization,X-Api-Key'"
I used it to set a timeout for the function and some Cors settings to call the Gateway API later from my static page with ContactUs form.OutputsThis block allows you to dynamically define some variables in the global AWS CloudFormation context.Outputs:
ContactUsApi:
Description: "API Gateway endpoint URL for Prod stage for ContactUs function"
Value: !Sub "https://${ServerlessRestApi}.execute-api.${AWS::Region}.amazonaws.com/Prod/contact/"
ContactUsFunction:
Description: "ContactUs Lambda Function ARN"
Value: !GetAtt ContactUsFunction.Arn
ContactUsFunctionIamRole:
Description: "Implicit IAM Role created for ContactUs function"
Value: !GetAtt ContactUsFunctionRole.Arn
For example, we declared a ContactUsApi variable, which will be set to a value, as the public address of our created API endpoint.Since we are using $ {ServerlessRestApi} , AWS will insert the unique identifier of our new Gateway API into the string. As a result, any application that has access to CloudFormation will be able to get this address - thereby you can not hardcode the URL of your services. Well, another plus is that it is very convenient to see the list of outputs - some meta information about your stack.A complete list of functions and what parameters you can use can be found here .ParametersIn addition to all of the above, you can add a Parameters block. These options will help make the template more versatile. In any other block of the template, you can make references to these parameters, thereby not hardcode some values. For example, in my template it can be emails, SES ARN, amount of memory, etc.That's the whole template. No one forbids adding a couple more resources nearby, for example, an S3 bucket, any other CloudFormation resource, or a custom resource in general .6. We proceed to the deployment
In order to assemble our project, we will use not Gradle, but SAM.AssemblyF:\aws\projects\contact-us-sam-app>sam build
Building resource 'ContactUsFunction'
Running JavaGradleWorkflow:GradleBuild
Running JavaGradleWorkflow:CopyArtifacts
Build Succeeded
Built Artifacts : .aws-sam\build
Built Template : .aws-sam\build\template.yaml
Commands you can use next
=========================
[*] Invoke Function: sam local invoke
[*] Deploy: sam deploy –guided
Running the sam build command from the root of the project will automatically collect all the necessary files into the .aws-sam folder: classes, dependencies, SAM template.Next, you need to create an S3 bucket, where SAM subsequently uploads all the collected artifacts.This can be done either through the browser-based AWS console, or with the commandaws s3 mb s3://bucket-name
Note: all buckets are created in a global context, and it is rummaged between all accounts. So you can’t create a bucket if someone has already created it in your account.When the bucket is ready, execute the command:sam package --output-template-file packaged.yaml --s3-bucket <YOUR_BACKET>
Package resultF:\aws\projects\contact-us-sam-app>sam package --output-template-file packaged.yaml --s3-bucket contact-us-sam-app
Uploading to ea0c122c06a50d9676fbf9000a80a3bf 9212768 / 9212768.0 (100.00%)
Successfully packaged artifacts and wrote output template to file packaged.yaml.
Execute the following command to deploy the packaged template
sam deploy --template-file F:\aws\projects\contact-us-sam-app\packaged.yaml --stack-name <YOUR STACK NAME>
I pointed my contact-us-sam-app bucket, and SAM uploaded all the resources to the specified location. Next, SAM already tells you a command to create a stack with resources, and thereby embed your decision. We execute the command, having a little finalized:sam deploy --template-file packaged.yaml --region eu-west-1 --capabilities CAPABILITY_IAM --stack-name contact-us-sam-app
As you can see, I added --capabilities CAPABILITY_IAM . This will enable CloudFormation to create IAM resources. Otherwise, you will receive an InsufficientCapabilities error when creating.The following is the log of the work of this command (the picture is clickable). Details such as the status of each resource and the values of outputs became available only in one of the latest versions of SAM CLI.
7. Check the status of CloudFormation
We can wait for the deployment to complete in the console until a message appears stating that the stack has been deployed (the deploy command logs in the previous paragraph):Successfully created/updated stack - contact-us-sam-app in eu-west-1
But in our case, you will see this message only after ten minutes due to canary deployment mode. Therefore, it’s easier to open a browser console and watch the stack there.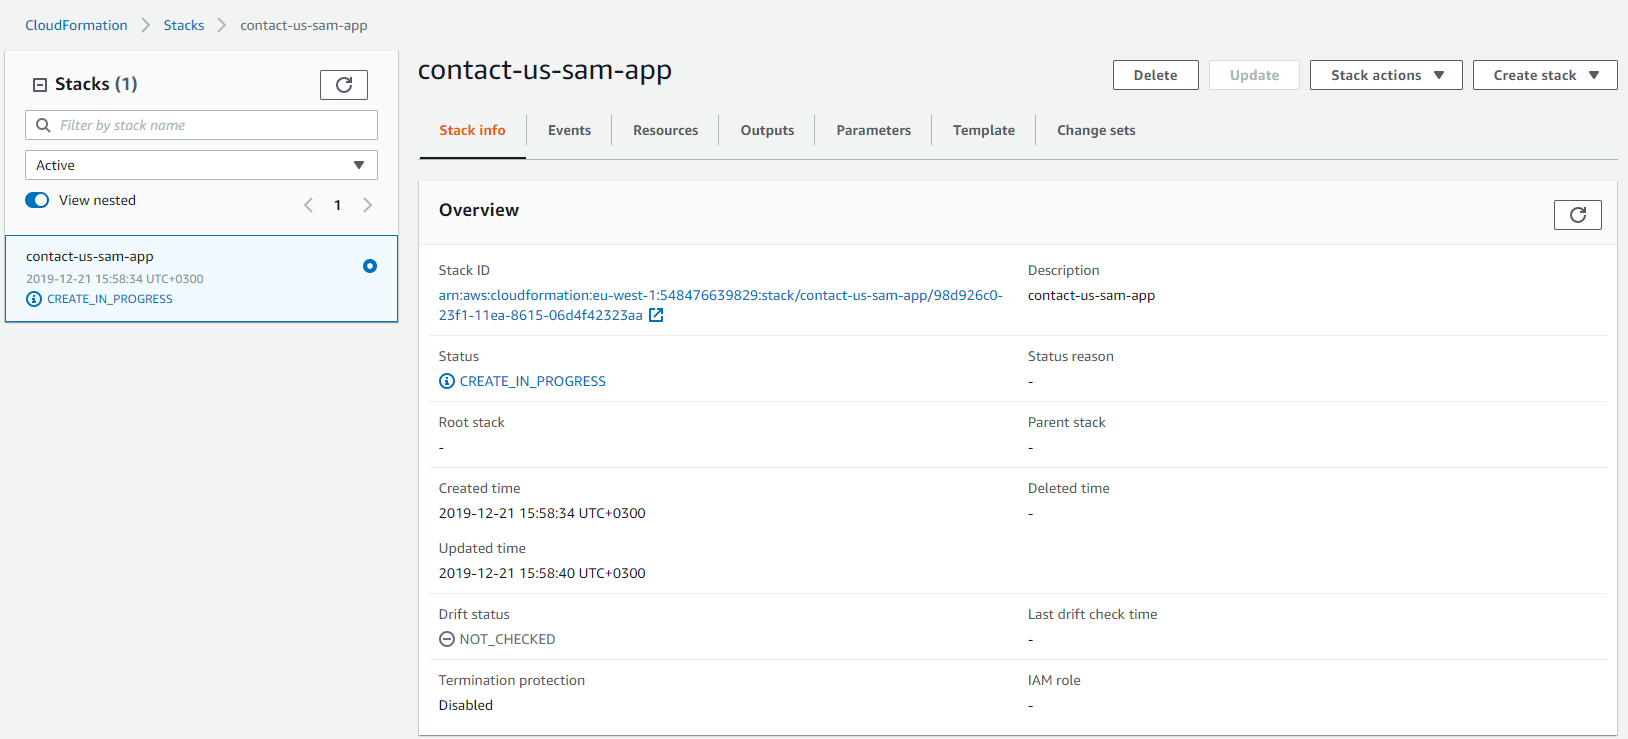 After some time, the status will change to CREATE_COMPLETE , which will mean successful completion.In the Events tab, you can see the status of all resources. If your stack flops, this is where you can find detailed error messages.For example, this: UPDATE_FAILED - if you incorrectly configure the Gateway API in the template.
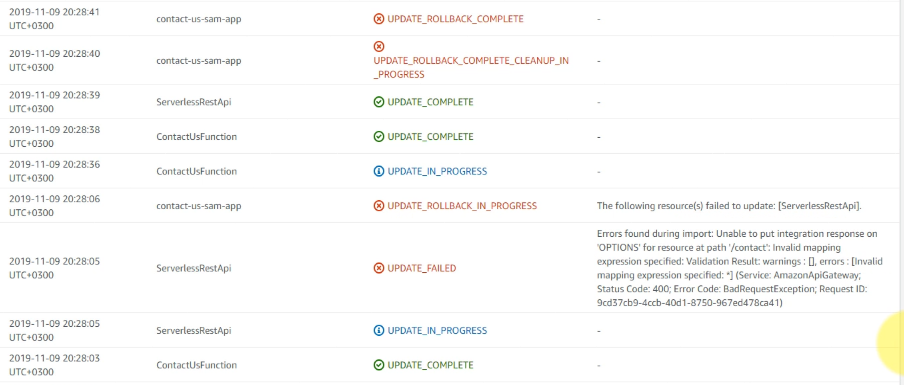 In the Resources tab, you can find all created resources. Do not be surprised at their quantity. Although we only declared a function and a database table in the SAM template, CloudFormation created many other resources for us. If you look at their Type, you can understand what service they belong to.For Api Gateway, it was implicitly created:
- ServerlessRestApi
- ServerlessRestApiDeployment
- ServerlessRestApiProdStage
Also for lambda several additional objects were created.Now open Outputs and find the URL of our API. Copy it, it will come in handy soon.8. HTML ContactUs Form
As you remember, I decided to make a ContactUs form, and now we need to somehow make it available not only on the local machine.ConfigurationAs for the form itself, for example, I decided to take the simplest HTML form and added Gateway API calls through ajax.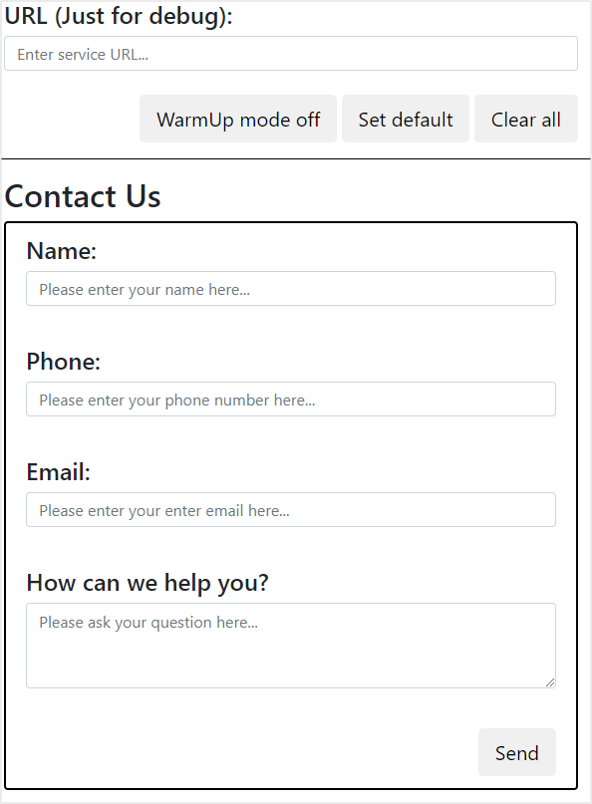 In addition to the form itself, I added a couple of buttons for debugging and simplifying the filling:Set default - substitutes, as expected, the default parameters specified inside HTML.
$("#url-input").val("https://4ykskscuq0.execute-api.eu-west-1.amazonaws.com/Prod/contact");
$("#name-input").val("Mike");
$("#email-input").val("Mike@somemail.com");
$("#phone-input").val("+79999999999");
$("#description-input").val("How much does it cost?");
If you intend to use this functionality, change url-input to the path to your Gateway API, which you copied from Outputs .Hosting- Create a new S3 bucket.
- We load the HTML file into the bucket by choosing the option to make the file public.
- We go into the bucket where we uploaded the file.
- Go to Properties, then turn on Static website hosting and see your new publicly available Endpoint.
9. Health Check
Standard requestNow you can follow the link to your form, click Set default and Send.This way you will make a request that will go through the Gateway API to AWS Lambda.If you configured everything correctly after a while you will receive a message like:Successful: Message 0102016f28b06243-ae897a1e-b805-406b-9987-019f21547682-000000 has been sent successfully.
This means that the message was delivered successfully. Check your mailbox that you specified in the SAM template. If you have not changed the template, then the letter will be in this format: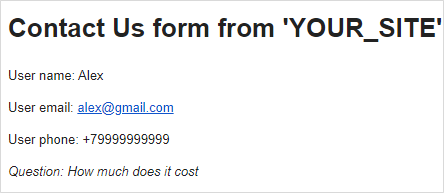 You can also open DynamoDB and make sure that a new entry has appeared.Features of a cold startI think you noticed that the message about the successful sending came after a fairly long time. This is due to the fact that the AWS Lambda service, having received a processing request, began to raise the instance of your Java application, and this includes lifting the container with the operating system and JRE, loading the classpath, initializing all the variables, and only after that is the start of the handleRequest ( ) . This is called a cold start.Try filling out and submitting the form again. This time the answer came almost instantly, right? If more than 20-30 minutes have elapsed between the first and second requests, the result may vary.What is the reason for this? And with the fact that AWS Lambda caches already used containers with lambdas for their reuse. This reduces the initialization time of the entire context for starting the method.There is no clear correlation for how long lambdas are cached depending on whatsoever, but some people experimentally found that this directly depends on the chosen value of RAM. That is, a lambda with 128MB of memory will be available longer than with 3GB. Perhaps there are other parameters, for example, the average load on the region in which your lambdas are executed, but this is inaccurate.Therefore, experiment yourself and plan the caching time if you use synchronous requests.Warming UpAs an additional option, you can use lambda heating. In the code, I added an X-WAMP-UP header check . If there is one, the lambda simply returns a response without executing any business logic, but the container will be ready for subsequent calls.You can call your lambda yourself, for example, by the crown timer, using CloudWatch. This will help if you do not want your customers to join Cold Start.In the HTML form, you can find the WarmUp mode button, which adds this special header to the request. You can verify that neither sending a letter nor writing to the database occurs, but the response from the lambda arrives, and the subsequent call to the real request will not take much time.
Summarizing
During the article, we went through all the main stages from application design to its release in the so-called production .I hope that those people who have already heard about Serverless and AWS Lambda, but who did not have practical experience, will be able to use this guide and be able to feel that this gives significant advantages in the speed of deployment of some software solutions and not only that.BenefitsFor myself, I have identified the most valuable advantages:- Free Tier , , .
- 1-2 . /.
- , , .
- Serverless . , — . SAM AWS. AWS , , .
- Lambda , .
- Serverless , , . ELK/Promethes/Grafana .
- , API. API Key, IAM , .
- Well, probably the most basic thing is Serverless. There is no need to think about which EC2 instance you need to pay for, how to configure access to it, how to configure alerts in the event of an application crash, configure auto-scaling, etc.
DisadvantagesUnfortunately, this does not mean that now you can take this solution and use it as part of an enterprise system instead of your favorite microservices in the cuber. Very often, you need to dig deeper to determine a more suitable solution in a particular case.And I also have comments that you should pay attention to when choosing Lambda:- Cold start. Especially significant when using synchronous queries, and languages such as Java or C #. The problem is moderately solved by warming up, but it is better to think about such a solution in advance and compare the cost and possible benefits
- . 3GB , 2 , , - Fargate, , .
- API, , .
- / 1-2 Serverless, .
- If you already have the infrastructure for developing microservices and CI / CD in Coober, it will again be problematic to argue (especially for managers) the need to support another CI / CD process.
- Well, where without testing. And to test the lambda for throughput is quite difficult, because it is still different from the usual perfarmance testing, and many factors must be taken into account.
UsageIn general, the use of AWS Lambda and other Serverless services fits very well with the principles of async and event-driven development. And it is by using asynchronous processing that optimal results can be achieved both in terms of performance and cost. Here is a list of solutions in which Serveress solutions will play a significant role:
PS
Since the article turned out to be quite extensive, and I do not want to inflate it even more, I will most likely prepare a sequel in which I will show how to conduct development more efficiently using all the features of the AWS console, SAM framework, and even IntelljIDEA. Well, since I omitted the testing part, I’ll try to describe this aspect of development in more detail. Also, if you have any wishes what to add to the next article, or questions, feel free to write in the comments or in private messages.Added: AWS Lambda in Action. Part 2Some important and useful links from the article: