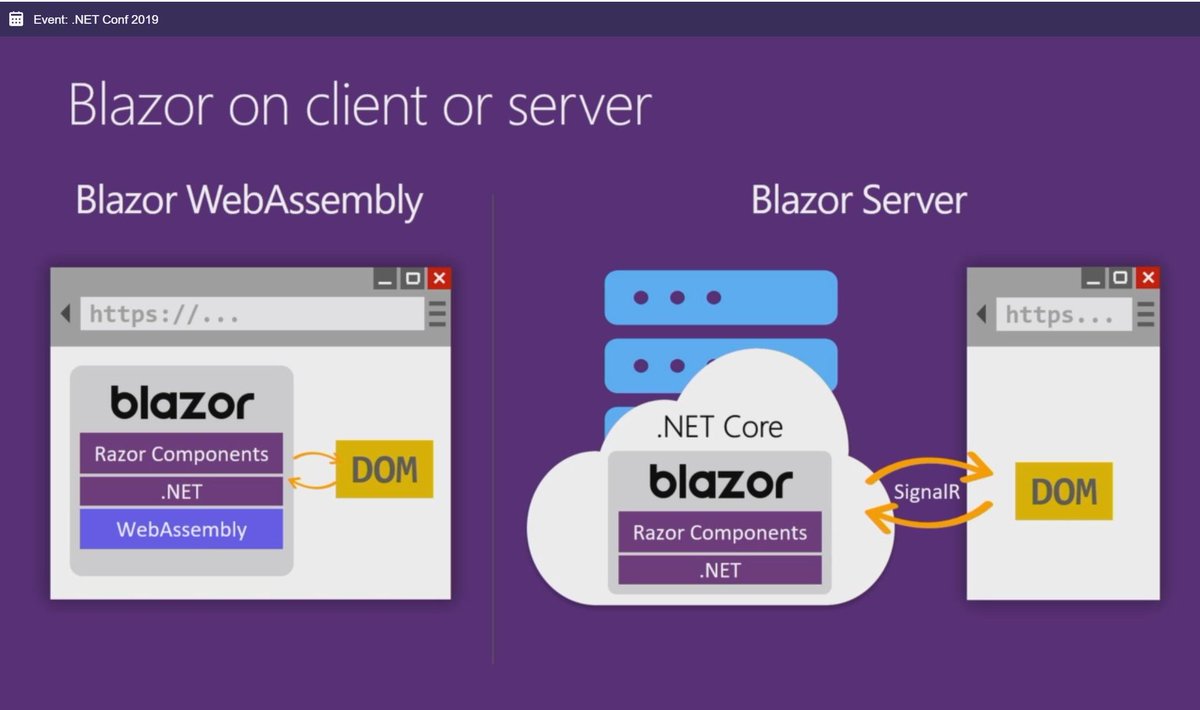
Today we released a new preview update for Blazor WebAssembly with many great new features and enhancements.Here's what's new in this release:- Version updated to 3.2.
- Simplified launch
- Download Size Improvements
- .NET SignalR Client Support

Start
To get started with Blazor WebAssembly 3.2.0 Preview 1, install the .NET Core 3.1 SDK and then run the following command:dotnet new -i Microsoft.AspNetCore.Blazor.Templates::3.2.0-preview1.20073.1
That's all! You can find additional documents and examples at https://blazor.net .Update existing project
To upgrade an existing Blazor WebAssembly application from 3.1.0 Preview 4 to 3.2.0 Preview 1:- Update all links to Microsoft.AspNetCore.Blazor * packages to 3.2.0-preview1.20073.1.
- In Program.cs in the Blazor WebAssembly client project, replace
BlazorWebAssemblyHost.CreateDefaultBuilder() with WebAssemblyHostBuilder.CreateDefault(). - Move the root component registrations in the Blazor WebAssembly client project from
Startup.Configure to Program.cs by calling builder.RootComponents.Add<TComponent>( ). - Blazor WebAssembly
Startup.ConfigureServices Program.cs builder.Services. - Startup.cs Blazor WebAssembly client project.
- Blazor WebAssembly ASP.NET Core, Server
app.UseClientSideBlazorFiles<Client.Startup>(...) app.UseClientSideBlazorFiles<Client.Program>(...).
3.2
In this release, we upgraded Blazor WebAssembly package versions to 3.2 to distinguish them from the recent release of .NET Core 3.1 Long Term Support (LTS). There is no corresponding release of .NET Core 3.2 - the new version 3.2 applies only to Blazor WebAssembly. Blazor WebAssembly is currently based on .NET Core 3.1, but does not inherit the status of .NET Core 3.1 LTS. Instead, the initial release of Blazor WebAssembly, scheduled for May of this year, will be Current , which is "maintained for three months after the next release of Current or LTS," as described in the .NET Core Support Policy . The next upcoming release of Blazor WebAssembly after release 3.2 in May will be with .NET 5. This means that after the release of .NET 5, you will need to upgrade your Blazor WebAssembly applications to .NET 5 to support it.Simplified launch
In this release, we have simplified the launch and hosting APIs for Blazor WebAssembly. Initially, the launch and deployment APIs for Blazor WebAssembly were designed to reflect the patterns used in ASP.NET Core, but not all concepts were relevant. Updated APIs also allow some new scenarios to be used.Here's what the new startup code looks like in Program.cs :public class Program
{
public static async Task Main(string[] args)
{
var builder = WebAssemblyHostBuilder.CreateDefault(args);
builder.RootComponents.Add<App>("app");
await builder.Build().RunAsync();
}
}
Blazor WebAssembly applications now support asynchronous Mainmethods for the entry point to the application.To create a default host, call WebAssemblyHostBuilder.CreateDefault(). Root components and services are configured using the linker; a separate class is Startupno longer needed. The following example is added WeatherService, so it is available through dependency injection (DI):public class Program
{
public static async Task Main(string[] args)
{
var builder = WebAssemblyHostBuilder.CreateDefault(args);
builder.Services.AddSingleton<WeatherService>();
builder.RootComponents.Add<App>("app");
await builder.Build().RunAsync();
}
}
After the host is created, you can access the services from the root DI before any components are presented. This can be useful if you need to run some initialization logic before anything is displayed:public class Program
{
public static async Task Main(string[] args)
{
var builder = WebAssemblyHostBuilder.CreateDefault(args);
builder.Services.AddSingleton<WeatherService>();
builder.RootComponents.Add<App>("app");
var host = builder.Build();
var weatherService = host.Services.GetRequiredService<WeatherService>();
await weatherService.InitializeWeatherAsync();
await host.RunAsync();
}
}
The host also now provides an instance of the central configuration for the application. The configuration is not populated with any default data, but you can populate it as required in your application.public class Program
{
public static async Task Main(string[] args)
{
var builder = WebAssemblyHostBuilder.CreateDefault(args);
builder.Services.AddSingleton<WeatherService>();
builder.RootComponents.Add<App>("app");
var host = builder.Build();
var weatherService = host.Services.GetRequiredService<WeatherService>();
await weatherService.InitializeWeatherAsync(host.Configuration["WeatherServiceUrl"]);
await host.RunAsync();
}
}
Download Size Improvements
Blazor WebAssembly applications run the .NET IL linker in each assembly to remove unused code from the application. In previous releases, only the main framework libraries were cut off. Starting with this release, Blazor assemblies are also trimmed, resulting in a slight reduction in size — around 100 KB. As before, if you ever need to disable binding, add your own <BlazorLinkOnBuild>false</BlazorLinkOnBuild> to your project file ..NET SignalR Client Support
Now you can use SignalR from your Blazor WebAssembly applications using the .NET SignalR client.To try SignalR in your Blazor WebAssembly application:- Create a Blazor WebAssembly application hosted on ASP.NET Core.
dotnet new blazorwasm -ho -o BlazorSignalRApp
- Add the ASP.NET Core SignalR client package to the Client project .
cd BlazorSignalRApp
dotnet add Client package Microsoft.AspNetCore.SignalR.Client
- In the Server project, add the following Hub / ChatHub.cs class .
using System.Threading.Tasks;
using Microsoft.AspNetCore.SignalR;

namespace BlazorSignalRApp.Server.Hubs
{
    public class ChatHub : Hub
    {
        public async Task SendMessage(string user, string message)
        {
            await Clients.All.SendAsync("ReceiveMessage", user, message);
        }
    }
}
- In the Server project, add the SignalR services in the method
Startup.ConfigureServices.
services.AddSignalR();
- Also add the endpoint for
ChatHubat Startup.Configure.
.UseEndpoints(endpoints =>
{
    endpoints.MapDefaultControllerRoute();
    endpoints.MapHub<ChatHub>("/chatHub");
    endpoints.MapFallbackToClientSideBlazor<Client.Program>("index.html");
});
- Update Pages / Index.razor in the Client project with the following markup.
@using Microsoft.AspNetCore.SignalR.Client
@page "/"
@inject NavigationManager NavigationManager

<div>
    <label for="userInput">User:</label>
    <input id="userInput" @bind="userInput" />
</div>
<div class="form-group">
    <label for="messageInput">Message:</label>
    <input id="messageInput" @bind="messageInput" />
</div>
<button @onclick="Send" disabled="@(!IsConnected)">Send Message</button>

<hr />

<ul id="messagesList">
    @foreach (var message in messages)
    {
        <li>@message</li>
    }
</ul>

@code {
    HubConnection hubConnection;
    List<string> messages = new List<string>();
    string userInput;
    string messageInput;

    protected override async Task OnInitializedAsync()
    {
        hubConnection = new HubConnectionBuilder()
            .WithUrl(NavigationManager.ToAbsoluteUri("/chatHub"))
            .Build();

        hubConnection.On<string, string>("ReceiveMessage", (user, message) =>
        {
            var encodedMsg = user + " says " + message;
            messages.Add(encodedMsg);
            StateHasChanged();
        });

        await hubConnection.StartAsync();
    }

    Task Send() => hubConnection.SendAsync("SendMessage", userInput, messageInput);

    public bool IsConnected => hubConnection.State == HubConnectionState.Connected;
}
- Create and run a Server project
cd Server
dotnet run
- Open the application in two separate browser tabs to communicate in real time through SignalR.
Known Issues
The following is a list of known issues in this release that will be fixed in a future update.Reviews
We hope you enjoy the new features in this preview version of Blazor WebAssembly! Please let us know what you think when reporting issues on GitHub .Thanks for using Blazor.