What nonsense, you think. What kind of meaningless set of words? But, alas or cheers - someone like that, today this is not nonsense, but reality. The article will be about a game I wrote for Instagram in which your face is used as a controller, or rather, not only it, but sometimes the whole head. Moving around the playing field is carried out by turning and tilting the head, and the choice of action is by opening the mouth or double “clicking” (blinking) eyes. Double blink would probably be worth calling it ...Oh brave new world! Probably, hipsters of the future will develop scripts to generate beautiful colorful smoke behind their lightweight space capsules or write shaders to give interesting visual effects to the black gates of a personal teleport, such as falling snowflakes (Web 100.0) or fractal fog (WebGL 100.0) or ... No, perhaps I don’t have enough imagination to imagine what kind of nonsense we could deal with in the future: I try to think too logically. But about 30 years ago, we certainly, in no dream, under any circumstances, could even have thought that today we will create masks for a social network called Instagram. And what's more, that inside these masks full-fledged games will appear. I became scared and interesting. All in all, scary interesting. And, as you already understood, I could not resist and also wrote such a game.Of course, in order to play it, you must have a smartphone on Android or iOS with a front camera and the installed Instagram application.This game is Tic Tac Toe. In general, this is one of the first games that I created in my life, and maybe even the very first one - I just won’t remember it now. But I wrote it back in Pascal, then I dragged that old algorithm into Delphi. After that, the game, of course, also appeared on the web, on my website: well, where on your personal page without your own personal tic-tac-toe ... And now it's time to put this epic game on Instagram. In general, if I were a dagger or a tac toe in this game (rather, probably a toe), I could tell a lot about my long, interesting life ...What kind of masks are these?
For a start - a brief historical digression. Masks on Instagram appeared thanks to the Belarusian team that developed the MSQRD selfie application. After this application was bought by Facebook, the team within the corporation continued to integrate its technology into Facebook products. So there was a platform offering augmented reality features, Spark AR. In August 2019, the platform left beta status and became available to all users who can now create augmented reality content for Facebook and Instagram.Masks were conceived as filters for giving funny effects to their physiognomy with the subsequent placement of a selfie on a social network. As for the masked games, I did not find so many of them. There is a Flying Face, an analog of Flappy Bird, where a bird flies across the screen, and you need to prevent it from crashing into obstacles, blinking at the right moments. I also saw a game where you need to catch mouth falling food from top to bottom. A shooter like Invaders. And a 3D runner where a character runs along a city street and jumps over obstacles. Perhaps there are some more. In general, the topic is quite new.The content creation process takes place in the Spark AR Studio development environment, which can be downloaded for Windows for free. Also, it is worth downloading the Spark AR Player application for testing the effects you create on Andrioid or iOS mobile devices, for which these effects are, in fact, intended. The connection to the computer is via a USB cable, at least in my case with an Android smartphone. After downloading the mask through the Facebook / sparkarhub component and passing the moderation, your mask (or game) will be available to all Instagram users from the Internet. The mask can be obtained by direct link or from the page of its creator on Instagram.Understanding how to work in Spark AR Studio is not at all difficult. I will not dwell on this in detail, especially since the Internet is full of lessons on this topic. I will only note that there are two ways to develop a more or less interactive application that involves something more than just applying some kind of static sprite to your face: creating the so-called patches and writing scripts. The first method visually resembles working with materials in a 3D editor, and the second is just programming in Javascript using a specialized api. I chose the second option. However, no one forbids combining both methods: from scripts there is the possibility of access to everything that is happening in the patches.Graphic arts
So, for starters, it would be nice to create some graphic elements that will be used in the game. Open your favorite 3D modeling program and create. I am using Blender. In principle, you can create just separate sprites, and then ask them some logic of behavior using Spark AR and not use the 3D editor at all. But I decided to make voluminous figures of crosses and toe, so I could not do without such an editor.The first thing to do is create a 2D texture. Combine all the textures in one atlas.Texture satinNow about 3D models. As a game 3D space, a plane of two triangles is used, on which the field marking is stretched (here is that large mesh fragment from the texture atlas). The atlas itself is with a transparent alpha channel. 9 blue squares, also consisting of two triangles each, will be inserted into the field. Also, in addition to the nine blue ones, the 3D model will contain in the same coordinates 9 green and red squares that will be hidden at the start of the game. The meaning is that in the normal state the color of all the squares of the field is blue, and green and red are used as the cursor to select the position in which you want to set a cross or a zero, respectively. In addition, green and red are used to highlight the winning row of three cells at the end of each round. It would be enough, of course,use 9 blue and only 3 green and red squares, but then you would have to, in addition to showing / hiding, set them some kind of logic of movement. It seemed to me that just hiding and displaying them without any manipulation of the coordinates in space would be easier, and the 3D model would load it insignificantly.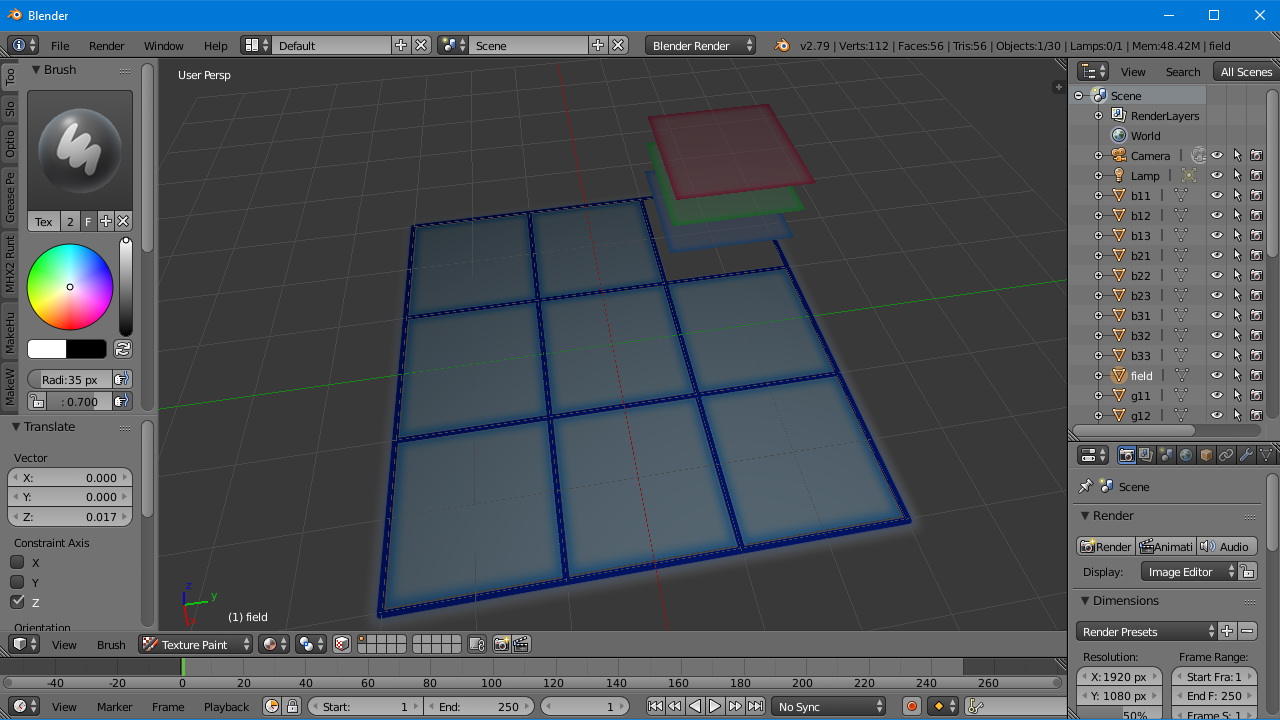
Import to Spark AR Studio
First, launch Spark AR Studio and import 3D models there. They will appear in the Assets list at the bottom left. At the same time, we will create for ourselves a thematic mask with war paint in the form of “tattoos” of a cross and a toe on the face. About how to create a textured mask, you can learn from thousands of lessons on the global network or from the official documentation on the platform, I will not focus on this. In short: download the “blank”, open it in your favorite graphics editor, draw something on top of it, save it, import the image into Spark AR Studio, adjust the material and texture parameters.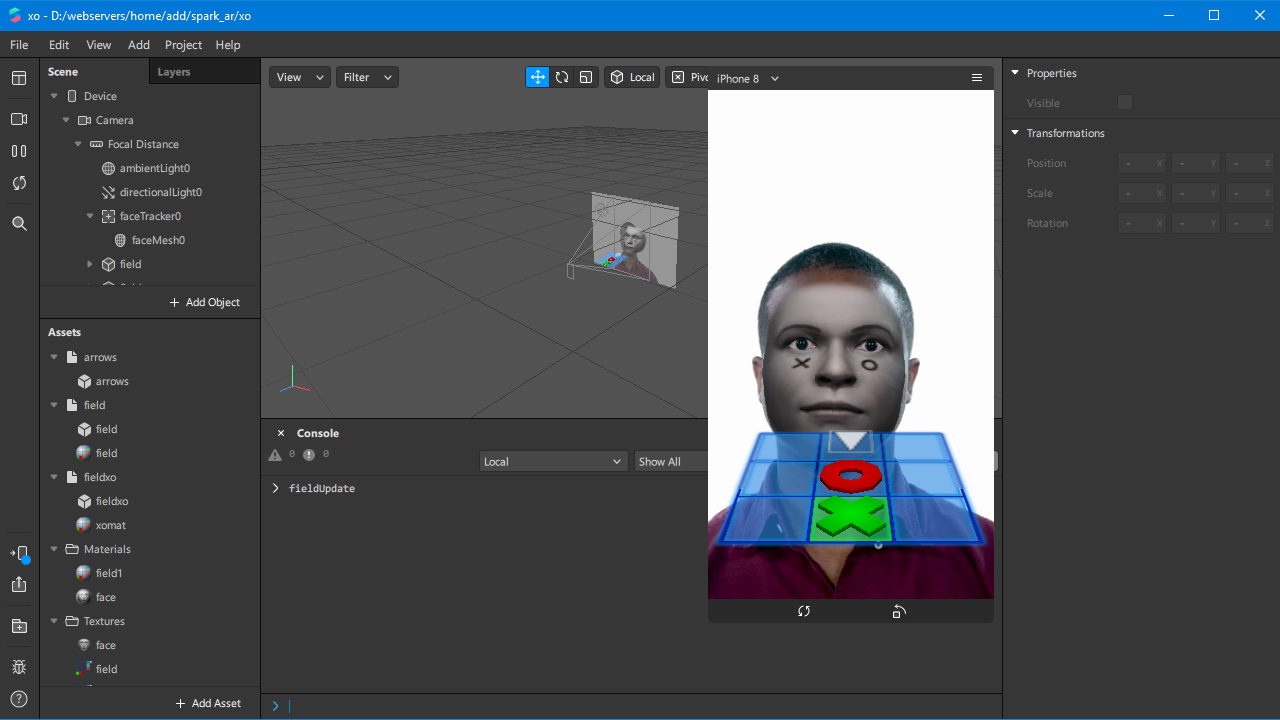
Programming
At the beginning of the script, connect the modules that we need in this project. This is a scene, face tracking, modules for working with time, sound and animation.const Scene = require('Scene');
const FaceTracking = require('FaceTracking');
const Time = require('Time');
const Audio = require('Audio');
const Animation = require('Animation');
There are many ways to implement tic-tac-toe in Javascript. This article is not about implementing this game in a given programming language, but about managing with the help of a person. I will describe key points specific to interaction with the Spark AR system so that the principle is understood.Access to the named fragment of the 3D model (mesh), for example, to the blue square in the first row, second column of the playing field:Scene.root.find('b12');
(Recall b12 - this is how we called this mesh in the 3D editor.)Access to the cross at this position:Scene.root.find('x12');
Hiding a toe (o), setting a cross (x) and coloring in green (g) the cells of the field '32' (third row, second column):
Scene.root.find('o32').hidden = true;
Scene.root.find('x32').hidden = false;
Scene.root.find('b32').hidden = true;
Scene.root.find('g32').hidden = false;
Scene.root.find('r32').hidden = true;
Green cross with green backlight in the '32' field.Subscribe to the events of head turning and tilting to move around the field.
FaceTracking.face(0).cameraTransform.rotationX.monitor().subscribe(function(event) {
var v = event.newValue;
...
});
FaceTracking.face(0).cameraTransform.rotationY.monitor().subscribe(function(event) {
var v = event.newValue;
...
});
Everything is very simple here. We take from the event the values of the head rotation or tilt (event.newValue) and check whether they are out of a certain range. If yes, then move the cursor (green box) visually in the desired direction. A negative value of the head rotation corresponds to its rotation to the left, positive - to the right. Similarly - to tilt the head back and forth to move along the lines. The entire range is from -1 to +1. Thus, you can implement the cursor movement and ...And then it dawned on me
I suddenly realized that controlling the cursor on the field in the way that I chose was inconvenient: you need to turn your head to move one cell, then return your head to its original position, then turn it again for the next step and so on. And why not just use the fractional values of turning the head to the sides and tilting back and forth in order to immediately focus on the desired cell in the field? That is, how to indicate to the cursor his position with a look, or rather, with the direction of the head. And then the first method is a too hard workout for the neck. Physical education is, of course, good, but not to the same extent. Naturally, we will remember the current position somewhere in ap.cur = {x: 1, y: 1} in order to erase the cursor at the previous position and save the coordinates of the new position, which is subsequently needed for the “click”. By the wayvisual arrows to indicate the direction of cursor movement are no longer needed: we throw one 3D model (arrows.fbx) from the project. You can also erase the arrow image from the texture.Double Blink?
And now we got to the most interesting. Double click eyes. Admit it, you wanted to do this from the moment you learned about it at the beginning of the article? Now you will tell your friends that the mouse is already outdated and that double blinking is used for a click today! Double blink. Why double? Everything is simple: a single person does involuntarily periodically, so to hang any events on a single blink would be sadism.In Spark AR, there are events leftEye.openness and rightEye.openness, by subscribing to which, you can get the opening value of each eye in event.newValue in the range from 0 to 1. We will consider the eye closed with a value of less than 0.1. And we will call the blink processing function ap.blink1 () (ap is a namespace, it’s just more convenient for me).
FaceTracking.face(0).leftEye.openness.monitor().subscribe(function(event) {
if (event.newValue < 0.1) {
ap.blink1();
};
});
FaceTracking.face(0).rightEye.openness.monitor().subscribe(function(event) {
if (event.newValue < 0.1) {
ap.blink1();
};
});
In the blink processing function itself, we define the minimum interval between blinks of 200 milliseconds so that this function does not work immediately twice when blinking with both eyes, since its call is hung on each eye. I think it’s clear. Also, we define the maximum double blink time - 1 sec. If we fit into this range, the action () function will work, which displays the cross at the current position. At the same time, we will hang action () on the mouth.openness event - so that the player has a choice whether to put a cross on double blinking or on opening the mouth.blink1:function () {
var tmNew = Date.now();
if (tmNew - ap.blinkStart > 200) {
ap.blinkCount++;
if (ap.blinkCount > 1) {
if (tmNew - ap.blinkStart < 1000) {
ap.action();
};
ap.blinkCount = 0;
ap.blinkStart = 0;
} else {
ap.blinkStart = tmNew;
};
};
},
action:function() {
if (ap.fProc == false) {
ap.fProc = true;
xo.putx();
};
},
FaceTracking.face(0).mouth.openness.monitor().subscribe(function(event) {
if (event.newValue > 0.2) {
ap.action();
};
});
Sounds
I found them in the royalty-free sections of various sound effect sites. Important detail: Spark AR requires sound files of a certain format, namely, M4A, mono, 44.1 kHz, 16 bit. Online converters from wav and mp3 to m4a are in stock in the global network. I added sound to four events: move, win daggers, win tac toe and draw. The total volume of all sounds after conversion was 105 Kb.To use sounds in a script, you need to connect an audio module in the script, add the desired number of speakers to the scene by the number of sounds (I got Speaker0, Speaker1, Speaker2, Speaker3), add the Playback Controllers module to Assets, create the necessary number of audioPlaybackController sub-items in it according to the number of sounds and attach a sound to each speaker.After that, you can play the sound from the script as follows (for example, the sound of a click):var audioClick = Audio.getPlaybackController('audioPlaybackControllerClick');
audioClick.reset();
audioClick.setPlaying(true);
Final build
To create builds for all supported mobile devices (Android, iOs), just click File -> Export. The volume of the game for each mobile platform with all 3D models and textures in my case was about 1 Mb. Then you need to go through the browser to the Spark AR Hub on Facebook / sparkarhub and upload the exported file there. You also need to fill out a description, search keywords and download a demo video. Moreover, it must be shot on the phone through the Instagram camera. To do this, in the hub there is a section "Preview Camera" containing a link. This link can be opened on a mobile device. The Instagram application will start and your mask (game) will open in it. The link can also be sent for testing to all your friends, who, of course, must have a smartphone with the Instagram application installed.Until the end of the moderation process, the mask will not be visible to all users and they will not be able to add it to their effects list until it is visible only by this link.The moderation process usually takes a couple of days (it can take up to 10 business days). As I understand it, at first the effect is subjected to machine testing, at least a demo video - for sure, because a second after sending I received a message that the moderation did not pass. Reason - the video contains text. In general, for some reason, masked text is fundamentally not welcome, as the rules say. I had to redesign the game interface so that the score did not hang constantly above the player’s head, as I had done before, but only appeared at the end of each round. And re-shoot the video. After making all the changes, I resubmitted my game for moderation.Three days later, the game was approved, after moving it to the “Camera Styles” section. Honestly, I don’t remember which section I put it in initially (and the section, or, in other words, the category, needed to be selected). This is not obvious, since there is no games section for Instagram. But, okay, now we will know where to put new games. If the games will appear in the future, then, probably, Instagram should add a new section.Total
You can try on a mask by going to the profile of its creator on Instagram and clicking on the icon of its masks below (emoticon with two pluses). The same applies, of course, to masked games. Previously, during the beta testing of masks, it was also necessary to subscribe to the author. But now this rule has been canceled.They do not pay money for creating masks and there is no paid masks shop where they can be sold, like applications in well-known stores. Also, you do not need to pay for the placement of the mask you created in your profile. It is only necessary to wait for the passage of moderation. However, many bloggers and companies order the development of branded masks for themselves. Well, of course, you can ask your subscribers to try on the masks that you created, and play your games, broadcasting all this to Instagram story. Such actions can produce a so-called viral effect, especially if the game is interesting. This can help promote your account. However, now everyone is not too lazy to do masks. But the idea of Instagram masked games is still quite new. In addition, there is a higher entry threshold and less competition,since not every mask maker is a programmer to write a full-fledged game.