Let me introduce: Veeam Availability Suite v10
In the whirlwind of holidays and various events that followed the holidays, one could also lose sight of the fact that the long-awaited release of Veeam Availability Suite version 10.0 will be released very soon - in February.A lot of materials have been released about the new functionality, including reports on online and offline conferences, blog posts and various communities in different languages. For those who haven’t had a chance to get to know them yet, and just for everyone who is interested in industry-specific innovations, today I will briefly list the new features of Veeam Backup & Replication and dwell on one of the key features in more detail. So welcome to cat.
“All works are good - choose to taste”
Indeed, all development teams have contributed to the anniversary release. For each potential client, there is a set of features necessary specifically for its infrastructure. Here is just a partial list of new products:- Backup NAS and file balloon
- Data Integration API
- Linux VIX and backup proxies for Linux
- Support for block cloning on XFS
- Updated Cloud Tier and SOBR repository
- NFS Backup Repository
- Work with NetApp ONTAP SVM
- Plugin RMAN Plugin for Solaris
- Archiving backups of transaction logs (transaction logs backup copy job)
- Jobs with GFS Retention M Primary Backup Jobs retention policy
- Improved WAN Accelerator
- Enhanced Backup for Nutanix AHV Virtual Infrastructures
And these are just the innovations in Veeam Backup & Replication! But the upcoming version of Veeam Availability Suite includes both the new Veeam ONE and the new Veeam Agents. We are expecting, without a doubt, a lot of interesting things - but still, let's start in order.Backup for NAS and file ball
This functionality was expected for a long time, and our engineers have not worked in vain on it for more than one month. Users will receive tools with very flexible options for backup and recovery of files and folders, all this is implemented on the basis of a clear and scalable architecture and in a familiar interface.With the kind permission of our Vanguard Evgeny Elizarov (Korp), who visited the Veeam Vanguards forum at the end of 2019, I share a link to his very detailed article on this feature.For my part, I’ll tell you a little about the scheme of work and the procedure for setting up this type of backup.How does it work
The general scheme of work is shown below: As you can see, the following components are involved in the backup process:
- Source File Storage (NAS, SMB share)
- Veeam Backup & Replication Management Server
- The auxiliary proxy server File Backup Proxy, which performs data transfer during backup, namely: enumeration, reading, writing, compression, decompression, encryption, decryption. (This component is identical to the well-known backup proxy.)
- , , .
- -: , . , .. . , . Windows Linux, NAS ( SMB share). SSD, .
: Veeam, . , SOBR/Deduplication storage/Cloud repository .
- Archive repository, if necessary - and it is most often there - in long-term storage. Here you can use low-cost storage and configure regular archiving of backups from the main repository, as will be shown below.
Note: Rotated drives are not supported as repositories.
The main stages of the process briefly look like this:- Veeam Backup & Replication initiates the enumeration and construction of the folder and file tree in the source ball.
- These actions are performed by the file proxy, which transfers the constructed structure to the cache repository for storage.
- When file proxy receives a new structure, it compares it with the previous one stored in the repository. If changes are detected, the cache repository sends a request to its resources to the backup repository
- File proxy starts reading new data from the source balls and transferring it to the backup repository. They are transmitted being “packed” into BLOBs: each BLOB contains backup data in the form of files of 64 Mb in size. Metadata files are also saved.
Let's see how all this can be configured in the interface.Configuring a file backup in the Veeam console
First you need to configure the necessary components: proxy, file share and repository.Configuring file proxy
As a proxy for backup files, you can use the Windows server - the main thing is to x64, and it is very desirable that older than Windows 2012R2, if you need to backup CIFS balls using VSS.This machine should already be included in the backup infrastructure, or you can add a new server - for this, in the Backup Infrastructure view, right-click the Backup Proxies node and select the Add file backup proxy command . Then we go through the steps of the wizard, indicating:- The name of the new proxy
- Maximum of simultaneously performed tasks (1 task - 1 initial ball). The default value is calculated automatically based on available resources.
At the Traffic Rules step, we configure the rules for processing network traffic, as we usually do for proxies.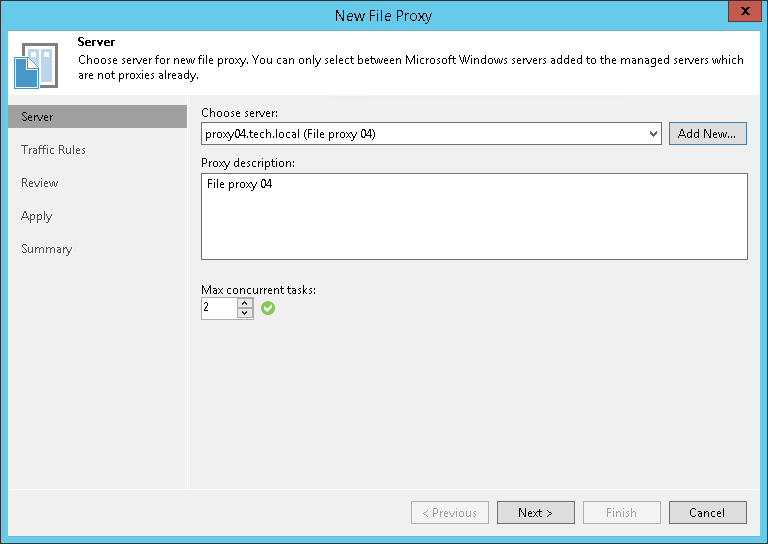
Adding source balls
A new node appeared in the Inventory view - File Shares , as well as the corresponding commands:- Add file share - add a new share
- Create job - create a backup job
- Restore - perform recovery from backup
Add the file ball to the infrastructure in this way:- After clicking on the File Shares node, select the Add file share command .
- Choose the type of object to be added.

You can choose as the source file storage:
- Windows or Linux file server.
- NFS — 3.0 4.1.
- SMB (CIFS), SMB3 Microsoft VSS.
c SMB share.
: , ( , ). , .
- , Advanced , — VSS storage.
: VSS File Backup Proxy. -, .

- :
- , file proxy — (All proxies).
- - — Cache repository. , SOBR/Deduplication/Cloud .

- Backup I/O control, .
- Lower impact ( NAS) — ;
- Faster backup ( ) — , ; .
, , , . : , Enterprise-, Faster backup, NAS , , , Lower impact.
- Then we say Apply , we complete the steps of the wizard - and in the Veeam Backup infrastructure tree we see our file share.
Backup job
Now you need to create a backup task. From the Backup Job menu, select File share .The job setup wizard starts. In it, we first indicate the name of the new task, and then at the Files and Folders step what we want to backup specifically.If we want to set the inclusion / exclusion filters, click the Advanced button . By default, all content will be backed up. Then we go to the Storage step , where we set the storage settings:
- Backup repository - path to the repository
- Keep all versions of each file for N days — , .. ( 28 — -, “ ”, ).
- , Keep file versions history , , ( , , ).
 To choose for which files to organize long-term storage, click Choose :
 Here, in addition to the inclusion / exclusion filter by the mask, you can also separately configure how many versions should be stored for active files and deleted files ( Active file versions to keep and Deleted file versions to keep fields , respectively). Of course, all these settings must be done in accordance with your data accessibility policy.Click OK and return to the wizard step.The usual settings for notifications, custom scripts, etc. available by clicking on Advanced .If you need long-term storage on an auxiliary archive repository, then go to stepSecondary Target . Data archiving will start at the end of the backup.This is also a small innovation. In fact, these are all well-known Backup Copy tasks, but immediately built into the main one, i.e. no need to create a separate one.If you want to additionally configure the storage policy, encryption and duration of the archiving window for a specific repository, you need to select the repository in the list and click Edit .
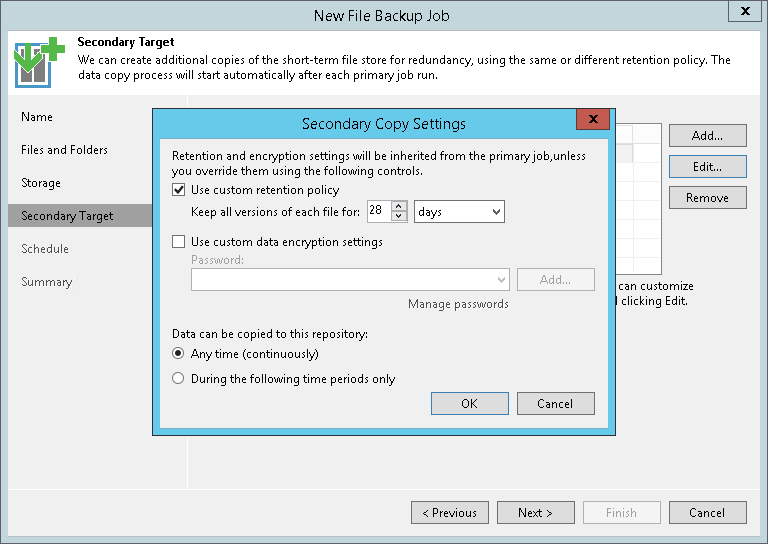 Next, set up the schedule - here everything is as usual.Well, at the last step we check the settings and, if necessary, select the immediate launch ( Run the job when I click Finish ), after which we observe the backup progress:
Recovery options
Recovery is possible in three modes: you can restore the entire ball to a specific point in time, you can select specific files to restore or restore all files that changed at the time of backup.- The file sphere is restored entirely to the state in which it was backed up and hit the selected recovery point. All files and folders will be restored; You can restore them to their original location or to another location:

- Rollback to the selected point in time by restoring only the changed files: everything is clear here too - first we select the desired point in time, then the files / folders that we want to restore.

The logic of choosing a recovery point has changed a bit. By running the recovery wizard, you can select:- Latest Restore Point - restore from the last backup in the selected mode.
- Selected restore point - if you missed the restore point, now you can select it again directly in the wizard (previously you had to go to the main interface for this).
- All Time - in this mode you can see the whole history of backup balls, plus you can recover from the archive storage.
In addition, for the restored object, you can also specify its version: For today, perhaps that's all. But to be continued!
Additional materials
Source: https://habr.com/ru/post/undefined/
All Articles