Müssen Sie die Benutzerfarbauswahl für Ihre Android-App implementieren? Diese Bibliothek ist eine gute Wahl. Ohne eine lange Einführung können wir loslegen.Fügen Sie zunächst wie immer die Bibliothek zur Anwendung hinzu (Datei build.gradle (module.app)): Wir habenimplementation 'com.jaredrummler:colorpicker:1.1.0'es herausgefunden. Nun fahren wir direkt mit der Umsetzung der Farbwahl fort.Erstellen Sie das Markup:<?xml version="1.0" encoding="utf-8"?>
<RelativeLayout xmlns:android="http://schemas.android.com/apk/res/android"
xmlns:app="http://schemas.android.com/apk/res-auto"
xmlns:tools="http://schemas.android.com/tools"
android:layout_width="match_parent"
android:layout_height="match_parent"
android:id="@+id/activityMain"
tools:context=".MainActivity">
<Button
android:id="@+id/firstButton"
android:layout_width="match_parent"
android:layout_height="wrap_content"
android:text="Color picker №1"
android:layout_margin="5dp"
android:onClick="onClickButton"
/>
<Button
android:id="@+id/secondButton"
android:layout_width="match_parent"
android:layout_height="wrap_content"
android:text="Color picker №2"
android:layout_below="@id/firstButton"
android:layout_margin="5dp"
android:onClick="onClickButton"
/>
<TextView
android:id="@+id/firstText"
android:layout_width="wrap_content"
android:layout_height="wrap_content"
android:layout_centerInParent="true"
android:text="First text"
android:textSize="40sp"
android:textColor="@android:color/black"
/>
<TextView
android:id="@+id/secondText"
android:layout_width="wrap_content"
android:layout_height="wrap_content"
android:text="Second text"
android:textSize="40sp"
android:layout_below="@+id/firstText"
android:layout_centerInParent="true"
android:textColor="@android:color/black"
/>
</RelativeLayout>
Wir haben 2 Schaltflächen, durch Klicken ein Dialogfeld zur Auswahl einer Farbe geöffnet wird. Wenn wir eine Farbe ausgewählt haben, ändert sich diese in unseren beiden Textansichten.Fügen Sie unsere Felder zu MainActivity hinzu: Button firstButton,secondButton;
TextView firstText,secondText;
private static final int firstId = 1,secondId = 2;
... und initialisiere sie in onCreate ():
        firstButton = findViewById(R.id.firstButton);
        secondButton = findViewById(R.id.secondButton);

        firstText = findViewById(R.id.firstText);
        secondText = findViewById(R.id.secondText);
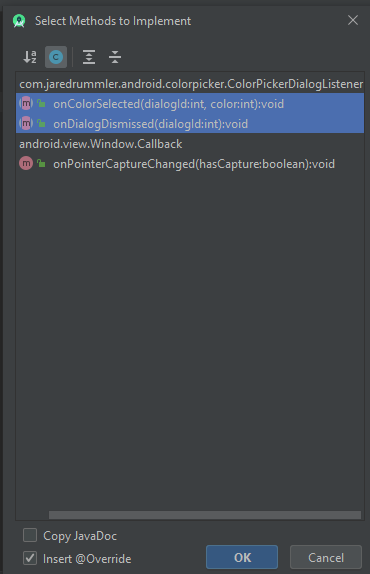
WICHTIG : MainActivity muss auch die Methoden der ColorPickerDialogListener-Schnittstelle implementieren:
 Jetzt erstellen wir eine Methode zum Erstellen eines Dialogfelds und die im XML-Markup angegebene onClick-Methode:
private void createColorPickerDialog(int id) {
ColorPickerDialog.newBuilder()
.setColor(Color.RED)
.setDialogType(ColorPickerDialog.TYPE_PRESETS)
.setAllowCustom(true)
.setAllowPresets(true)
.setColorShape(ColorShape.SQUARE)
.setDialogId(id)
.show(this);
}
public void onClickButton(View view) {
switch (view.getId()) {
case R.id.firstButton:
createColorPickerDialog(firstId);
break;
case R.id.secondButton:
createColorPickerDialog(secondId);
break;
}
}
 alle Attribute der ColorPickerDialog-KlasseSie müssen auch die Methoden der ColorPickerDialogListener-Schnittstelle implementieren:
@Override
public void onColorSelected(int dialogId, int color) {
switch (dialogId) {
case firstId:
firstText.setTextColor(color);
break;
case secondId:
secondText.setTextColor(color);
break;
}
}
@Override
public void onDialogDismissed(int dialogId) {
Toast.makeText(this, "Dialog dismissed", Toast.LENGTH_SHORT).show();
}
Starten und ... fertig!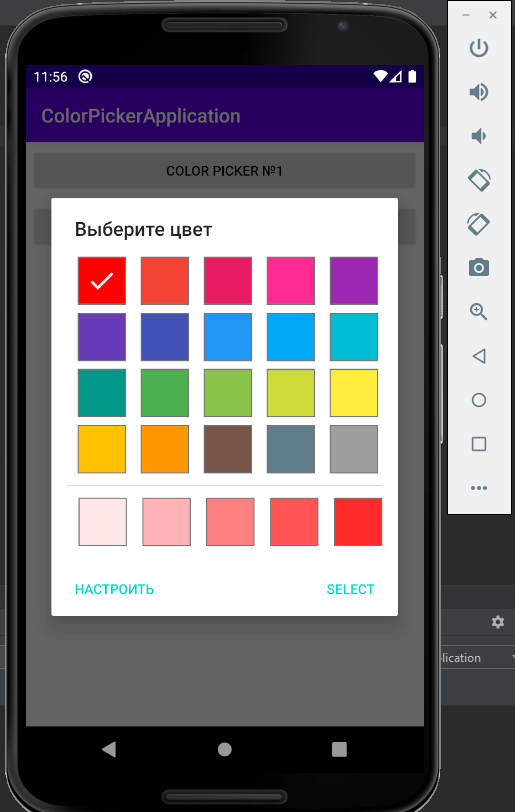
 Dies sind jedoch nicht alle Möglichkeiten der ColorPicker-Bibliothek. Sie fügt auch Präferenz für PreferenceScreen hinzu. Auf diese Weise können Sie die Farbauswahl in den Einstellungen implementieren. Mal sehen, wie es funktioniert.1) Erstellen Sie eine neue SettingsActivity:
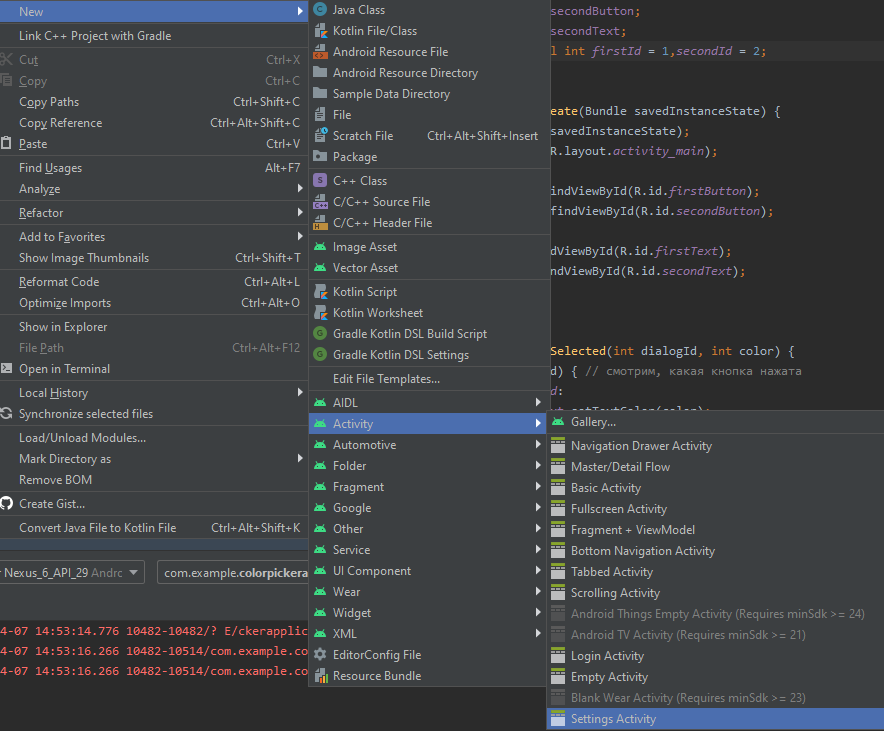 2) Öffnen Sie die Datei root_preferences.xml und ändern Sie sie wie folgt:
<PreferenceScreen xmlns:app="http://schemas.android.com/apk/res-auto"
    xmlns:android="http://schemas.android.com/apk/res/android">
    <PreferenceCategory app:title=" ">
        <com.jaredrummler.android.colorpicker.ColorPreferenceCompat
            android:key="color_picker"
            app:title=" "
            />
    </PreferenceCategory>

</PreferenceScreen>
Wie Sie sehen können, haben wir eine Voreinstellung vom Typ ColorPreferenceCompat erstellt.3) Erstellen Sie eine Schaltfläche in activity_main.xml, um zu unserer SettingsActivty zu gelangen:<Button
android:id="@+id/settingsButton"
android:layout_width="wrap_content"
android:layout_height="wrap_content"
android:text=""
android:layout_alignParentBottom="true"
android:layout_alignParentRight="true"
android:layout_margin="5dp"
android:onClick="openSettingsActivity"
/>
4) Erstellen Sie eine openSettingsActivity-Methode in MainActivity und geben Sie sie im Feld "onClick" dieser Schaltfläche an:public void openSettingsActivity(View view) {
startActivity(new Intent(this,SettingsActivity.class));
}
Erstellen Sie in derselben MainActivity eine Methode, deren Hintergrund abhängig von der in den Einstellungen ausgewählten Farbe geändert wird, und rufen Sie diesen Filter in onCreate auf:private void setBackgroundColorFromSettingsActivity() {
SharedPreferences sp = PreferenceManager.getDefaultSharedPreferences(this);
//SharedPreferences
// - :
//https://developer.android.com/reference/android/content/SharedPreferences?hl=ru
int color = sp.getInt("color_picker",Color.GREEN);
RelativeLayout layout = findViewById(R.id.activityMain);
layout.setBackgroundColor(color);
}
Definieren Sie die onResume-Methode neu (weitere Details hier ):@Override
protected void onResume() {
setBackgroundColorFromSettingsActivity();
super.onResume();
}
5) Führen Sie die Anwendung aus und sehen Sie, was passiert ist:
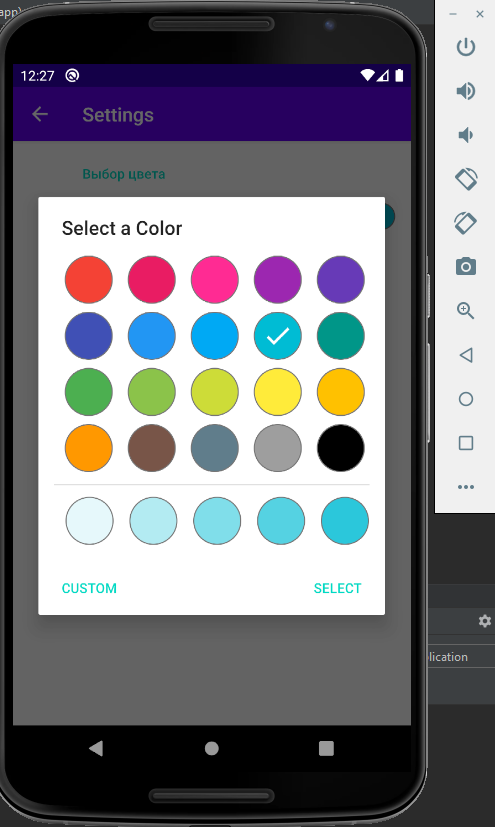
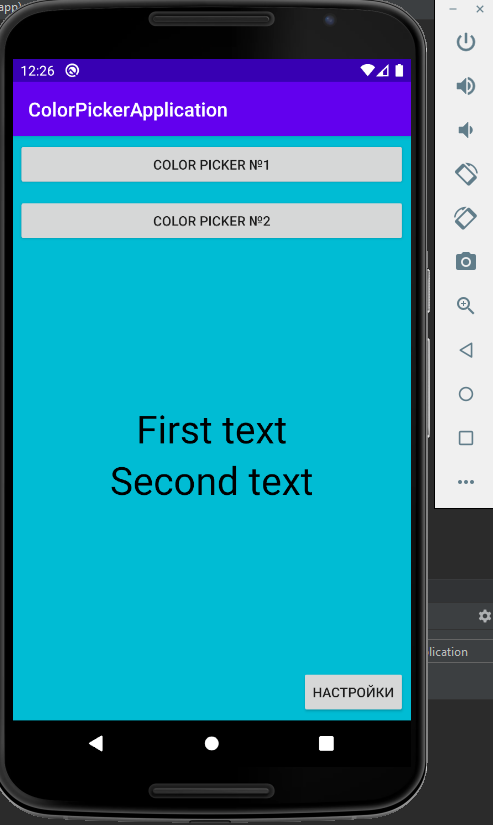 Wie Sie sehen, funktioniert alles korrekt.PS: Nützliche Links:PSS: GitHub-Anwendungscode