Hallo Habr!Dies ist meine erste Erfahrung mit Mikrocontrollern im Allgemeinen und ESP8266 (in Form von Nodemcu v2) im Besonderen. Vielleicht ist diese Erfahrung für jemanden nützlich.Warum genau Mikropython? Die Antwort ist einfach: Meine bescheidene Programmiererfahrung beschränkt sich auf Pascal an der Universität und das Schreiben von Konfigurationsskripten für Procera in Python. Die Beispiele werden für Linux (Ubuntu 18.04) sein, aber ich glaube, es wird keinen grundlegenden Unterschied bei anderen Linux-Distributionen geben.Ausbildung:
Wir setzen python3, pip und picocom, falls sie noch nicht installiert sind:sudo apt install python3 python3-pip picocom
Überprüfen der Python-Version:python --version
Python 3.6.9
Wenn Python Version 2.7, wechseln Sie zu 3:sudo update-alternatives --install /usr/bin/python python /usr/bin/python3 10
update-alternatives: using /usr/bin/python3 to provide /usr/bin/python (python) in auto mode
Wir aktualisieren pip und überprüfen die Version:sudo pip3 install --upgrade pip
pip --version
pip 20.0.2 from /usr/local/lib/python3.6/dist-packages/pip (python 3.6)
pip3 --version
pip 20.0.2 from /usr/local/lib/python3.6/dist-packages/pip (python 3.6)
Wir installieren eine neuere Version von esptool 2.8 von pip (da Version 2.1 aus dem Ubuntu-Repository den Fehler "Ein schwerwiegender Fehler ist aufgetreten: ESP8266 ROM unterstützt die Funktion erase_flash nicht." Während der Firmware):pip3 install esptool
Laden Sie die Firmware hier . Ich habe Stable Build 1.12 verwendet .Zwei Optionen sind möglich:1. Sunrise manuell (mit Terminal und REPL):
Wir löschen den Blitz auf ESP8266:
esptool.py --port /dev/ttyUSB0 erase_flash
Befehlsausgabe:
esptool.py v2.8
Serial port /dev/ttyUSB0
Connecting....
Detecting chip type... ESP8266
Chip is ESP8266EX
Features: WiFi
Crystal is 26MHz
MAC: c8:2b:96:00:63:35
Uploading stub...
Running stub...
Stub running...
Erasing flash (this may take a while)...
Chip erase completed successfully in 9.5s
Hard resetting via RTS pin...
Füllen Sie die Firmware:
esptool.py --port /dev/ttyUSB0 --baud 460800 write_flash --flash_size=detect 0 Downloads/esp8266-20191220-v1.12.bin
Befehlsausgabe:
esptool.py v2.8
Serial port /dev/ttyUSB0
Connecting....
Detecting chip type... ESP8266
Chip is ESP8266EX
Features: WiFi
Crystal is 26MHz
MAC: c8:2b:96:00:63:35
Uploading stub...
Running stub...
Stub running...
Changing baud rate to 460800
Changed.
Configuring flash size...
Auto-detected Flash size: 4MB
Flash params set to 0x0040
Compressed 619828 bytes to 404070...
Wrote 619828 bytes (404070 compressed) at 0x00000000 in 9.1 seconds (effective 543.8 kbit/s)...
Hash of data verified.
Leaving...
Hard resetting via RTS pin...
Überprüfen Sie auf Wunsch die Richtigkeit der Prüfsumme:
esptool.py --port /dev/ttyUSB0 --baud 460800 verify_flash --flash_size=detect 0 Downloads/esp8266-20191220-v1.12.bin
Danach versuchen wir, eine Verbindung zu MK herzustellen und sehen die REPL- Konsole :
picocom /dev/ttyUSB0 -b115200
picocom v2.2
port is : /dev/ttyUSB0
flowcontrol : none
baudrate is : 115200
parity is : none
databits are : 8
stopbits are : 1
escape is : C-a
local echo is : no
noinit is : no
noreset is : no
nolock is : no
send_cmd is : sz -vv
receive_cmd is : rz -vv -E
imap is :
omap is :
emap is : crcrlf,delbs,
Type [C-a] [C-h] to see available commands
Terminal ready
>>> help()
Welcome to MicroPython!
For online docs please visit http://docs.micropython.org/en/latest/esp8266/ .
For diagnostic information to include in bug reports execute 'import port_diag'.
Basic WiFi configuration:
import network
sta_if = network.WLAN(network.STA_IF); sta_if.active(True)
sta_if.scan()
sta_if.connect("<AP_name>", "<password>")
sta_if.isconnected()
ap_if = network.WLAN(network.AP_IF)
ap_if.config(essid="<AP_NAME>", authmode=network.AUTH_WPA_WPA2_PSK, password="<password>")
Control commands:
CTRL-A -- on a blank line, enter raw REPL mode
CTRL-B -- on a blank line, enter normal REPL mode
CTRL-C -- interrupt a running program
CTRL-D -- on a blank line, do a soft reset of the board
CTRL-E -- on a blank line, enter paste mode
For further help on a specific object, type help(obj)
>>>
PS: Um picocom zu beenden, verwenden Sie Strg + a und sofort Strg + x2. Verwenden der IDE
Obwohl die erste Option sehr funktional ist (zumindest können Sie auch eine LED darin blinken lassen), ist sie mit der IDE noch viel praktischer. Ich habe ein paar Optionen ausprobiert und mich schließlich für Thonny entschieden .
Installation:
Wir haben python3-tk aus den Repositories und tatsächlich Thonny über pip:
sudo apt install python3-tk
sudo pip3 install thonny
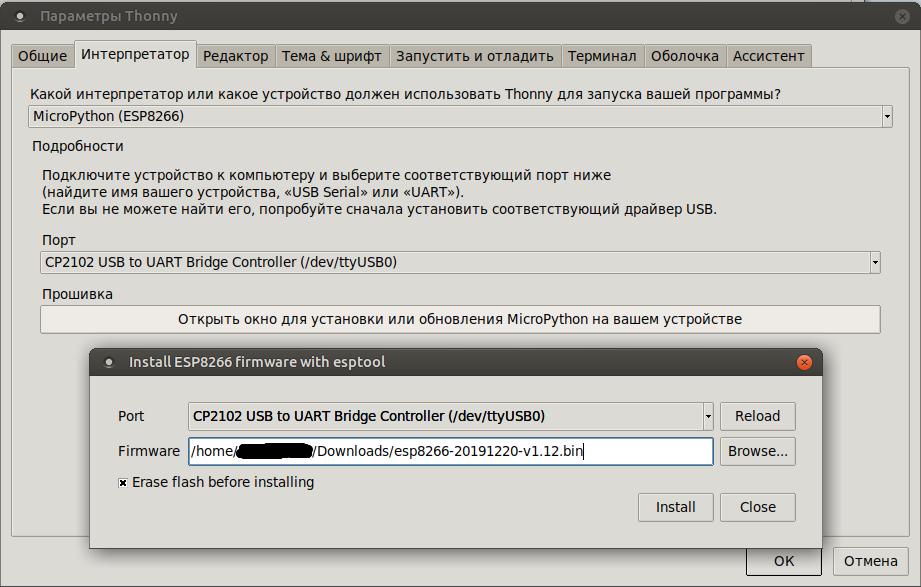
Sie können Firmware direkt über Thonny auf MK hochladen:
Danach wird das Blinken der LED viel bequemer:

Gesamt
Am Ausgang haben wir einen esp8266 MK mit Mikropython-Stitching und eine benutzerfreundliche IDE, um damit zu arbeiten.PS: der zweite Teil (Selbstfahrende Plattform auf MK esp8266 mit Mikropyhon)