مرحبا يا هابر!توضح هذه المقالة معاناة المبتدئ في عملية تصنيع منصة منصة ذاتية الدفع تعتمد على esp8266 MK مع ميكروبيثون ، تدار من خلال خادم ويب متكامل.KDPV: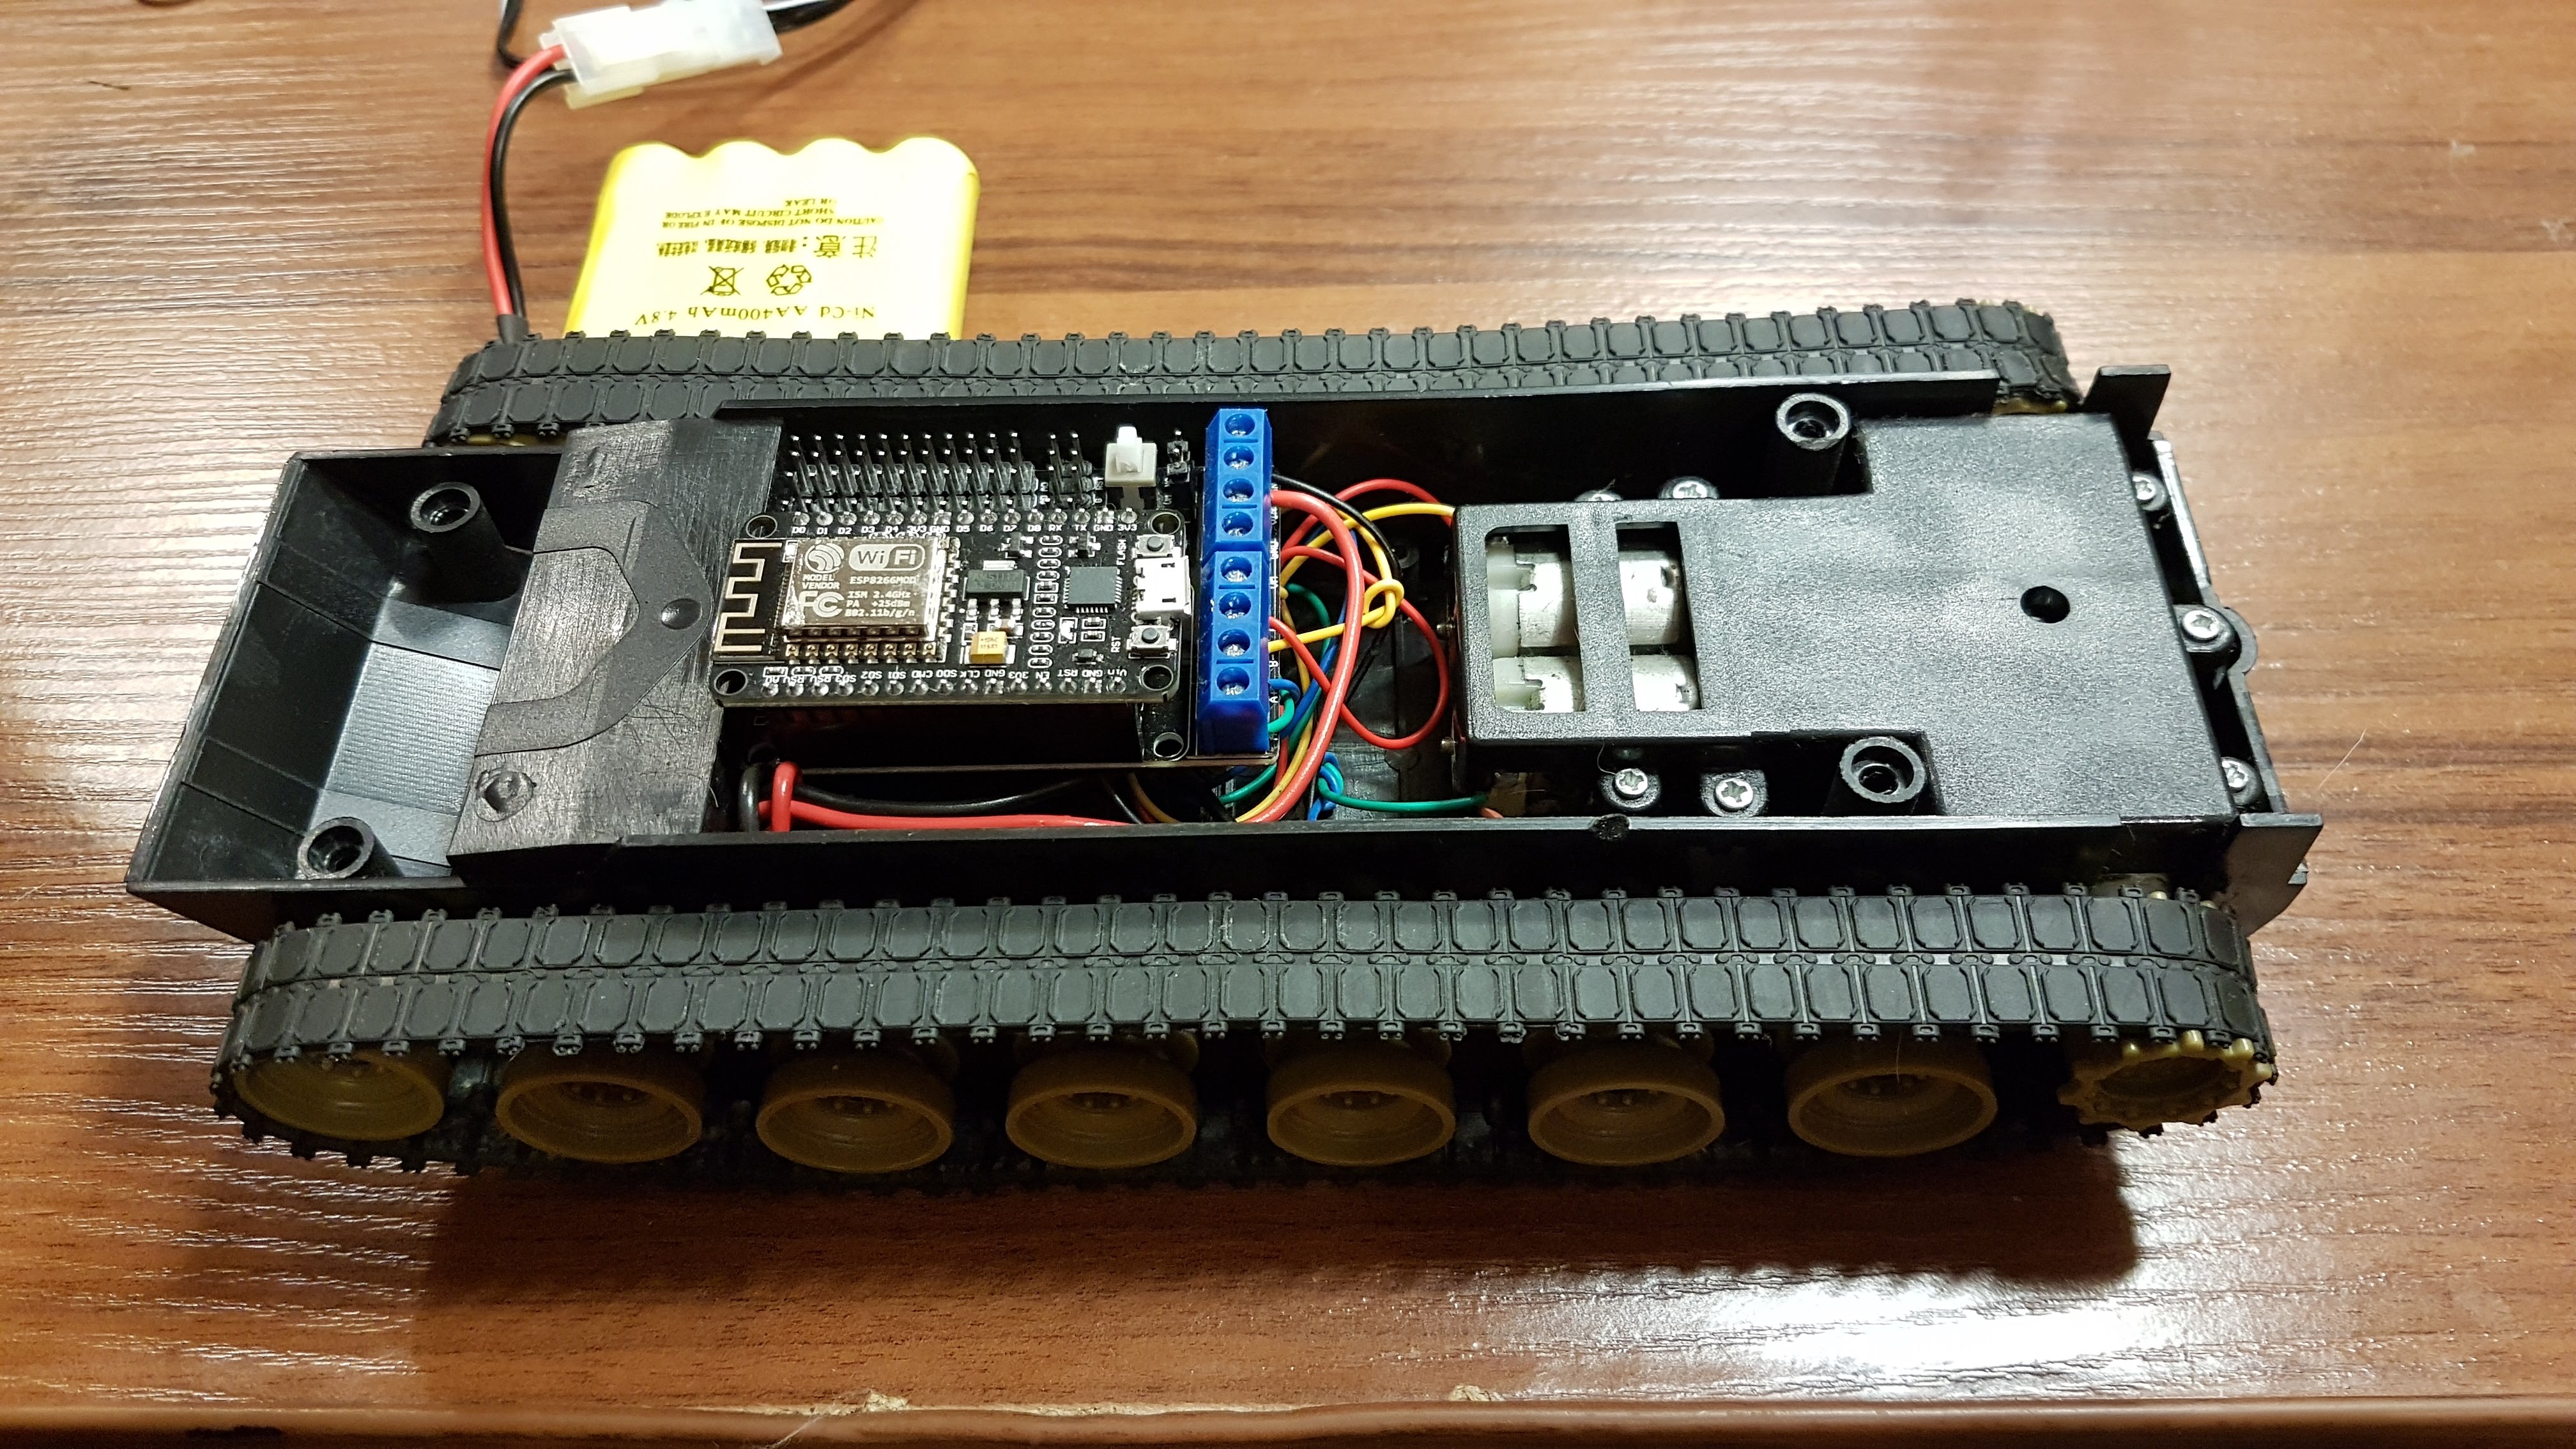 كما ذكرت في المقال الأول ، المشروع تعليمي ، لذا يرجى عدم الحكم بدقة.لذا ، فإن مهمة المرحلة الأولى هي إنشاء منصة كاتربيلر يمكن التحكم فيها عبر شبكة wi-fi.لأي غرض تم العثور على خزانات ألعاب قديمة في الصناديق ، وكذلك تم شراء MK esp8266 (ESP-12E) وسائق محرك لها.
esp8266 وتجميع درع المحركات علاوة على ذلك ، تم جمع كل ما سبق وفقًا للمخطط: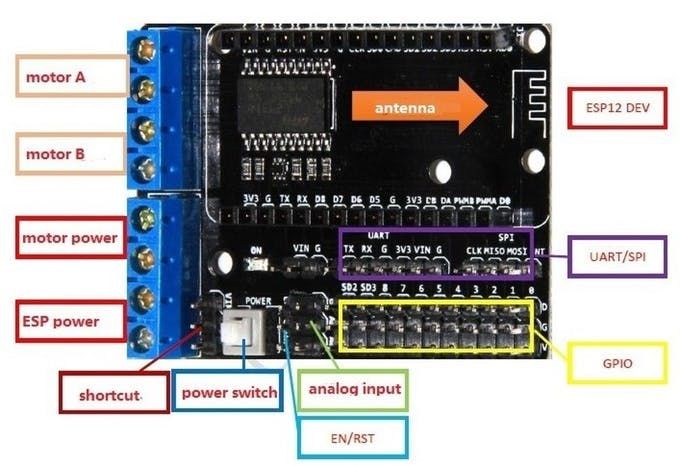 وبعد
وبعد يومين من دراسة موجزة للتوثيق ، أصبح من الواضح كيفية التحكم في المحركات:from machine import Pin, PWM
""" nodemcu pins from the motor shield """
servo_1 = Pin(5, Pin.OUT)
servo_2 = Pin(4, Pin.OUT)
revrs_L = Pin(0, Pin.OUT, value=0)
revrs_R = Pin(2, Pin.OUT, value=0)
""" named after the L9110 h-bridge pins """
motor_L = PWM(servo_1, freq=1000, duty=0)
motor_R = PWM(servo_2, freq=1000, duty=0)
""" TODO: variable speed """
speed = 1023
def stop_all():
    revrs_L.value(0)
    motor_L.duty(0)
    revrs_R.value(0)
    motor_R.duty(0)

def forward():
    revrs_L.value(0)
    motor_L.duty(speed)
    revrs_R.value(0)
    motor_R.duty(speed)
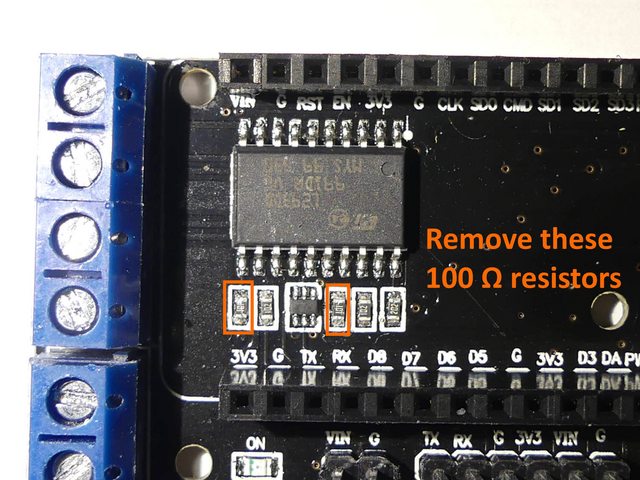
وبالتالي ، pin5 و pin4 - يسمح لك بضبط سرعة دوران المحركات من خلال PWM ، و pin0 و pin2 - يتحكمان في عكس المخرجات "A" و "B" ، على التوالي. بالإضافة إلى ذلك ، نظرًا لأن LED متصل أيضًا بـ pin2 على لوحتي ، فإننا نلاحظ أيضًا تأثيرات الضوء بالتوازي مع الحركة :)ومع ذلك ، لم يتم الإقلاع على الفور ... أدىGoogle في موضوع معين إلى منتدى حيث كانت هناك توصية لإزالة مقاومين "إضافيين" ، الذي تم القيام به. اقتباس من هناك:قمت بقياس هذه المقاومات ، عند مدخل L293DD ، المقاومة هي 1 كيلو ، ولكن لديهم مقاومة 100 أوم فقط للأرض. هذا يعني أن إشارة الإدخال من وحدة تحكم NodeMCU لا يمكنها الوصول إلى L293DD. لا أعرف حقاً سبب وجودهم - يمكن لـ L293DD معالجة ما يصل إلى 7 فولت عند الإدخال ، وتعطي NodeMCU مخرجًا بقوة 3.3 فولت.
لقد أزلت مقاومتي أوم 100 (الأول والثالث على اليسار عندما يكون الهوائي على اليمين) ، والآن يعمل الدرع.
 بعد ذلك ، سارت الأمور بسلاسة ، و
النسخة النهائية من الكود
import network
import socket
from machine import Pin, PWM
""" nodemcu pins from the motor shield """
servo_1 = Pin(5, Pin.OUT)
servo_2 = Pin(4, Pin.OUT)
revrs_L = Pin(0, Pin.OUT, value=0)
revrs_R = Pin(2, Pin.OUT, value=0)
""" named after the L9110 h-bridge pins """
motor_L = PWM(servo_1, freq=1000, duty=0)
motor_R = PWM(servo_2, freq=1000, duty=0)
""" TODO: variable speed """
speed = 1023
""" function for connecting to your local WiFi network """
def do_connect():
essid = 'home_wifi'
password = '12345678'
sta_if = network.WLAN(network.STA_IF)
if not sta_if.isconnected():
print('connecting to network...')
sta_if.active(True)
sta_if.connect(essid, password)
while not sta_if.isconnected():
pass
print('network config:', sta_if.ifconfig())
def stop_all():
revrs_L.value(0)
motor_L.duty(0)
revrs_R.value(0)
motor_R.duty(0)
def backward():
revrs_L.value(1)
motor_L.duty(speed)
revrs_R.value(1)
motor_R.duty(speed)
def forward():
revrs_L.value(0)
motor_L.duty(speed)
revrs_R.value(0)
motor_R.duty(speed)
def right():
revrs_L.value(0)
motor_L.duty(speed)
revrs_R.value(1)
motor_R.duty(speed)
def left():
revrs_L.value(1)
motor_L.duty(speed)
revrs_R.value(0)
motor_R.duty(speed)
def right_turn():
revrs_L.value(0)
motor_L.duty(speed)
revrs_R.value(0)
motor_R.duty(0)
def left_turn():
revrs_L.value(0)
motor_L.duty(0)
revrs_R.value(0)
motor_R.duty(speed)
def web_page(request):
motor_state="Stopped"
if request.find('GET /?forward') > 0:
motor_state="Going Forward"
forward()
if request.find('GET /?left') > 0:
motor_state="Rotate Left"
left()
if request.find('GET /?right') > 0:
motor_state="Rotate Right"
right()
if request.find('GET /?left_turn') > 0:
motor_state="Turn Left"
left_turn()
if request.find('GET /?right_turn') > 0:
motor_state="Turn Right"
right_turn()
if request.find('GET /?backward') > 0:
motor_state="Going Backward"
backward()
if request.find('GET /?stop') > 0:
motor_state="Stopped"
stop_all()
html = """<html><head><title>RoboTank WEB</title>
<meta name="viewport" content="width=device-width, initial-scale=1">
<link rel="icon" href="data:,"> <style>
html{font-family: Helvetica; display:inline-block; margin: 0px auto; text-align: center;}
h1{color: #0F3376; padding: 2vh;}p{font-size: 1.5rem;}
.button{display: inline-block; background-color: #33c080; border: none;
border-radius: 4px; color: white; text-decoration: none; font-size: 30px; width:100%}
.button2{background-color: #4286f4; width:30%}
.button3{background-color: #eb2b10; width:35%}
.button4{background-color: #8386f4; width:44%}
</style></head>
<body> <h1>RoboTank WEB</h1>
<p>Status : <strong>""" + motor_state + """</strong></p>
<p><a href='/?forward'><button class="button">Forward</button></a></p>
<p><a href='/?left_turn'><button class="button button2">LEFT</button></a>
<a href='/?stop'><button class="button button3">STOP</button></a>
<a href='/?right_turn'><button class="button button2">RIGHT</button></a>
<p><a href='/?backward'><button class="button">Backward</button></a></p>
<p><a href='/?left'><button class="button button4">L-rotate</button></a>
<a href='/?right'><button class="button button4">R-rotate</button></a></p>
</body></html>"""
return html
stop_all()
do_connect()
addr = socket.getaddrinfo('0.0.0.0', 80)[0][-1]
s = socket.socket()
try:
s.bind(addr)
s.listen(1)
except:
s.close()
s.bind(addr)
s.listen(1)
while True:
conn, addr = s.accept()
print('Got a connection from %s' % str(addr))
request = conn.recv(1024)
request = str(request)
print('The Content = %s' % request)
response = web_page(request)
conn.send('HTTP/1.1 200 OK\n')
conn.send('Content-Type: text/html\n')
conn.send('Connection: close\n\n')
conn.sendall(response)
conn.close()
وتبين أنها فعالة للغاية ، وحل مجموعة المهام بنجاح في المرحلة الأولى.بوكاتوشكي الأول:الجزء الأول (تثبيت ميكروبيثون على ESP8266 والعمل معه تحت لينكس)الجزء التالي (روبوت بسيط على MK esp8266 مع ميكروبيثون)مصادر الإلهام:funprojects.blog/2019/02/12/micropython-air-boatwww.instructables.com/id / Simplest-Wifi-Car-Using-ESP8266-Motorshield forum.micropython.org/viewtopic.php؟t=3977randomnerdtutorials.com/esp32-esp8266-micropython-web-serverdocs.micropython.org/en/latest/esp8266/ تعليمي / index.html